Tutorial: instrucciones paso a paso para crear una aplicación de HoloLens Unity mediante Azure Spatial Anchors
En este tutorial se muestra cómo crear una aplicación de HoloLens Unity con Azure Spatial Anchors.
Requisitos previos
Para completar este tutorial, asegúrese de disponer de los siguientes elementos:
- PC: un equipo con Windows.
- Visual Studio: Visual Studio 2019 instalado con la carga de trabajo de desarrollo de la plataforma Windows Universal y el componente SDK de Windows 10 (10.0.18362.0 o superior). La extensión de Visual Studio para C++/WinRT (VSIX) para Visual Studio instalada desde Visual Studio Marketplace.
- HoloLens: un dispositivo HoloLens con el modo de programador habilitado. Para este artículo se necesita un dispositivo HoloLens con la actualización de mayo de 2020 de Windows 10. Para actualizar a la versión más reciente en HoloLens, abra la aplicación Settings (Configuración), vaya a Update & Security (Actualización y seguridad) y, a continuación, seleccione el botón Check for updates (Buscar actualizaciones).
- Unity - Unity 2020.3.25 con los módulos Universal Windows Platform Build Support y Windows Build Support (IL2CPP)
Creación y configuración de un proyecto de Unity
Creación de un proyecto
- En Unity Hub (Centro de conectividad de Unity), seleccione New project (Nuevo proyecto).
- Seleccione 3D
- Escriba el nombre del proyecto y una ubicación.
- Seleccione Create project (Crear proyecto) y espere a que Unity cree el proyecto.
Cambio de la plataforma de compilación
- En el editor de Unity, seleccione File>Build Settings (Archivo > Configuración de compilación).
- Seleccione Universal Windows Platform (Plataforma universal de Windows) y, luego, elija Switch Platform (Cambiar de plataforma). Espere a que Unity haya terminado de procesar todos los archivos.
Importación de ASA y OpenXR
- Herramienta de características de Mixed Reality
- Seleccione la ruta de acceso del proyecto: la carpeta que contiene carpetas como Assets (Recursos), Packages (Paquetes), ProjectSettings, etc., y elija Discover Features (Detectar características).
- En Azure Mixed Reality Services (Servicios de Azure Mixed Reality), seleccione:
- Azure Spatial Anchors SDK Core (SDK Core de Azure Spatial Anchors)
- Azure Spatial Anchors SDK for Windows (SDK de Azure Spatial Anchors para Windows)
- En Platform Support (Compatibilidad con la plataforma), seleccione:
- Mixed Reality OpenXR Plugin (Complemento OpenXR de Mixed Reality).
Nota
Asegúrese de que ha actualizado el catálogo y de que la versión más reciente está seleccionada para cada uno.
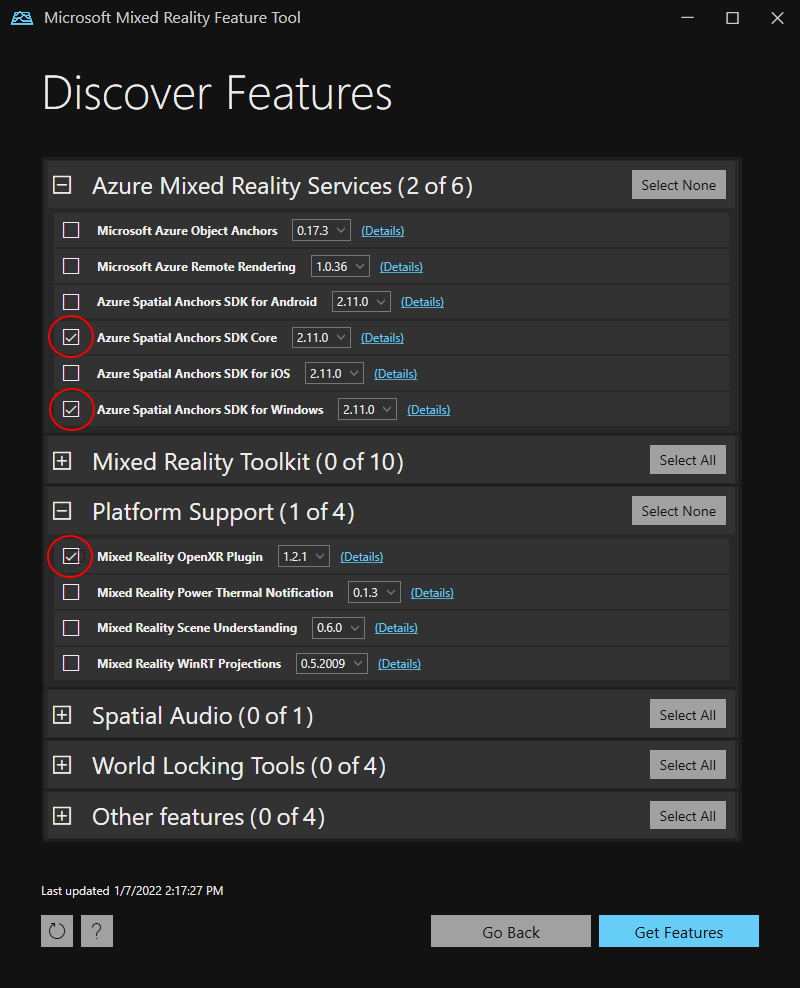
- Presione Get Features -->Import -->Approve -->Exit (Obtener características > Importar > Aprobar > Salir).
- Al volver a centrar la ventana de Unity, Unity comenzará a importar los módulos.
- Si recibe un mensaje sobre el uso del nuevo sistema de entrada, seleccione Sí para reiniciar Unity y habilitar los servidores back-end.
Configuración del proyecto
A continuación, se van a establecer algunos valores de configuración del proyecto de Unity que nos ayuden a trabajar con el SDK de Windows Holographic para el desarrollo.
Cambio de la configuración de OpenXR
- Seleccione File>Build Settings (Archivo > Configuración de compilación) (puede que aún la tenga abierta del paso anterior).
- Seleccione Player Settings... (Configuración del Reproductor...)
- Seleccione XR Plug-in Management (Administración del complemento XR).
- Asegúrese de que la pestaña Universal Windows Platform Settings (Configuración de la plataforma universal de Windows) esté seleccionada y active el cuadro junto a OpenXR y junto a Microsoft HoloLens feature group (Grupo de características de Microsoft HoloLens).
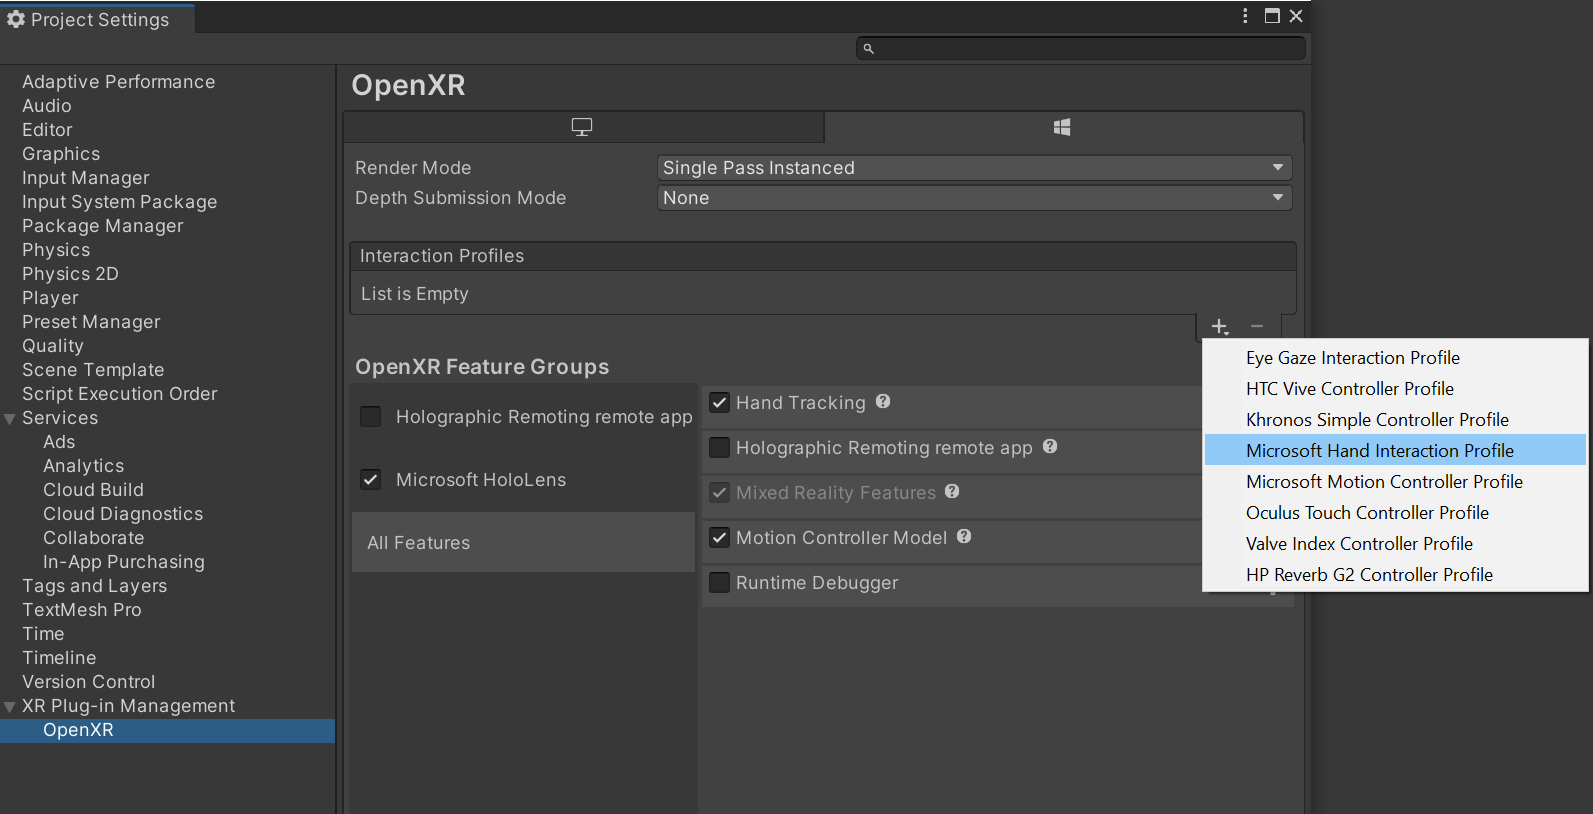
- Seleccione el signo de advertencia amarillo junto a OpenXR para mostrar todos los problemas de OpenXR.
- Seleccione Fix all (Corregir todo).
- Para corregir el problema "At least one interaction profile must be added" (Se debe agregar al menos un perfil de interacción), seleccione Edit (Editar) para abrir la configuración del proyecto de OpenXR. A continuación, en Interaction Profiles (Perfiles de interacción), seleccione el símbolo + y elija Microsoft Hand Interaction Profile (Perfil de interacción de Microsoft Hand)
Cambio de la configuración de calidad
- Seleccione Edit>Project Settings>Quality (Editar > Configuración del proyecto > Calidad).
- En la columna situada bajo el logotipo de la Plataforma universal de Windows, seleccione en la flecha de la fila Default(Predeterminado) y seleccioneVery Low (Muy baja). Sabrá que la configuración se ha aplicado correctamente cuando el cuadro de la columna Universal Windows Platform (Plataforma universal de Windows) y la fila Very Low (Muy baja) estén en color verde.
Establecimiento de funcionalidades
- Vaya a Edit>Project Settings>Player (Editar > Configuración del proyecto > Reproductor) (puede que aún lo tenga abierto del paso anterior).
- Asegúrese de que la pestaña Universal Windows Platform settings (Configuración de Plataforma universal de Windows) está seleccionada.
- En la sección Publishing Settings (Configuración de publicación > Configuración), habilite lo siguiente:
- InternetClient
- InternetClientServer
- PrivateNetworkClientServer
- SpatialPerception (es posible que ya esté habilitado)
Configuración de la cámara principal
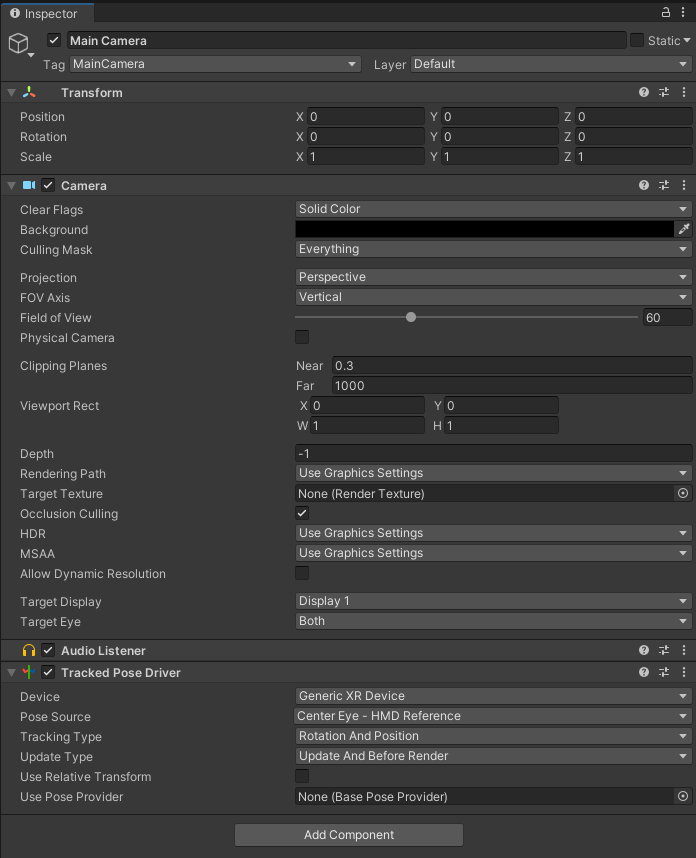
- En Hierarchy Panel (Panel de jerarquía), seleccione Main Camera (Cámara principal).
- En Inspector, establezca su posición de transformación en 0,0,0.
- Busque la propiedad Clear Flags (Borrar marcas) y cambie la lista desplegable de Skybox a Solid Color (Color sólido).
- Seleccione el campo Background (Fondo) para abrir un selector de colores.
- Establezca R, G, B, and A (R, G, B y A) en 0.
- Seleccione Add Component (Agregar componente) en la parte inferior y agregue el componente Tracked Pose Driver (Controlador de posición conseguimiento) a la cámara
Prueba 1
Ahora debería tener una escena vacía que esté lista para implementarse en el dispositivo HoloLens. Para probar que todo funciona, compile la aplicación en Unity e impleméntela desde Visual Studio. Para ello, siga las instrucciones de Uso de Visual Studio para la implementación y la depuración. Verá la pantalla de inicio de Unity y, luego, una opción para borrar la pantalla.
Creación de un recurso de Spatial Anchors
Vaya a Azure Portal.
En el menú izquierdo, seleccione Crear un recurso.
Use el cuadro de búsqueda para buscar Spatial Anchors.
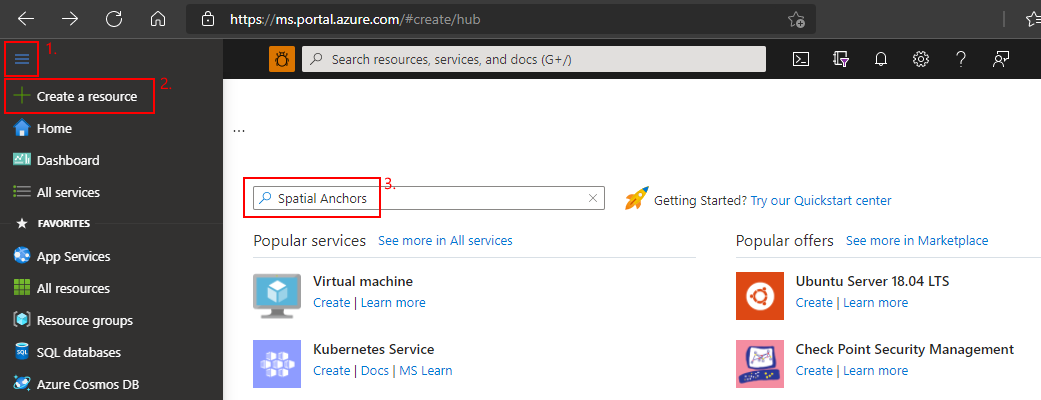
Seleccione Spatial Anchors y, después, seleccione Crear.
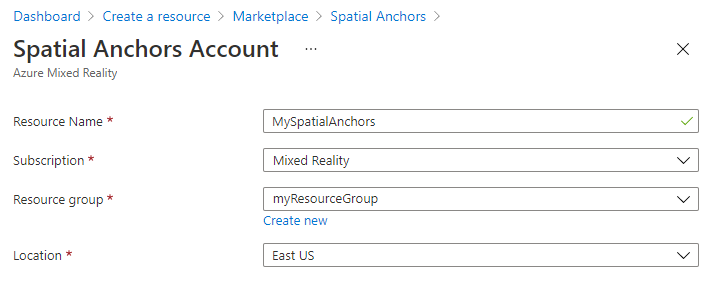
En el panel Cuenta de Spatial Anchors, haga lo siguiente:
Escriba un nombre de recurso único con caracteres alfanuméricos normales.
Seleccione la suscripción a la que desea asociar el recurso.
Cree un grupo de recursos, para lo que debe seleccionar Crear nuevo. Asígnele el nombre myResourceGroup y luego seleccione Aceptar.
Un grupo de recursos es un contenedor lógico en el que los recursos de Azure, como aplicaciones web, bases de datos y cuentas de almacenamiento, se implementen y administren. Por ejemplo, más adelante puede elegir eliminar todo el grupo de recursos en un solo paso.
Seleccione la ubicación (región) en la que desea colocar el recurso.
Seleccione Crear para empezar a crear el recurso.
Una vez creado el recurso, Azure Portal muestra que se ha completado la implementación.
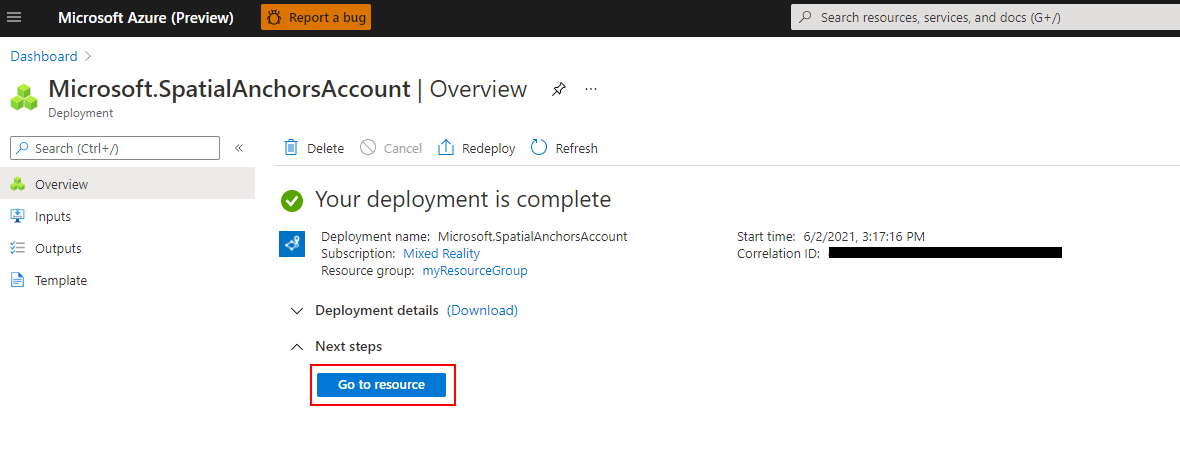
Haga clic en Go to resource (Ir al recurso). Ahora puede ver las propiedades del recurso.
Copie el valor de Id. de cuenta del recurso en un editor de texto para usarlo más adelante.
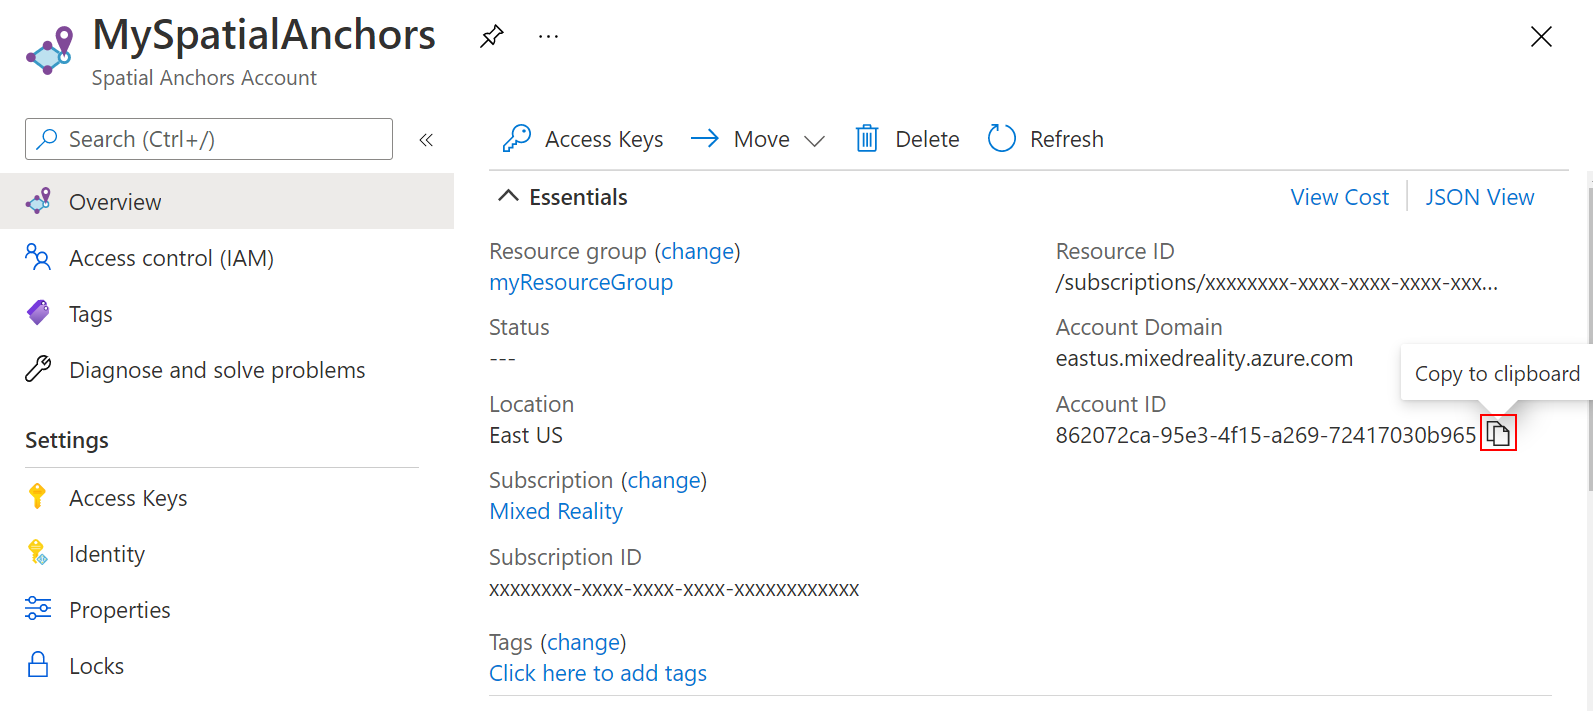
Copie también el valor de Account Domain (Dominio de cuenta) del recurso en un editor de texto para usarlo más adelante.
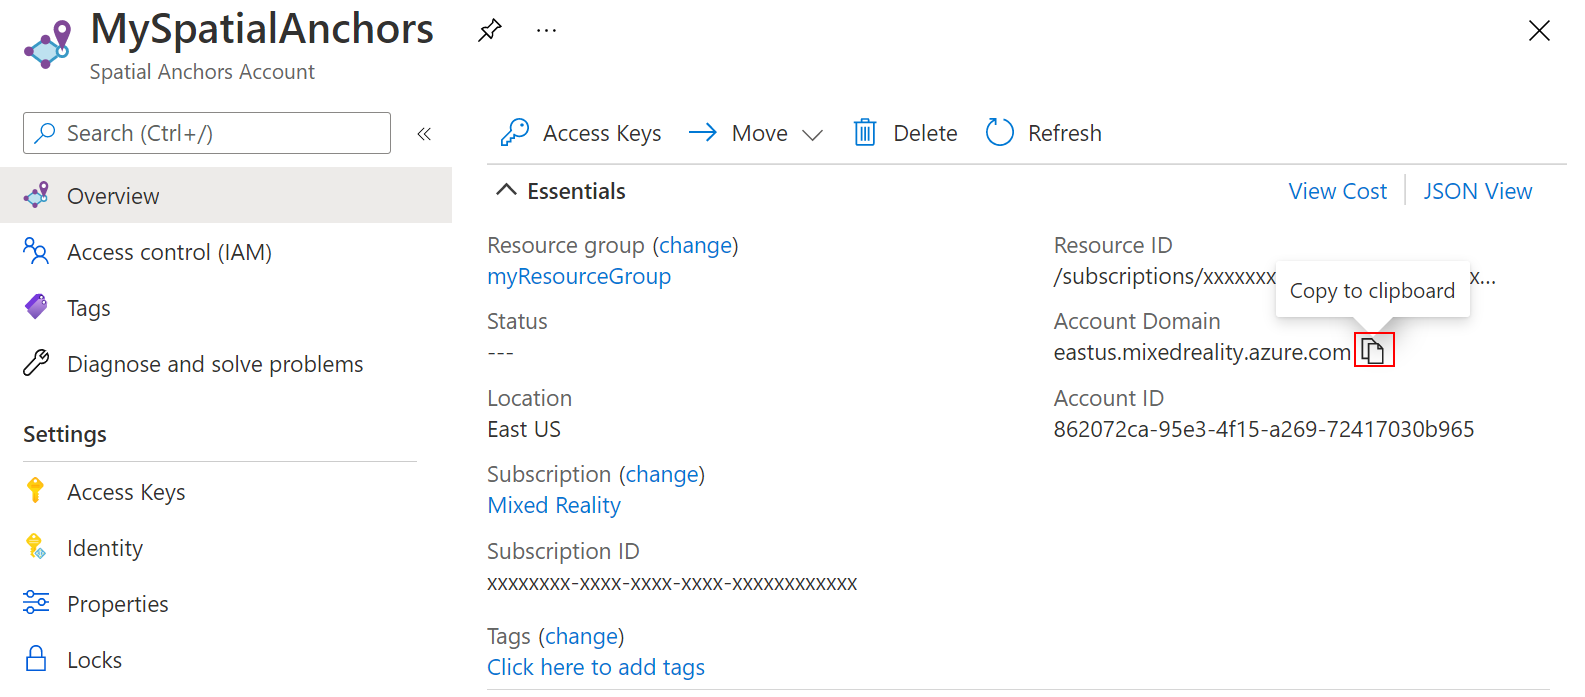
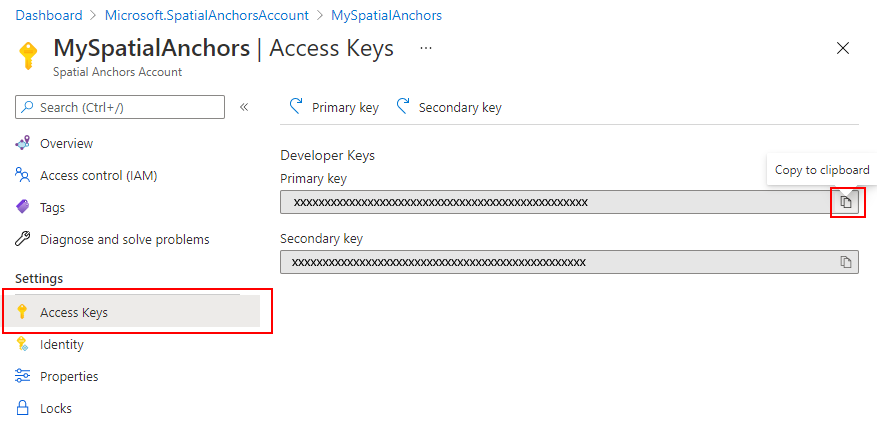
En Configuración, seleccione Clave de acceso. Copie el valor de Clave principal, Clave de cuenta, en un editor de texto para su uso posterior.

Crear y agregar scripts
- En Unity, en el panel Project (Proyecto), cree una carpeta llamada Scripts, en la carpeta Assets (Recursos).
- En la carpeta, haga clic con el botón derecho en >Create ->C# Script (Crear > Script de C#). Asígnele el nombre AzureSpatialAnchorsScript.
- Vaya a GameObject ->Create Empty (Crear vacío).
- Selecciónelo y, en Inspector, cambie su nombre de GameObject a AzureSpatialAnchors.
- Todavía en
GameObject:- Establezca su posición en 0,0,0.
- Seleccione Add Component (Agregar componente) y busque y agregue AzureSpatialAnchorsScript.
- Seleccione de nuevo Add Component (Agregar componente) y busque y agregue AR Anchor Manager (Anchor Manager de AR). Se agregará automáticamente también el origen de sesión de AR.
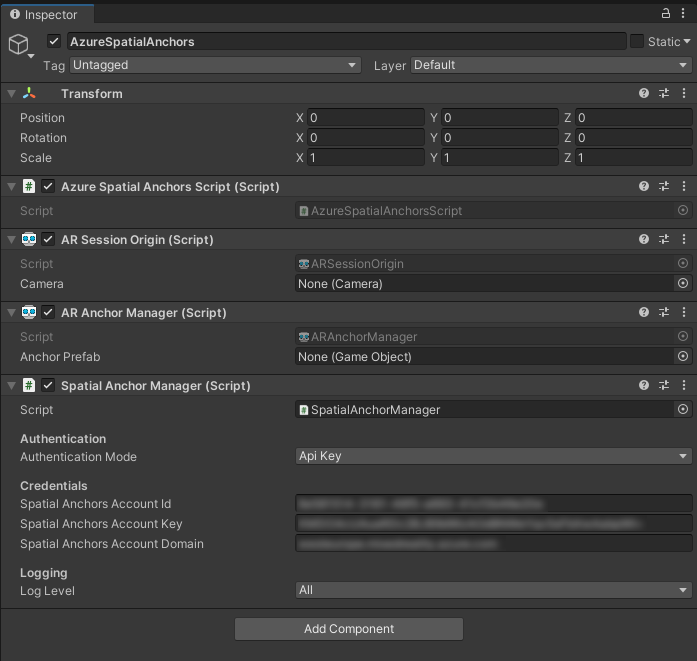
- Seleccione de nuevo Add Component (Agregar componente) y busque y agregue el script SpatialAnchorManager.
- En el componente SpatialAnchorManager agregado, rellene los valores de Account ID (Id. de cuenta), Account Key (Clave de cuenta) y Account Domain (Dominio de cuenta) que ha copiado en el paso anterior del recurso Spatial Anchors en Azure Portal.
Introducción a las aplicaciones
Nuestra aplicación admitirá las interacciones siguientes:
| Gesto | Acción |
|---|---|
| Pulsar en cualquier parte | Inicia/continúa la sesión + crea anclaje en la posición de la mano. |
| Pulsar en un anclaje | Elimina GameObject + elimina el anclaje en el servicio en la nube de ASA. |
| Pulsar + mantener presionado durante 2 segundos (+ se está ejecutando la sesión) | Detiene la sesión y quitar todos los GameObjects. Mantiene los anclajes en el servicio en la nube de ASA. |
| Pulsar + mantener presionado durante 2 segundos (+ la sesión no se está ejecutando) | Inicia la sesión y busca todos los anclajes. |
Adición de reconocimiento de pulsación
Vamos a agregar código a nuestro script para poder reconocer el gesto de pulsar de un usuario.
- Abra
AzureSpatialAnchorsScript.csen Visual Studio haciendo doble clic en el script en el panel Project (Proyecto) de Unity. - Agregue la siguiente matriz a la clase:
public class AzureSpatialAnchorsScript : MonoBehaviour
{
    /// <summary>
    /// Used to distinguish short taps and long taps
    /// </summary>
    private float[] _tappingTimer = { 0, 0 };
- Agregue los dos métodos siguientes debajo del método Update(). Agregaremos la implementación en una fase posterior.
// Update is called once per frame
void Update()
{
}

/// <summary>
/// Called when a user is air tapping for a short time
/// </summary>
/// <param name="handPosition">Location where tap was registered</param>
private async void ShortTap(Vector3 handPosition)
{
}

/// <summary>
/// Called when a user is air tapping for a long time (>=2 sec)
/// </summary>
private async void LongTap()
{
}
- Agregue la siguiente importación:
using UnityEngine.XR;
- Agregue el código siguiente al método
Update(). Esto permitirá que la aplicación reconozca gestos de pulsación con la mano cortos y largos (2 segundos).
// Update is called once per frame
void Update()
{

    //Check for any air taps from either hand
    for (int i = 0; i < 2; i++)
    {
        InputDevice device = InputDevices.GetDeviceAtXRNode((i == 0) ? XRNode.RightHand : XRNode.LeftHand);
        if (device.TryGetFeatureValue(CommonUsages.primaryButton, out bool isTapping))
        {
            if (!isTapping)
            {
                //Stopped Tapping or wasn't tapping
                if (0f < _tappingTimer[i] && _tappingTimer[i] < 1f)
                {
                    //User has been tapping for less than 1 sec. Get hand position and call ShortTap
                    if (device.TryGetFeatureValue(CommonUsages.devicePosition, out Vector3 handPosition))
                    {
                        ShortTap(handPosition);
                    }
                }
                _tappingTimer[i] = 0;
            }
            else
            {
                _tappingTimer[i] += Time.deltaTime;
                if (_tappingTimer[i] >= 2f)
                {
                    //User has been air tapping for at least 2sec. Get hand position and call LongTap
                    if (device.TryGetFeatureValue(CommonUsages.devicePosition, out Vector3 handPosition))
                    {
                        LongTap();
                    }
                    _tappingTimer[i] = -float.MaxValue; // reset the timer, to avoid retriggering if user is still holding tap
                }
            }
        }

    }
}
Agregar y configurar SpatialAnchorManager
El SDK de ASA ofrece una interfaz sencilla llamada SpatialAnchorManager para realizar llamadas al servicio ASA. Vamos a agregarlo como variable a nuestro AzureSpatialAnchorsScript.cs.
En primer lugar, agregue la importación.
using Microsoft.Azure.SpatialAnchors.Unity;
Luego, declare la variable.
public class AzureSpatialAnchorsScript : MonoBehaviour
{
    /// <summary>
    /// Used to distinguish short taps and long taps
    /// </summary>
    private float[] _tappingTimer = { 0, 0 };

    /// <summary>
    /// Main interface to anything Spatial Anchors related
    /// </summary>
    private SpatialAnchorManager _spatialAnchorManager = null;
En el método Start(), asigne la variable al componente que agregamos en un paso anterior.
// Start is called before the first frame update
void Start()
{
    _spatialAnchorManager = GetComponent<SpatialAnchorManager>();
}
Para recibir los registros de errores y depuración, es necesario suscribirse a las diferentes devoluciones de llamada.
// Start is called before the first frame update
void Start()
{
    _spatialAnchorManager = GetComponent<SpatialAnchorManager>();
    _spatialAnchorManager.LogDebug += (sender, args) => Debug.Log($"ASA - Debug: {args.Message}");
    _spatialAnchorManager.Error += (sender, args) => Debug.LogError($"ASA - Error: {args.ErrorMessage}");
}
Nota
Para ver los registros, asegúrese de que después de crear el proyecto desde Unity y abrir la solución de Visual Studio .sln, selecciona Depurar --> Run with Debugging (Ejecutar con depuración) y deja HoloLens conectado al equipo mientras se ejecuta la aplicación.
Inicio de sesión
Para crear y buscar anclajes, primero hay que iniciar una sesión. Al llamar a StartSessionAsync(), SpatialAnchorManager creará una sesión si es necesario y, luego, la iniciará. Vamos a agregar esto a nuestro método ShortTap().
/// <summary>
/// Called when a user is air tapping for a short time
/// </summary>
/// <param name="handPosition">Location where tap was registered</param>
private async void ShortTap(Vector3 handPosition)
{
    await _spatialAnchorManager.StartSessionAsync();
}
Creación de anclajes
Ahora que tenemos una sesión en ejecución, podemos crear anclajes. En esta aplicación, nos gustaría realizar un seguimiento del anclaje creado GameObjects y los identificadores de anclaje creados (identificadores de anclaje). Vamos a agregar dos listas al código.
using Microsoft.Azure.SpatialAnchors.Unity;
using System;
using System.Collections.Generic;
using UnityEngine;
using UnityEngine.XR;
    /// <summary>
    /// Main interface to anything Spatial Anchors related
    /// </summary>
    private SpatialAnchorManager _spatialAnchorManager = null;

    /// <summary>
    /// Used to keep track of all GameObjects that represent a found or created anchor
    /// </summary>
    private List<GameObject> _foundOrCreatedAnchorGameObjects = new List<GameObject>();

    /// <summary>
    /// Used to keep track of all the created Anchor IDs
    /// </summary>
    private List<String> _createdAnchorIDs = new List<String>();
Vamos a crear un método CreateAnchor que crea un anclaje en una posición definida por su parámetro.
using System.Threading.Tasks;
/// <summary>
/// Creates an Azure Spatial Anchor at the given position rotated towards the user
/// </summary>
/// <param name="position">Position where Azure Spatial Anchor will be created</param>
/// <returns>Async Task</returns>
private async Task CreateAnchor(Vector3 position)
{
    //Create Anchor GameObject. We will use ASA to save the position and the rotation of this GameObject.
}
Puesto que los anclajes espaciales no solo tienen una posición, sino también una rotación, vamos a establecer la rotación para que siempre se orienten hacia HoloLens durante la creación.
/// <summary>
/// Creates an Azure Spatial Anchor at the given position rotated towards the user
/// </summary>
/// <param name="position">Position where Azure Spatial Anchor will be created</param>
/// <returns>Async Task</returns>
private async Task CreateAnchor(Vector3 position)
{
    //Create Anchor GameObject. We will use ASA to save the position and the rotation of this GameObject.
    if (!InputDevices.GetDeviceAtXRNode(XRNode.Head).TryGetFeatureValue(CommonUsages.devicePosition, out Vector3 headPosition))
    {
        headPosition = Vector3.zero;
    }

    Quaternion orientationTowardsHead = Quaternion.LookRotation(position - headPosition, Vector3.up);

}
Ahora que tenemos la posición y la rotación del anclaje deseado, vamos a crear un objeto GameObject visible. Tenga en cuenta que Spatial Anchors no requiere que el anclajeGameObject sea visible para el usuario final, ya que el propósito principal de Spatial Anchors es proporcionar un marco de referencia común y persistente. En este tutorial, visualizaremos los anclajes como cubos. Cada anclaje se inicializará como un cubo blanco, que se convertirá en un verde una vez que el proceso de creación se haya realizado correctamente.
/// <summary>
/// Creates an Azure Spatial Anchor at the given position rotated towards the user
/// </summary>
/// <param name="position">Position where Azure Spatial Anchor will be created</param>
/// <returns>Async Task</returns>
private async Task CreateAnchor(Vector3 position)
{
    //Create Anchor GameObject. We will use ASA to save the position and the rotation of this GameObject.
    if (!InputDevices.GetDeviceAtXRNode(XRNode.Head).TryGetFeatureValue(CommonUsages.devicePosition, out Vector3 headPosition))
    {
        headPosition = Vector3.zero;
    }

    Quaternion orientationTowardsHead = Quaternion.LookRotation(position - headPosition, Vector3.up);

    GameObject anchorGameObject = GameObject.CreatePrimitive(PrimitiveType.Cube);
    anchorGameObject.GetComponent<MeshRenderer>().material.shader = Shader.Find("Legacy Shaders/Diffuse");
    anchorGameObject.transform.position = position;
    anchorGameObject.transform.rotation = orientationTowardsHead;
    anchorGameObject.transform.localScale = Vector3.one * 0.1f;

}
Nota
Estamos usando un sombreador heredado, ya que se incluye en una compilación predeterminada de Unity. Otros sombreadores, como el sombreador predeterminado, solo se incluyen si se especifican manualmente o forman parte directamente de la escena. Si no se incluye un sombreador y la aplicación intenta representarlo, se genera un material rosa.
Ahora vamos a agregar y configurar los componentes de Spatial Anchor. Vamos a establecer la expiración del anclaje en 3 días a partir de la creación de este. Después, se eliminarán automáticamente de la nube. No olvide agregar la importación.
using Microsoft.Azure.SpatialAnchors;
/// <summary>
/// Creates an Azure Spatial Anchor at the given position rotated towards the user
/// </summary>
/// <param name="position">Position where Azure Spatial Anchor will be created</param>
/// <returns>Async Task</returns>
private async Task CreateAnchor(Vector3 position)
{
    //Create Anchor GameObject. We will use ASA to save the position and the rotation of this GameObject.
    if (!InputDevices.GetDeviceAtXRNode(XRNode.Head).TryGetFeatureValue(CommonUsages.devicePosition, out Vector3 headPosition))
    {
        headPosition = Vector3.zero;
    }

    Quaternion orientationTowardsHead = Quaternion.LookRotation(position - headPosition, Vector3.up);

    GameObject anchorGameObject = GameObject.CreatePrimitive(PrimitiveType.Cube);
    anchorGameObject.GetComponent<MeshRenderer>().material.shader = Shader.Find("Legacy Shaders/Diffuse");
    anchorGameObject.transform.position = position;
    anchorGameObject.transform.rotation = orientationTowardsHead;
    anchorGameObject.transform.localScale = Vector3.one * 0.1f;

    //Add and configure ASA components
    CloudNativeAnchor cloudNativeAnchor = anchorGameObject.AddComponent<CloudNativeAnchor>();
    await cloudNativeAnchor.NativeToCloud();
    CloudSpatialAnchor cloudSpatialAnchor = cloudNativeAnchor.CloudAnchor;
    cloudSpatialAnchor.Expiration = DateTimeOffset.Now.AddDays(3);

}
Para guardar un anclaje, el usuario debe recopilar datos del entorno.
/// <summary>
/// Creates an Azure Spatial Anchor at the given position rotated towards the user
/// </summary>
/// <param name="position">Position where Azure Spatial Anchor will be created</param>
/// <returns>Async Task</returns>
private async Task CreateAnchor(Vector3 position)
{
    //Create Anchor GameObject. We will use ASA to save the position and the rotation of this GameObject.
    if (!InputDevices.GetDeviceAtXRNode(XRNode.Head).TryGetFeatureValue(CommonUsages.devicePosition, out Vector3 headPosition))
    {
        headPosition = Vector3.zero;
    }

    Quaternion orientationTowardsHead = Quaternion.LookRotation(position - headPosition, Vector3.up);

    GameObject anchorGameObject = GameObject.CreatePrimitive(PrimitiveType.Cube);
    anchorGameObject.GetComponent<MeshRenderer>().material.shader = Shader.Find("Legacy Shaders/Diffuse");
    anchorGameObject.transform.position = position;
    anchorGameObject.transform.rotation = orientationTowardsHead;
    anchorGameObject.transform.localScale = Vector3.one * 0.1f;

    //Add and configure ASA components
    CloudNativeAnchor cloudNativeAnchor = anchorGameObject.AddComponent<CloudNativeAnchor>();
    await cloudNativeAnchor.NativeToCloud();
    CloudSpatialAnchor cloudSpatialAnchor = cloudNativeAnchor.CloudAnchor;
    cloudSpatialAnchor.Expiration = DateTimeOffset.Now.AddDays(3);

    //Collect Environment Data
    while (!_spatialAnchorManager.IsReadyForCreate)
    {
        float createProgress = _spatialAnchorManager.SessionStatus.RecommendedForCreateProgress;
        Debug.Log($"ASA - Move your device to capture more environment data: {createProgress:0%}");
    }

}
Nota
Un dispositivo HoloLens puede reutilizar los datos del entorno ya capturados que rodean el anclaje, lo que da lugar a que IsReadyForCreate sea true cuando se llama por primera vez.
Ahora que se ha preparado el anclaje espacial de la nube, podemos probar el guardado real aquí.
/// <summary>
/// Creates an Azure Spatial Anchor at the given position rotated towards the user
/// </summary>
/// <param name="position">Position where Azure Spatial Anchor will be created</param>
/// <returns>Async Task</returns>
private async Task CreateAnchor(Vector3 position)
{
    //Create Anchor GameObject. We will use ASA to save the position and the rotation of this GameObject.
    if (!InputDevices.GetDeviceAtXRNode(XRNode.Head).TryGetFeatureValue(CommonUsages.devicePosition, out Vector3 headPosition))
    {
        headPosition = Vector3.zero;
    }

    Quaternion orientationTowardsHead = Quaternion.LookRotation(position - headPosition, Vector3.up);

    GameObject anchorGameObject = GameObject.CreatePrimitive(PrimitiveType.Cube);
    anchorGameObject.GetComponent<MeshRenderer>().material.shader = Shader.Find("Legacy Shaders/Diffuse");
    anchorGameObject.transform.position = position;
    anchorGameObject.transform.rotation = orientationTowardsHead;
    anchorGameObject.transform.localScale = Vector3.one * 0.1f;

    //Add and configure ASA components
    CloudNativeAnchor cloudNativeAnchor = anchorGameObject.AddComponent<CloudNativeAnchor>();
    await cloudNativeAnchor.NativeToCloud();
    CloudSpatialAnchor cloudSpatialAnchor = cloudNativeAnchor.CloudAnchor;
    cloudSpatialAnchor.Expiration = DateTimeOffset.Now.AddDays(3);

    //Collect Environment Data
    while (!_spatialAnchorManager.IsReadyForCreate)
    {
        float createProgress = _spatialAnchorManager.SessionStatus.RecommendedForCreateProgress;
        Debug.Log($"ASA - Move your device to capture more environment data: {createProgress:0%}");
    }

    Debug.Log($"ASA - Saving cloud anchor... ");

    try
    {
        // Now that the cloud spatial anchor has been prepared, we can try the actual save here.
        await _spatialAnchorManager.CreateAnchorAsync(cloudSpatialAnchor);

        bool saveSucceeded = cloudSpatialAnchor != null;
        if (!saveSucceeded)
        {
            Debug.LogError("ASA - Failed to save, but no exception was thrown.");
            return;
        }

        Debug.Log($"ASA - Saved cloud anchor with ID: {cloudSpatialAnchor.Identifier}");
        _foundOrCreatedAnchorGameObjects.Add(anchorGameObject);
        _createdAnchorIDs.Add(cloudSpatialAnchor.Identifier);
        anchorGameObject.GetComponent<MeshRenderer>().material.color = Color.green;
    }
    catch (Exception exception)
    {
        Debug.Log("ASA - Failed to save anchor: " + exception.ToString());
        Debug.LogException(exception);
    }
}
Por último, vamos a agregar la llamada de función a nuestro método ShortTap.
/// <summary>
/// Called when a user is air tapping for a short time
/// </summary>
/// <param name="handPosition">Location where tap was registered</param>
private async void ShortTap(Vector3 handPosition)
{
    await _spatialAnchorManager.StartSessionAsync();
        await CreateAnchor(handPosition);
}
Nuestra aplicación ahora puede crear varios anclajes. Cualquier dispositivo puede localizar ahora los anclajes creados (si aún no han expirado) siempre y cuando se conozcan los identificadores de anclaje y se tenga acceso al mismo recurso Spatial Anchors en Azure.
Detener sesión y destruir GameObjects
Para emular un segundo dispositivo que encuentre todos los anclajes, ahora se detendrá la sesión y se quitarán todos los objetos GameObjects de anclaje (se conservarán los identificadores de anclaje). Después, iniciaremos una nueva sesión y consultaremos los anclajes mediante los identificadores de anclaje almacenados.
SpatialAnchorManager puede ocuparse de la detención de la sesión simplemente llamando a su método DestroySession(). Vamos a agregar esto a nuestro método LongTap().
/// <summary>
/// Called when a user is air tapping for a long time (>=2 sec)
/// </summary>
private async void LongTap()
{
        _spatialAnchorManager.DestroySession();
}
Vamos a crear un método para quitar todos los GameObjects de anclaje.
/// <summary>
/// Destroys all Anchor GameObjects
/// </summary>
private void RemoveAllAnchorGameObjects()
{
    foreach (var anchorGameObject in _foundOrCreatedAnchorGameObjects)
    {
        Destroy(anchorGameObject);
    }
    _foundOrCreatedAnchorGameObjects.Clear();
}
Y lo llamaremos después de destruir la sesión en LongTap().
/// <summary>
/// Called when a user is air tapping for a long time (>=2 sec)
/// </summary>
private async void LongTap()
{
        // Stop Session and remove all GameObjects. This does not delete the Anchors in the cloud
        _spatialAnchorManager.DestroySession();
        RemoveAllAnchorGameObjects();
        Debug.Log("ASA - Stopped Session and removed all Anchor Objects");
}
Búsqueda de anclajes
Ahora intentaremos encontrar los anclajes de nuevo con la posición y rotación correctas en las que los creamos. Para ello, es necesario iniciar una sesión y crear un objeto Watcher que busque los anclajes que se ajusten a los criterios especificados. Como criterios, usaremos los identificadores de los anclajes que hemos creado anteriormente. Vamos a crear un método LocateAnchor() y a usar SpatialAnchorManager para crear un objeto Watcher. Para información sobre estrategias de ubicación distintas de los identificadores de anclaje, consulte Estrategia de búsqueda de delimitadores.
/// <summary>
/// Looking for anchors with ID in _createdAnchorIDs
/// </summary>
private void LocateAnchor()
{
    if (_createdAnchorIDs.Count > 0)
    {
        //Create watcher to look for all stored anchor IDs
        Debug.Log($"ASA - Creating watcher to look for {_createdAnchorIDs.Count} spatial anchors");
        AnchorLocateCriteria anchorLocateCriteria = new AnchorLocateCriteria();
        anchorLocateCriteria.Identifiers = _createdAnchorIDs.ToArray();
        _spatialAnchorManager.Session.CreateWatcher(anchorLocateCriteria);
        Debug.Log($"ASA - Watcher created!");
    }
}
Una vez que se inicia un monitor, se inicia una devolución de llamada cuando se encuentra un anclaje que se ajusta a los criterios especificados. En primer lugar, vamos a crear nuestro método anchor-located llamado SpatialAnchorManager_AnchorLocated() que configuraremos para que se llame cuando el monitor haya ubicado un anclaje. Este método creará un objeto GameObject visual y le asociará el componente de anclaje nativo. El componente de anclaje nativo se asegurará de que se establezcan la posición y la rotación correctas de GameObject.
De forma similar al proceso de creación, el anclaje se asocia a un objeto GameObject. Este objeto GameObject no tiene que estar visible en la escena para que los anclajes espaciales funcionen. En este tutorial, visualizaremos cada anclaje como un cubo azul una vez que se haya localizado. Si solo usa el anclaje para establecer un sistema de coordenadas compartido, no es necesario visualizar el objeto GameObject.
/// <summary>
/// Callback when an anchor is located
/// </summary>
/// <param name="sender">Callback sender</param>
/// <param name="args">Callback AnchorLocatedEventArgs</param>
private void SpatialAnchorManager_AnchorLocated(object sender, AnchorLocatedEventArgs args)
{
    Debug.Log($"ASA - Anchor recognized as a possible anchor {args.Identifier} {args.Status}");

    if (args.Status == LocateAnchorStatus.Located)
    {
        //Creating and adjusting GameObjects have to run on the main thread. We are using the UnityDispatcher to make sure this happens.
        UnityDispatcher.InvokeOnAppThread(() =>
        {
            // Read out Cloud Anchor values
            CloudSpatialAnchor cloudSpatialAnchor = args.Anchor;

            //Create GameObject
            GameObject anchorGameObject = GameObject.CreatePrimitive(PrimitiveType.Cube);
            anchorGameObject.transform.localScale = Vector3.one * 0.1f;
            anchorGameObject.GetComponent<MeshRenderer>().material.shader = Shader.Find("Legacy Shaders/Diffuse");
            anchorGameObject.GetComponent<MeshRenderer>().material.color = Color.blue;

            // Link to Cloud Anchor
            anchorGameObject.AddComponent<CloudNativeAnchor>().CloudToNative(cloudSpatialAnchor);
            _foundOrCreatedAnchorGameObjects.Add(anchorGameObject);
        });
    }
}
Ahora vamos a suscribirnos a la devolución de llamada AnchorLocated de SpatialAnchorManager para asegurarnos de que se llama al método SpatialAnchorManager_AnchorLocated() una vez que el monitor encuentra un anclaje.
// Start is called before the first frame update
void Start()
{
    _spatialAnchorManager = GetComponent<SpatialAnchorManager>();
    _spatialAnchorManager.LogDebug += (sender, args) => Debug.Log($"ASA - Debug: {args.Message}");
    _spatialAnchorManager.Error += (sender, args) => Debug.LogError($"ASA - Error: {args.ErrorMessage}");
    _spatialAnchorManager.AnchorLocated += SpatialAnchorManager_AnchorLocated;
}
Por último, vamos a expandir nuestro método LongTap() para incluir la búsqueda del anclaje. Usaremos el valor booleano IsSessionStarted para decidir si buscamos todos los anclajes o los destruimos, como se describe en Información general de la aplicación.
/// <summary>
/// Called when a user is air tapping for a long time (>=2 sec)
/// </summary>
private async void LongTap()
{
    if (_spatialAnchorManager.IsSessionStarted)
    {
        // Stop Session and remove all GameObjects. This does not delete the Anchors in the cloud
        _spatialAnchorManager.DestroySession();
        RemoveAllAnchorGameObjects();
        Debug.Log("ASA - Stopped Session and removed all Anchor Objects");
    }
    else
    {
        //Start session and search for all Anchors previously created
        await _spatialAnchorManager.StartSessionAsync();
        LocateAnchor();
    }
}
Prueba 2
La aplicación ahora admite la creación de anclajes y su localización. Compile la aplicación en Unity e impleméntela desde Visual Studio siguiendo las instrucciones de Uso de Visual Studio para la implementación y la depuración.
Asegúrese de que HoloLens está conectado a Internet. Una vez que se haya iniciado la aplicación y desaparezca el mensaje made with Unity (hecho con Unity), realice una pulsación corta en los alrededores. Debería aparecer un cubo blanco para mostrar la posición y la rotación del anclaje que se va a crear. Se llama automáticamente al proceso de creación del anclaje. Mientras mira lentamente lo que le rodea, va capturado los datos del entorno. Una vez que se recopilan suficientes datos del entorno, nuestra aplicación intentará crear un anclaje en la ubicación especificada. Cuando se haya completado el proceso de creación del anclaje, el cubo se volverá verde. Compruebe los registros de depuración en Visual Studio para ver si todo ha funcionado según lo previsto.
Realice una pulsación larga para quitar todos los objetos GameObjects de la escena y detener la sesión de Spatial Anchor.
Una vez borrada la escena, puede volver a realizar una pulsación larga, lo que iniciará una sesión y buscará los anclajes anteriormente creados. Cuando se encuentran, se visualizan como cubos azules en la posición y la rotación ancladas. Todos los dispositivos compatibles pueden encontrar estos anclajes (mientras no hayan expirado), siempre y cuando tengan los identificadores de anclaje correctos y tengan acceso al recurso de anclaje espacial.
Eliminación de anclajes
En este momento, nuestra aplicación puede crear y buscar anclajes. Aunque elimina los objetos GameObjects, no elimina el anclaje en la nube. Vamos a agregar la funcionalidad para eliminarlo también de la nube si pulsa en un anclaje existente.
Vamos a agregar un método DeleteAnchor que recibe un objeto GameObject. A continuación, usaremos SpatialAnchorManager junto con el componente CloudNativeAnchor del objeto para solicitar la eliminación del delimitador de la nube.
/// <summary>
/// Deleting Cloud Anchor attached to the given GameObject and deleting the GameObject
/// </summary>
/// <param name="anchorGameObject">Anchor GameObject that is to be deleted</param>
private async void DeleteAnchor(GameObject anchorGameObject)
{
    CloudNativeAnchor cloudNativeAnchor = anchorGameObject.GetComponent<CloudNativeAnchor>();
    CloudSpatialAnchor cloudSpatialAnchor = cloudNativeAnchor.CloudAnchor;

    Debug.Log($"ASA - Deleting cloud anchor: {cloudSpatialAnchor.Identifier}");

    //Request Deletion of Cloud Anchor
    await _spatialAnchorManager.DeleteAnchorAsync(cloudSpatialAnchor);

    //Remove local references
    _createdAnchorIDs.Remove(cloudSpatialAnchor.Identifier);
    _foundOrCreatedAnchorGameObjects.Remove(anchorGameObject);
    Destroy(anchorGameObject);

    Debug.Log($"ASA - Cloud anchor deleted!");
}
Para llamar a este método desde ShortTap, es necesario poder determinar si una pulsación ha estado cerca de un anclaje visible existente. Vamos a crear un método auxiliar que se encargue de eso.
using System.Linq;
/// <summary>
/// Returns true if an Anchor GameObject is within 15cm of the received reference position
/// </summary>
/// <param name="position">Reference position</param>
/// <param name="anchorGameObject">Anchor GameObject within 15cm of received position. Not necessarily the nearest to this position. If no AnchorObject is within 15cm, this value will be null</param>
/// <returns>True if a Anchor GameObject is within 15cm</returns>
private bool IsAnchorNearby(Vector3 position, out GameObject anchorGameObject)
{
    anchorGameObject = null;

    if (_foundOrCreatedAnchorGameObjects.Count <= 0)
    {
        return false;
    }

    //Iterate over existing anchor gameobjects to find the nearest
    var (distance, closestObject) = _foundOrCreatedAnchorGameObjects.Aggregate(
        new Tuple<float, GameObject>(Mathf.Infinity, null),
        (minPair, gameobject) =>
        {
            Vector3 gameObjectPosition = gameobject.transform.position;
            float distance = (position - gameObjectPosition).magnitude;
            return distance < minPair.Item1 ? new Tuple<float, GameObject>(distance, gameobject) : minPair;
        });

    if (distance <= 0.15f)
    {
        //Found an anchor within 15cm
        anchorGameObject = closestObject;
        return true;
    }
    else
    {
        return false;
    }
}
Ahora podemos extender nuestro método ShortTap para incluir la llamada DeleteAnchor.
/// <summary>
/// Called when a user is air tapping for a short time
/// </summary>
/// <param name="handPosition">Location where tap was registered</param>
private async void ShortTap(Vector3 handPosition)
{
    await _spatialAnchorManager.StartSessionAsync();
    if (!IsAnchorNearby(handPosition, out GameObject anchorGameObject))
    {
        //No Anchor Nearby, start session and create an anchor
        await CreateAnchor(handPosition);
    }
    else
    {
        //Delete nearby Anchor
        DeleteAnchor(anchorGameObject);
    }
}
Prueba 3
Compile la aplicación en Unity e impleméntela desde Visual Studio siguiendo las instrucciones de Uso de Visual Studio para la implementación y la depuración.
Tenga en cuenta que la ubicación del gesto de pulsar con la mano es el centro de la mano en esta aplicación y no la punta de los dedos.
Al pulsar en un anclaje, se crea (verde) o se localiza (azul), se envía una solicitud al servicio de anclaje espacial para quitar este anclaje de la cuenta. Detenga la sesión (pulsación larga) e iníciela de nuevo (pulsación larga) para buscar todos los anclajes. Los anclajes eliminados ya no se encontrarán.
Todo junto
Así es como debería ser el archivo de clase AzureSpatialAnchorsScript completo después de unir los distintos elementos. Puede usarlo como referencia para compararlo con su propio archivo, con el fin de detectar si es posible que queden diferencias.
Nota
Observará que hemos incluido [RequireComponent(typeof(SpatialAnchorManager))] en el script. Con esto, Unity se asegura de que el elemento GameObject al que asociamos AzureSpatialAnchorsScript también tenga SpatialAnchorManager asociado.
using Microsoft.Azure.SpatialAnchors;
using Microsoft.Azure.SpatialAnchors.Unity;
using System;
using System.Collections.Generic;
using System.Linq;
using System.Threading.Tasks;
using UnityEngine;
using UnityEngine.XR;


[RequireComponent(typeof(SpatialAnchorManager))]
public class AzureSpatialAnchorsScript : MonoBehaviour
{
    /// <summary>
    /// Used to distinguish short taps and long taps
    /// </summary>
    private float[] _tappingTimer = { 0, 0 };

    /// <summary>
    /// Main interface to anything Spatial Anchors related
    /// </summary>
    private SpatialAnchorManager _spatialAnchorManager = null;

    /// <summary>
    /// Used to keep track of all GameObjects that represent a found or created anchor
    /// </summary>
    private List<GameObject> _foundOrCreatedAnchorGameObjects = new List<GameObject>();

    /// <summary>
    /// Used to keep track of all the created Anchor IDs
    /// </summary>
    private List<String> _createdAnchorIDs = new List<String>();

    // <Start>
    // Start is called before the first frame update
    void Start()
    {
        _spatialAnchorManager = GetComponent<SpatialAnchorManager>();
        _spatialAnchorManager.LogDebug += (sender, args) => Debug.Log($"ASA - Debug: {args.Message}");
        _spatialAnchorManager.Error += (sender, args) => Debug.LogError($"ASA - Error: {args.ErrorMessage}");
        _spatialAnchorManager.AnchorLocated += SpatialAnchorManager_AnchorLocated;
    }
    // </Start>

    // <Update>
    // Update is called once per frame
    void Update()
    {

        //Check for any air taps from either hand
        for (int i = 0; i < 2; i++)
        {
            InputDevice device = InputDevices.GetDeviceAtXRNode((i == 0) ? XRNode.RightHand : XRNode.LeftHand);
            if (device.TryGetFeatureValue(CommonUsages.primaryButton, out bool isTapping))
            {
                if (!isTapping)
                {
                    //Stopped Tapping or wasn't tapping
                    if (0f < _tappingTimer[i] && _tappingTimer[i] < 1f)
                    {
                        //User has been tapping for less than 1 sec. Get hand position and call ShortTap
                        if (device.TryGetFeatureValue(CommonUsages.devicePosition, out Vector3 handPosition))
                        {
                            ShortTap(handPosition);
                        }
                    }
                    _tappingTimer[i] = 0;
                }
                else
                {
                    _tappingTimer[i] += Time.deltaTime;
                    if (_tappingTimer[i] >= 2f)
                    {
                        //User has been air tapping for at least 2sec. Get hand position and call LongTap
                        if (device.TryGetFeatureValue(CommonUsages.devicePosition, out Vector3 handPosition))
                        {
                            LongTap();
                        }
                        _tappingTimer[i] = -float.MaxValue; // reset the timer, to avoid retriggering if user is still holding tap
                    }
                }
            }

        }
    }
    // </Update>


    // <ShortTap>
    /// <summary>
    /// Called when a user is air tapping for a short time
    /// </summary>
    /// <param name="handPosition">Location where tap was registered</param>
    private async void ShortTap(Vector3 handPosition)
    {
        await _spatialAnchorManager.StartSessionAsync();
        if (!IsAnchorNearby(handPosition, out GameObject anchorGameObject))
        {
            //No Anchor Nearby, start session and create an anchor
            await CreateAnchor(handPosition);
        }
        else
        {
            //Delete nearby Anchor
            DeleteAnchor(anchorGameObject);
        }
    }
    // </ShortTap>

    // <LongTap>
    /// <summary>
    /// Called when a user is air tapping for a long time (>=2 sec)
    /// </summary>
    private async void LongTap()
    {
        if (_spatialAnchorManager.IsSessionStarted)
        {
            // Stop Session and remove all GameObjects. This does not delete the Anchors in the cloud
            _spatialAnchorManager.DestroySession();
            RemoveAllAnchorGameObjects();
            Debug.Log("ASA - Stopped Session and removed all Anchor Objects");
        }
        else
        {
            //Start session and search for all Anchors previously created
            await _spatialAnchorManager.StartSessionAsync();
            LocateAnchor();
        }
    }
    // </LongTap>

    // <RemoveAllAnchorGameObjects>
    /// <summary>
    /// Destroys all Anchor GameObjects
    /// </summary>
    private void RemoveAllAnchorGameObjects()
    {
        foreach (var anchorGameObject in _foundOrCreatedAnchorGameObjects)
        {
            Destroy(anchorGameObject);
        }
        _foundOrCreatedAnchorGameObjects.Clear();
    }
    // </RemoveAllAnchorGameObjects>

    // <IsAnchorNearby>
    /// <summary>
    /// Returns true if an Anchor GameObject is within 15cm of the received reference position
    /// </summary>
    /// <param name="position">Reference position</param>
    /// <param name="anchorGameObject">Anchor GameObject within 15cm of received position. Not necessarily the nearest to this position. If no AnchorObject is within 15cm, this value will be null</param>
    /// <returns>True if a Anchor GameObject is within 15cm</returns>
    private bool IsAnchorNearby(Vector3 position, out GameObject anchorGameObject)
    {
        anchorGameObject = null;

        if (_foundOrCreatedAnchorGameObjects.Count <= 0)
        {
            return false;
        }

        //Iterate over existing anchor gameobjects to find the nearest
        var (distance, closestObject) = _foundOrCreatedAnchorGameObjects.Aggregate(
            new Tuple<float, GameObject>(Mathf.Infinity, null),
            (minPair, gameobject) =>
            {
                Vector3 gameObjectPosition = gameobject.transform.position;
                float distance = (position - gameObjectPosition).magnitude;
                return distance < minPair.Item1 ? new Tuple<float, GameObject>(distance, gameobject) : minPair;
            });

        if (distance <= 0.15f)
        {
            //Found an anchor within 15cm
            anchorGameObject = closestObject;
            return true;
        }
        else
        {
            return false;
        }
    }
    // </IsAnchorNearby>

    // <CreateAnchor>
    /// <summary>
    /// Creates an Azure Spatial Anchor at the given position rotated towards the user
    /// </summary>
    /// <param name="position">Position where Azure Spatial Anchor will be created</param>
    /// <returns>Async Task</returns>
    private async Task CreateAnchor(Vector3 position)
    {
        //Create Anchor GameObject. We will use ASA to save the position and the rotation of this GameObject.
        if (!InputDevices.GetDeviceAtXRNode(XRNode.Head).TryGetFeatureValue(CommonUsages.devicePosition, out Vector3 headPosition))
        {
            headPosition = Vector3.zero;
        }

        Quaternion orientationTowardsHead = Quaternion.LookRotation(position - headPosition, Vector3.up);

        GameObject anchorGameObject = GameObject.CreatePrimitive(PrimitiveType.Cube);
        anchorGameObject.GetComponent<MeshRenderer>().material.shader = Shader.Find("Legacy Shaders/Diffuse");
        anchorGameObject.transform.position = position;
        anchorGameObject.transform.rotation = orientationTowardsHead;
        anchorGameObject.transform.localScale = Vector3.one * 0.1f;

        //Add and configure ASA components
        CloudNativeAnchor cloudNativeAnchor = anchorGameObject.AddComponent<CloudNativeAnchor>();
        await cloudNativeAnchor.NativeToCloud();
        CloudSpatialAnchor cloudSpatialAnchor = cloudNativeAnchor.CloudAnchor;
        cloudSpatialAnchor.Expiration = DateTimeOffset.Now.AddDays(3);

        //Collect Environment Data
        while (!_spatialAnchorManager.IsReadyForCreate)
        {
            float createProgress = _spatialAnchorManager.SessionStatus.RecommendedForCreateProgress;
            Debug.Log($"ASA - Move your device to capture more environment data: {createProgress:0%}");
        }

        Debug.Log($"ASA - Saving cloud anchor... ");

        try
        {
            // Now that the cloud spatial anchor has been prepared, we can try the actual save here.
            await _spatialAnchorManager.CreateAnchorAsync(cloudSpatialAnchor);

            bool saveSucceeded = cloudSpatialAnchor != null;
            if (!saveSucceeded)
            {
                Debug.LogError("ASA - Failed to save, but no exception was thrown.");
                return;
            }

            Debug.Log($"ASA - Saved cloud anchor with ID: {cloudSpatialAnchor.Identifier}");
            _foundOrCreatedAnchorGameObjects.Add(anchorGameObject);
            _createdAnchorIDs.Add(cloudSpatialAnchor.Identifier);
            anchorGameObject.GetComponent<MeshRenderer>().material.color = Color.green;
        }
        catch (Exception exception)
        {
            Debug.Log("ASA - Failed to save anchor: " + exception.ToString());
            Debug.LogException(exception);
        }
    }
    // </CreateAnchor>

    // <LocateAnchor>
    /// <summary>
    /// Looking for anchors with ID in _createdAnchorIDs
    /// </summary>
    private void LocateAnchor()
    {
        if (_createdAnchorIDs.Count > 0)
        {
            //Create watcher to look for all stored anchor IDs
            Debug.Log($"ASA - Creating watcher to look for {_createdAnchorIDs.Count} spatial anchors");
            AnchorLocateCriteria anchorLocateCriteria = new AnchorLocateCriteria();
            anchorLocateCriteria.Identifiers = _createdAnchorIDs.ToArray();
            _spatialAnchorManager.Session.CreateWatcher(anchorLocateCriteria);
            Debug.Log($"ASA - Watcher created!");
        }
    }
    // </LocateAnchor>

    // <SpatialAnchorManagerAnchorLocated>
    /// <summary>
    /// Callback when an anchor is located
    /// </summary>
    /// <param name="sender">Callback sender</param>
    /// <param name="args">Callback AnchorLocatedEventArgs</param>
    private void SpatialAnchorManager_AnchorLocated(object sender, AnchorLocatedEventArgs args)
    {
        Debug.Log($"ASA - Anchor recognized as a possible anchor {args.Identifier} {args.Status}");

        if (args.Status == LocateAnchorStatus.Located)
        {
            //Creating and adjusting GameObjects have to run on the main thread. We are using the UnityDispatcher to make sure this happens.
            UnityDispatcher.InvokeOnAppThread(() =>
            {
                // Read out Cloud Anchor values
                CloudSpatialAnchor cloudSpatialAnchor = args.Anchor;

                //Create GameObject
                GameObject anchorGameObject = GameObject.CreatePrimitive(PrimitiveType.Cube);
                anchorGameObject.transform.localScale = Vector3.one * 0.1f;
                anchorGameObject.GetComponent<MeshRenderer>().material.shader = Shader.Find("Legacy Shaders/Diffuse");
                anchorGameObject.GetComponent<MeshRenderer>().material.color = Color.blue;

                // Link to Cloud Anchor
                anchorGameObject.AddComponent<CloudNativeAnchor>().CloudToNative(cloudSpatialAnchor);
                _foundOrCreatedAnchorGameObjects.Add(anchorGameObject);
            });
        }
    }
    // </SpatialAnchorManagerAnchorLocated>

    // <DeleteAnchor>
    /// <summary>
    /// Deleting Cloud Anchor attached to the given GameObject and deleting the GameObject
    /// </summary>
    /// <param name="anchorGameObject">Anchor GameObject that is to be deleted</param>
    private async void DeleteAnchor(GameObject anchorGameObject)
    {
        CloudNativeAnchor cloudNativeAnchor = anchorGameObject.GetComponent<CloudNativeAnchor>();
        CloudSpatialAnchor cloudSpatialAnchor = cloudNativeAnchor.CloudAnchor;

        Debug.Log($"ASA - Deleting cloud anchor: {cloudSpatialAnchor.Identifier}");

        //Request Deletion of Cloud Anchor
        await _spatialAnchorManager.DeleteAnchorAsync(cloudSpatialAnchor);

        //Remove local references
        _createdAnchorIDs.Remove(cloudSpatialAnchor.Identifier);
        _foundOrCreatedAnchorGameObjects.Remove(anchorGameObject);
        Destroy(anchorGameObject);

        Debug.Log($"ASA - Cloud anchor deleted!");
    }
    // </DeleteAnchor>

}
Pasos siguientes
En este tutorial, ha aprendido a implementar una aplicación básica Spatial Anchors para HoloLens mediante Unity. Para más información acerca de cómo usar Azure Spatial Anchors en una nueva aplicación Android, continúe con el siguiente tutorial.