Tutorial: Microsoft Entra single sign-on (SSO) integration with Check Point Remote Secure Access VPN
In this tutorial, you'll learn how to integrate Check Point Remote Secure Access VPN with Microsoft Entra ID. When you integrate Check Point Remote Secure Access VPN with Microsoft Entra ID, you can:
- Control in Microsoft Entra ID who has access to Check Point Remote Secure Access VPN.
- Enable your users to be automatically signed-in to Check Point Remote Secure Access VPN with their Microsoft Entra accounts.
- Manage your accounts in one central location.
Prerequisites
To get started, you need the following items:
- A Microsoft Entra subscription. If you don't have a subscription, you can get a free account.
- Check Point Remote Secure Access VPN single sign-on (SSO) enabled subscription.
Scenario description
In this tutorial, you configure and test Microsoft Entra SSO in a test environment.
- Check Point Remote Secure Access VPN supports SP initiated SSO.
Adding Check Point Remote Secure Access VPN from the gallery
To configure the integration of Check Point Remote Secure Access VPN into Microsoft Entra ID, you need to add Check Point Remote Secure Access VPN from the gallery to your list of managed SaaS apps.
- Sign in to the Microsoft Entra admin center as at least a Cloud Application Administrator.
- Browse to Identity > Applications > Enterprise applications > New application.
- In the Add from the gallery section, type Check Point Remote Secure Access VPN in the search box.
- Select Check Point Remote Secure Access VPN from results panel and then add the app. Wait a few seconds while the app is added to your tenant.
Alternatively, you can also use the Enterprise App Configuration Wizard. In this wizard, you can add an application to your tenant, add users/groups to the app, assign roles, as well as walk through the SSO configuration as well. Learn more about Microsoft 365 wizards.
Configure and test Microsoft Entra SSO for Check Point Remote Secure Access VPN
Configure and test Microsoft Entra SSO with Check Point Remote Secure Access VPN using a test user called B.Simon. For SSO to work, you need to establish a link relationship between a Microsoft Entra user and the related user in Check Point Remote Secure Access VPN.
To configure and test Microsoft Entra SSO with Check Point Remote Secure Access VPN, perform the following steps:
Configure Microsoft Entra SSO - to enable your users to use this feature.
- Create a Microsoft Entra test user - to test Microsoft Entra single sign-on with B.Simon.
- Assign the Microsoft Entra test user - to enable B.Simon to use Microsoft Entra single sign-on.
Configure Check Point Remote Secure Access VPN SSO - to enable your users to use this feature.
- Create Check Point Remote Secure Access VPN test user - to have a counterpart of B.Simon in Check Point Remote Secure Access VPN that is linked to the Microsoft Entra representation of user.
Test SSO - to verify whether the configuration works.
Configure Microsoft Entra SSO
Follow these steps to enable Microsoft Entra SSO.
Sign in to the Microsoft Entra admin center as at least a Cloud Application Administrator.
Browse to Identity > Applications > Enterprise applications > Check Point Remote Secure Access VPN > Single sign-on.
On the Select a single sign-on method page, select SAML.
On the Set up single sign-on with SAML page, click the pencil icon for Basic SAML Configuration to edit the settings.
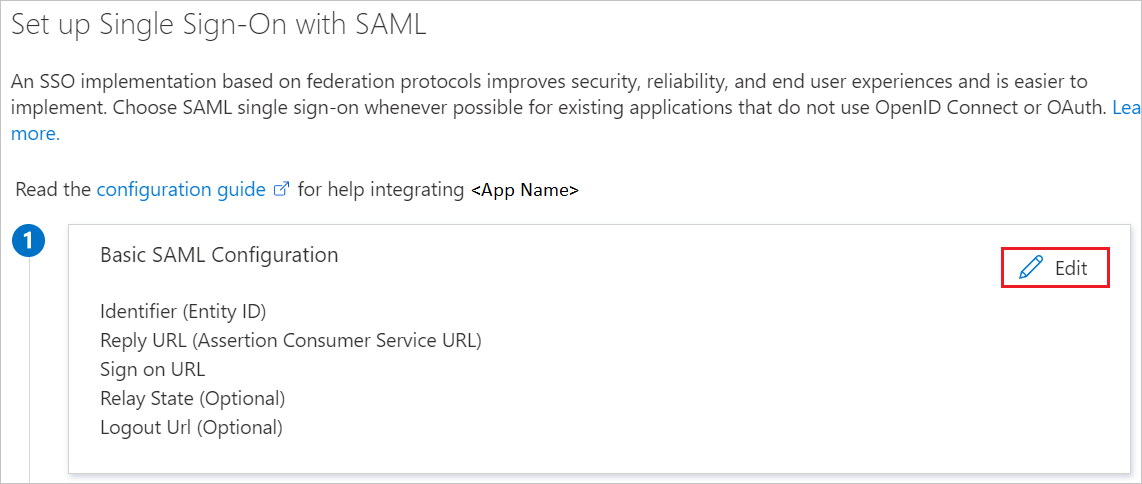
On the Basic SAML Configuration section, enter the values for the following fields:
In the Identifier (Entity ID) text box, type a URL using the following pattern:
https://<GATEWAY_IP>/saml-vpn/spPortal/ACS/ID/<IDENTIFIER_UID>In the Reply URL text box, type a URL using the following pattern:
https://<GATEWAY_IP>/saml-vpn/spPortal/ACS/Login/<IDENTIFIER_UID>In the Sign on URL text box, type a URL using the following pattern:
https://<GATEWAY_IP>/saml-vpn/
Note
These values are not real. Update these values with the actual Identifier, Reply URL and Sign on URL. Contact Check Point Remote Secure Access VPN Client support team to get these values. You can also refer to the patterns shown in the Basic SAML Configuration section.
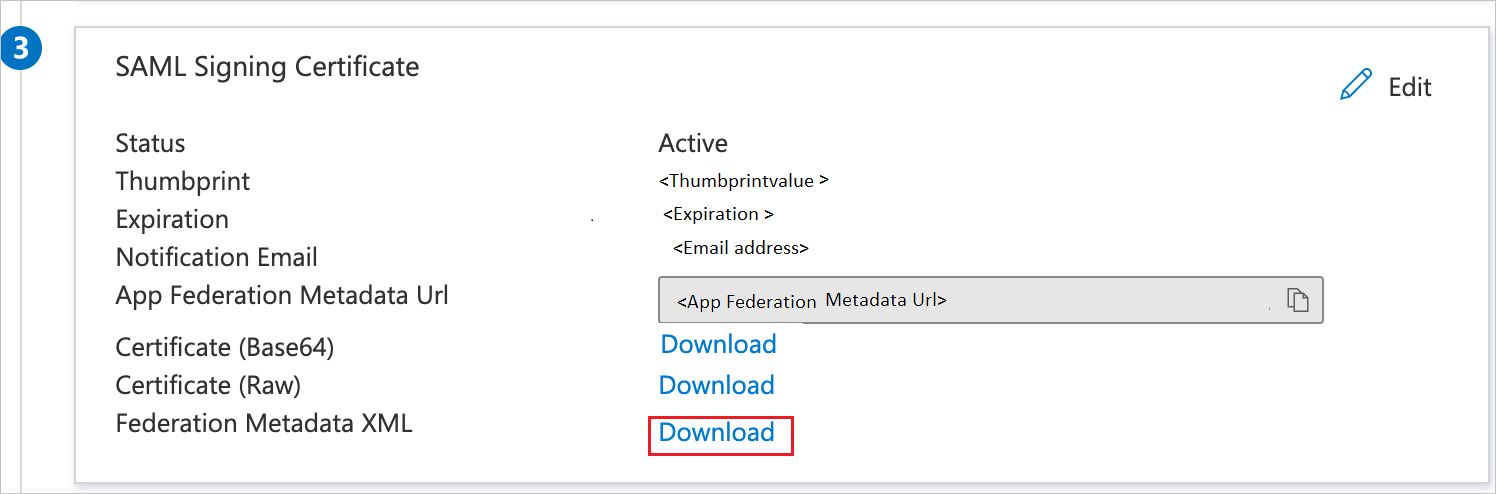
On the Set up single sign-on with SAML page, in the SAML Signing Certificate section, find Federation Metadata XML and select Download to download the certificate and save it on your computer.
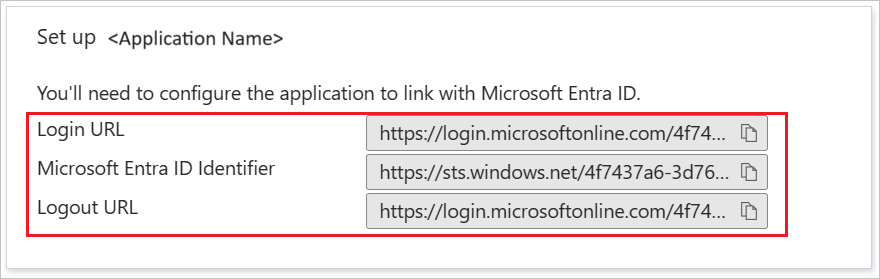
On the Set up Check Point Remote Secure Access VPN section, copy the appropriate URL(s) based on your requirement.
Create a Microsoft Entra test user
In this section, you'll create a test user called B.Simon.
- Sign in to the Microsoft Entra admin center as at least a User Administrator.
- Browse to Identity > Users > All users.
- Select New user > Create new user, at the top of the screen.
- In the User properties, follow these steps:
- In the Display name field, enter
B.Simon. - In the User principal name field, enter the username@companydomain.extension. For example,
B.Simon@contoso.com. - Select the Show password check box, and then write down the value that's displayed in the Password box.
- Select Review + create.
- In the Display name field, enter
- Select Create.
Assign the Microsoft Entra test user
In this section, you'll enable B.Simon to use single sign-on by granting access to Check Point Remote Secure Access VPN.
- Sign in to the Microsoft Entra admin center as at least a Cloud Application Administrator.
- Browse to Identity > Applications > Enterprise applications > Check Point Remote Secure Access VPN.
- In the app's overview page, select Users and groups.
- Select Add user/group, then select Users and groups in the Add Assignment dialog.
- In the Users and groups dialog, select B.Simon from the Users list, then click the Select button at the bottom of the screen.
- If you are expecting a role to be assigned to the users, you can select it from the Select a role dropdown. If no role has been set up for this app, you see "Default Access" role selected.
- In the Add Assignment dialog, click the Assign button.
Configure Check Point Remote Secure Access VPN SSO
Configure an External User Profile object
Note
This section is needed only if you do not want to use an on-premises Active Directory (LDAP).
Configure a generic user profile in the Legacy SmartDashboard:
In SmartConsole, go to Manage & Settings > Blades.
In the Mobile Access section, click Configure in SmartDashboard. The Legacy SmartDashboard opens.
In the Network Objects pane, and click Users.
Right-click on an empty space and select New > External User Profile > Match all users.
Configure the External User Profile properties:
On the General Properties page:
- In the External User Profile name field, leave the default name
generic* - In the Expiration Date field, set the applicable date
- In the External User Profile name field, leave the default name
On the Authentication page:
- From the Authentication Scheme drop-down list, select
undefined
- From the Authentication Scheme drop-down list, select
On the Location, Time, and Encryption pages:
- Configure other applicable settings
Click OK.
From the top toolbar, click Update (or press Ctrl + S).
Close SmartDashboard.
In SmartConsole, install the Access Control Policy.
Configure Remote Access VPN
Open the object of the applicable Security Gateway.
On the General Properties page, enable the IPSec VPN Software Blade.
From the left tree, click the IPSec VPN page.
In the section This Security Gateway participates in the following VPN communities, click Add and select Remote Access Community.
From the left tree, click VPN clients > Remote Access.
Enable Support Visitor Mode.
From the left tree, click VPN clients > Office Mode.
Select Allow Office Mode and select the applicable Office Mode Method.
From the left tree, click VPN Clients > SAML Portal Settings.
Make sure the Main URL contains the fully qualified domain name of the gateway. This domain name should end with a DNS suffix registered by your organization. For example:
https://gateway1.company.com/saml-vpnMake sure the certificate is trusted by the end users’ browser.
Click OK.
Configure an Identity Provider object
Do the following steps for each Security Gateway that participates in Remote Access VPN.
In SmartConsole > Gateways & Servers view, click New > More > User/Identity > Identity Provider.
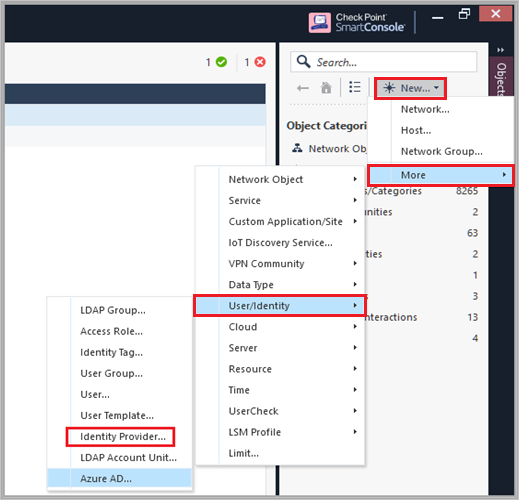
Perform the following steps in New Identity Provider window.
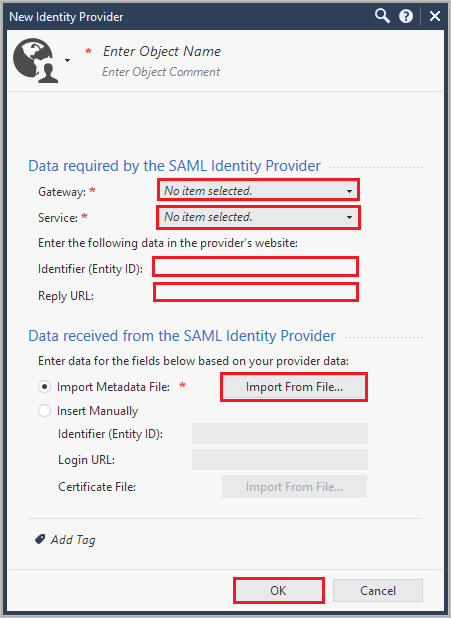
a. In the Gateway field, select the Security Gateway, which needs to perform the SAML authentication.
b. In the Service field, select Remote Access VPN from the dropdown.
c. Copy Identifier(Entity ID) value, paste this value into the Identifier text box in the Basic SAML Configuration section.
d. Copy Reply URL value, paste this value into the Reply URL text box in the Basic SAML Configuration section.
e. Select Import Metadata File to upload the downloaded Federation Metadata XML.
Note
Alternatively you can also select Insert Manually to paste manually the Entity ID and Login URL values into the corresponding fields, and to upload the Certificate File.
f. Click OK.
Configure the Identity Provider as an authentication method
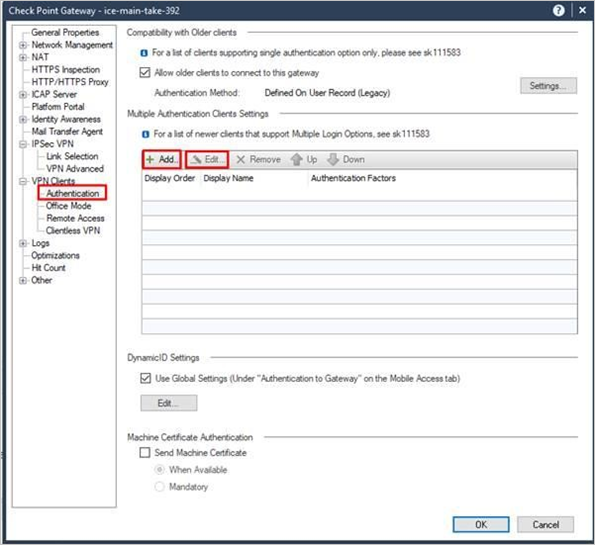
Open the object of the applicable Security Gateway.
On the VPN Clients > Authentication page:
a. Clear the checkbox Allow older clients to connect to this gateway.
b. Add a new object or edit an existing realm.
Enter a name and a display name, and add/edit an authentication method: In case the Login Option will be use on GWs who participate in MEP, in order to allow smooth user experience the Name should start with
SAMLVPN_prefix.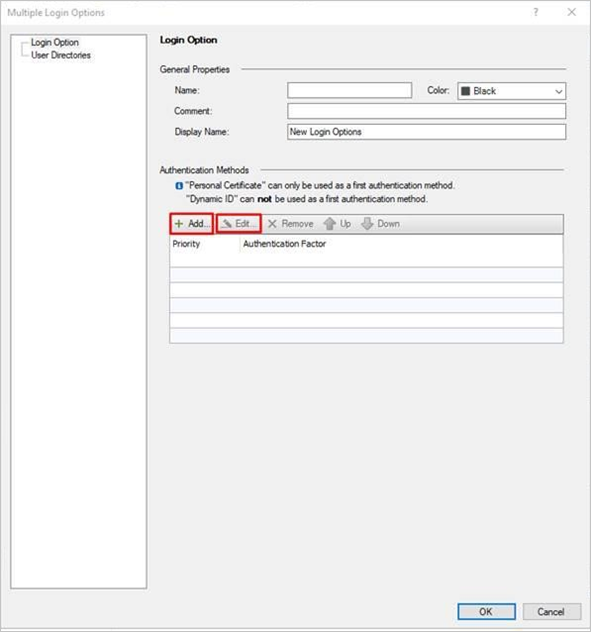
Select the option Identity Provider, click the green
+button and select the applicable Identity Provider object.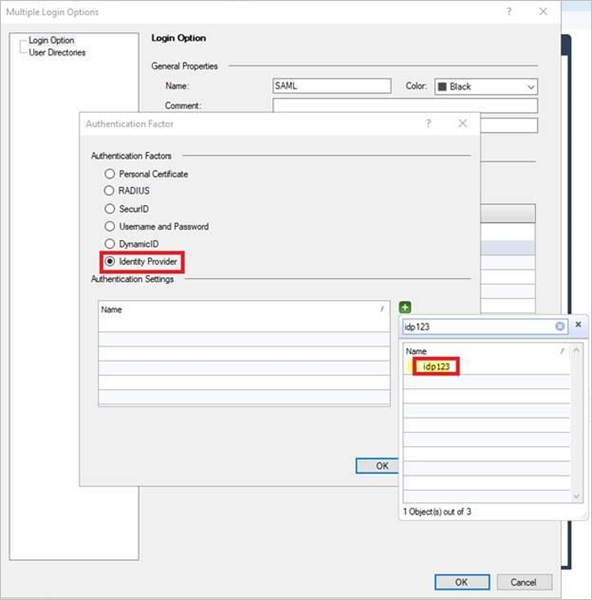
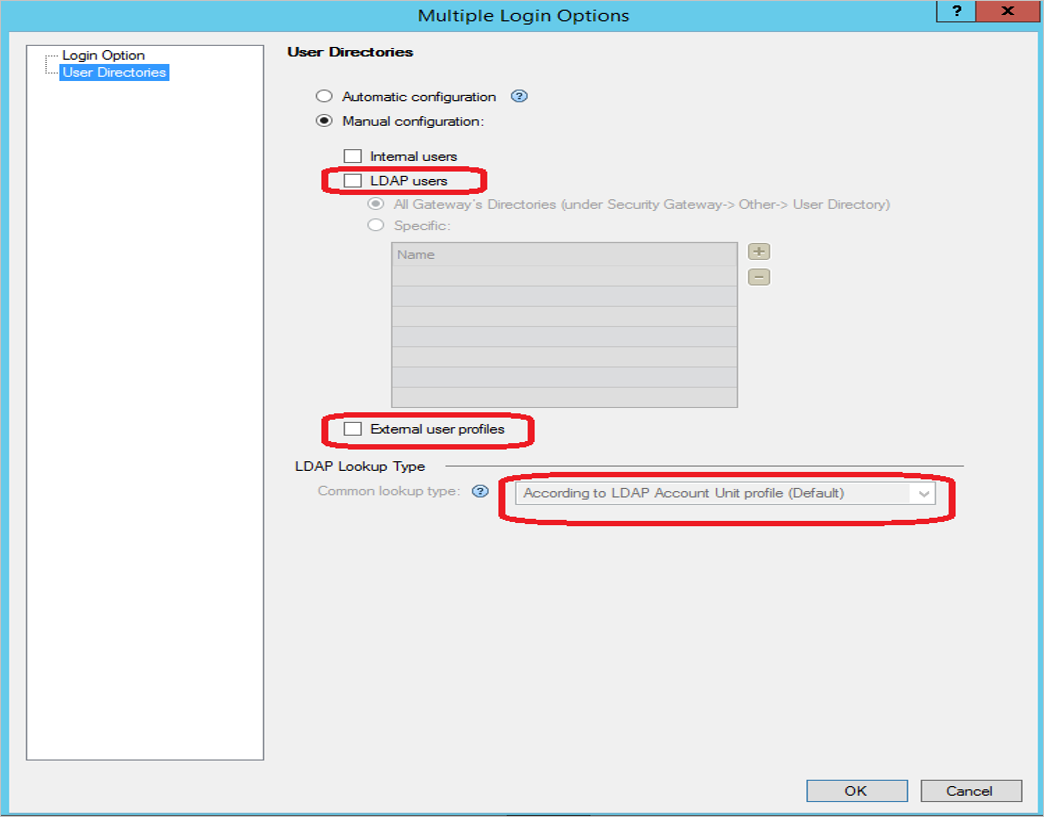
In the Multiple Logon Options window: From the left pane, click User Directories and then select Manual configuration. There are two options:
- If you do not want to use an on-premises Active Directory (LDAP), select only External User Profiles and click OK.
- If you do want to use an on-premises Active Directory (LDAP), select only LDAP users and in the LDAP Lookup Type select email. Then click OK.
Configure the required settings in the management database:
Close SmartConsole.
Connect with the GuiDBEdit Tool to the Management Server (see sk13009).
In the top left pane, go to Edit > Network Objects.
In the top right pane, select the Security Gateway object.
In the bottom pane, go to realms_for_blades > vpn.
If you do not want to use an on-premises Active Directory (LDAP), set do_ldap_fetch to false and do_generic_fetch to true. Then click OK. If you do want to use an on-premises Active Directory (LDAP), set do_ldap_fetch to true and do_generic_fetch to false. Then click OK.
Repeat steps 4 to 6 for all applicable Security Gateways.
Save all changes by selecting File > Save All.
Close the GuiDBEdit Tool.
Each Security Gateway and each Software Blade have separate settings. Review the settings in each Security Gateway and each Software Blade that use authentication (VPN, Mobile Access, and Identity Awareness).
Make sure to select the option LDAP users only for Software Blades that use LDAP.
Make sure to select the option External user profiles only for Software Blades that do not use LDAP.
Install the Access Control Policy on each Security Gateway.
VPN RA Client Installation and configuration
Install the VPN client.
Set the Identity Provider browser mode (optional).
By default, the Windows client uses its embedded browser and the macOS client uses Safari to authenticate on the Identity Provider's portal. For Windows clients, change this behavior to use Internet Explorer instead:
On the client machine, open a plain-text editor as an Administrator.
Open the
trac.defaultsfile in the text editor.On 32-bit Windows:
%ProgramFiles%\CheckPoint\Endpoint Connect\trac.defaultsOn 64-bit Windows:
%ProgramFiles(x86)%\CheckPoint\Endpoint Connect\trac.defaults
Change the
idp_browser_modeattribute value fromembeddedtoIE.Save the file.
Restart the Check Point Endpoint Security VPN client service.
Open the Windows Command Prompt as an Administrator and run these commands:
# net stop TracSrvWrapper# net start TracSrvWrapperStart authentication with browser running in background:
On the client machine, open a plain-text editor as an Administrator.
Open the
trac.defaultsfile in the text editor.On 32-bit Windows:
%ProgramFiles%\CheckPoint\Endpoint Connect\trac.defaultsOn 64-bit Windows:
%ProgramFiles(x86)%\CheckPoint\Endpoint Connect\trac.defaultsOn macOS:
/Library/Application Support/Checkpoint/Endpoint Security/Endpoint Connect/trac.defaults
Change the value of
idp_show_browser_primary_auth_flowtofalse.Save the file.
Restart the Check Point Endpoint Security VPN client service.
On Windows clients, open the Windows Command Prompt as an Administrator and run these commands:
# net stop TracSrvWrapper# net start TracSrvWrapperOn macOS clients, run:
sudo launchctl stop com.checkpoint.epc.servicesudo launchctl start com.checkpoint.epc.service
Create Check Point Remote Secure Access VPN test user
In this section, you create a user called Britta Simon in Check Point Remote Secure Access VPN. Work with Check Point Remote Secure Access VPN support team to add the users in the Check Point Remote Secure Access VPN platform. Users must be created and activated before you use single sign-on.
Test SSO
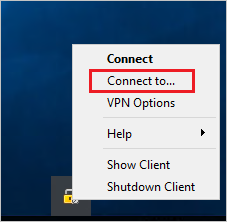
Open the VPN client and click Connect to....
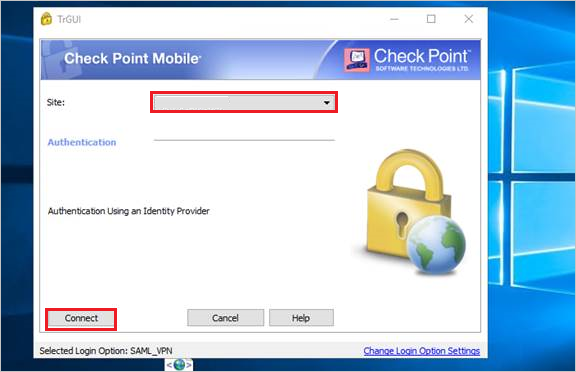
Select Site from the dropdown and click Connect.
In Microsoft Entra login pop up, sign in using Microsoft Entra credentials which you have created in the Create a Microsoft Entra test user section.
Next steps
Once you configure Check Point Remote Secure Access VPN you can enforce session control, which protects exfiltration and infiltration of your organization’s sensitive data in real time. Session control extends from Conditional Access. Learn how to enforce session control with Microsoft Defender for Cloud Apps.
Tagasiside
Varsti tulekul: 2024. aasta jooksul tühistame GitHubi probleemide funktsiooni sisutagasiside mehhanismina ja asendame selle uue tagasisidesüsteemiga. Lisateabe saamiseks vt https://aka.ms/ContentUserFeedback.
Esita ja vaata tagasisidet