Join a SUSE Linux Enterprise virtual machine to a Microsoft Entra Domain Services managed domain
To let users sign in to virtual machines (VMs) in Azure using a single set of credentials, you can join VMs to a Microsoft Entra Domain Services managed domain. When you join a VM to a Domain Services managed domain, user accounts and credentials from the domain can be used to sign in and manage servers. Group memberships from the managed domain are also applied to let you control access to files or services on the VM.
This article shows you how to join a SUSE Linux Enterprise (SLE) VM to a managed domain.
Prerequisites
To complete this tutorial, you need the following resources and privileges:
- An active Azure subscription.
- If you don't have an Azure subscription, create an account.
- A Microsoft Entra tenant associated with your subscription, either synchronized with an on-premises directory or a cloud-only directory.
- A Microsoft Entra Domain Services managed domain enabled and configured in your Microsoft Entra tenant.
- If needed, the first tutorial creates and configures a Microsoft Entra Domain Services managed domain.
- A user account that's a part of the managed domain.
- Unique Linux VM names that are a maximum of 15 characters to avoid truncated names that might cause conflicts in Active Directory.
Create and connect to a SLE Linux VM
If you have an existing SLE Linux VM in Azure, connect to it using SSH, then continue on to the next step to start configuring the VM.
If you need to create a SLE Linux VM, or want to create a test VM for use with this article, you can use one of the following methods:
When you create the VM, pay attention to the virtual network settings to make sure that the VM can communicate with the managed domain:
- Deploy the VM into the same, or a peered, virtual network in which you have enabled Microsoft Entra Domain Services.
- Deploy the VM into a different subnet than your Microsoft Entra Domain Services managed domain.
Once the VM is deployed, follow the steps to connect to the VM using SSH.
Configure the hosts file
To make sure that the VM host name is correctly configured for the managed domain, edit the /etc/hosts file and set the hostname:
sudo vi /etc/hosts
In the hosts file, update the localhost address. In the following example:
- aaddscontoso.com is the DNS domain name of your managed domain.
- linux-q2gr is the hostname of your SLE VM that you're joining to the managed domain.
Update these names with your own values:
127.0.0.1 linux-q2gr linux-q2gr.aaddscontoso.com
When done, save and exit the hosts file using the :wq command of the editor.
Join VM to the managed domain using SSSD
To join the managed domain using SSSD and the User Logon Management module of YaST, complete the following steps:
Install the User Logon Management YaST module:
sudo zypper install yast2-auth-clientOpen YaST.
To successfully use DNS autodiscovery later, configure the managed domain IP addresses (the Active Directory server) as the name server for your client.
In YaST, select System > Network Settings.
Select the Hostname/DNS tab, then enter the IP address(es) of the managed domain into the text box Name Server 1. These IP addresses are shown on the Properties window in the Microsoft Entra admin center for your managed domain, such as 10.0.2.4 and 10.0.2.5.
Add your own managed domain IP addresses, then select OK.
From the YaST main window, choose Network Services > User Logon Management.
The module opens with an overview showing different network properties of your computer and the authentication method currently in use, as shown in the following example screenshot:
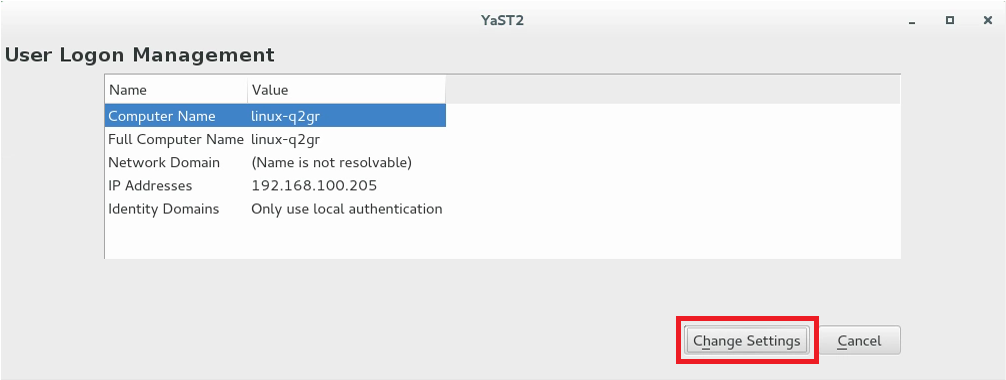
To start editing, select Change Settings.
To join the VM to the managed domain, complete the following steps:
In the dialog box, select Add Domain.
Specify the correct Domain name, such as aaddscontoso.com, then specify the services to use for identity data and authentication. Select Microsoft Active Directory for both.
Make sure the option for Enable the domain is selected.
When ready, select OK.
Accept the default settings in the following dialog, then select OK.
The VM installs additional software as needed, then checks to see if the managed domain is available.
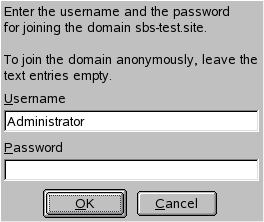
If everything is correct, the following example dialog is shown to indicate the VM has discovered the managed domain but that you're Not yet enrolled.
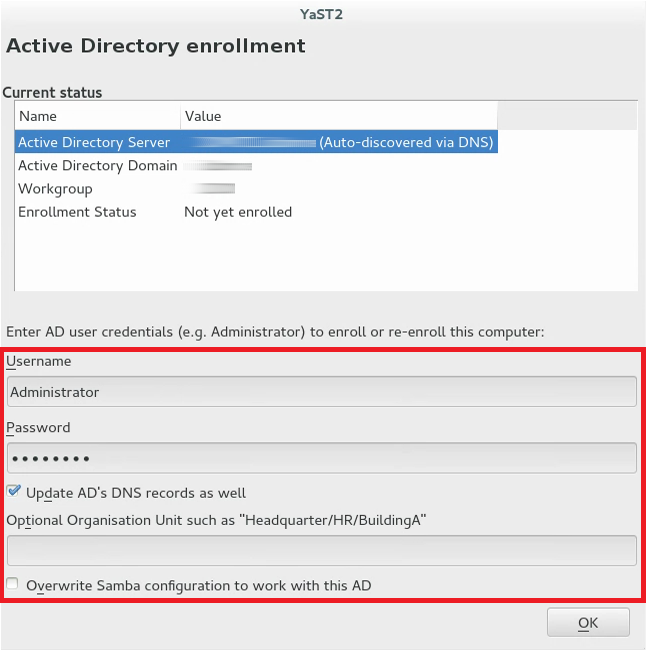
In the dialog, specify the Username and Password of a user that's a part of the managed domain. If needed, add a user account to a group in Microsoft Entra ID.
To make sure that the current domain is enabled for Samba, activate Overwrite Samba configuration to work with this AD.
To enroll, select OK.
A message is shown to confirm that you are successfully enrolled. To finish, select OK.
After the VM is enrolled in the managed domain, configure the client using Manage Domain User Logon, as shown in the following example screenshot:
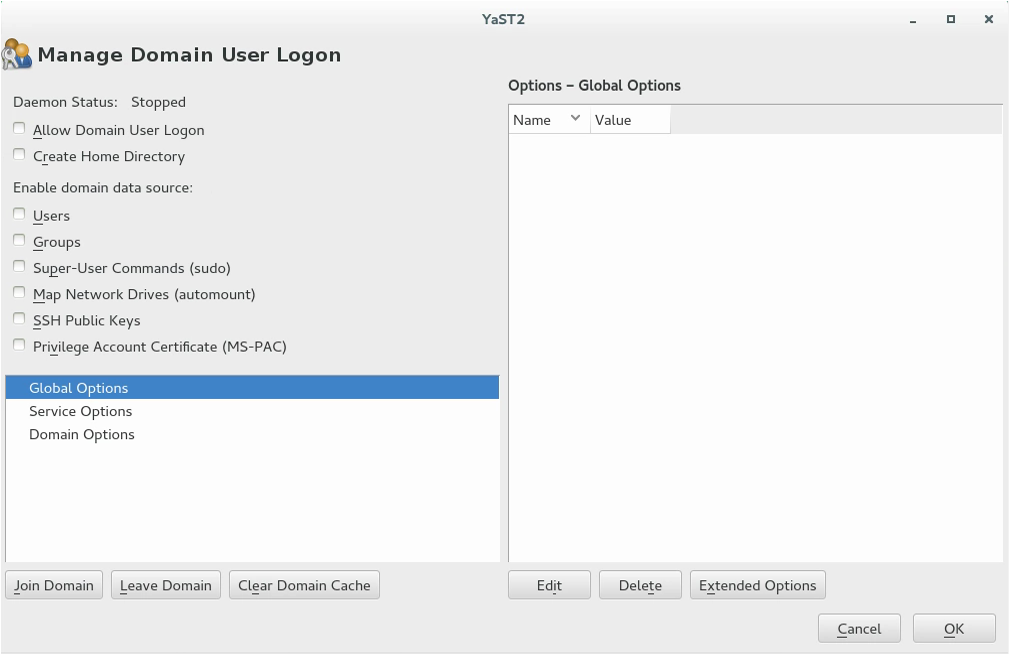
To allow sign-ins using data provided by the managed domain, check the box for Allow Domain User Logon.
Optionally, under Enable domain data source, check additional data sources as needed for your environment. These options include which users are allowed to use sudo or which network drives are available.
To allow users in the managed domain to have home directories on the VM, check the box for Create Home Directories.
From the side bar, select Service Options › Name switch, then Extended Options. From that window, select either fallback_homedir or override_homedir, then select Add.
Specify a value for the home directory location. To have home directories follow the format of /home/USER_NAME, use /home/%u. For more information about possible variables, see the sssd.conf man page (
man 5 sssd.conf), section override_homedir.Select OK.
To save the changes, select OK. Then make sure that the values displayed now are correct. To leave the dialog, select Cancel.
If you intend to run SSSD and Winbind simultaneously (such as when joining via SSSD, but then running a Samba file server), the Samba option kerberos method should be set to secrets and keytab in smb.conf. The SSSD option ad_update_samba_machine_account_password should also be set to true in sssd.conf. These options prevent the system keytab from going out of sync.
Join VM to the managed domain using Winbind
To join the managed domain using winbind and the Windows Domain Membership module of YaST, complete the following steps:
In YaST, select Network Services > Windows Domain Membership.
Enter the domain to join at Domain or Workgroup in the Windows Domain Membership screen. Enter the managed domain name, such as aaddscontoso.com.
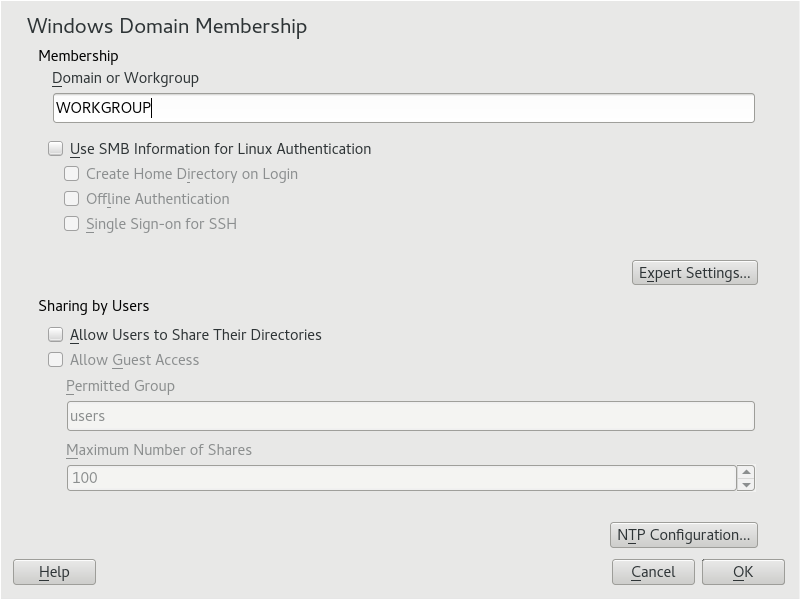
To use the SMB source for Linux authentication, check the option for Use SMB Information for Linux Authentication.
To automatically create a local home directory for managed domain users on the VM, check the option for Create Home Directory on Login.
Check the option for Offline Authentication to allow your domain users to sign in even if the managed domain is temporarily unavailable.
If you want to change the UID and GID ranges for the Samba users and groups, select Expert Settings.
Configure Network Time Protocol (NTP) time synchronization for your managed domain by selecting NTP Configuration. Enter the IP addresses of the managed domain. These IP addresses are shown on the Properties window in the Microsoft Entra admin center for your managed domain, such as 10.0.2.4 and 10.0.2.5.
Select OK and confirm the domain join when prompted for it.
Provide the password for an administrator in the managed domain and select OK.
After you have joined the managed domain, you can sign in to it from your workstation using the display manager of your desktop or the console.
Join VM to the managed domain using Winbind from the YaST command line interface
To join the managed domain using winbind and the YaST command line interface:
Join the domain:
sudo yast samba-client joindomain domain=aaddscontoso.com user=<admin> password=<admin password> machine=<(optional) machine account>
Join VM to the managed domain using Winbind from the terminal
To join the managed domain using winbind and the samba net command:
Install kerberos client and samba-winbind:
sudo zypper in krb5-client samba-winbindEdit the configuration files:
/etc/samba/smb.conf
[global]
    workgroup = AADDSCONTOSO
    usershare allow guests = NO #disallow guests from sharing
    idmap config * : backend = tdb
    idmap config * : range = 1000000-1999999
    idmap config AADDSCONTOSO : backend = rid
    idmap config AADDSCONTOSO : range = 5000000-5999999
    kerberos method = secrets and keytab
    realm = AADDSCONTOSO.COM
    security = ADS
    template homedir = /home/%D/%U
    template shell = /bin/bash
    winbind offline logon = yes
    winbind refresh tickets = yes
/etc/krb5.conf
[libdefaults]
    default_realm = AADDSCONTOSO.COM
    clockskew = 300
[realms]
    AADDSCONTOSO.COM = {
        kdc = PDC.AADDSCONTOSO.COM
        default_domain = AADDSCONTOSO.COM
        admin_server = PDC.AADDSCONTOSO.COM
    }
[domain_realm]
    .aaddscontoso.com = AADDSCONTOSO.COM
[appdefaults]
    pam = {
        ticket_lifetime = 1d
        renew_lifetime = 1d
        forwardable = true
        proxiable = false
        minimum_uid = 1
    }
/etc/security/pam_winbind.conf
[global]
    cached_login = yes
    krb5_auth = yes
    krb5_ccache_type = FILE
    warn_pwd_expire = 14
/etc/nsswitch.conf
passwd: compat winbind
group: compat winbind
Check that the date and time in Microsoft Entra ID and Linux are in sync. You can do this by adding the Microsoft Entra server to the NTP service:
Add the following line to
/etc/ntp.conf:server aaddscontoso.comRestart the NTP service:
sudo systemctl restart ntpd
Join the domain:
sudo net ads join -U Administrator%MypasswordEnable winbind as a login source in the Linux Pluggable Authentication Modules (PAM):
config pam-config --add --winbindEnable automatic creation of home directories so that users can log in:
sudo pam-config -a --mkhomedirStart and enable the winbind service:
sudo systemctl enable winbind
sudo systemctl start winbind
Allow password authentication for SSH
By default, users can only sign in to a VM using SSH public key-based authentication. Password-based authentication fails. When you join the VM to a managed domain, those domain accounts need to use password-based authentication. Update the SSH configuration to allow password-based authentication as follows.
Open the sshd_conf file with an editor:
sudo vi /etc/ssh/sshd_configUpdate the line for PasswordAuthentication to yes:
PasswordAuthentication yesWhen done, save and exit the sshd_conf file using the
:wqcommand of the editor.To apply the changes and let users sign in using a password, restart the SSH service:
sudo systemctl restart sshd
Grant the 'AAD DC Administrators' group sudo privileges
To grant members of the AAD DC Administrators group administrative privileges on the SLE VM, add an entry to the /etc/sudoers. Once added, members of the AAD DC Administrators group can use the sudo command on the SLE VM.
Open the sudoers file for editing:
sudo visudoAdd the following entry to the end of /etc/sudoers file. The AAD DC Administrators group contains whitespace in the name, so include the backslash escape character in the group name. Add your own domain name, such as aaddscontoso.com:
# Add 'AAD DC Administrators' group members as admins.
%AAD\ DC\ Administrators@aaddscontoso.com ALL=(ALL) NOPASSWD:ALL
When done, save and exit the editor using the
:wqcommand of the editor.
Sign in to the VM using a domain account
To verify that the VM has been successfully joined to the managed domain, start a new SSH connection using a domain user account. Confirm that a home directory has been created, and that group membership from the domain is applied.
Create a new SSH connection from your console. Use a domain account that belongs to the managed domain using the
ssh -lcommand, such ascontosoadmin@aaddscontoso.comand then enter the address of your VM, such as linux-q2gr.aaddscontoso.com. If you use the Azure Cloud Shell, use the public IP address of the VM rather than the internal DNS name.sudo ssh -l contosoadmin@AADDSCONTOSO.com linux-q2gr.aaddscontoso.comWhen you've successfully connected to the VM, verify that the home directory was initialized correctly:
sudo pwdYou should be in the /home directory with your own directory that matches the user account.
Now check that the group memberships are being resolved correctly:
sudo idYou should see your group memberships from the managed domain.
If you signed in to the VM as a member of the AAD DC Administrators group, check that you can correctly use the
sudocommand:sudo zypper update
Next steps
If you have problems connecting the VM to the managed domain or signing in with a domain account, see Troubleshooting domain join issues.
Palaute
Tulossa pian: Vuoden 2024 aikana poistamme asteittain GitHub Issuesin käytöstä sisällön palautemekanismina ja korvaamme sen uudella palautejärjestelmällä. Lisätietoja on täällä: https://aka.ms/ContentUserFeedback.
Lähetä ja näytä palaute kohteelle