Set up attorney-client privilege detection in eDiscovery (Premium)
A major and costly aspect of the review phase of any eDiscovery process is reviewing documents for privileged content. Microsoft Purview eDiscovery (Premium) provides machine learning-based detection of privileged content to make this process more efficient. This feature is called attorney-client privilege detection.
Tip
If you're not an E5 customer, use the 90-day Microsoft Purview solutions trial to explore how additional Purview capabilities can help your organization manage data security and compliance needs. Start now at the Microsoft Purview compliance portal trials hub. Learn details about signing up and trial terms.
How does it work?
When attorney-client privilege detection is enabled, all documents in a review set will be processed by the attorney-client privilege detection model when you analyze the data in the review set. The model looks for two things:
- Privileged content: The model uses machine learning to determine the likelihood that the document contains content that is legal in nature.
- Participants: As part of setting up attorney-client privilege detection, you have to submit a list of attorneys for your organization. The model then compares the participants of the document with the attorney list to determine if a document has at least one attorney participant.
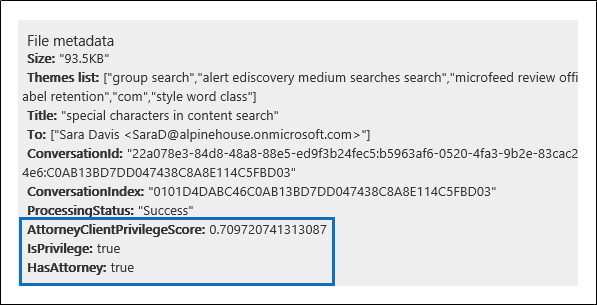
The model produces the following three properties for every document:
- AttorneyClientPrivilegeScore: The likelihood the document is legal in nature; the values for the score are between 0 and 1.
- HasAttorney: This property is set to true if one of the document participants is listed in the attorney list; otherwise the value is false. The value is also set to false if your organization didn't upload an attorney list.
- IsPrivilege: This property is set to true if the value for AttorneyClientPrivilegeScore is above the threshold or if the document has an attorney participant; otherwise the value is set to false.
These properties (and their corresponding values) are added to the file metadata of the documents in a review set, as shown in the following screenshot:
These three properties are also searchable within a review set. For more information, see Query the data in a review set.
Set up the attorney-client privilege detection model
To enable the attorney-client privilege detection model, your organization has to turn it on and then upload an attorney list.
Step 1: Turn on attorney-client privilege detection
A person who is an eDiscovery Administrator in your organization (a member of the eDiscovery Administrator subgroup in the eDiscovery Manager role group) must make the model available in your eDiscovery (Premium) cases.
In the Microsoft Purview compliance portal, go to eDiscovery (Premium), and then select eDiscovery (Premium) settings.

On the Settings page, select the Analytics tab, and then switch the Attorney-client privilege detection toggle to on.

Select Save to save the change.
Step 2: Upload a list of attorneys (optional)
To take full advantage of the attorney-client privilege detection model and use the results of the Has Attorney or Potentially Privileged detection that was previously described, we recommend that you upload a list of email addresses for the lawyers and legal personnel who work for your organization.
To upload an attorney list for use by the attorney-client privilege detection model:
Create a .csv file (without a header row) and add the email address for each appropriate person on a separate line. Save this file to your local computer.
On the eDiscovery (Premium) Settings page, select the Analytics tab.
The Attorney-client privilege page is displayed, and the Attorney-client privilege detection toggle is turned on.

Select Choose file and then find and select the .csv file that you created in step 1.
Select Save to upload the attorney list.
Use the attorney-client privilege detection model
Follow the steps in this section to use attorney-client privilege detection for documents in a review set.
Step 1: Create a smart tag group with attorney-client privilege detection model
One of the primary ways to see the results of attorney-client privilege detection in your review process is by using a smart tag group. A smart tag group indicates the results of the attorney-client privilege detection and shows the results in-line next to the tags in a smart tag group. This lets you quickly identify potentially privileged documents during document review. Additionally, you can also use the tags in the smart tag group to tag documents as privileged or non-privileged. For more information about smart tags, see Set up smart tags in eDiscovery (Premium).
In the review set that contains the documents that you analyzed in Step 1, select Manage review set and then select Manage tags.
Under Tags, select the pull-down next to Add group and then select Add smart tag group.
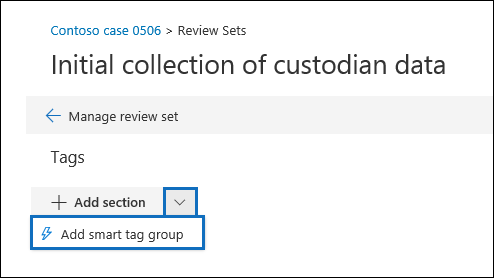
On the Choose a model for your smart tag page, choose Select next to Attorney-client privilege.
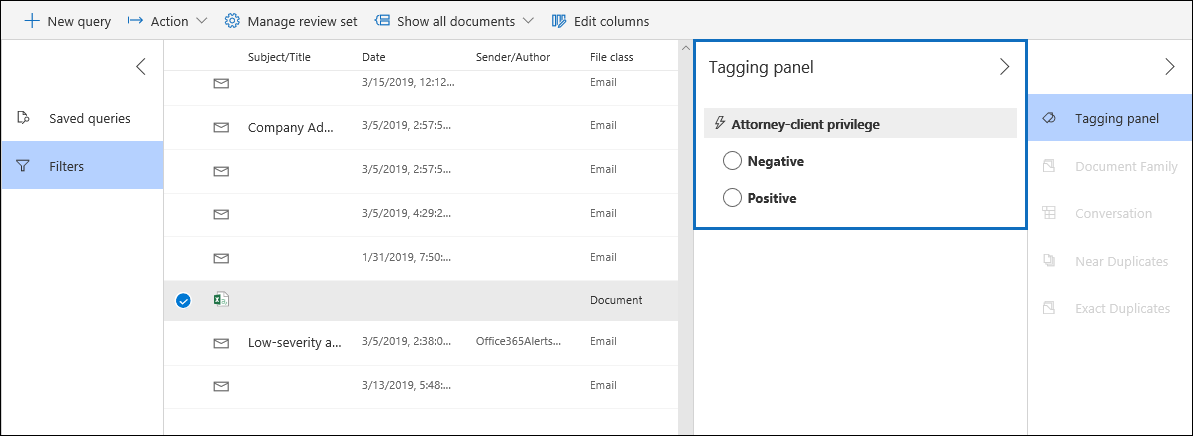
A tag group named Attorney-client privilege is displayed. It contains two child tags named Positive and Negative, which correspond to the possible results produced by the model.
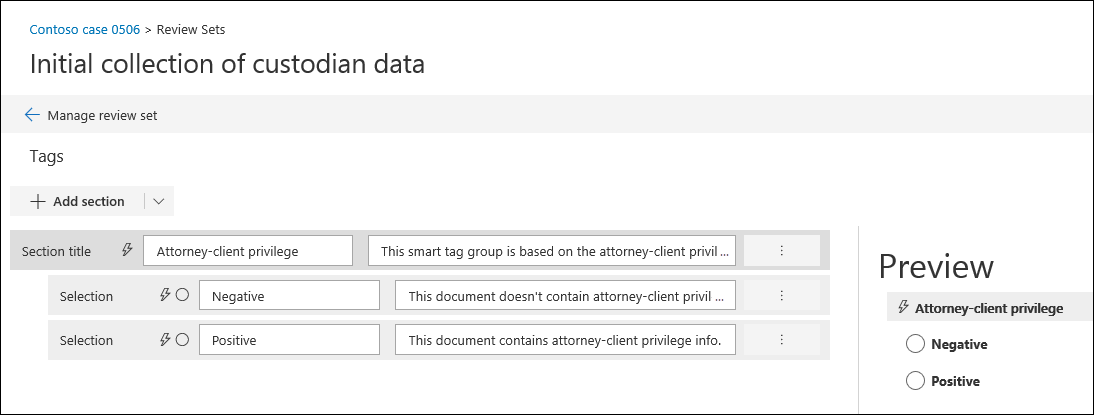
Rename the tag group and tags as appropriate for your review. For example, you can rename Positive to Privileged and Negative to Not privileged.
Step 2: Analyze a review set
When you analyze the documents in a review set, the attorney-client privilege detection model will also run and the corresponding properties (described in How does it work?) will be added to every document in the review set. For more information about analyzing data in review set, see Analyze data in a review set in eDiscovery (Premium).
Step 3: Use the smart tag group for review of privileged content
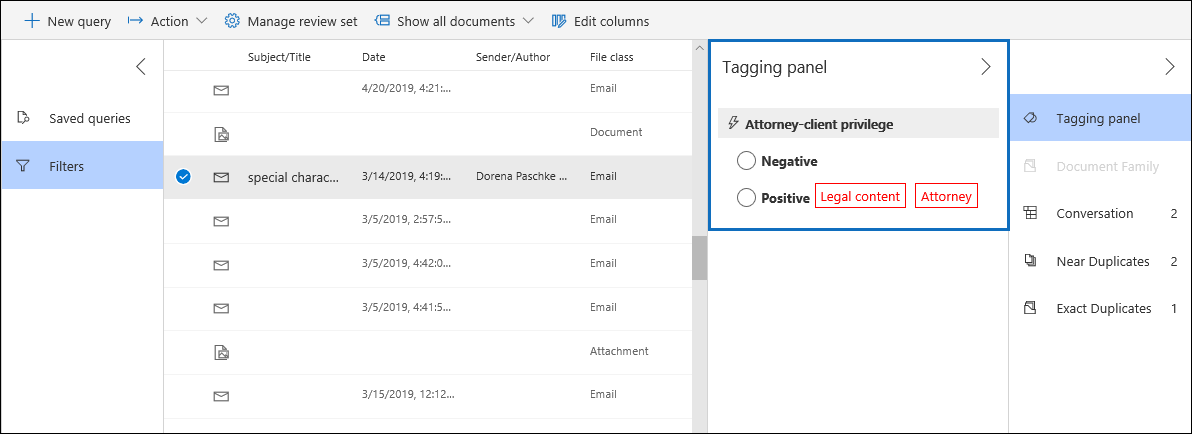
After analyzing the review set and setting up smart tags, the next step is to review the documents. If the model has determined the document is potentially privileged, the corresponding smart tag in the Tagging panel will indicate the following results produced by the attorney-client privilege detection:
- If the document has content that may be legal in nature, the label Legal content is displayed next to the corresponding smart tag (which in this case is the default Positive tag).
- If the document has a participant who is found in your organization's attorney list, the label Attorney is displayed next to the corresponding smart tag (which in this case is also the default Positive tag).
- If the document has content that may be legal in nature and has a participant found in the attorney list, both the Legal content and Attorney labels are displayed.
If the model determines that a document doesn't contain content that is legal in nature or doesn't contain a participant from the attorney list, then neither label is displayed in the tagging panel.
For example, the following screenshots show two documents. The first one contains content that is legal in nature and has a participant found in the list of attorneys. The second contains neither and therefore doesn't display any labels.
After you review a document to see if it contains privileged content, you can tag the document with the appropriate tag.
Palaute
Tulossa pian: Vuoden 2024 aikana poistamme asteittain GitHub Issuesin käytöstä sisällön palautemekanismina ja korvaamme sen uudella palautejärjestelmällä. Lisätietoja on täällä: https://aka.ms/ContentUserFeedback.
Lähetä ja näytä palaute kohteelle