Network protection for macOS
Applies to:
- Microsoft Microsoft Defender XDR for Endpoint Plan 1
- Microsoft Microsoft Defender XDR for Endpoint Plan 2
- Microsoft Defender XDR
Overview
Microsoft Network protection helps reduce the attack surface of your devices from Internet-based events. It prevents employees from using any application to access dangerous domains that might host:
- phishing scams
- exploits
- other malicious content on the Internet
Network protection expands the scope of Microsoft Defender XDR SmartScreen to block all outbound HTTP(s) traffic that attempts to connect to low-reputation sources. The blocks on outbound HTTP(s) traffic are based on the domain or hostname.
Availability
Network Protection for macOS is now available for all Microsoft Defender for Endpoint onboarded macOS devices that meet the minimum requirements. All of your currently configured Network Protection and Web Threat Protection policies are enforced on macOS devices where Network Protection is configured for block mode.
To roll out Network Protection for macOS, we recommend the following actions:
- Create a device group for a small set of devices that you can use to test Network Protection.
- Evaluate the impact of Web Threat Protection, Custom Indicators of Compromise, Web Content Filtering, and Microsoft Defender for Cloud Apps enforcement policies that target those macOS devices where Network Protection is in Block mode.
- Deploy an audit or block mode policy to this device group and verify there are no issues or broken workstreams.
- Gradually deploy Network Protection to a larger set of devices until rolled out.
Current capabilities
- Custom Indicators of Compromise on Domains and IPs.
- Web Content Filtering support:
- Block website categories scoped to device groups through policies created in the Microsoft Defender portal.
- Policies are applied to browsers, including Chromium Microsoft Edge for macOS.
- Advanced Hunting - Network Events are reflected in the Machine Timeline, and queryable in Advanced Hunting to aid security investigations.
- Microsoft Defender for Cloud Apps:
- Shadow IT discovery - Identify which apps are being used in your organization.
- Block applications - Block entire applications (such as Slack and Facebook) from being used in your organization.
- Corporate VPN in tandem or side-by-side with Network Protection:
- Currently, no VPN conflicts are identified.
- If you do experience conflicts, you can provide feedback through the feedback channel listed at the bottom of this page.
Known issues
- Block/Warn UX isn't customizable and might require other look and feel changes. (Customer feedback is being collected to drive further design improvements)
- There's a known application incompatibility issue with VMware's "Per-App Tunnel" feature. (This incompatibility might result in an inability to block traffic that goes through the "Per-App Tunnel.")
- There's a known application incompatibility issue with Blue Coat Proxy. (This incompatibility might result in network layer crashes in unrelated applications when both Blue Coat Proxy and Network Protection are enabled.)
Important notes
- We don't recommend controlling network protection from System Preferences by using the Disconnect button. Instead, use the mdatp command-line tool or JAMF / Intune to control network protection for macOS.
- To evaluate effectiveness of macOS web threat protection, we recommend trying it in browsers other than Microsoft Edge for macOS (for example, Safari). Microsoft Edge for macOS has built-in web threat protection that is enabled regardless of whether the Mac network protection feature you're evaluating, is turned on or not.
Note
Microsoft Edge for macOS does not currently support web content filtering, custom indicators, or other enterprise features. However, network protection will provide this protection to Microsoft Edge for macOS if network protection is enabled.
Prerequisites
- Licensing: Microsoft Defender XDR for Endpoint Plan 1 or Microsoft Defender XDR for Endpoint Plan 2 (can be trial)
- Onboarded Machines:
- Minimum macOS version: 11
- Product version 101.94.13 or later
Deployment instructions
Microsoft Defender XDR for Endpoint
Install the most recent product version through Microsoft AutoUpdate. To open Microsoft AutoUpdate, run the following command from the Terminal:
open /Library/Application\ Support/Microsoft/MAU2.0/Microsoft\ AutoUpdate.app
Configure the product with your organization information using the instructions in our public documentation.
Network protection is disabled by default, but it can be configured to run in one of the following modes (also called enforcement levels):
- Audit: useful to make sure it doesn't affect line-of-business apps, or get an idea of how often blocks occur
- Block: network protection prevents connection to malicious websites
- Disabled: all components associated with network protection are disabled
You can deploy this feature in one of the following ways: manually, through JAMF, or through Intune. The following sections describe each of these methods in detail.
Manual deployment
To configure the enforcement level, run the following command from the Terminal:
mdatp config network-protection enforcement-level --value [enforcement-level]
For example, to configure network protection to run in blocking mode, execute the following command:
mdatp config network-protection enforcement-level --value block
To confirm that network protection has been started successfully, run the following command from the Terminal, and verify that it prints "started":
mdatp health --field network_protection_status
JAMF deployment
A successful JAMF deployment requires a configuration profile to set the enforcement level of network protection. After you create this configuration profile, assign it to the devices where you want to enable network protection.
Configure the enforcement level
Note: If you've already configured Microsoft Defender XDR for Endpoint on Mac using the instructions listed here, then update the plist file you previously deployed with the content listed below and redeploy it from JAMF.
- In Computers > Configuration Profiles, select Options > Applications & Custom Settings
- Select Upload File (PLIST file)
- Set preference domain to com.microsoft.wdav
- Upload the following plist file
<?xml version="1.0" encoding="UTF-8"?>
<!DOCTYPE plist PUBLIC "-//Apple//DTD PLIST 1.0//EN" "http://www.apple.com/DTDs/PropertyList-1.0.dtd">
<plist version="1.0">
<dict>
    <key>networkProtection</key>
    <dict>
        <key>enforcementLevel</key>
        <string>block</string>
    </dict>
</dict>
</plist>
Intune deployment
A successful Intune deployment requires a configuration profile to set the enforcement level of network protection. After you create this configuration profile, assign it to the devices where you want to enable network protection.
Configure the enforcement level using Intune
Note
If you've already configured Microsoft Defender for Endpoint on Mac using the previous instructions (with an XML file), then remove the previous Custom configuration policy and replace it with the instructions below.
- Open Manage > Device configuration. Select Manage > Profiles > Create Profile.
- Change Platform to macOS and Profile type to Settings catalog. Select Create.
- Specify a name for the profile.
- On the Configuration settings screen, select Add settings. Select Microsoft Defender > Network protection, and tick the Enforcement level checkbox.
- Set the enforcement level to block. Select Next
- Open the configuration profile and upload the com.microsoft.wdav.xml file. (This file was created in step 3.)
- Select OK
- Select Manage > Assignments. In the Include tab, select the devices for which you want to enable network protection.
Mobileconfig deployment
To deploy the configuration via a .mobileconfig file, which can be used with non-Microsoft MDM solutions or distributed to devices directly:
Save the following payload as com.microsoft.wdav.xml.mobileconfig
<?xml version="1.0" encoding="utf-8"?>
<!DOCTYPE plist PUBLIC "-//Apple//DTD PLIST 1.0//EN" "http://www.apple.com/DTDs/PropertyList-1.0.dtd">
<plist version="1">
    <dict>
        <key>PayloadUUID</key>
        <string>C4E6A782-0C8D-44AB-A025-EB893987A295</string>
        <key>PayloadType</key>
        <string>Configuration</string>
        <key>PayloadOrganization</key>
        <string>Microsoft</string>
        <key>PayloadIdentifier</key>
        <string>com.microsoft.wdav</string>
        <key>PayloadDisplayName</key>
        <string>Microsoft Defender ATP settings</string>
        <key>PayloadDescription</key>
        <string>Microsoft Defender ATP configuration settings</string>
        <key>PayloadVersion</key>
        <integer>1</integer>
        <key>PayloadEnabled</key>
        <true/>
        <key>PayloadRemovalDisallowed</key>
        <true/>
        <key>PayloadScope</key>
        <string>System</string>
        <key>PayloadContent</key>
        <array>
            <dict>
                <key>PayloadUUID</key>
                <string>99DBC2BC-3B3A-46A2-A413-C8F9BB9A7295</string>
                <key>PayloadType</key>
                <string>com.microsoft.wdav</string>
                <key>PayloadOrganization</key>
                <string>Microsoft</string>
                <key>PayloadIdentifier</key>
                <string>com.microsoft.wdav</string>
                <key>PayloadDisplayName</key>
                <string>Microsoft Defender ATP configuration settings</string>
                <key>PayloadDescription</key>
                <string/>
                <key>PayloadVersion</key>
                <integer>1</integer>
                <key>PayloadEnabled</key>
                <true/>
                <key>networkProtection</key>
                <dict>
                    <key>enforcementLevel</key>
                    <string>block</string>
                </dict>
            </dict>
        </array>
    </dict>
</plist>
Verify that the above file was copied correctly. From the Terminal, run the following command and verify that it outputs OK:
plutil -lint com.microsoft.wdav.xml
How to explore the features
Learn how to Protect your organization against web threats using web threat protection.
- Web threat protection is part of web protection in Microsoft Defender for Endpoint. It uses network protection to secure your devices against web threats.
Run through the Custom Indicators of Compromise flow to get blocks on the Custom Indicator type.
Explore Web content filtering.
Note
If you are removing a policy or changing device groups at the same time, this might cause a delay in policy deployment. Pro tip: You can deploy a policy without selecting any category on a device group. This action will create an audit only policy, to help you understand user behavior before creating a block policy.
Device group creation is supported in Defender for Endpoint Plan 1 and Plan 2.
Integrate Microsoft Defender for Endpoint with Defender for Cloud Apps and your network protection-enabled macOS devices have endpoint policy enforcement capabilities.
Note
Discovery and other features are currently not supported on these platforms.
Scenarios
The following scenarios are supported.
Web threat protection
Web threat protection is part of web protection in Microsoft Defender XDR for Endpoint. It uses network protection to secure your devices against web threats. By integrating with Microsoft Edge for macOS and popular non-Microsoft browsers, such as Chrome and Firefox, web threat protection stops web threats without a web proxy. Web threat protection can protect devices while they're on premises or away. Web threat protection stops access to the following types of sites:
- phishing sites
- malware vectors
- exploit sites
- untrusted or low-reputation sites
- sites that are blocked in your custom indicator list

For more information, see Protect your organization against web threat
Custom Indicators of Compromise
Indicator of compromise (IoCs) matching is an essential feature in every endpoint protection solution. This capability gives SecOps the ability to set a list of indicators for detection and for blocking (prevention and response).
Create indicators that define the detection, prevention, and exclusion of entities. You can define the action to be taken as well as the duration for when to apply the action and the scope of the device group to apply it to.
Currently supported sources are the cloud detection engine of Defender for Endpoint, the automated investigation and remediation engine, and the endpoint prevention engine (Microsoft Defender Antivirus).

For more information, see: Create indicators for IPs and URLs/domains.
Web content filtering
Web content filtering is part of the Web protection capabilities in Microsoft Defender for Endpoint and Microsoft Defender for Business. Web content filtering enables your organization to track and regulate access to websites based on their content categories. Many of these websites (even if they're not malicious) might be problematic because of compliance regulations, bandwidth usage, or other concerns.
Configure policies across your device groups to block certain categories. Blocking a category prevents users within specified device groups from accessing URLs associated with the category. For any category that's not blocked, the URLs are automatically audited. Your users can access the URLs without disruption, and you gather access statistics to help create a more custom policy decision. Your users see a block notification if an element on the page they're viewing is making calls to a blocked resource.
Web content filtering is available on the major web browsers, with blocks performed by Network Protection (Safari, Chrome, Firefox, Brave, and Opera). For more information about browser support, see Prerequisites.

For more information about reporting, see Web content filtering.
Microsoft Defender for Cloud Apps
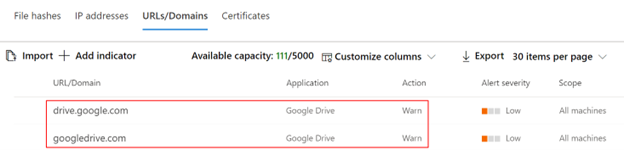
The Microsoft Defender for Cloud Apps / Cloud App Catalog identifies apps you would want end users to be warned upon accessing with Microsoft Defender XDR for Endpoint, and mark them as Monitored. The domains listed under monitored apps would be later synced to Microsoft Defender XDR for Endpoint:

Within 10-15 minutes, these domains are listed in Microsoft Defender XDR under Indicators > URLs/Domains with Action=Warn. Within the enforcement SLA (see details at the end of this article), end users are getting warn messages when attempting to access these domains:
When the end user is attempting to access monitored domains, they're warned by Defender for Endpoint.
The user gets a plain block experience accompanied by the following toast message, which is displayed by the operating system including the name of the blocked application (e.g Blogger.com)

If the end user encounters a block, the user has two possible resolutions:
User bypass
- For toast message experience: Press the Unblock button. By reloading the webpage, the user is able to proceed and use the cloud app. (This action is applicable for the next 24 hours, after which the user has to unblock once again)
User education
- For toast message experience: Press the toast message itself. End user is redirected to a custom redirect URL set globally in Microsoft Defender for Cloud Apps (More information at the bottom of this page)
Note
Tracking bypasses per app** – You can track how many users have bypassed the warning in the Application page in Microsoft Defender for Cloud Apps.

Appendix
End user education center SharePoint site template
For many organizations, it's important to take the cloud controls provided by Microsoft Defender for Cloud Apps, and to not only set limitations on end users when needed, but to also educate and coach them about:
- the specific incident
- why it has happened
- what is the thinking behind this decision
- how encountering block sites can be mitigated
Upon facing an unexpected behavior, users' confusion might be reduced by providing them as much information as possible, not only to explain about what has happened but to also educate them to be more aware the next time they choose a cloud app to complete their job. For example, this information can include:
- Organization security and compliance policies and guidelines for internet and cloud use
- Approved/recommended cloud apps for use
- Restricted/blocked cloud apps for use
For this page, we recommend that your organization uses a basic SharePoint site.
Important things to know
- It can take up to two hours (typically less) for app domains to propagate and to be update in the endpoint devices, after it's marked as Monitored.
- By default, action is taken for all apps and domains that were marked as Monitored in Microsoft Defender for Cloud Apps portal for all the onboarded endpoints in the organization.
- Full URLs are currently not supported and won't be sent from Microsoft Defender for Cloud Apps to Microsoft Defender XDR for Endpoint, if any full URLs are listed under Microsoft Defender for Cloud Apps monitored apps, hence, user won't get warned on access attempt (for example, google.com/drive isn't supported, while drive.google.com is supported).
No End-user notification on third party browsers? Check your toast message settings.
See also
- Microsoft Defender XDR for Endpoint on Mac
- Microsoft Defender XDR for Endpoint integration with Microsoft Microsoft Defender XDR for Cloud Apps
- Get to know the innovative features in Microsoft Edge
- Protect your network
- Turn on network protection
- Web protection
- Create indicators
- Web content filtering
Tip
Do you want to learn more? Engage with the Microsoft Security community in our Tech Community: Microsoft Defender for Endpoint Tech Community.
Palaute
Tulossa pian: Vuoden 2024 aikana poistamme asteittain GitHub Issuesin käytöstä sisällön palautemekanismina ja korvaamme sen uudella palautejärjestelmällä. Lisätietoja on täällä: https://aka.ms/ContentUserFeedback.
Lähetä ja näytä palaute kohteelle