Clustering de données de point dans le kit Android SDK
Lors de la visualisation de nombreux points de données sur la carte, les points peuvent se chevaucher. Le chevauchement peut rendre la carte illisible et difficile à utiliser. Le clustering de point de données est le processus permettant de combiner des données de point proches les unes des autres et de les représenter sur une carte en tant qu’un point de données en cluster unique. Lorsque l’utilisateur effectue un zoom avant sur la carte, les clusters se décomposent pour afficher les points de données individuels qui les composent. Quand vous travaillez avec un grand nombre de points de données, utilisez les processus de clustering pour améliorer l’expérience de vos utilisateurs.
Remarque
Mise hors service d’Android SDK Azure Maps
Le kit de développement logiciel (SDK) natif Azure Maps pour Android est désormais déconseillé et va être mis hors service le 31 mars 2025. Pour éviter toute interruption de service, nous vous recommandons de migrer vers le kit de développement logiciel (SDK) web Azure Maps avant le 31 mars 2025. Pour plus d’informations, consultez le Guide de migration Android SDK Azure Maps.
Prérequis
Veillez à suivre la procédure du document Démarrage rapide : Création d’une application Android. Les blocs de code de cet article peuvent être insérés dans le gestionnaire d’événements onReady des cartes.
Activer le clustering sur une source de données
Activez le clustering dans la classe DataSource en définissant l’option cluster sur true. Définissez la valeur clusterRadius pour sélectionner des points à proximité et les combiner dans un cluster. La valeur de clusterRadius est exprimée en pixels. Utilisez clusterMaxZoom pour spécifier un niveau de zoom auquel désactiver la logique de clustering. Voici un exemple montrant comment activer le clustering dans une source de données.
//Create a data source and enable clustering.
DataSource source = new DataSource(
    //Tell the data source to cluster point data.
    cluster(true),

    //The radius in pixels to cluster points together.
    clusterRadius(45),

    //The maximum zoom level in which clustering occurs.
    //If you zoom in more than this, all points are rendered as symbols.
    clusterMaxZoom(15)
);
 //Create a data source and enable clustering.
val source = DataSource(
    //Tell the data source to cluster point data.
    cluster(true),

    //The radius in pixels to cluster points together.
    clusterRadius(45),

    //The maximum zoom level in which clustering occurs.
    //If you zoom in more than this, all points are rendered as symbols.
    clusterMaxZoom(15)
)
Attention
Le clustering fonctionne uniquement avec les fonctionnalités Point. Si votre source de données contient des fonctionnalités d’autres types de géométrie, tels que LineString ou Polygon, une erreur se produit.
Conseil
Si deux points de données sont proches l’un de l’autre sur le sol, il est possible que le cluster ne se décompose jamais, quelle que soit l’importance du zoom avant effectué par l’utilisateur. Pour résoudre ce problème, vous pouvez définir l’option clusterMaxZoom de façon à désactiver la logique de clustering et à simplement afficher tous les éléments.
La classe DataSource fournit également les méthodes relatives au clustering suivantes.
| Méthode | Type de retour | Description |
|---|---|---|
getClusterChildren(Feature clusterFeature) |
FeatureCollection |
Récupère les enfants du cluster donné sur le niveau de zoom suivant. Ces enfants peuvent être une combinaison de formes et sous-clusters. Les sous-clusters deviennent des fonctionnalités dont les propriétés correspondent à ClusteredProperties. |
getClusterExpansionZoom(Feature clusterFeature) |
int |
Calcule un niveau de zoom à partir duquel le cluster commence à se développer ou à se décomposer. |
getClusterLeaves(Feature clusterFeature, long limit, long offset) |
FeatureCollection |
Récupère tous les points dans un cluster. Définissez le paramètre limit de manière à renvoyer un sous-ensemble des points et utilisez offset pour parcourir les points. |
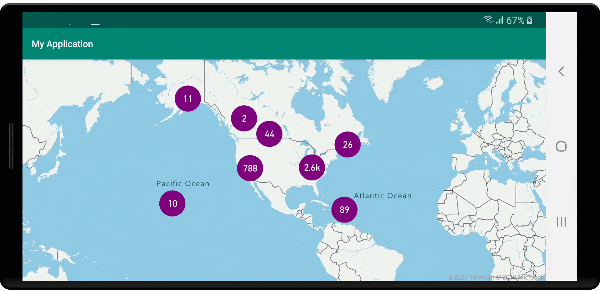
Afficher les clusters à l’aide d’une couche de bulles
Un calque de bulles est un bon moyen de rendre des points de données regroupés en cluster. Utilisez des expressions pour mettre à l’échelle le rayon et changer la couleur en fonction du nombre de points du cluster. Si vous affichez des clusters sous la forme d’un calque de bulles, vous devez également utiliser un calque distinct pour rendre les points de données non regroupés dans le cluster.
Pour afficher la taille du cluster en haut de la bulle, utilisez un calque de symboles avec du texte, et n’utilisez pas une icône.
Le code suivant affiche des points en cluster à l’aide d’un calque de bulles et le nombre de points dans chaque cluster à l’aide d’un calque de symboles. Un deuxième calque de symboles est utilisé pour afficher des points individuels qui ne se trouvent pas dans un cluster.
//Create a data source and add it to the map.
DataSource source = new DataSource(
    //Tell the data source to cluster point data.
    cluster(true),

    //The radius in pixels to cluster points together.
    clusterRadius(45),

    //The maximum zoom level in which clustering occurs.
    //If you zoom in more than this, all points are rendered as symbols.
    clusterMaxZoom(15)
);

//Import the geojson data and add it to the data source.
map.importDataFromUrl("https://earthquake.usgs.gov/earthquakes/feed/v1.0/summary/all_week.geojson");

//Add data source to the map.
map.sources.add(source);

//Create a bubble layer for rendering clustered data points.
map.layers.add(new BubbleLayer(source,
    //Scale the size of the clustered bubble based on the number of points in the cluster.
    bubbleRadius(
        step(
            get("point_count"),
            20,             //Default of 20 pixel radius.
            stop(100, 30),  //If point_count >= 100, radius is 30 pixels.
            stop(750, 40)   //If point_count >= 750, radius is 40 pixels.
        )
    ),

    //Change the color of the cluster based on the value on the point_cluster property of the cluster.
    bubbleColor(
        step(
            toNumber(get("point_count")),
            color(Color.GREEN),              //Default to lime green.
            stop(100, color(Color.YELLOW)),  //If the point_count >= 100, color is yellow.
            stop(750, color(Color.RED))      //If the point_count >= 100, color is red.
        )
    ),

    bubbleStrokeWidth(0f),

    //Only rendered data points which have a point_count property, which clusters do.
    BubbleLayerOptions.filter(has("point_count"))
));

//Create a symbol layer to render the count of locations in a cluster.
map.layers.add(new SymbolLayer(source,
    iconImage("none"),                //Hide the icon image.
    textField(get("point_count")),    //Display the point count as text.
    textOffset(new Float[]{ 0f, 0.4f }),

    //Allow clustered points in this layer.
    SymbolLayerOptions.filter(has("point_count"))
));

//Create a layer to render the individual locations.
map.layers.add(new SymbolLayer(source,
    //Filter out clustered points from this layer.
    SymbolLayerOptions.filter(not(has("point_count")))
));
//Create a data source and add it to the map.
val source = DataSource(
    //Tell the data source to cluster point data.
    cluster(true),

    //The radius in pixels to cluster points together.
    clusterRadius(45),

    //The maximum zoom level in which clustering occurs.
    //If you zoom in more than this, all points are rendered as symbols.
    clusterMaxZoom(15)
)

//Import the geojson data and add it to the data source.
map.importDataFromUrl("https://earthquake.usgs.gov/earthquakes/feed/v1.0/summary/all_week.geojson")

//Add data source to the map.
map.sources.add(source)

//Create a bubble layer for rendering clustered data points.
map.layers.add(
    BubbleLayer(
        source,

        //Scale the size of the clustered bubble based on the number of points in the cluster.
        bubbleRadius(
            step(
                get("point_count"),
                20,  //Default of 20 pixel radius.
                stop(100, 30),  //If point_count >= 100, radius is 30 pixels.
                stop(750, 40) //If point_count >= 750, radius is 40 pixels.
            )
        ),

        //Change the color of the cluster based on the value on the point_cluster property of the cluster.
        bubbleColor(
            step(
                toNumber(get("point_count")),
                color(Color.GREEN),  //Default to lime green.
                stop(100, color(Color.YELLOW)),  //If the point_count >= 100, color is yellow.
                stop(750, color(Color.RED)) //If the point_count >= 100, color is red.
            )
        ),
        bubbleStrokeWidth(0f),

        //Only rendered data points which have a point_count property, which clusters do.
        BubbleLayerOptions.filter(has("point_count"))
    )
)

//Create a symbol layer to render the count of locations in a cluster.
map.layers.add(
    SymbolLayer(
        source,
        iconImage("none"),  //Hide the icon image.
        textField(get("point_count")),  //Display the point count as text.
        textOffset(arrayOf(0f, 0.4f)),

        //Allow clustered points in this layer.
        SymbolLayerOptions.filter(has("point_count"))
    )
)

//Create a layer to render the individual locations.
map.layers.add(
    SymbolLayer(
        source,

        //Filter out clustered points from this layer.
        SymbolLayerOptions.filter(not(has("point_count")))
    )
)
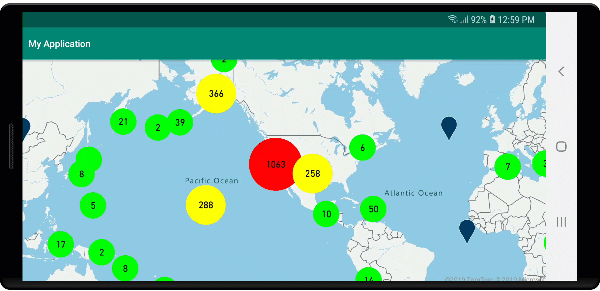
L’illustration suivante montre le code ci-dessus qui affiche les fonctionnalités de point en cluster dans un calque de bulles, mises à l’échelle et colorées en fonction du nombre de points du cluster. Les points non mis en cluster sont affichés à l’aide d’un calque de symboles.
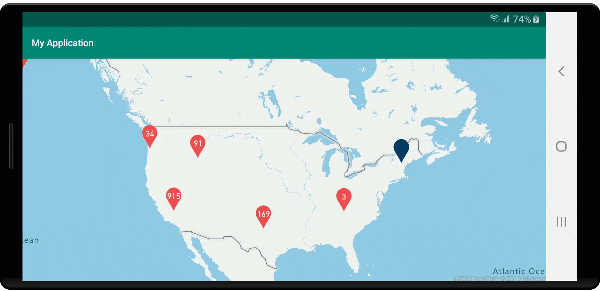
Afficher les clusters à l’aide d’une couche de symboles
Lors de la visualisation des points de données, le calque de symboles masque automatiquement les symboles qui se chevauchent pour garantir une interface utilisateur plus propre. Ce comportement par défaut peut être indésirable si vous voulez montrer la densité des points de données sur la carte. Ces paramètres peuvent cependant être modifiés. Pour afficher tous les symboles, définissez l’option iconAllowOverlap du calque de symboles sur true.
Utilisez le clustering pour montrer la densité des points de données tout en conservant une interface utilisateur propre. L’exemple suivant montre comment ajouter des symboles personnalisés, et comment représenter des clusters et des points de données individuels en utilisant le calque de symboles.
//Load all the custom image icons into the map resources.
map.images.add("earthquake_icon", R.drawable.earthquake_icon);
map.images.add("warning_triangle_icon", R.drawable.warning_triangle_icon);

//Create a data source and add it to the map.
DataSource source = new DataSource(
    //Tell the data source to cluster point data.
    cluster(true)
);

//Import the geojson data and add it to the data source.
map.importDataFromUrl("https://earthquake.usgs.gov/earthquakes/feed/v1.0/summary/all_week.geojson");

//Add data source to the map.
map.sources.add(source);

//Create a symbol layer to render the clusters.
map.layers.add(new SymbolLayer(source,
    iconImage("warning_triangle_icon"),
    textField(get("point_count")),
    textOffset(new Float[]{ 0f, -0.4f }),

    //Allow clustered points in this layer.
    filter(has("point_count"))
));

//Create a layer to render the individual locations.
map.layers.add(new SymbolLayer(source,
    iconImage("earthquake_icon"),

    //Filter out clustered points from this layer.
    filter(not(has("point_count")))
));
//Load all the custom image icons into the map resources.
map.images.add("earthquake_icon", R.drawable.earthquake_icon)
map.images.add("warning_triangle_icon", R.drawable.warning_triangle_icon)

//Create a data source and add it to the map.
val source = DataSource(
    //Tell the data source to cluster point data.
    cluster(true)
)

//Import the geojson data and add it to the data source.
map.importDataFromUrl("https://earthquake.usgs.gov/earthquakes/feed/v1.0/summary/all_week.geojson")

//Add data source to the map.
map.sources.add(source)

//Create a symbol layer to render the clusters.
map.layers.add(
    SymbolLayer(
        source,
        iconImage("warning_triangle_icon"),
        textField(get("point_count")),
        textOffset(arrayOf(0f, -0.4f)),

        //Allow clustered points in this layer.
        filter(has("point_count"))
    )
)

//Create a layer to render the individual locations.
map.layers.add(
    SymbolLayer(
        source,
        iconImage("earthquake_icon"),

        //Filter out clustered points from this layer.
        filter(not(has("point_count")))
    )
)
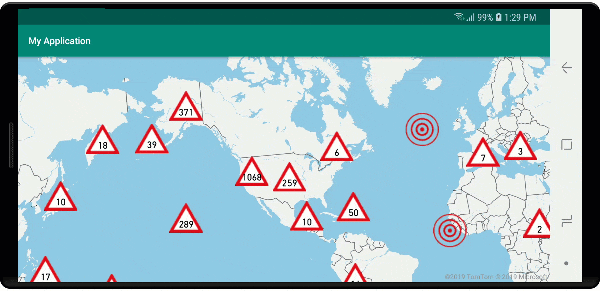
Pour cet exemple, l’image suivante a été chargée dans le dossier drawable de l’application.
| earthquake_icon.png | warning_triangle_icon.png |
L’illustration suivante montre le code ci-dessus qui restitue les fonctionnalités de point en cluster et non-cluster à l’aide d’icônes personnalisées.
Clustering et couche de cartes thermiques
Les cartes thermiques sont un excellent moyen pour afficher la densité des données sur la carte. Cette méthode de visualisation peut gérer par elle-même un grand nombre de points de données. Si les points de données sont en cluster et que la taille du cluster est utilisée comme pondération de la carte thermique, la carte thermique peut traiter encore plus de données. Pour cela, définissez l’option heatmapWeight du calque de la carte thermique sur get("point_count"). Quand le rayon du cluster est faible, la carte thermique ressemble fortement à une carte thermique utilisant des points de données qui ne sont pas mis en cluster, tout en étant beaucoup plus performante. Cependant, un rayon du cluster plus petit aboutit à une carte thermique plus précise, mais avec moins de bénéfices en termes de performances.
//Create a data source and add it to the map.
DataSource source = new DataSource(
    //Tell the data source to cluster point data.
    cluster(true),

    //The radius in pixels to cluster points together.
    clusterRadius(10)
);

//Import the geojson data and add it to the data source.
map.importDataFromUrl("https://earthquake.usgs.gov/earthquakes/feed/v1.0/summary/all_week.geojson");

//Add data source to the map.
map.sources.add(source);

//Create a heat map and add it to the map.
map.layers.add(new HeatMapLayer(source,
    //Set the weight to the point_count property of the data points.
    heatmapWeight(get("point_count")),

    //Optionally adjust the radius of each heat point.
    heatmapRadius(20f)
), "labels");
//Create a data source and add it to the map.
val source = DataSource(
    //Tell the data source to cluster point data.
    cluster(true),

    //The radius in pixels to cluster points together.
    clusterRadius(10)
)

//Import the geojson data and add it to the data source.
map.importDataFromUrl("https://earthquake.usgs.gov/earthquakes/feed/v1.0/summary/all_week.geojson")

//Add data source to the map.
map.sources.add(source)

//Create a heat map and add it to the map.
map.layers.add(
    HeatMapLayer(
        source,

        //Set the weight to the point_count property of the data points.
        heatmapWeight(get("point_count")),

        //Optionally adjust the radius of each heat point.
        heatmapRadius(20f)
    ), "labels"
)
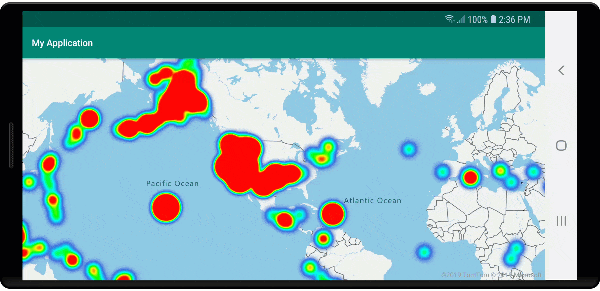
L’illustration suivante montre le code ci-dessus affichant une carte thermique optimisée à l’aide des fonctionnalités de points en cluster et du nombre de clusters en tant que poids dans la carte thermique.
Événements de souris sur des points de données en cluster
Quand des événements de souris se produisent sur un calque contenant des points de données en cluster, le point de données en cluster derniers est retourné à l’événement en tant qu’objet de fonctionnalité de point GeoJSON. Cette fonctionnalité de point possède les propriétés suivantes :
| Nom de la propriété | Type | Description |
|---|---|---|
cluster |
boolean | Indique si la fonctionnalité représente un cluster. |
point_count |
nombre | Le nombre de points que contient le cluster. |
point_count |
nombre | Le nombre de points que contient le cluster. |
point_count_abbreviated |
string | Une chaîne qui abrège la valeur de point_count si elle est trop longue. (par exemple, 4 000 devient 4K) |
Cet exemple prend un calque de bulles qui affiche des points de cluster et ajoute un événement de clic. Quand l’événement de clic est déclenché, le code calcule et effectue un zoom de la carte au niveau de zoom suivant, à partir duquel le cluster se décompose. Cette fonctionnalité est implémentée avec la méthode getClusterExpansionZoom de la classe DataSource et la propriété cluster_id du point de données en cluster sur lequel l’utilisateur a cliqué.
//Create a data source and add it to the map.
DataSource source = new DataSource(
    //Tell the data source to cluster point data.
    cluster(true),

    //The radius in pixels to cluster points together.
    clusterRadius(45),

    //The maximum zoom level in which clustering occurs.
    //If you zoom in more than this, all points are rendered as symbols.
    clusterMaxZoom(15)
);

//Import the geojson data and add it to the data source.
source.importDataFromUrl("https://earthquake.usgs.gov/earthquakes/feed/v1.0/summary/all_week.geojson");

//Add data source to the map.
map.sources.add(source);

//Create a bubble layer for rendering clustered data points.
BubbleLayer clusterBubbleLayer = new BubbleLayer(source,
    //Scale the size of the clustered bubble based on the number of points in the cluster.
    bubbleRadius(
        step(
            get("point_count"),
            20f,    //Default of 20 pixel radius.
            stop(100, 30),   //If point_count >= 100, radius is 30 pixels.
            stop(750, 40)    //If point_count >= 750, radius is 40 pixels.
        )
    ),

    //Change the color of the cluster based on the value on the point_cluster property of the cluster.
    bubbleColor(
        step(
            get("point_count"),
            color(Color.GREEN),  //Default to green.
            stop(100, color(Color.YELLOW)), //If the point_count >= 100, color is yellow.
            stop(750, color(Color.RED))     //If the point_count >= 100, color is red.
        )
    ),

    bubbleStrokeWidth(0f),

    //Only rendered data points which have a point_count property, which clusters do.
    BubbleLayerOptions.filter(has("point_count"))
);

//Add the clusterBubbleLayer and two additional layers to the map.
map.layers.add(clusterBubbleLayer);

//Create a symbol layer to render the count of locations in a cluster.
map.layers.add(new SymbolLayer(source,
    //Hide the icon image.
    iconImage("none"),

    //Display the 'point_count_abbreviated' property value.
    textField(get("point_count_abbreviated")),

    //Offset the text position so that it's centered nicely.
    textOffset(new Float[] { 0f, 0.4f }),

    //Only rendered data points which have a point_count property, which clusters do.
    SymbolLayerOptions.filter(has("point_count"))
));

//Create a layer to render the individual locations.
map.layers.add(new SymbolLayer(source,
    //Filter out clustered points from this layer.
    SymbolLayerOptions.filter(not(has("point_count")))
));

//Add a click event to the cluster layer so we can zoom in when a user clicks a cluster.
map.events.add((OnFeatureClick) (features) -> {
    if(features.size() > 0) {
        //Get the clustered point from the event.
        Feature cluster = features.get(0);

        //Get the cluster expansion zoom level. This is the zoom level at which the cluster starts to break apart.
        int expansionZoom = source.getClusterExpansionZoom(cluster);

        //Update the map camera to be centered over the cluster.
        map.setCamera(
            //Center the map over the cluster points location.
            center((Point)cluster.geometry()),

            //Zoom to the clusters expansion zoom level.
            zoom(expansionZoom),

            //Animate the movement of the camera to the new position.
            animationType(AnimationType.EASE),
            animationDuration(200)
        );
    }

    //Return true indicating if event should be consumed and not passed further to other listeners registered afterwards, false otherwise.
    return true;
}, clusterBubbleLayer);
//Create a data source and add it to the map.
val source = DataSource( //Tell the data source to cluster point data.
    //The radius in pixels to cluster points together.
    cluster(true),

    //The maximum zoom level in which clustering occurs.
    clusterRadius(45),

    //If you zoom in more than this, all points are rendered as symbols.
    clusterMaxZoom(15)
)

//Import the geojson data and add it to the data source.
source.importDataFromUrl("https://earthquake.usgs.gov/earthquakes/feed/v1.0/summary/all_week.geojson")

//Add data source to the map.
map.sources.add(source)

//Create a bubble layer for rendering clustered data points.
val clusterBubbleLayer = BubbleLayer(
    source,

    //Scale the size of the clustered bubble based on the number of points in the cluster.
    bubbleRadius(
        step(
            get("point_count"),
            20f,  //Default of 20 pixel radius.
            stop(100, 30),  //If point_count >= 100, radius is 30 pixels.
            stop(750, 40) //If point_count >= 750, radius is 40 pixels.
        )
    ),

    //Change the color of the cluster based on the value on the point_cluster property of the cluster.
    bubbleColor(
        step(
            get("point_count"),
            color(Color.GREEN),  //Default to green.
            stop(
                100,
                color(Color.YELLOW)
            ),  //If the point_count >= 100, color is yellow.
            stop(750, color(Color.RED)) //If the point_count >= 100, color is red.
        )
    ),

    bubbleStrokeWidth(0f),

    //Only rendered data points which have a point_count property, which clusters do.
    BubbleLayerOptions.filter(has("point_count"))
)

//Add the clusterBubbleLayer and two additional layers to the map.
map.layers.add(clusterBubbleLayer)

//Create a symbol layer to render the count of locations in a cluster.
map.layers.add(
    SymbolLayer(
        source,

        //Hide the icon image.
        iconImage("none"),

        //Display the 'point_count_abbreviated' property value.
        textField(get("point_count_abbreviated")),

        //Offset the text position so that it's centered nicely.
        textOffset(
            arrayOf(
                0f,
                0.4f
            )
        ),

        //Only rendered data points which have a point_count property, which clusters do.
        SymbolLayerOptions.filter(has("point_count"))
    )
)

//Create a layer to render the individual locations.
map.layers.add(
    SymbolLayer(
        source,

        //Filter out clustered points from this layer.
        SymbolLayerOptions.filter(not(has("point_count")))
    )
)

//Add a click event to the cluster layer so we can zoom in when a user clicks a cluster.
map.events.add(OnFeatureClick { features: List<Feature?>? ->
    if (features.size() > 0) {
        //Get the clustered point from the event.
        val cluster: Feature = features.get(0)

        //Get the cluster expansion zoom level. This is the zoom level at which the cluster starts to break apart.
        val expansionZoom: Int = source.getClusterExpansionZoom(cluster)

        //Update the map camera to be centered over the cluster.
        map.setCamera(

            //Center the map over the cluster points location.
            center(cluster.geometry() as Point?),

            //Zoom to the clusters expansion zoom level.
            zoom(expansionZoom),

            //Animate the movement of the camera to the new position.
            animationType(AnimationType.EASE),
            animationDuration(200)
        )
    }
    true
}, clusterBubbleLayer)
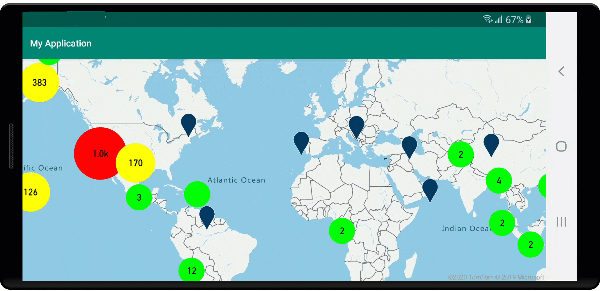
L’illustration suivante montre le code ci-dessus affichant des points en cluster sur une carte qui, lorsque vous les sélectionnez, effectue un zoom avant sur le niveau de zoom suivant et commence à décomposer et développer le cluster.
Afficher la zone du cluster
Les données de point représentées par un cluster sont réparties sur une zone. Dans cet exemple, quand la souris passe sur un cluster, deux comportements principaux se produisent. D’abord, les points de données individuels contenus dans le cluster sont utilisés pour calculer une enveloppe convexe. Ensuite, l’enveloppe convexe s’affiche sur la carte pour montrer une zone. Une enveloppe convexe est un polygone qui entoure un ensemble de points comme un élastique et qui peut être calculé à l’aide de la méthode atlas.math.getConvexHull. Tous les points contenus dans un cluster peuvent être récupérés à partir de la source de données à l’aide de la méthode getClusterLeaves.
//Create a data source and add it to the map.
DataSource source = new DataSource(
    //Tell the data source to cluster point data.
    cluster(true)
);

//Import the geojson data and add it to the data source.
source.importDataFromUrl("https://earthquake.usgs.gov/earthquakes/feed/v1.0/summary/all_week.geojson");

//Add data source to the map.
map.sources.add(source);

//Create a data source for the convex hull polygon. Since this will be updated frequently it is more efficient to separate this into its own data source.
DataSource polygonDataSource = new DataSource();

//Add data source to the map.
map.sources.add(polygonDataSource);

//Add a polygon layer and a line layer to display the convex hull.
map.layers.add(new PolygonLayer(polygonDataSource));
map.layers.add(new LineLayer(polygonDataSource));

//Create a symbol layer to render the clusters.
SymbolLayer clusterLayer = new SymbolLayer(source,
    iconImage("marker-red"),
    textField(get("point_count_abbreviated")),
    textOffset(new Float[] { 0f, -1.2f }),
    textColor(Color.WHITE),
    textSize(14f),

    //Only rendered data points which have a point_count property, which clusters do.
    SymbolLayerOptions.filter(has("point_count"))
);
map.layers.add(clusterLayer);

//Create a layer to render the individual locations.
map.layers.add(new SymbolLayer(source,
    //Filter out clustered points from this layer.
    SymbolLayerOptions.filter(not(has("point_count")))
));

//Add a click event to the layer so we can calculate the convex hull of all the points within a cluster.
map.events.add((OnFeatureClick) (features) -> {
    if(features.size() > 0) {
        //Get the clustered point from the event.
        Feature cluster = features.get(0);

        //Get all points in the cluster. Set the offset to 0 and the max long value to return all points.
        FeatureCollection leaves = source.getClusterLeaves(cluster, Long.MAX_VALUE, 0);

        //Get the point features from the feature collection.
        List<Feature> childFeatures = leaves.features();

        //When only two points in a cluster. Render a line.
        if(childFeatures.size() == 2){
            //Extract the geometry points from the child features.
            List<Point> points = new ArrayList();

            childFeatures.forEach(f -> {
                points.add((Point)f.geometry());
            });

            //Create a line from the points.
            polygonDataSource.setShapes(LineString.fromLngLats(points));
        } else {
            Polygon hullPolygon = MapMath.getConvexHull(leaves);

            //Overwrite all data in the polygon data source with the newly calculated convex hull polygon.
            polygonDataSource.setShapes(hullPolygon);
        }
    }

    //Return true indicating if event should be consumed and not passed further to other listeners registered afterwards, false otherwise.
    return true;
}, clusterLayer);
//Create a data source and add it to the map.
val source = DataSource(
    //Tell the data source to cluster point data.
    cluster(true)
)

//Import the geojson data and add it to the data source.
source.importDataFromUrl("https://earthquake.usgs.gov/earthquakes/feed/v1.0/summary/all_week.geojson")

//Add data source to the map.
map.sources.add(source)

//Create a data source for the convex hull polygon. Since this will be updated frequently it is more efficient to separate this into its own data source.
val polygonDataSource = DataSource()

//Add data source to the map.
map.sources.add(polygonDataSource)

//Add a polygon layer and a line layer to display the convex hull.
map.layers.add(PolygonLayer(polygonDataSource))
map.layers.add(LineLayer(polygonDataSource))

//Create a symbol layer to render the clusters.
val clusterLayer = SymbolLayer(
    source,
    iconImage("marker-red"),
    textField(get("point_count_abbreviated")),
    textOffset(arrayOf(0f, -1.2f)),
    textColor(Color.WHITE),
    textSize(14f),

    //Only rendered data points which have a point_count property, which clusters do.
    SymbolLayerOptions.filter(has("point_count"))
)
map.layers.add(clusterLayer)

//Create a layer to render the individual locations.
map.layers.add(
    SymbolLayer(
        source,

        //Filter out clustered points from this layer.
        SymbolLayerOptions.filter(not(has("point_count")))
    )
)

//Add a click event to the layer so we can calculate the convex hull of all the points within a cluster.
map.events.add(OnFeatureClick { features: List<Feature?>? ->
    if (features.size() > 0) {
        //Get the clustered point from the event.
        val cluster: Feature = features.get(0)

        //Get all points in the cluster. Set the offset to 0 and the max long value to return all points.
        val leaves: FeatureCollection = source.getClusterLeaves(cluster, Long.MAX_VALUE, 0)

        //Get the point features from the feature collection.
        val childFeatures = leaves.features()

        //When only two points in a cluster. Render a line.
        if (childFeatures!!.size == 2) {
            //Extract the geometry points from the child features.
            val points: MutableList<Point?> = ArrayList()
            childFeatures!!.forEach(Consumer { f: Feature ->
                points.add(
                    f.geometry() as Point?
                )
            })

            //Create a line from the points.
            polygonDataSource.setShapes(LineString.fromLngLats(points))
        } else {
            val hullPolygon: Polygon = MapMath.getConvexHull(leaves)

            //Overwrite all data in the polygon data source with the newly calculated convex hull polygon.
            polygonDataSource.setShapes(hullPolygon)
        }
    }
    true
}, clusterLayer)
L’illustration suivante montre le code ci-dessus qui affiche la zone de tous les points figurant dans le cluster qui a fait l’objet d’un clic.
Agrégation de données dans des clusters
Souvent, les clusters sont représentés à l’aide d’un symbole avec le nombre de points qui se trouvent dans le cluster. Cependant, il est parfois souhaitable de pouvoir personnaliser le style des clusters avec plus de métriques. Avec les propriétés de cluster, des propriétés personnalisées peuvent être créées et égales à un calcul basé sur les propriétés de chaque point avec un cluster. Les propriétés de cluster peuvent être définies dans l’option clusterProperties de DataSource.
Le code suivant calcule un nombre basé sur la propriété du type d’entité de chaque point de données dans un cluster. Quand un utilisateur sélectionne un cluster, une fenêtre contextuelle s’affiche avec des informations supplémentaires sur le cluster.
//An array of all entity type property names in features of the data set.
String[] entityTypes = new String[] { "Gas Station", "Grocery Store", "Restaurant", "School" };

//Create a popup and add it to the map.
Popup popup = new Popup();
map.popups.add(popup);

//Close the popup initially.
popup.close();

//Create a data source and add it to the map.
source = new DataSource(
    //Tell the data source to cluster point data.
    cluster(true),

    //The radius in pixels to cluster points together.
    clusterRadius(50),

    //Calculate counts for each entity type in a cluster as custom aggregate properties.
    clusterProperties(new ClusterProperty[]{
        new ClusterProperty("Gas Station", sum(accumulated(), get("Gas Station")), switchCase(eq(get("EntityType"), literal("Gas Station")), literal(1), literal(0))),
        new ClusterProperty("Grocery Store", sum(accumulated(), get("Grocery Store")), switchCase(eq(get("EntityType"), literal("Grocery Store")), literal(1), literal(0))),
        new ClusterProperty("Restaurant", sum(accumulated(), get("Restaurant")), switchCase(eq(get("EntityType"), literal("Restaurant")), literal(1), literal(0))),
        new ClusterProperty("School", sum(accumulated(), get("School")), switchCase(eq(get("EntityType"), literal("School")), literal(1), literal(0)))
    })
);

//Import the geojson data and add it to the data source.
source.importDataFromUrl("https://samples.azuremaps.com/data/geojson/SamplePoiDataSet.json");

//Add data source to the map.
map.sources.add(source);

//Create a bubble layer for rendering clustered data points.
BubbleLayer clusterBubbleLayer = new BubbleLayer(source,
    bubbleRadius(20f),
    bubbleColor("purple"),
    bubbleStrokeWidth(0f),

    //Only rendered data points which have a point_count property, which clusters do.
    BubbleLayerOptions.filter(has("point_count"))
);

//Add the clusterBubbleLayer and two additional layers to the map.
map.layers.add(clusterBubbleLayer);

//Create a symbol layer to render the count of locations in a cluster.
map.layers.add(new SymbolLayer(source,
    //Hide the icon image.
    iconImage("none"),

    //Display the 'point_count_abbreviated' property value.
    textField(get("point_count_abbreviated")),

    textColor(Color.WHITE),
    textOffset(new Float[] { 0f, 0.4f }),

    //Only rendered data points which have a point_count property, which clusters do.
    SymbolLayerOptions.filter(has("point_count"))
));

//Create a layer to render the individual locations.
map.layers.add(new SymbolLayer(source,
    //Filter out clustered points from this layer.
    SymbolLayerOptions.filter(not(has("point_count")))
));

//Add a click event to the cluster layer and display the aggregate details of the cluster.
map.events.add((OnFeatureClick) (features) -> {
    if(features.size() > 0) {
        //Get the clustered point from the event.
        Feature cluster = features.get(0);

        //Create a number formatter that removes decimal places.
        NumberFormat nf = DecimalFormat.getInstance();
        nf.setMaximumFractionDigits(0);

        //Create the popup's content.
        StringBuilder sb = new StringBuilder();

        sb.append("Cluster size: ");
        sb.append(nf.format(cluster.getNumberProperty("point_count")));
        sb.append(" entities\n");

        for(int i = 0; i < entityTypes.length; i++) {
            sb.append("\n");

            //Get the entity type name.
            sb.append(entityTypes[i]);
            sb.append(": ");

            //Get the aggregated entity type count from the properties of the cluster by name.
            sb.append(nf.format(cluster.getNumberProperty(entityTypes[i])));
        }

        //Retrieve the custom layout for the popup.
        View customView = LayoutInflater.from(this).inflate(R.layout.popup_text, null);

        //Access the text view within the custom view and set the text to the title property of the feature.
        TextView tv = customView.findViewById(R.id.message);
        tv.setText(sb.toString());

        //Get the position of the cluster.
        Position pos = MapMath.getPosition((Point)cluster.geometry());

        //Set the options on the popup.
        popup.setOptions(
            //Set the popups position.
            position(pos),

            //Set the anchor point of the popup content.
            anchor(AnchorType.BOTTOM),

            //Set the content of the popup.
            content(customView)
        );

        //Open the popup.
        popup.open();
    }

    //Return a boolean indicating if event should be consumed or continue bubble up.
    return true;
}, clusterBubbleLayer);
//An array of all entity type property names in features of the data set.
val entityTypes = arrayOf("Gas Station", "Grocery Store", "Restaurant", "School")

//Create a popup and add it to the map.
val popup = Popup()
map.popups.add(popup)

//Close the popup initially.
popup.close()

//Create a data source and add it to the map.
val source = DataSource(
    //Tell the data source to cluster point data.
    cluster(true),

    //The radius in pixels to cluster points together.
    clusterRadius(50),

    //Calculate counts for each entity type in a cluster as custom aggregate properties.
    clusterProperties(
        arrayOf<ClusterProperty>(
            ClusterProperty("Gas Station", sum(accumulated(), get("Gas Station")), switchCase(eq(get("EntityType"), literal("Gas Station")), literal(1), literal(0))),
            ClusterProperty("Grocery Store", sum(accumulated(), get("Grocery Store")), switchCase(eq(get("EntityType"), literal("Grocery Store")), literal(1), literal(0))),
            ClusterProperty("Restaurant", sum(accumulated(), get("Restaurant")), switchCase(eq(get("EntityType"), literal("Restaurant")), literal(1), literal(0))),
            ClusterProperty("School", sum(accumulated(), get("School")), switchCase(eq(get("EntityType"), literal("School")), literal(1), literal(0)))
        )
    )
)

//Import the geojson data and add it to the data source.
source.importDataFromUrl("https://samples.azuremaps.com/data/geojson/SamplePoiDataSet.json")

//Add data source to the map.
map.sources.add(source)

//Create a bubble layer for rendering clustered data points.
val clusterBubbleLayer = BubbleLayer(
    source,
    bubbleRadius(20f),
    bubbleColor("purple"),
    bubbleStrokeWidth(0f),

    //Only rendered data points which have a point_count property, which clusters do.
    BubbleLayerOptions.filter(has("point_count"))
)

//Add the clusterBubbleLayer and two additional layers to the map.
map.layers.add(clusterBubbleLayer)

//Create a symbol layer to render the count of locations in a cluster.
map.layers.add(
    SymbolLayer(
        source,

        //Hide the icon image.
        iconImage("none"),

        //Display the 'point_count_abbreviated' property value.
        textField(get("point_count_abbreviated")),

        textColor(Color.WHITE),
        textOffset(arrayOf(0f, 0.4f)),

        //Only rendered data points which have a point_count property, which clusters do.
        SymbolLayerOptions.filter(has("point_count"))
    )
)

//Create a layer to render the individual locations.
map.layers.add(
    SymbolLayer(
        source,

        //Filter out clustered points from this layer.
        SymbolLayerOptions.filter(not(has("point_count")))
    )
)

//Add a click event to the cluster layer and display the aggregate details of the cluster.
map.events.add(OnFeatureClick { features: List<Feature> ->
    if (features.size > 0) {
        //Get the clustered point from the event.
        val cluster = features[0]

        //Create a number formatter that removes decimal places.
        val nf: NumberFormat = DecimalFormat.getInstance()
        nf.setMaximumFractionDigits(0)

        //Create the popup's content.
        val sb = StringBuilder()

        sb.append("Cluster size: ")
        sb.append(nf.format(cluster.getNumberProperty("point_count")))
        sb.append(" entities\n")

        for (i in entityTypes.indices) {
            sb.append("\n")

            //Get the entity type name.
            sb.append(entityTypes[i])
            sb.append(": ")

            //Get the aggregated entity type count from the properties of the cluster by name.
            sb.append(nf.format(cluster.getNumberProperty(entityTypes[i])))
        }

        //Retrieve the custom layout for the popup.
        val customView: View = LayoutInflater.from(this).inflate(R.layout.popup_text, null)

        //Access the text view within the custom view and set the text to the title property of the feature.
        val tv: TextView = customView.findViewById(R.id.message)
        tv.text = sb.toString()

        //Get the position of the cluster.
        val pos: Position = MapMath.getPosition(cluster.geometry() as Point?)

        //Set the options on the popup.
        popup.setOptions(
            //Set the popups position.
            position(pos),

            //Set the anchor point of the popup content.
            anchor(AnchorType.BOTTOM),

            //Set the content of the popup.
            content(customView)
        )

        //Open the popup.
        popup.open()
    }

    //Return a boolean indicating if event should be consumed or continue bubble up.
    true
} as OnFeatureClick, clusterBubbleLayer)
La fenêtre contextuelle suit les étapes décrites dans le document Afficher une fenêtre contextuelle.
L’image suivante montre le code ci-dessus qui affiche une fenêtre contextuelle avec des nombres agrégés de chaque type de valeur d’entité pour tous les points du point de cluster qui a fait l’objet d’un clic.
Étapes suivantes
Pour ajouter des données à votre carte :