Intégration à une application cliente à l’aide du SDK Speech
Important
Les commandes personnalisées seront supprimées le 30 avril 2026. Depuis le 30 octobre 2023, vous ne pouvez pas créer de nouvelles applications Commandes personnalisées dans Speech Studio. En lien avec ce changement, LUIS sera mis hors service le 1er octobre 2025. Depuis le 1er avril 2023, vous ne pouvez pas créer de ressources LUIS.
Dans cet article, vous apprendrez à effectuer des demandes à une application Commandes personnalisées publiée à partir du Kit de développement logiciel (SDK) Speech exécuté dans une application UWP. Pour établir une connexion avec l’application Commandes personnalisées, vous devez :
- Publier une application Commandes personnalisées et obtenir un identificateur d’application (ID d’application)
- Créer une application cliente UWP à l'aide du kit de développement logiciel (SDK) Speech pour vous permettre de parler avec votre application Commandes personnalisées
Prérequis
Vous devez disposer d’une application Commandes personnalisées pour poursuivre cet article. Essayez un démarrage rapide pour créer une application de commandes personnalisées :
Vous aurez également besoin des éléments suivants :
- Visual Studio 2019 ou version ultérieure. Ce guide est basé sur Visual Studio 2019.
- Une clé et une région de ressource Speech Azure AI : créez une ressource Speech sur le portail Azure. Pour plus d’informations, consultez Créer une ressource multiservices.
- Activer votre appareil pour le développement
Étape 1 : Publier une application Commandes personnalisées
Ouvrez votre application Commandes personnalisées précédemment créée.
Accédez à Paramètres, puis sélectionnez Ressource LUIS.
Si Ressource de prédiction n’est pas affecté, sélectionnez une clé de prédiction de requête ou créez-en une.
La clé de prédiction de requêtes est toujours requise avant la publication d’une application. Pour plus d’informations sur les ressources LUIS, reportez-vous à Créer une ressource LUIS
Revenez à la modification des commandes, puis sélectionnez Publier.
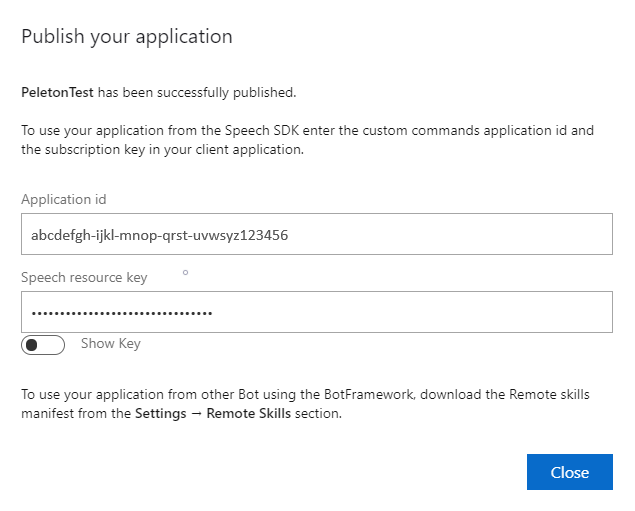
Copiez l’ID d’application depuis la notification de publication pour une utilisation ultérieure.
Copiez la clé de la ressource Speech pour une utilisation ultérieure.
Étape 2 : Créer un projet Visual Studio
Créez un projet Visual Studio pour UWP et installez le Kit de développement logiciel (SDK) Speech.
Étape 3 : Ajouter un exemple de code
Lors de cette étape, nous ajoutons le code XAML qui définit l’interface utilisateur de l’application, puis ajoutons l’implémentation du code-behind C#.
Code XAML
Créez l’interface utilisateur de l’application en ajoutant le code XAML.
Dans l’Explorateur de solutions, ouvrez
MainPage.xamlDans la vue XAML du concepteur, remplacez tout le contenu par l’extrait de code suivant :
<Page
    x:Class="helloworld.MainPage"
    xmlns="http://schemas.microsoft.com/winfx/2006/xaml/presentation"
    xmlns:x="http://schemas.microsoft.com/winfx/2006/xaml"
    xmlns:local="using:helloworld"
    xmlns:d="http://schemas.microsoft.com/expression/blend/2008"
    xmlns:mc="http://schemas.openxmlformats.org/markup-compatibility/2006"
    mc:Ignorable="d"
    Background="{ThemeResource ApplicationPageBackgroundThemeBrush}">

    <Grid>
        <StackPanel Orientation="Vertical" HorizontalAlignment="Center"
                    Margin="20,50,0,0" VerticalAlignment="Center" Width="800">
            <Button x:Name="EnableMicrophoneButton" Content="Enable Microphone"
                    Margin="0,10,10,0" Click="EnableMicrophone_ButtonClicked"
                    Height="35"/>
            <Button x:Name="ListenButton" Content="Talk"
                    Margin="0,10,10,0" Click="ListenButton_ButtonClicked"
                    Height="35"/>
            <StackPanel x:Name="StatusPanel" Orientation="Vertical"
                        RelativePanel.AlignBottomWithPanel="True"
                        RelativePanel.AlignRightWithPanel="True"
                        RelativePanel.AlignLeftWithPanel="True">
                <TextBlock x:Name="StatusLabel" Margin="0,10,10,0"
                           TextWrapping="Wrap" Text="Status:" FontSize="20"/>
                <Border x:Name="StatusBorder" Margin="0,0,0,0">
                    <ScrollViewer VerticalScrollMode="Auto"
                                  VerticalScrollBarVisibility="Auto" MaxHeight="200">
                        <!-- Use LiveSetting to enable screen readers to announce
                             the status update. -->
                        <TextBlock
                            x:Name="StatusBlock" FontWeight="Bold"
                            AutomationProperties.LiveSetting="Assertive"
                            MaxWidth="{Binding ElementName=Splitter, Path=ActualWidth}"
                            Margin="10,10,10,20" TextWrapping="Wrap"  />
                    </ScrollViewer>
                </Border>
            </StackPanel>
        </StackPanel>
        <MediaElement x:Name="mediaElement"/>
    </Grid>
</Page>
Le mode Création est mis à jour pour afficher l’interface utilisateur de l’application.
Source du code-behind C#
Ajoutez la source du code-behind pour que l’application fonctionne comme prévu. La source du code-behind inclut :
- Instructions
usingrequises pour les espaces de nomsSpeechetSpeech.Dialog. - Une implémentation simple pour permettre l’accès au microphone, couplée à un gestionnaire de bouton.
- Des assistances d’interface utilisateur de base pour présenter des messages et des erreurs dans l’application.
- Un point d’arrivée pour le chemin du code d’initialisation.
- Une assistance pour lire la synthèse vocale (sans prise en charge du streaming).
- Un gestionnaire de bouton vide pour commencer à écouter.
Ajoutez la source du code-behind en procédant comme suit :
Dans l’Explorateur de solutions, ouvrez le fichier source code-behind
MainPage.xaml.cs(regroupé sousMainPage.xaml).Remplacez le contenu du fichier par le code suivant :
using Microsoft.CognitiveServices.Speech;
using Microsoft.CognitiveServices.Speech.Audio;
using Microsoft.CognitiveServices.Speech.Dialog;
using System;
using System.IO;
using System.Text;
using Windows.UI.Xaml;
using Windows.UI.Xaml.Controls;
using Windows.UI.Xaml.Media;

namespace helloworld
{
    public sealed partial class MainPage : Page
    {
        private DialogServiceConnector connector;

        private enum NotifyType
        {
            StatusMessage,
            ErrorMessage
        };

        public MainPage()
        {
            this.InitializeComponent();
        }

        private async void EnableMicrophone_ButtonClicked(
            object sender, RoutedEventArgs e)
        {
            bool isMicAvailable = true;
            try
            {
                var mediaCapture = new Windows.Media.Capture.MediaCapture();
                var settings =
                    new Windows.Media.Capture.MediaCaptureInitializationSettings();
                settings.StreamingCaptureMode =
                    Windows.Media.Capture.StreamingCaptureMode.Audio;
                await mediaCapture.InitializeAsync(settings);
            }
            catch (Exception)
            {
                isMicAvailable = false;
            }
            if (!isMicAvailable)
            {
                await Windows.System.Launcher.LaunchUriAsync(
                    new Uri("ms-settings:privacy-microphone"));
            }
            else
            {
                NotifyUser("Microphone was enabled", NotifyType.StatusMessage);
            }
        }

        private void NotifyUser(
            string strMessage, NotifyType type = NotifyType.StatusMessage)
        {
            // If called from the UI thread, then update immediately.
            // Otherwise, schedule a task on the UI thread to perform the update.
            if (Dispatcher.HasThreadAccess)
            {
                UpdateStatus(strMessage, type);
            }
            else
            {
                var task = Dispatcher.RunAsync(
                    Windows.UI.Core.CoreDispatcherPriority.Normal,
                    () => UpdateStatus(strMessage, type));
            }
        }

        private void UpdateStatus(string strMessage, NotifyType type)
        {
            switch (type)
            {
                case NotifyType.StatusMessage:
                    StatusBorder.Background = new SolidColorBrush(
                        Windows.UI.Colors.Green);
                    break;
                case NotifyType.ErrorMessage:
                    StatusBorder.Background = new SolidColorBrush(
                        Windows.UI.Colors.Red);
                    break;
            }
            StatusBlock.Text += string.IsNullOrEmpty(StatusBlock.Text)
                ? strMessage : "\n" + strMessage;

            if (!string.IsNullOrEmpty(StatusBlock.Text))
            {
                StatusBorder.Visibility = Visibility.Visible;
                StatusPanel.Visibility = Visibility.Visible;
            }
            else
            {
                StatusBorder.Visibility = Visibility.Collapsed;
                StatusPanel.Visibility = Visibility.Collapsed;
            }
            // Raise an event if necessary to enable a screen reader
            // to announce the status update.
            var peer = Windows.UI.Xaml.Automation.Peers.FrameworkElementAutomationPeer.FromElement(StatusBlock);
            if (peer != null)
            {
                peer.RaiseAutomationEvent(
                    Windows.UI.Xaml.Automation.Peers.AutomationEvents.LiveRegionChanged);
            }
        }

        // Waits for and accumulates all audio associated with a given
        // PullAudioOutputStream and then plays it to the MediaElement. Long spoken
        // audio will create extra latency and a streaming playback solution
        // (that plays audio while it continues to be received) should be used --
        // see the samples for examples of this.
        private void SynchronouslyPlayActivityAudio(
            PullAudioOutputStream activityAudio)
        {
            var playbackStreamWithHeader = new MemoryStream();
            playbackStreamWithHeader.Write(Encoding.ASCII.GetBytes("RIFF"), 0, 4); // ChunkID
            playbackStreamWithHeader.Write(BitConverter.GetBytes(UInt32.MaxValue), 0, 4); // ChunkSize: max
            playbackStreamWithHeader.Write(Encoding.ASCII.GetBytes("WAVE"), 0, 4); // Format
            playbackStreamWithHeader.Write(Encoding.ASCII.GetBytes("fmt "), 0, 4); // Subchunk1ID
            playbackStreamWithHeader.Write(BitConverter.GetBytes(16), 0, 4); // Subchunk1Size: PCM
            playbackStreamWithHeader.Write(BitConverter.GetBytes(1), 0, 2); // AudioFormat: PCM
            playbackStreamWithHeader.Write(BitConverter.GetBytes(1), 0, 2); // NumChannels: mono
            playbackStreamWithHeader.Write(BitConverter.GetBytes(16000), 0, 4); // SampleRate: 16kHz
            playbackStreamWithHeader.Write(BitConverter.GetBytes(32000), 0, 4); // ByteRate
            playbackStreamWithHeader.Write(BitConverter.GetBytes(2), 0, 2); // BlockAlign
            playbackStreamWithHeader.Write(BitConverter.GetBytes(16), 0, 2); // BitsPerSample: 16-bit
            playbackStreamWithHeader.Write(Encoding.ASCII.GetBytes("data"), 0, 4); // Subchunk2ID
            playbackStreamWithHeader.Write(BitConverter.GetBytes(UInt32.MaxValue), 0, 4); // Subchunk2Size

            byte[] pullBuffer = new byte[2056];

            uint lastRead = 0;
            do
            {
                lastRead = activityAudio.Read(pullBuffer);
                playbackStreamWithHeader.Write(pullBuffer, 0, (int)lastRead);
            }
            while (lastRead == pullBuffer.Length);

            var task = Dispatcher.RunAsync(
                Windows.UI.Core.CoreDispatcherPriority.Normal, () =>
            {
                mediaElement.SetSource(
                    playbackStreamWithHeader.AsRandomAccessStream(), "audio/wav");
                mediaElement.Play();
            });
        }

        private void InitializeDialogServiceConnector()
        {
            // New code will go here
        }

        private async void ListenButton_ButtonClicked(
            object sender, RoutedEventArgs e)
        {
            // New code will go here
        }
    }
}
Notes
Si vous voyez l'erreur : « Le type "Object" est défini dans un assembly qui n'est pas référencé »
- Cliquez avec le bouton droit sur votre solution.
- Sélectionnez Gérer les packages NuGet de la solution, puis Mises à jour.
- Si Microsoft.NETCore.UniversalWindowsPlatform figure dans la liste des mises à jour, mettez à jour Microsoft.NETCore.UniversalWindowsPlatform vers la dernière version.
Ajoutez le code suivant au corps de la méthode de
InitializeDialogServiceConnector// This code creates the `DialogServiceConnector` with your resource information. // create a DialogServiceConfig by providing a Custom Commands application id and Speech resource key // The RecoLanguage property is optional (default en-US); note that only en-US is supported in Preview const string speechCommandsApplicationId = "YourApplicationId"; // Your application id const string speechSubscriptionKey = "YourSpeechSubscriptionKey"; // Your Speech resource key const string region = "YourServiceRegion"; // The Speech resource region. var speechCommandsConfig = CustomCommandsConfig.FromSubscription(speechCommandsApplicationId, speechSubscriptionKey, region); speechCommandsConfig.SetProperty(PropertyId.SpeechServiceConnection_RecoLanguage, "en-us"); connector = new DialogServiceConnector(speechCommandsConfig);Remplacez les chaînes
YourApplicationId,YourSpeechSubscriptionKeyetYourServiceRegionpar vos propres valeurs pour votre application, votre abonnement Speech et votre régionAjoutez l’extrait de code suivant à la fin du corps de la méthode
InitializeDialogServiceConnector// // This code sets up handlers for events relied on by `DialogServiceConnector` to communicate its activities, // speech recognition results, and other information. // // ActivityReceived is the main way your client will receive messages, audio, and events connector.ActivityReceived += (sender, activityReceivedEventArgs) => { NotifyUser( $"Activity received, hasAudio={activityReceivedEventArgs.HasAudio} activity={activityReceivedEventArgs.Activity}"); if (activityReceivedEventArgs.HasAudio) { SynchronouslyPlayActivityAudio(activityReceivedEventArgs.Audio); } }; // Canceled will be signaled when a turn is aborted or experiences an error condition connector.Canceled += (sender, canceledEventArgs) => { NotifyUser($"Canceled, reason={canceledEventArgs.Reason}"); if (canceledEventArgs.Reason == CancellationReason.Error) { NotifyUser( $"Error: code={canceledEventArgs.ErrorCode}, details={canceledEventArgs.ErrorDetails}"); } }; // Recognizing (not 'Recognized') will provide the intermediate recognized text // while an audio stream is being processed connector.Recognizing += (sender, recognitionEventArgs) => { NotifyUser($"Recognizing! in-progress text={recognitionEventArgs.Result.Text}"); }; // Recognized (not 'Recognizing') will provide the final recognized text // once audio capture is completed connector.Recognized += (sender, recognitionEventArgs) => { NotifyUser($"Final speech to text result: '{recognitionEventArgs.Result.Text}'"); }; // SessionStarted will notify when audio begins flowing to the service for a turn connector.SessionStarted += (sender, sessionEventArgs) => { NotifyUser($"Now Listening! Session started, id={sessionEventArgs.SessionId}"); }; // SessionStopped will notify when a turn is complete and // it's safe to begin listening again connector.SessionStopped += (sender, sessionEventArgs) => { NotifyUser($"Listening complete. Session ended, id={sessionEventArgs.SessionId}"); };Ajoutez l’extrait de code suivant au corps de la méthode
ListenButton_ButtonClickeddans la classeMainPage// This code sets up `DialogServiceConnector` to listen, since you already established the configuration and // registered the event handlers. if (connector == null) { InitializeDialogServiceConnector(); // Optional step to speed up first interaction: if not called, // connection happens automatically on first use var connectTask = connector.ConnectAsync(); } try { // Start sending audio await connector.ListenOnceAsync(); } catch (Exception ex) { NotifyUser($"Exception: {ex.ToString()}", NotifyType.ErrorMessage); }Dans la barre de menus, choisissez Fichier>Enregistrer tout pour enregistrer vos modifications
Faites un essai
Dans la barre de menus, choisissez Générer>Générer la solution pour générer l’application. Le code doit se compiler sans erreur.
Choisissez Déboguer>Démarrer le débogage (ou appuyez sur F5) pour démarrer l’application. La fenêtre helloworld s’affiche.
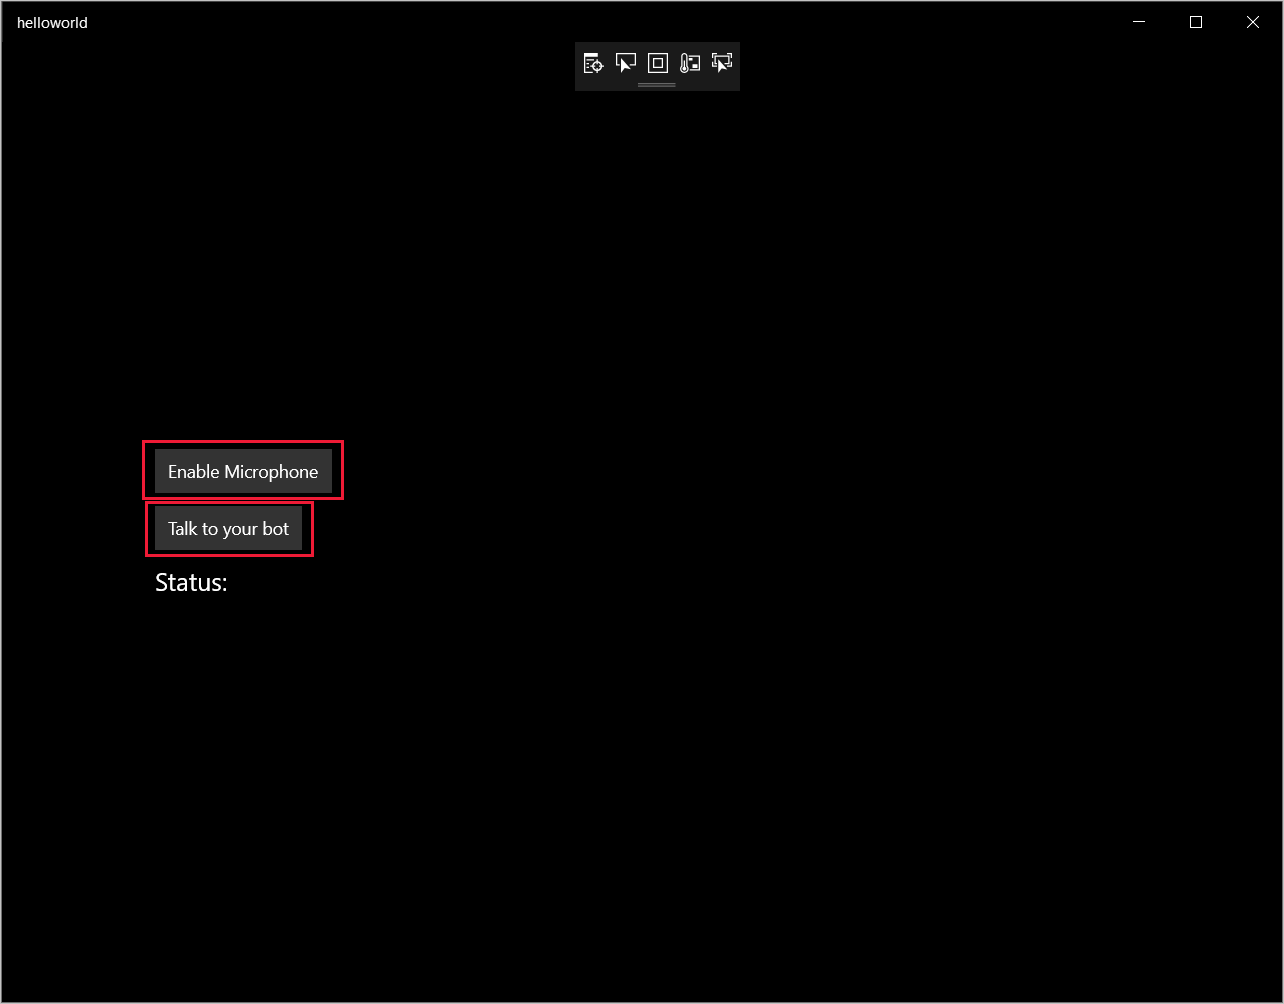
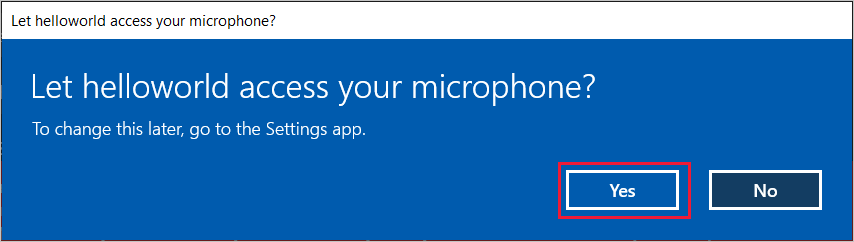
Sélectionnez Activer le microphone. Si la demande d’autorisation d’accès apparaît, sélectionnez Oui.
Sélectionnez Talk (Parler) et prononcez une phrase ou quelques mots en anglais dans le micro de votre appareil. Votre production orale est transmise au canal Direct Line Speech, et transcrite en texte qui apparaît dans la fenêtre.