Workspace Planning Azure Template for Workplace Analytics
This template is only available as part of a Microsoft service engagement.
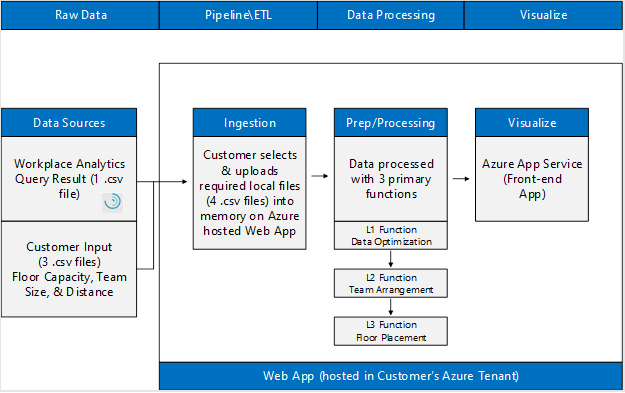
Workplace Analytics Azure Templates include the Workspace Planning template that provides a quantitative solution to optimize the seat locations of teams based on their collaboration with the teams around them. This planning can help maximize and foster physical workspace for teams and for cross-team productivity and collaboration.
The template combines Workplace Analytics data with your team size, workspace capacity, and the distances between seating areas to generate optimized floor plans.
Use cases
- Moving to a new workspace and your organization wants to know the best workspace plan for employees within a building for optimal cross-team collaboration.
- Reorganizing an existing workspace and your organization wants to generate an optimized floor plan and compare it to the current floor plan, based on current communication patterns.
How it works
This template combines Workplace Analytics data with your team size, workspace capacity, and the distances between the floors and the buildings to generate floor plans with recommended seating.
- Interaction - This is a Workplace Analytics group-to-group query that includes meeting and email activity for insight into current work and collaboration patterns.
- Space capacity - This file includes details about the maximum capacity for the workspace.
- Distance - This file includes details about the walking distances in a unit you specify, such as minutes or meters that can be estimates, between floors or buildings.
- Team size - This file includes details about the number of employees in each team in your organization.
This template combines the data in these files and generates a table that shows where to seat people in the specified floor plan.
Key features
- Seating Optimization - Generates seating assignments for teams that reduces the distance between teams who have the most collaboration with each other.
- Fixed Spaces - Allows the user to fix specific teams to particular locations and then optimize the remaining teams around them such that teams are situated nearest to teams who they have the most collaboration with.
- Interactive mode - Enables you to interactively change the floor plan results, such as the number of team members on each floor or in each office, within the application, and then it updates the results to reflect these changes.
Deploy and configure the template
- Confirm you meet the Prerequisites for deploying the template.
- Complete the steps to Deploy and configure the template.
Create an Interaction file
Confirm you are assigned the Analyst role in Workplace Analytics, which is required to create this file.
Sign in as an Analyst and open Workplace Analytics. (If that link doesn't work, try this link instead.)
Select Analyze > Query designer.
In Start custom query, select Group-to-group query.
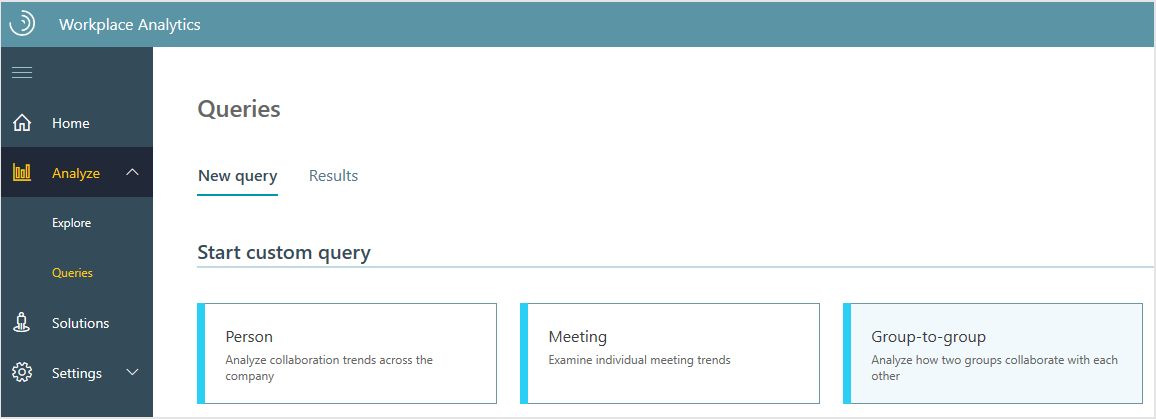
Enter or select the following to create the query.
- Name: Interaction
- Group by: Week
- Time period: 3 months (to start with)
- Meeting exclusion: Tenant Default Meeting Exclusion Rule
- Select metrics: Collaboration Hours
- Time investors
- Group the time investors by: Organization
- Limit the analysis to certain time investors: None
- Their collaborators
- Exclude collaborators: None
- Group people who collaborated with time investors: Organization
- Focus analysis on a set of collaborators: None
At the top right, select Run to create the query.
After the query is successfully created, in Query designer > Results, locate and select the Download icon for your new Interactions query, and then save the zipped file.

Locate and right-click the interaction.zip file, select Extract all, and then select Extract and specify the folder.
Confirm the new file is named (or rename it as) interaction.csv (exact file name is required).
Create a Space capacity file
Key term
Total_Capacity is the total number of individual desks and office seats that are available within a specified workspace.
Note
Only include workspaces that you want to account for or utilize.
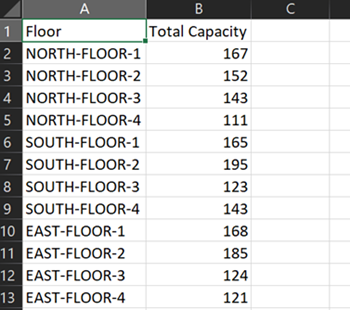
Open and save the space_capacity.csv file to local storage. The file must be named space_capacity.csv (match exactly).
In the Floor (first) column in the file, replace the example floor names with your own that match the same format of [Building name-Floor number], as shown in the following graphic.
- Use valid characters, including: a-z, A-Z, 0-9, "-" (dashes), and " " (spaces)
- Do not use invalid characters, including: "_" (underscores) and "," (commas)
In the Total Capacity column, enter the maximum capacity for each floor.
If you have office seat variables to define, continue to the next set of steps. Otherwise, save and close the file.
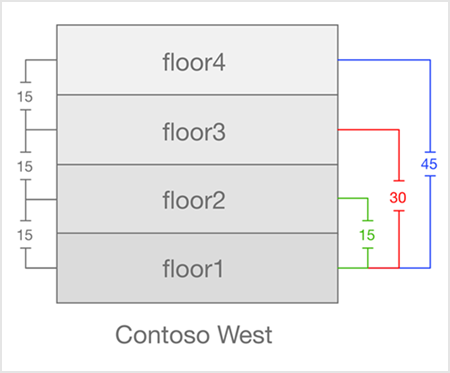
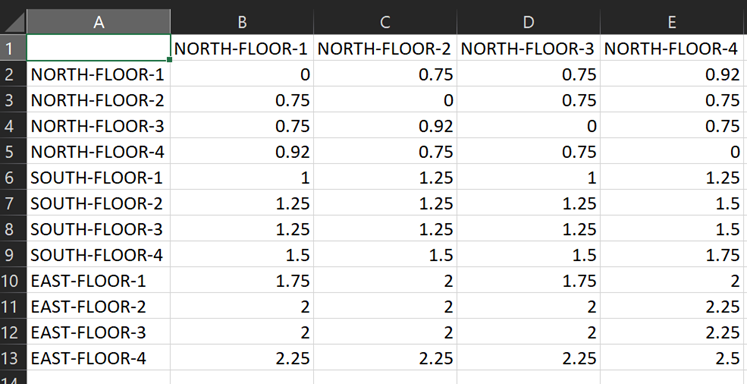
Create a Distance file
The following graphic depicts a building with four floors. The distance between each parallel floor needs to be the same consistent value. You can use the default value of 15 for parallel floors, which is a good estimate of how long it takes to get from one floor to the next in the same building.
[!Notes]
- You must define the distances between buildings, floors, or zones within a floor. You can use any single unit, such as meters, feet, seconds, or minutes, if you use it consistently. Estimates of distances are acceptable.
- For distances between floors directly above and below each other, use a default value of 15.
- Start your distance measurements by walking at a normal pace across the furthest distance of teams on a single floor. This will be used as the benchmark distance of all teams throughout the campus. Consider asking your customer support advisor for guidance on how to efficiently generate this file.
To create a Distance file
Open and save the distance.csv file to local storage.
In the first row and the first column, replace the example data with the locations you want processed with the structure that match the same format of [Building name-Floor number], similar to the data shown in the following graphic.
Starting in the second row and column, enter the distances where the corresponding locations intersect to denote the distance between the two locations.
Save and close the file.
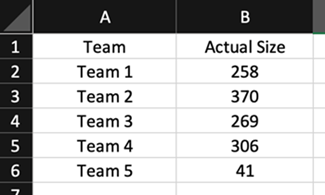
Create a Team size file
Note
Employees can only be included in one team.
Key terms
- Team is the name of the team or group that is being moved, which should match the names of the teams within the Interaction file.
- Actual Size is the total number of people that are a part of the team to account for during the move.
Open and save the team_size.csv file to local storage.
Starting in the second row, replace the example data with your own that matches the same format, similar to what's shown in the following graphic.
- Team - Enter the name or function of each team.
- Actual Size - Enter the number of employees that are in each corresponding team.
Save the file, and then continue to the next set of steps.
Generate a floor plan
Before you can generate a floor plan, you need to create a Project folder. This enables you to group related floor plans and any edited versions of a floor plan as a single project. For example, when planning workspace for a multi-building campus, you’ll want multiple floor plans grouped together in one project folder.
To add a new project:
- In the Workspace Planning Azure Template, select Create Project at the top right.
- Enter a project name, and then select Create Project again.
- Proceed to the next set of steps to create a new floor plan.
To generate a floor plan:
In the Workspace Planning Azure Template, select the applicable project (created in the previous steps) for this new floor plan.
Select Create Floor Plan.
Enter a unique floor plan name.
In Upload data files, select Browse files, and then select the .csv data files created in the previous steps, including interaction, space_capacity, distance, and team_size.
Confirm the Status for each file shows as Accepted, and then select Submit.
After the floor plan shows a green check mark for the Status, select it, or any edited floor plans generated from the original, and then select Generated Floor Plan to open it.
Confirm or change how teams are assigned to workspaces, such as:
- Select Clear Floor Plan to replace all values with zero in this plan.
- Select the Clear (eraser) icon for any column or row to clear all the values for it.
- Select the Eye icon to hide or unhide a full workspace or a team that’s fully assigned in the floor plan view.
Select Save Floor Plan.
Name the plan, and then select Save Floor Plan again.
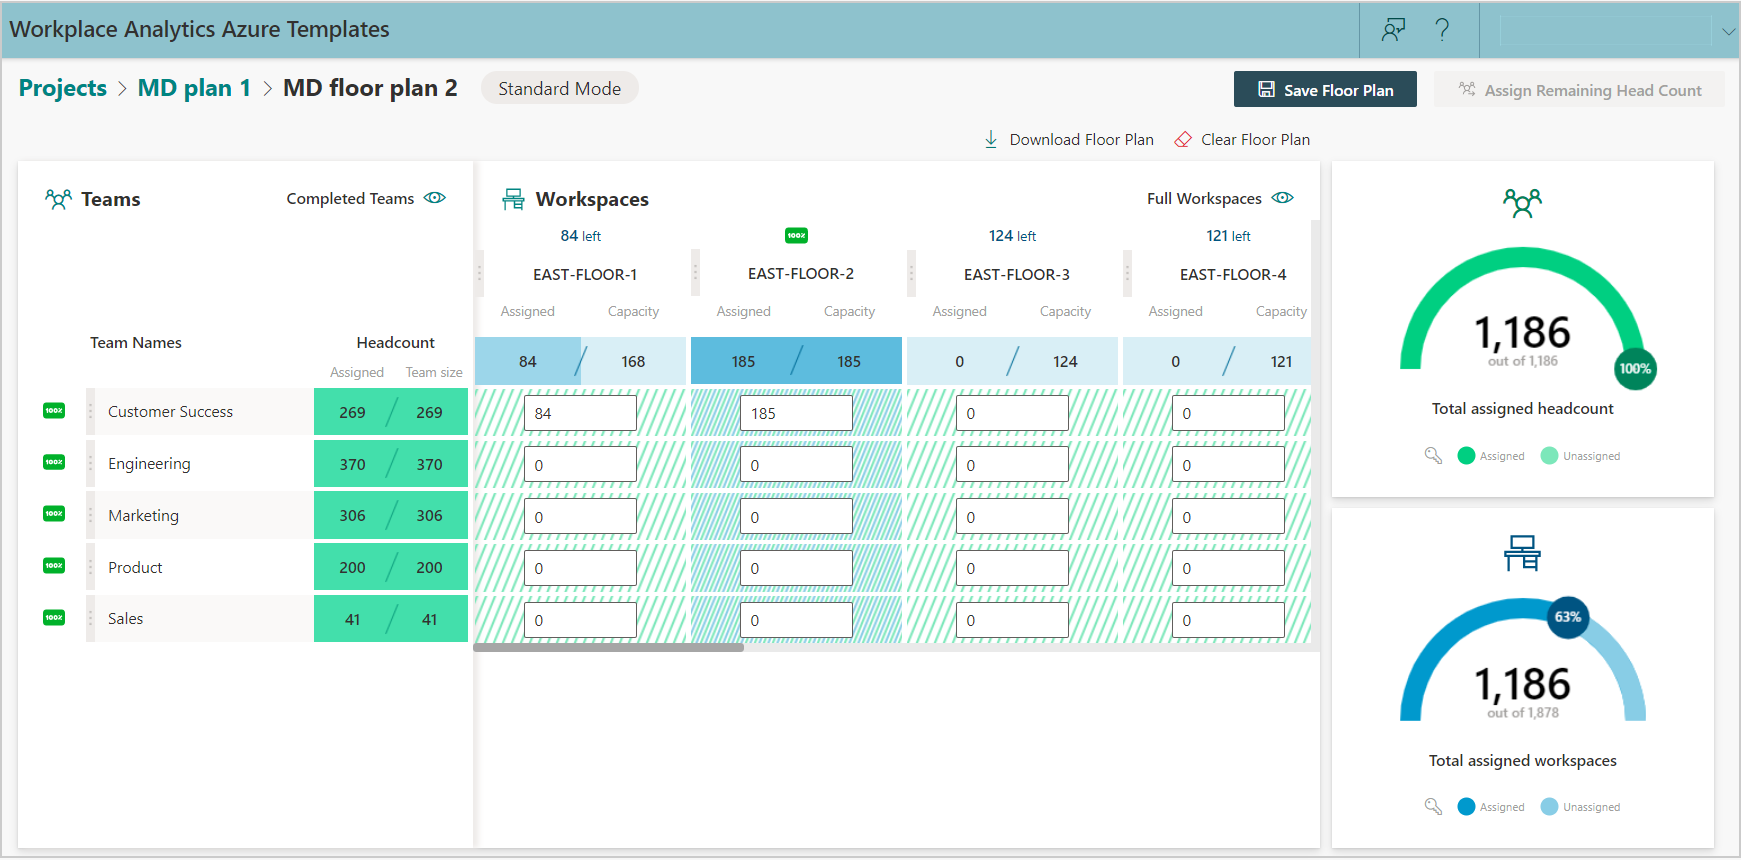
Capacity color key
The workspace capacity bar shows the total capacity and the exact number of unassigned or over-assigned seats for each workspace name. As you assign or unassign seats for a workspace, the capacity bar will change colors as follows:
- Light blue reflects a workspace with available capacity.
- Dark blue reflects a workspace that is at capacity.
- Red reflects a workspace that is over capacity.
Also, a green 100% icon and a blue striped or blue and green striped background show for a column when a workspace is at capacity, depending on the team head count.
Team size color key
Similar to the workspace capacity bar, each team has a head count bar next to the team’s name that shows the team size and number of team members who are assigned or over assigned to a workspace. As you assign or unassign team members to workspaces, this bar will change colors as follows:
- Light green shows when capacity is available for team members.
- Dark green shows when all the team members are assigned to a workspace.
- Red shows if a team is over assigned for a workspace.
Also, a green 100% icon and a green striped background show for a team’s row when the head count is fully assigned to a workspace.
Activate fixed spaces
After generating an optimized floor plan, you can reassign head count and move teams to specific workspaces. If extra head count remains, you can use Assign Remaining Head Count to re-run the optimization, which generates a new floor plan with your changes and assigns the remaining team members to the workspace:
- Select Clear Floor Plan and then reassign teams to different workspaces.
- Confirm any changes, and then select Assign Remaining Head Count.
- Enter a unique floor plan name, and then select Assign Remaining Head Count again. Your new floor plan will show as loading in the same project folder as your original floor plan.
- After this new version shows a Status of a green check mark, you can select the floor plan to open, review, make changes, and download it.
Note
The more teams you assign to fixed locations, the less optimized the floor plan will be.
View project and floor plan details
After you create projects and associated floor plans, they are available in the Workspace Planning list with the following options:
- Select a table column heading, such as Name or Created by, to sort the list by.
- Select a project name to view its floor plans.
- For floor plans, select the Download icon to download the constraint files that were used to create the floor plan.
- Select the Dataset Parameters icon to see more details about a floor plan.
- Select the Job Details icon to see more details about the floor plan was generation.
- Select the Delete (trashcan) icon to delete a project or a floor plan that you created from the list.
Save and download a floor plan
To download an existing floor plan, select the Download icon for the plan listed in Load Floor Plan. Or to make changes and then download an updated floor plan, do the following steps.
In the Workspace Planning Azure Template, select the applicable project for the floor plan.
Select the name of the floor plan you want to save and download.
Confirm or change how teams are assigned to workspaces, such as:
- Select Clear Floor Plan to replace all values with zero in this plan.
- Select the Clear (eraser) icon for any column or row to clear all the values for it.
- Select the Eye icon to hide or unhide a full workspace or a team that’s fully assigned in the floor plan view.
Select Save Floor Plan.
Name the plan, and then select Save Floor Plan again.
Select Download Floor Plan to save a .csv version of it.