Démarrage rapide : Notifications d’application dans le SDK d'application Windows
Dans ce guide de démarrage rapide, vous allez créer une application Windows de bureau qui envoie et reçoit des notifications d’application locale, également appelées notifications toast, à l’aide duSDK d'application Windows.
Important
Les notifications pour une application avec élévation de privilèges (administrateur) ne sont actuellement pas prises en charge.
Prérequis
- Configurer votre environnement de développement
- Soit Créer un projet qui utilise le SDK d’application Windows ou Utiliser le SDK d’application Windows dans un projet existant
Exemple d’application
Ce guide de démarrage rapide traite du code des exemples d’applications de notifications trouvés sur GitHub.
Informations de référence sur l'API
Pour obtenir la documentation de référence sur les API pour les notifications d’application, consultez Espace de noms Microsoft.Windows.AppNotifications.
Étape 1 : Ajouter des déclarations d’espaces de noms
Ajoutez l’espace de noms pour les notifications d’application SDK d'application WindowsMicrosoft.Windows.AppNotifications.
using Microsoft.Windows.AppNotifications;
Étape 2 : Mettre à jour le manifeste de votre application
Si votre application n’est pas empaquetée (c’est-à-dire qu’elle n’a pas d’identité de package au moment de l’exécution), passez à l’Étape 3 : S’inscrire pour gérer une notification d’application.
Si votre application est empaquetée (y compris empaquetée avec un emplacement externe) :
- Ouvrez votre Package.appxmanifest.
- Ajouter
xmlns:com="http://schemas.microsoft.com/appx/manifest/com/windows10"et espaces de nomsxmlns:desktop="http://schemas.microsoft.com/appx/manifest/desktop/windows10"à<Package> - Ajoutez
<desktop:Extension>pour quewindows.toastNotificationActivationdéclare votre CLSID d’activateur COM. Vous pouvez obtenir un CLSID en accédant à Créer un GUID sous Outils dans Visual Studio. - Ajoutez
<com:Extension>pour l’activateur COM à l’aide du même CLSID.- Spécifiez votre fichier .exe dans l’attribut
Executable. Le fichier .exe doit être le même processus d’appelRegister()lors de l’inscription de votre application pour les notifications, ce qui est décrit plus en détail à l’étape 3. Dans l’exemple ci-dessous, nous utilisonsExecutable="SampleApp\SampleApp.exe". - Spécifiez
Arguments="----AppNotificationActivated:"pour vous assurer que SDK d'application Windows peut traiter la charge utile de votre notification en tant que type AppNotification. - Spécifiez une
DisplayName.
- Spécifiez votre fichier .exe dans l’attribut
Important
Avertissement : si vous définissez un type d’extensibilité d’application Windows.Protocol dans votre manifeste appx avec <uap:Protocol>, le fait de cliquer sur les notifications lance de nouveaux processus de la même application, même si votre application est déjà en cours d’exécution.
<!--Packaged apps only-->
<!--package.appxmanifest-->

<Package
  xmlns:com="http://schemas.microsoft.com/appx/manifest/com/windows10"
  xmlns:desktop="http://schemas.microsoft.com/appx/manifest/desktop/windows10"
  ...
  <Applications>
    <Application>
      ...
      <Extensions>

        <!--Specify which CLSID to activate when notification is clicked-->
        <desktop:Extension Category="windows.toastNotificationActivation">
          <desktop:ToastNotificationActivation ToastActivatorCLSID="replaced-with-your-guid-C173E6ADF0C3" />
        </desktop:Extension>

        <!--Register COM CLSID-->
        <com:Extension Category="windows.comServer">
          <com:ComServer>
            <com:ExeServer Executable="SampleApp\SampleApp.exe" DisplayName="SampleApp" Arguments="----AppNotificationActivated:">
              <com:Class Id="replaced-with-your-guid-C173E6ADF0C3" />
            </com:ExeServer>
          </com:ComServer>
        </com:Extension>

      </Extensions>
    </Application>
  </Applications>
 </Package>
Étape 3 : S’inscrire pour gérer une notification d’application
Inscrivez votre application pour gérer les notifications, puis annulez l’inscription à l’arrêt de votre application.
Dans votre App.xaml fichier, inscrivez-vous à AppNotificationManager::Default().NotificationInvoked, puis appelez AppNotificationManager::Default().Register. L’ordre de ces appels est important.
Important
Vous devez appeler AppNotificationManager::Default().Register avant d’appeler AppInstance.GetCurrent.GetActivatedEventArgs.
Lorsque votre application se termine, appelez AppNotificationManager::Default(). Unregister() pour libérer le serveur COM et autoriser les appels suivants à lancer un nouveau processus.
// App.xaml.cs
namespace CsUnpackagedAppNotifications
{

    public partial class App : Application
    {
        private Window mainWindow;
        private NotificationManager notificationManager;

        public App()
        {
            this.InitializeComponent();
            notificationManager = new NotificationManager();
            AppDomain.CurrentDomain.ProcessExit += new EventHandler(OnProcessExit);
        }

        protected override void OnLaunched(LaunchActivatedEventArgs args)
        {
            mainWindow = new MainWindow();

            notificationManager.Init();

            // Complete in Step 5

            mainWindow.Activate();
        }

        void OnProcessExit(object sender, EventArgs e)
        {
            notificationManager.Unregister();
        }
    }
}


// NotificationManager.cs
namespace CsUnpackagedAppNotifications
{
    internal class NotificationManager
    {
        private bool m_isRegistered;

        private Dictionary<string, Action<AppNotificationActivatedEventArgs>> c_map;

        public NotificationManager()
        {
            m_isRegistered = false;

            // When adding new a scenario, be sure to add its notification handler here.
            c_map = new Dictionary<int, Action<AppNotificationActivatedEventArgs>>();
            c_map.Add(ToastWithAvatar.ScenarioId, ToastWithAvatar.NotificationReceived);
            c_map.Add(ToastWithTextBox.ScenarioId, ToastWithTextBox.NotificationReceived);
        }

        ~NotificationManager()
        {
            Unregister();
        }

        public void Init()
        {
            // To ensure all Notification handling happens in this process instance, register for
            // NotificationInvoked before calling Register(). Without this a new process will
            // be launched to handle the notification.
            AppNotificationManager notificationManager = AppNotificationManager.Default;

            notificationManager.NotificationInvoked += OnNotificationInvoked;

            notificationManager.Register();
            m_isRegistered = true;
        }

        public void Unregister()
        {
            if (m_isRegistered)
            {
                AppNotificationManager.Default.Unregister();
                m_isRegistered = false;
            }
        }

        public void ProcessLaunchActivationArgs(AppNotificationActivatedEventArgs notificationActivatedEventArgs)
        {
            // Complete in Step 5
        }

    }
}
Étape 4 : Afficher une notification d’application
Vous DEVEZ effectuer l’étape 3 : S’inscrire pour gérer une notification d’application avant de continuer.
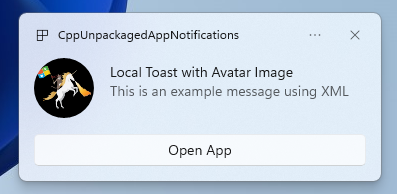
Vous allez maintenant afficher une simple notification d’application avec une imageappLogoOverride et un bouton.
Construisez votre notification d’application à l’aide de la classe AppNotificationBuilder, puis appelez Show. Pour plus d’informations sur la façon de construire votre notification d’application à l’aide de XML, reportez-vous aux exemples de contenu Toast et au schéma XML notifications.
Remarque
Si votre application est empaquetée (y compris empaquetée avec un emplacement externe), l’icône de votre application dans le coin supérieur gauche de la notification provient de package.manifest. Si votre application n’est pas empaquetée, l’icône est générée en examinant d’abord le raccourci, puis en examinant le fichier de ressources dans le processus de l’application. Si toutes les tentatives échouent, l’icône d’application Windows par défaut est utilisée. Les types de fichiers d’icônes pris en charge sont .jpg, .png, .bmpet .ico.
// ToastWithAvatar.cs
class ToastWithAvatar
{
    public const int ScenarioId = 1;
    public const string ScenarioName = "Local Toast with Avatar Image";

    public static bool SendToast()
    {
        var appNotification = new AppNotificationBuilder()
            .AddArgument("action", "ToastClick")
            .AddArgument(Common.scenarioTag, ScenarioId.ToString())
            .SetAppLogoOverride(new System.Uri("file://" + App.GetFullPathToAsset("Square150x150Logo.png")), AppNotificationImageCrop.Circle)
            .AddText(ScenarioName)
            .AddText("This is an example message using XML")
            .AddButton(new AppNotificationButton("Open App")
                .AddArgument("action", "OpenApp")
                .AddArgument(Common.scenarioTag, ScenarioId.ToString()))
            .BuildNotification();

        AppNotificationManager.Default.Show(appNotification);

        return appNotification.Id != 0; // return true (indicating success) if the toast was sent (if it has an Id)
    }

    public static void NotificationReceived(AppNotificationActivatedEventArgs notificationActivatedEventArgs)
    {
        // Complete in Step 5
    }
}

// Call SendToast() to send a notification.
Étape 5 : Traiter un utilisateur sélectionnant une notification
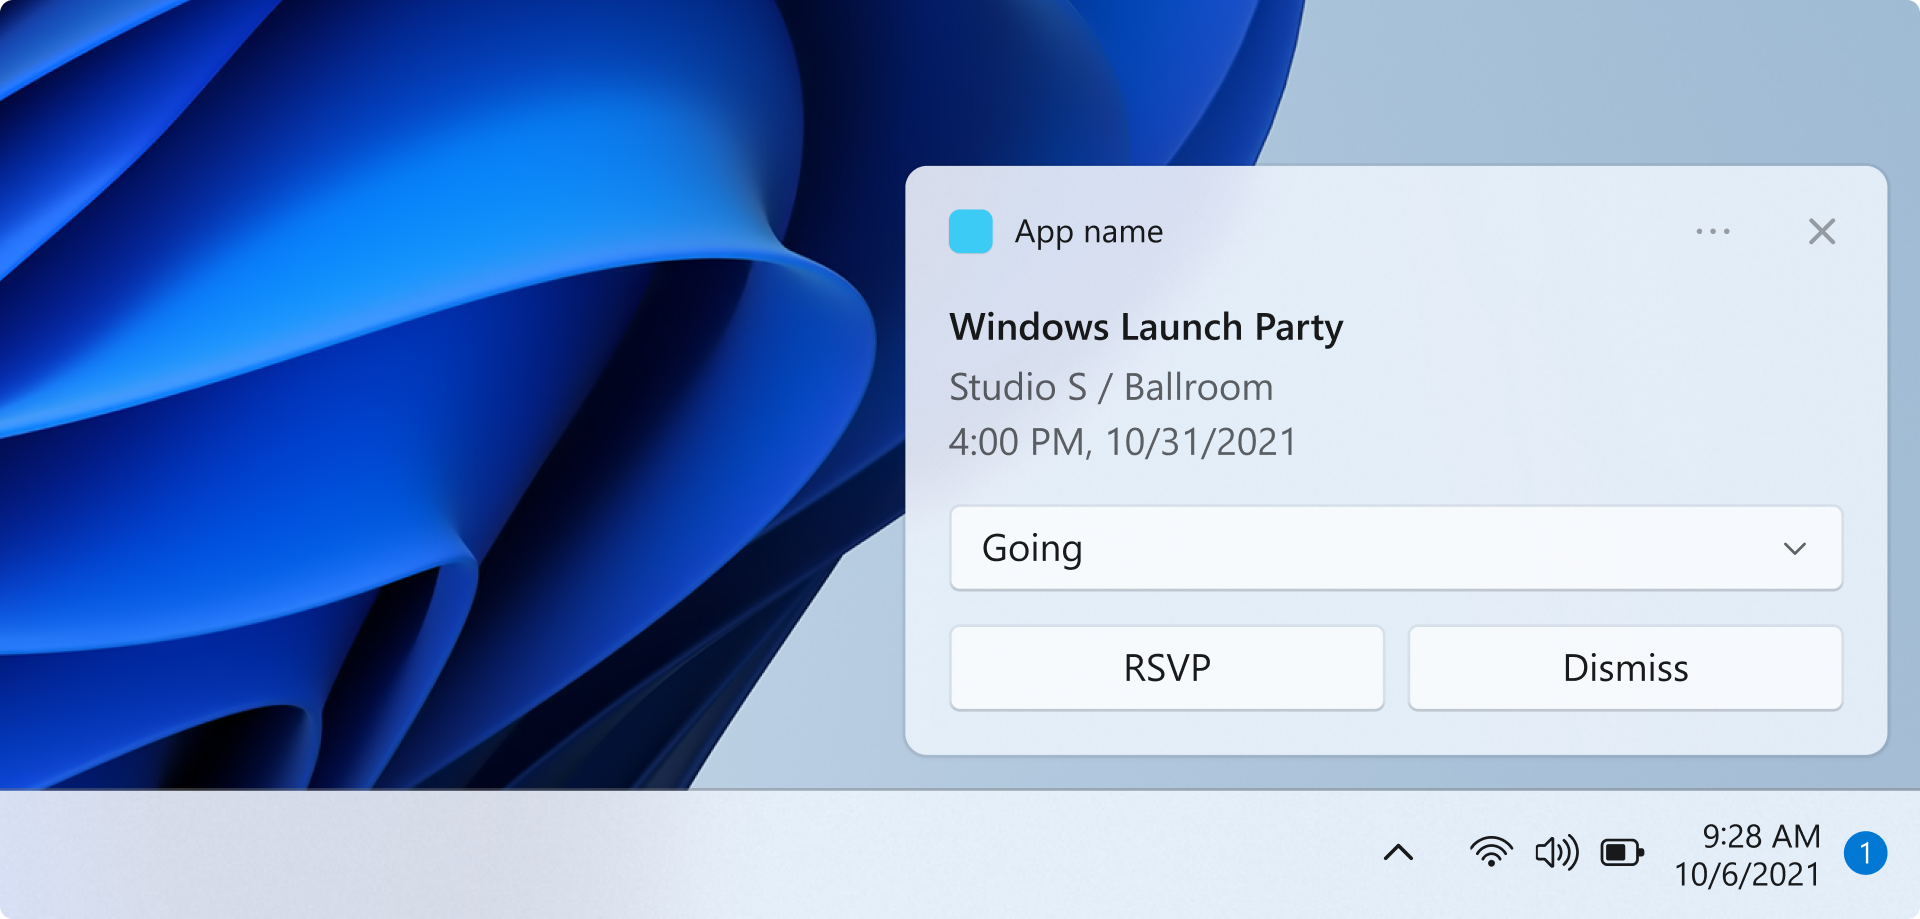
Les utilisateurs peuvent sélectionner le corps ou le bouton de votre notification. Votre application doit traiter l’appel en réponse à l’interaction d’un utilisateur avec votre notification.
Il existe 2 façons courantes de traiter cela :
- Vous choisissez de lancer votre application dans un contexte d’interface utilisateur spécifique OU
- Vous choisissez de faire en sorte que votre application évalue un comportement spécifique à l’action (comme une pression sur un bouton dans le corps de la notification) sans afficher d’interface utilisateur. Également appelée action d’arrière-plan.
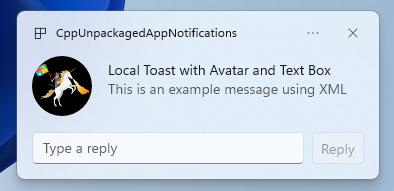
L’exemple de code ci-dessous, qui ne provient pas de l’exemple d’application, illustre les deux façons de traiter une action générée par l’utilisateur. Ajoutez une valeur launch (correspond à un utilisateur qui clique sur le corps de la notification), un élémentinput (zone de texte de réponse rapide) et un bouton avec une valeur arguments(correspond à l’utilisateur qui clique sur le bouton) à la charge utile XML de votre notification. Dans votre ProcessLaunchActivationArgs, cas sur chaque argument.
Important
Le paramètre activationType="background" dans la charge utile XML de notification est ignoré pour les applications de bureau. Vous devez plutôt traiter les arguments d’activation et décider d’afficher ou non une fenêtre, comme indiqué dans cette étape.
// Example of how to process a user either selecting the notification body or inputting a quick reply in the text box.
// Notification XML payload
//<toast launch="action=openThread&threadId=92187">
// <visual>
// <binding template="ToastGeneric">
// <image placement="appLogoOverride" hint-crop="circle" src="C:\<fullpath>\Logo.png"/>
// <text>Local Toast with Avatar and Text box</text>
// <text>This is an example message using</text>
// </binding>
// </visual>
// <actions>
// <input id="replyBox" type="text" placeHolderContent="Reply" />
// <action
// content="Send"
// hint-inputId="replyBox"
// arguments="action=reply&threadId=92187" />
// </actions>
//</toast>
void ProcessLaunchActivationArgs(const winrt::AppNotificationActivatedEventArgs& notificationActivatedEventArgs)
{
// If the user clicks on the notification body, your app needs to launch the chat thread window
if (std::wstring(notificationActivatedEventArgs.Argument().c_str()).find(L"openThread") != std::wstring::npos)
{
GenerateChatThreadWindow();
}
else // If the user responds to a message by clicking a button in the notification, your app needs to reply back to the other user with no window launched
if (std::wstring(notificationActivatedEventArgs.Argument().c_str()).find(L"reply") != std::wstring::npos)
{
auto input = notificationActivatedEventArgs.UserInput();
auto replyBoxText = input.Lookup(L"replyBox");
// Process the reply text
SendReplyToUser(replyBoxText);
}
}
Suivez les instructions ci-dessous:
- Si une notification est sélectionnée par l’utilisateur et que votre application n’est pas en cours d’exécution, votre application est lancée et l’utilisateur peut voir la fenêtre de premier plan dans le contexte de la notification.
- Si une notification est sélectionnée par l’utilisateur et que votre application est réduite, votre application est mise au premier plan et une nouvelle fenêtre est affichée dans le contexte de la notification.
- Si une action d’arrière-plan de notification est appelée par l’utilisateur (par exemple, l’utilisateur répond à une notification en tapant dans la zone de texte de notification et en appuyant sur répondre), votre application traite la charge utile sans afficher de fenêtre de premier plan.
Pour obtenir un exemple plus détaillé, consultez l’exemple de code d’application trouvé sur GitHub .
Étape 6 : Supprimer les notifications
Supprimez les notifications lorsqu’elles ne sont plus pertinentes pour l’utilisateur.
Dans cet exemple, l’utilisateur a vu tous les messages d’une conversation de groupe dans votre application, donc vous effacez toutes les notifications de la conversation de groupe. Ensuite, l’utilisateur désactive un ami, afin d’effacer toutes les notifications de l’ami. Vous avez tout d’abord ajouté les propriétés Groupe et Balise aux notifications avant de les afficher afin de les identifier maintenant.
void SendNotification(winrt::hstring const& payload, winrt::hstring const& friendId, winrt::hstring const& groupChatId)
{
    winrt::AppNotification notification(payload);

    // Setting Group Id here allows clearing notifications from a specific chat group later
    notification.Group(groupChatId);

    // Setting Tag Id here allows clearing notifications from a specific friend later
    notification.Tag(friendId);

    winrt::AppNotificationManager::Default().Show(notification);
}

winrt::Windows::Foundation::IAsyncAction RemoveAllNotificationsFromGroupChat(const std::wstring groupChatId)
{
    winrt::AppNotificationManager manager = winrt::AppNotificationManager::Default();
    co_await manager.RemoveByGroupAsync(groupChatId);
}

winrt::Windows::Foundation::IAsyncAction RemoveAllNotificationsFromFriend(const std::wstring friendId)
{
    winrt::AppNotificationManager manager = winrt::AppNotificationManager::Default();
    co_await manager.RemoveByTagAsync(friendId);
}
Fonctionnalités supplémentaires
Envoyer une notification d’application de source cloud
Pour envoyer une notification d’application à partir du cloud, suivez Envoyer une notification d’application de source cloud dans Démarrage rapide : Notifications Push dans le SDK d'application Windows.
Définir une heure d'expiration
Définissez un délai d’expiration sur votre notification d’application à l’aide de la propriété Expiration si le message de votre notification n’est pertinent que pendant une certaine période. Par exemple, si vous envoyez un rappel d’événement de calendrier, définissez l’heure d’expiration sur la fin de l’événement de calendrier.
Remarque
La durée d’expiration par défaut et maximale est de 3 jours.
class ToastWithAvatar
{
    public static bool SendToast()
    {

        var appNotification = new AppNotificationBuilder()
            .SetAppLogoOverride(new System.Uri("ms-appx:///images/logo.png"), AppNotificationImageCrop.Circle)
            .AddText("Example expiring notification")
            .AddText("This is an example message")
            .BuildNotification();


        appNotification.Expiration = DateTime.Now.AddDays(1);
        AppNotificationManager.Default.Show(appNotification);

        return appNotification.Id != 0; // return true (indicating success) if the toast was sent (if it has an Id)
    }
}
Vérifier que les notifications expirent au redémarrage
Définissez la propriété ExpiresOnRebootsur True si vous souhaitez que les notifications suppriment au redémarrage.
class ToastWithAvatar
{
    public static bool SendToast()
    {

        var appNotification = new AppNotificationBuilder()
            .SetAppLogoOverride(new System.Uri("ms-appx:///images/logo.png"), AppNotificationImageCrop.Circle)
            .AddText("Example ExpiresOnReboot notification")
            .AddText("This is an example message")
            .BuildNotification();


            appNotification.ExpiresOnReboot = true;
            AppNotificationManager.Default.Show(appNotification);

            return appNotification.Id != 0; // return true (indicating success) if the toast was sent (if it has an Id)
    }
}
Envoyer et mettre à jour une notification de barre de progression
Vous pouvez afficher les mises à jour liées à la barre de progression dans une notification :
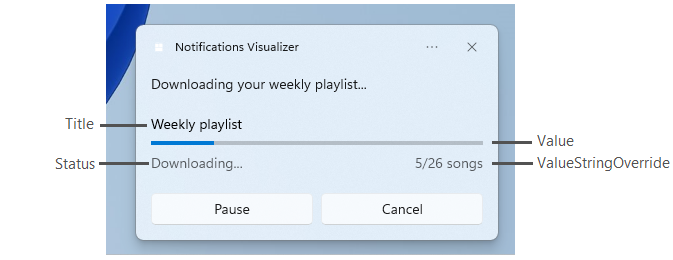
Utilisez la construction AppNotificationProgressDatapour mettre à jour la notification de barre de progression.
const winrt::hstring c_tag = L"weekly-playlist";
const winrt::hstring c_group = L"downloads";

// Send first Notification Progress Update
void SendUpdatableNotificationWithProgress()
{
    auto notification{ winrt::AppNotificationBuilder()
            .AddText(L"Downloading this week's new music...")
            .AddProgressBar(winrt::AppNotificationProgressBar()
                .BindTitle()
                .BindValue()
                .BindValueStringOverride()
                .BindStatus())
            .BuildNotification() }

    notification.Tag(c_tag);
    notification.Group(c_group);

    // Assign initial values for first notification progress UI
    winrt::AppNotificationProgressData data(1); // Sequence number
    data.Title(L"Weekly playlist"); // Binds to {progressTitle} in xml payload
    data.Value(0.6); // Binds to {progressValue} in xml payload
    data.ValueStringOverride(L"15/26 songs"); // Binds to {progressValueString} in xml payload
    data.Status(L"Downloading..."); // Binds to {progressStatus} in xml payload

    notification.Progress(data);
    winrt::AppNotificationManager::Default().Show(notification);
}

// Send subsequent progress updates
winrt::Windows::Foundation::IAsyncAction UpdateProgressAsync()
{
    // Assign new values
    winrt::AppNotificationProgressData data(2 /* Sequence number */ );
    data.Title(L"Weekly playlist"); // Binds to {progressTitle} in xml payload
    data.Value(0.7); // Binds to {progressValue} in xml payload
    data.ValueStringOverride(L"18/26 songs"); // Binds to {progressValueString} in xml payload
    data.Status(L"Downloading..."); // Binds to {progressStatus} in xml payload

    auto result = co_await winrt::AppNotificationManager::Default().UpdateAsync(data, c_tag, c_group);
    if (result == winrt::AppNotificationProgressResult::AppNotificationNotFound)
    {
        // Progress Update failed since the previous notification update was dismissed by the user! So account for this in your logic by stopping updates or starting a new Progress Update flow.
    }
}
Ressources

Windows developer
Commentaires
Bientôt disponible : Tout au long de 2024, nous allons supprimer progressivement GitHub Issues comme mécanisme de commentaires pour le contenu et le remplacer par un nouveau système de commentaires. Pour plus d’informations, consultez https://aka.ms/ContentUserFeedback.
Envoyer et afficher des commentaires pour