Configure web and Direct Line channel security
Important
Power Virtual Agents capabilities and features are now part of Microsoft Copilot Studio following significant investments in generative AI and enhanced integrations across Microsoft Copilot.
Some articles and screenshots may refer to Power Virtual Agents while we update documentation and training content.
When you create a Microsoft Copilot Studio copilot, it's immediately available in the Demo website and Custom website channels to anyone who knows the copilot ID. These channels are available by default, and no configuration is needed.
For the Microsoft Teams app, you can configure advanced web channel security options.
Note
If you have a Teams-only license, you can't generate secrets to enable secure access. Secure access tokens are created automatically for you and secure access is enabled by default.
Users can find the copilot ID directly from within Microsoft Copilot Studio or by receiving it from someone. But, depending on the copilot's capability and sensitivity that might not be desirable.
With Direct Line-based security, you can enable access only to locations that you control by enabling secured access with Direct Line secrets or tokens.
You can also swap and regenerate secrets and refresh tokens, and you can easily disable secured access if you no longer want to use it.
Note
Microsoft Copilot Studio uses the Bot Framework Direct Line channel to connect your web page or app to the copilot.
Enable or disable web channel security
You can enforce the use of secrets and tokens for each individual copilot.
Once this option is enabled, channels need the client to authenticate their requests either by using a secret or by using a token that is generated by using the secret, obtained at runtime.
Any access to the copilot that doesn't provide this security measure won't work.
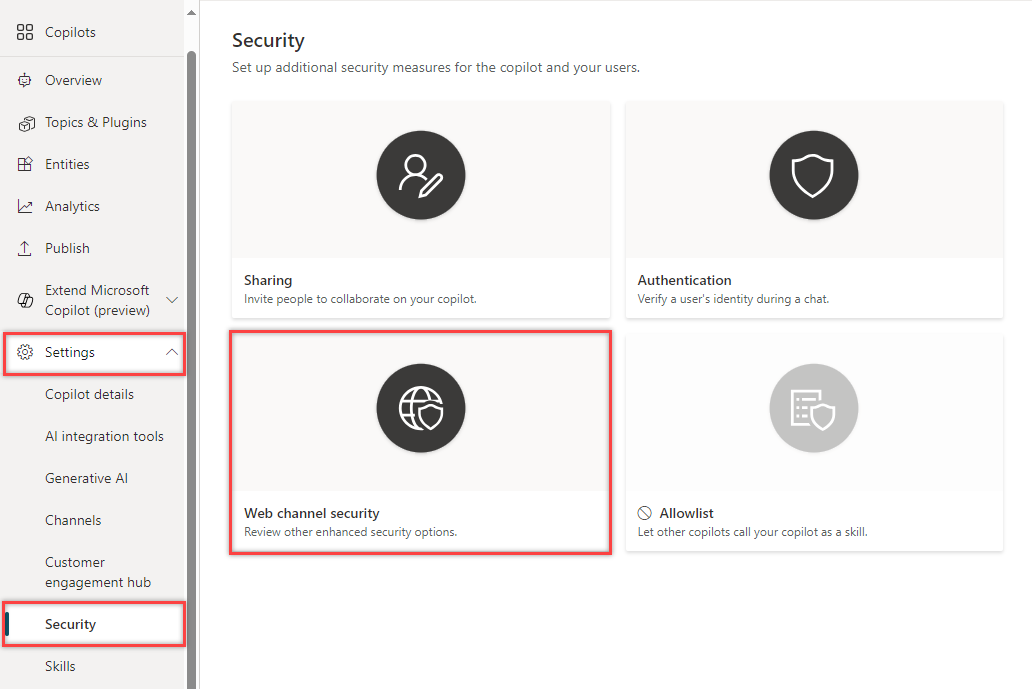
In the navigation menu, under Settings, select Security. Then select the Web channel security tile.
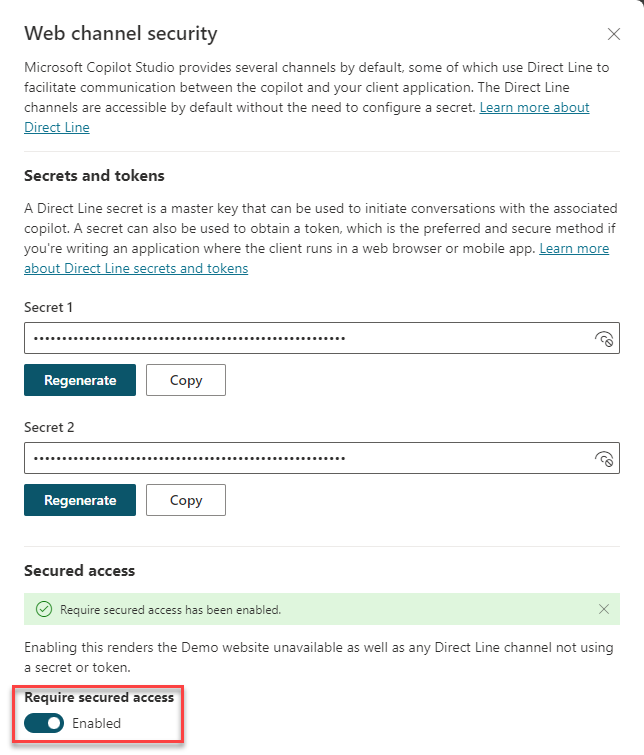
Turn the Require secured access switch to Enabled.
Warning
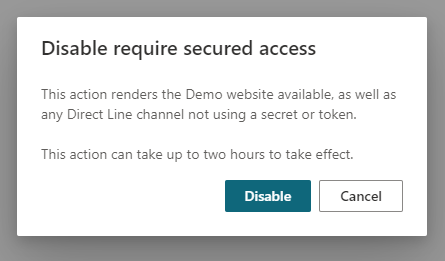
Once "Require secured access" is enabled or disabled, the system can take up to two hours to propagate the settings and take effect. Until then, the previous setting will be in effect. You do not need to publish the copilot for this change to take effect.
You should plan ahead to avoid exposing your copilot unintentionally.
If you need to disable the web channel security option, you can do so by switching Require secured access to Disabled. Disabling secured access can take up to two hours to propagate.
Use secrets or tokens
If you're creating a service-to-service app, specifying the secret in the authorization header requests might be the simplest approach.
If you're writing an app where the client runs in a web browser or mobile app, or otherwise the code might be visible to customers, you must exchange your secret for a token. If you don't use a token, your secret can be compromised. When you're making the request to acquire the token in your service, specify the secret in the authorization header.
Tokens only work for a single conversation and expire unless refreshed.
Choose the security model that works best for your situation.
Warning
We strongly discourage exposing the secret in any code that runs in the browser, either hard-coded or transferred through a network call.
Acquiring the token using the secret in your service code is the most secured way to protect your Microsoft Copilot Studio copilot.
Obtain the secrets
You need the secret so you can specify it in your app's authorization header requests or similar.
In the navigation menu, under Settings, select Security. Then select the Web channel security tile.
Select Copy for either Secret 1 or Secret 2 to copy it to the clipboard. Select the visibility icon
 to reveal the secret. A warning prompt appears before you can reveal it.
Swap secrets
If you need to change the secret being used by your copilot, you can do so without any downtime or interruption.
Microsoft Copilot Studio provides you with two secrets, which work simultaneously. You can swap the secret being used with the other one. Once the secrets are swapped and your users are all connected using the new secret, you're safe to regenerate the secret.
Regenerate a secret
To regenerate a secret, select Regenerate next to the secret.
Warning
Any user that's connected using the original secret or a token obtained from that secret will be disconnected.
Generate a token
You can generate a token that can be used when starting a single copilot conversation. For more information, see the section Get Direct Line token in the Add copilot to mobile and custom apps article.
Issue the following request in your service code to exchange the secret for a token. Replace
<SECRET>with the value of the secret you obtained in Step 1.POST https://directline.botframework.com/v3/directline/tokens/generate Authorization: Bearer <SECRET>
The following snippets provide examples of the generated token request and its response.
Sample generate token request
POST https://directline.botframework.com/v3/directline/tokens/generate
Authorization: Bearer RCurR_XV9ZA.cwA.BKA.iaJrC8xpy8qbOF5xnR2vtCX7CZj0LdjAPGfiCpg4Fv0
Sample generate token response
HTTP/1.1 200 OK
[other headers]
{
  "conversationId": "abc123",
  "token": "RCurR_XV9ZA.cwA.BKA.iaJrC8xpy8qbOF5xnR2vtCX7CZj0LdjAPGfiCpg4Fv0y8qbOF5xPGfiCpg4Fv0y8qqbOF5x8qbOF5xn",
  "expires_in": 1800
}
If the request is successful, the response contains a token that's valid for one conversation and an expires_in value that indicates the number of seconds until the token expires.
For the token to remain useful, you must refresh the token before it expires.
Refresh a token
A token can be refreshed an unlimited number of times, as long as it hasn't expired.
An expired token can't be refreshed.
To refresh a token, issue the following request and replace <TOKEN TO BE REFRESHED> with the token you want to refresh.
POST https://directline.botframework.com/v3/directline/tokens/refresh
Authorization: Bearer <TOKEN TO BE REFRESHED>
The following snippets provide examples of the refresh token request and response.
Sample refresh request
POST https://directline.botframework.com/v3/directline/tokens/refresh
Authorization: Bearer CurR_XV9ZA.cwA.BKA.iaJrC8xpy8qbOF5xnR2vtCX7CZj0LdjAPGfiCpg4Fv0y8qbOF5xPGfiCpg4Fv0y8qqbOF5x8qbOF5xn
Sample refresh response
If the request is successful, the response contains a new token that's valid for the same conversation as the previous token and an expires_in value that indicates the number of seconds until the new token expires.
For the new token to remain useful, you must refresh the token again before it expires.
HTTP/1.1 200 OK
[other headers]
{
  "conversationId": "abc123",
  "token": "RCurR_XV9ZA.cwA.BKA.y8qbOF5xPGfiCpg4Fv0y8qqbOF5x8qbOF5xniaJrC8xpy8qbOF5xnR2vtCX7CZj0LdjAPGfiCpg4Fv0",
  "expires_in": 1800
}
For more information on refreshing a token, see the section Refresh a Direct Line token in the Direct Line API - Authentication article.
Related articles
Povratne informacije
Stiže uskoro: Tijekom 2024. postupno ćemo ukinuti servis Problemi sa servisom GitHub kao mehanizam za povratne informacije za sadržaj i zamijeniti ga novim sustavom za povratne informacije. Dodatne informacije potražite u članku: https://aka.ms/ContentUserFeedback.
Pošaljite i pogledajte povratne informacije za