Get started with the Content Studio, REST API, or client SDKs to do basic image moderation. The Azure AI Content Safety service provides you with AI algorithms for flagging objectionable content. Follow these steps to try it out.
Once you have your Azure subscription, create a Content Safety resource in the Azure portal to get your key and endpoint. Enter a unique name for your resource, select your subscription, and select a resource group, supported region (see Region availability), and supported pricing tier. Then select Create.
The resource takes a few minutes to deploy. After it finishes, select go to resource. In the left pane, under Resource Management, select Subscription Key and Endpoint. The endpoint and either of the keys are used to call APIs.
The following section walks through a sample image moderation request with cURL.
Prepare a sample image
Choose a sample image to analyze, and download it to your device.
See Input requirements for the image limitations. If your format is animated, the service will extract the first frame to do the analysis.
You can input your image by one of two methods: local filestream or blob storage URL.
Local filestream (recommended): Encode your image to base64. You can use a website like codebeautify to do the encoding. Then save the encoded string to a temporary location.
Blob storage URL: Upload your image to an Azure Blob Storage account. Follow the blob storage quickstart to learn how to do this. Then open Azure Storage Explorer and get the URL to your image. Save it to a temporary location.
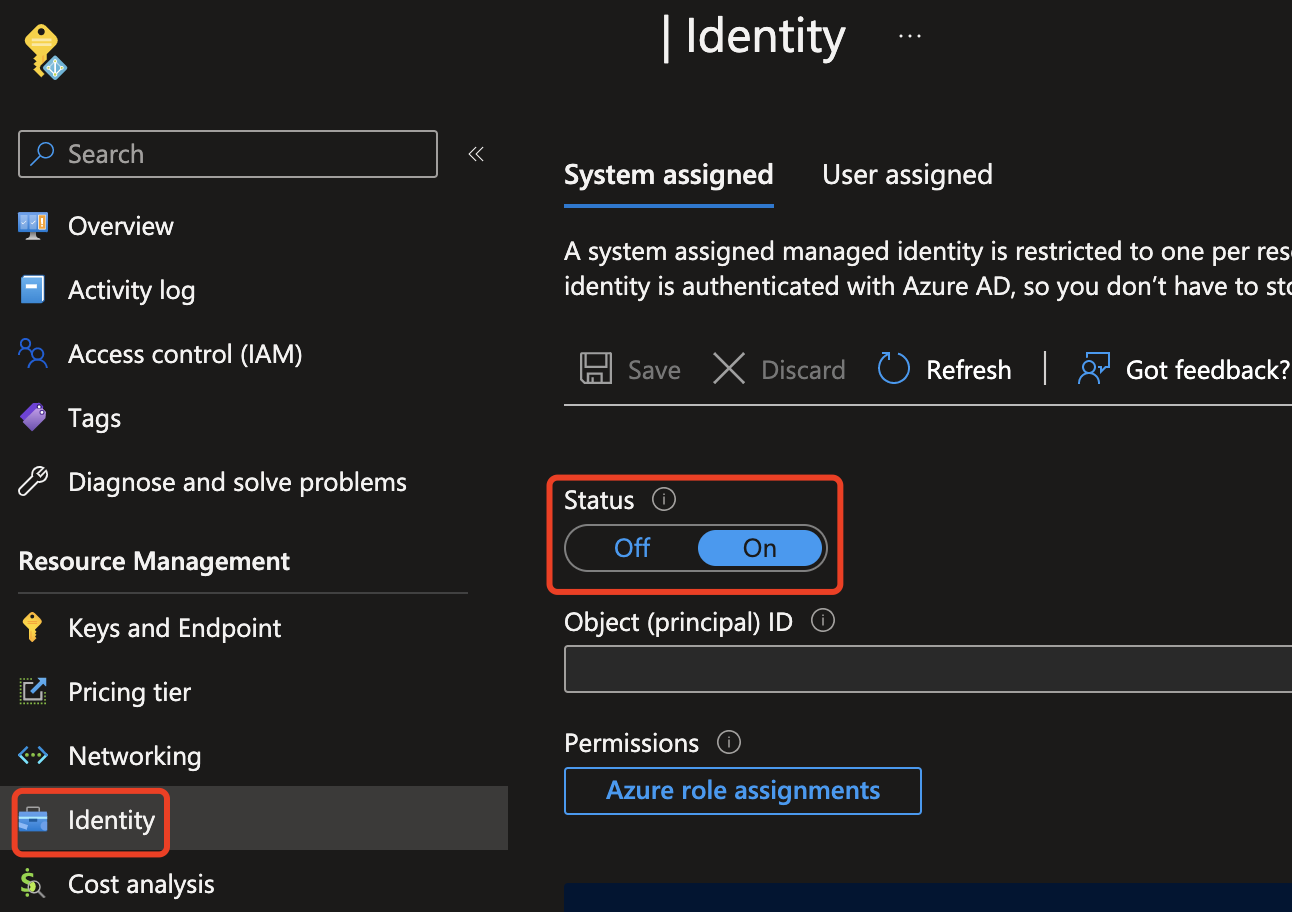
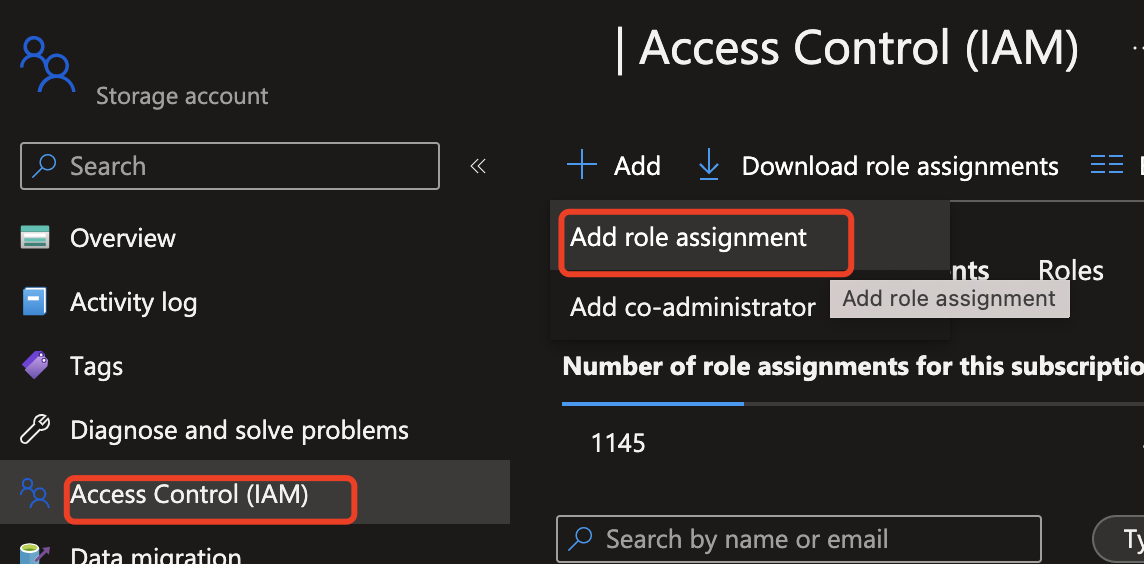
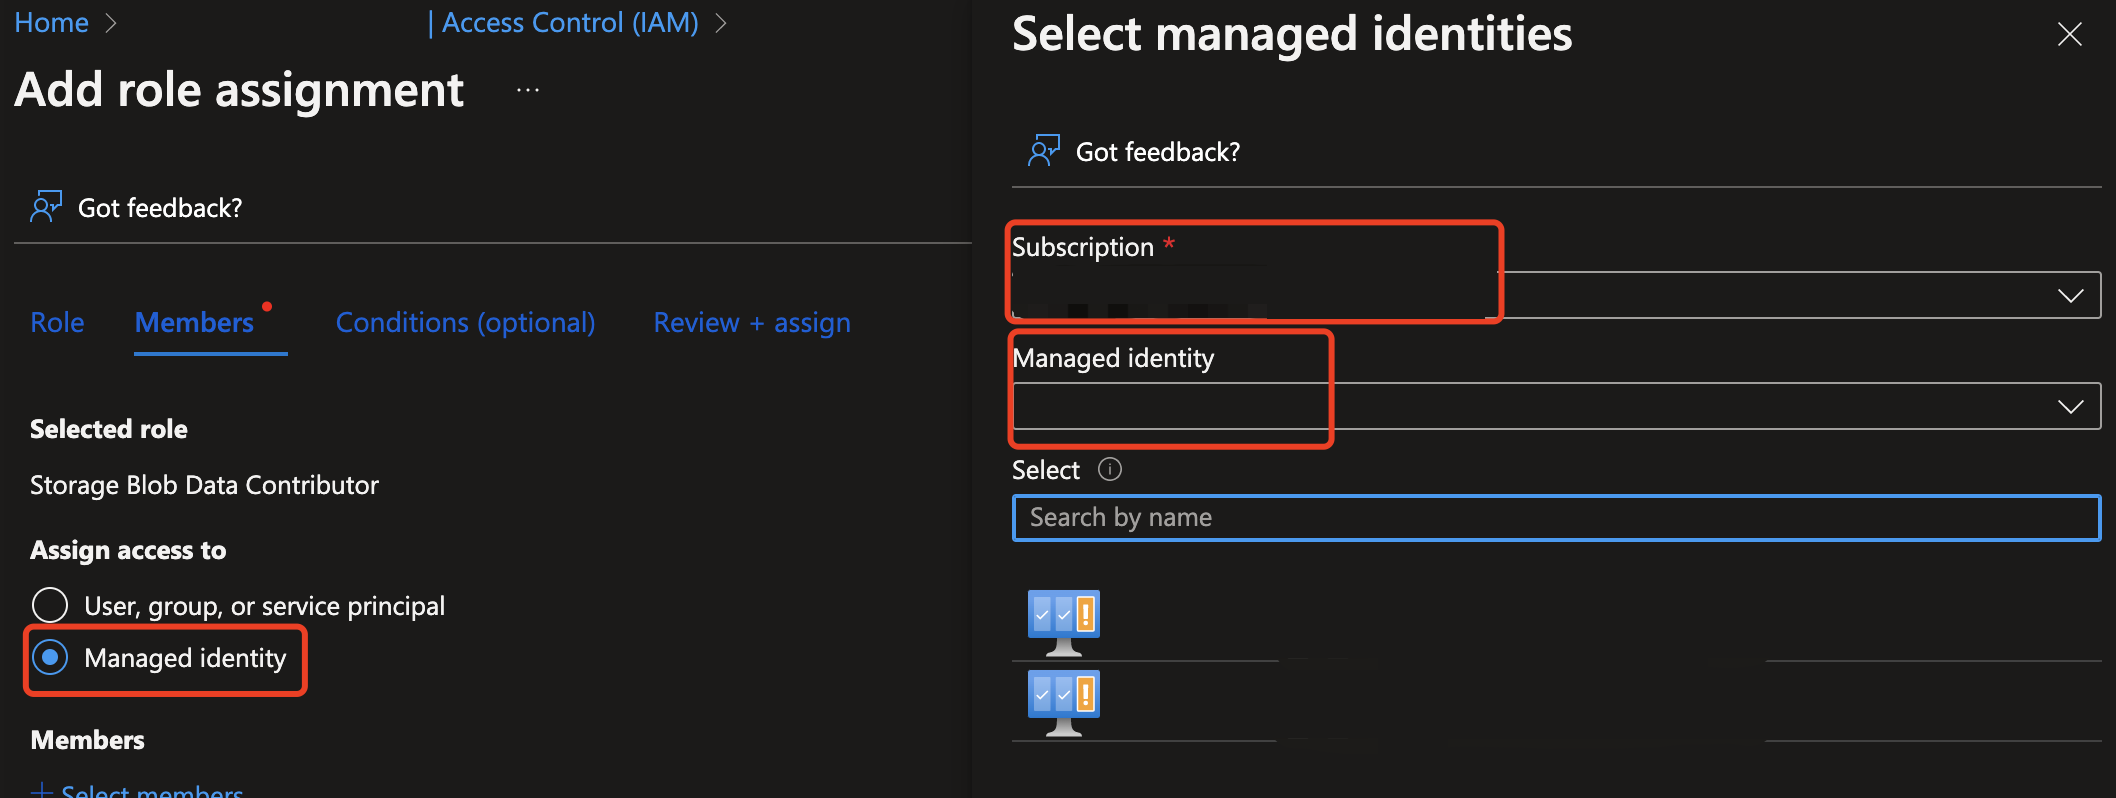
Next, you need to give your Content Safety resource access to read from the Azure Storage resource. Enable system-assigned Managed identity for the Azure AI Content Safety instance and assign the role of Storage Blob Data Contributor/Owner to the identity:
Važno
Only Storage Blob Data Contributor or Storage Blob Data Owner are valid roles to proceed.
Enable managed identity for the Azure AI Content Safety instance.
Assign the role of Storage Blob Data Contributor/Owner to the Managed identity. Any roles highlighted below should work.
Analyze image content
Paste the command below into a text editor, and make the following changes.
Replace <endpoint> with your resource endpoint URL.
Replace <your_subscription_key> with your key.
Populate the "image" field in the body with either a "content" field or a "blobUrl" field. For example: {"image": {"content": "<base_64_string>"} or {"image": {"blobUrl": "<your_storage_url>"}.
If you're using a blob storage URL, the request body should look like this:
{
  "image": {
    "blobUrl": "<your_storage_url>"
  }
}
The below fields must be included in the URL:
Name
Required?
Description
Type
API Version
Required
This is the API version to be checked. Current version is: api-version=2024-09-01. Example: <endpoint>/contentsafety/image:analyze?api-version=2024-09-01
String
The parameters in the request body are defined in this table:
Name
Required?
Description
Type
content
Required
The content or blob URL of the image. I can be either base64-encoded bytes or a blob URL. If both are given, the request is refused. The maximum allowed size of the image is 7,200 x 7,200 pixels, and the maximum file size is 4 MB. The minimum size of the image is 50 pixels x 50 pixels.
String
categories
Optional
This is assumed to be an array of category names. See the Harm categories guide for a list of available category names. If no categories are specified, all four categories are used. We use multiple categories to get scores in a single request.
String
outputType
Optional
Image moderation API only supports "FourSeverityLevels". Output severities in four levels. The value can be 0,2,4,6
String
Open a command prompt window and run the cURL command.
Output
You should see the image moderation results displayed as JSON data in the console. For example:
Each output class that the API predicts. Classification can be multi-labeled. For example, when an image is uploaded to the image moderation model, it could be classified as both sexual content and violence. Harm categories
String
Severity
The severity level of the flag in each harm category. Harm categories
The Visual Studio IDE with workload .NET desktop development enabled. Or if you don't plan on using Visual Studio IDE, you need the current version of .NET Core.
Once you have your Azure subscription, create a Content Safety resource in the Azure portal to get your key and endpoint. Enter a unique name for your resource, select your subscription, and select a resource group, supported region (see Region availability), and supported pricing tier. Then select Create.
The resource takes a few minutes to deploy. After it finishes, Select go to resource. In the left pane, under Resource Management, select Subscription Key and Endpoint. The endpoint and either of the keys are used to call APIs.
Open Visual Studio, and under Get started select Create a new project. Set the template filters to C#/All Platforms/Console. Select Console App (command-line application that can run on .NET on Windows, Linux and macOS) and choose Next. Update the project name to ContentSafetyQuickstart and choose Next. Select .NET 6.0 or above, and choose Create to create the project.
Install the client SDK
Once you've created a new project, install the client SDK by right-clicking on the project solution in the Solution Explorer and selecting Manage NuGet Packages. In the package manager that opens select Browse and search for Azure.AI.ContentSafety. Select Install.
In a console window (such as cmd, PowerShell, or Bash), use the dotnet new command to create a new console app with the name content-safety-quickstart. This command creates a simple "Hello World" C# project with a single source file: Program.cs.
dotnet
dotnetnew console -n content-safety-quickstart
Change your directory to the newly created app folder. You can build the application with:
dotnet
dotnetbuild
The build output should contain no warnings or errors.
Console
...
Build succeeded.
  0 Warning(s)
  0 Error(s)
...
Install the client SDK
Within the application directory, install the Computer Vision client SDK for .NET with the following command:
dotnet
dotnetadd package Azure.AI.ContentSafety
Create environment variables
In this example, you'll write your credentials to environment variables on the local machine running the application.
To set the environment variable for your key and endpoint, open a console window and follow the instructions for your operating system and development environment.
To set the CONTENT_SAFETY_KEY environment variable, replace YOUR_CONTENT_SAFETY_KEY with one of the keys for your resource.
To set the CONTENT_SAFETY_ENDPOINT environment variable, replace YOUR_CONTENT_SAFETY_ENDPOINT with the endpoint for your resource.
Važno
Use API keys with caution. Don't include the API key directly in your code, and never post it publicly. If you use an API key, store it securely in Azure Key Vault. For more information about using API keys securely in your apps, see API keys with Azure Key Vault.
After you add the environment variables, you might need to restart any running programs that will read the environment variables, including the console window.
Once you have your Azure subscription, create a Content Safety resource in the Azure portal to get your key and endpoint. Enter a unique name for your resource, select your subscription, and select a resource group, supported region (see Region availability), and supported pricing tier. Then select Create.
The resource takes a few minutes to deploy. After it finishes, Select go to resource. In the left pane, under Resource Management, select Subscription Key and Endpoint. The endpoint and either of the keys are used to call APIs.
Your Python installation should include pip. You can check if you have pip installed by running pip --version on the command line. Get pip by installing the latest version of Python.
Create environment variables
In this example, you'll write your credentials to environment variables on the local machine running the application.
To set the environment variable for your key and endpoint, open a console window and follow the instructions for your operating system and development environment.
To set the CONTENT_SAFETY_KEY environment variable, replace YOUR_CONTENT_SAFETY_KEY with one of the keys for your resource.
To set the CONTENT_SAFETY_ENDPOINT environment variable, replace YOUR_CONTENT_SAFETY_ENDPOINT with the endpoint for your resource.
Važno
Use API keys with caution. Don't include the API key directly in your code, and never post it publicly. If you use an API key, store it securely in Azure Key Vault. For more information about using API keys securely in your apps, see API keys with Azure Key Vault.
After you add the environment variables, you might need to restart any running programs that will read the environment variables, including the console window.
Once you have your Azure subscription, create a Content Safety resource in the Azure portal to get your key and endpoint. Enter a unique name for your resource, select your subscription, and select a resource group, supported region (see Region availability), and supported pricing tier. Then select Create.
The resource takes a few minutes to deploy. After it finishes, Select go to resource. In the left pane, under Resource Management, select Subscription Key and Endpoint. The endpoint and either of the keys are used to call APIs.
Set up application
Create a new Gradle project.
In a console window (such as cmd, PowerShell, or Bash), create a new directory for your app, and navigate to it.
Console
mkdir myapp && cd myapp
Run the gradle init command from your working directory. This command will create essential build files for Gradle, including build.gradle.kts, which is used at runtime to create and configure your application.
Console
gradle init --type basic
When prompted to choose a DSL, select Kotlin.
From your working directory, run the following command to create a project source folder:
Console
mkdir -p src/main/java
Navigate to the new folder and create a file called ContentSafetyQuickstart.java.
Also create a src/resources folder at the root of your project, and add a sample image to it.
Install the client SDK
This quickstart uses the Gradle dependency manager. You can find the client library and information for other dependency managers on the Maven Central Repository.
Locate build.gradle.kts and open it with your preferred IDE or text editor. Then copy in the following build configuration. This configuration defines the project as a Java application whose entry point is the class ContentSafetyQuickstart. It imports the Azure AI Vision library.
In this example, you'll write your credentials to environment variables on the local machine running the application.
To set the environment variable for your key and endpoint, open a console window and follow the instructions for your operating system and development environment.
To set the CONTENT_SAFETY_KEY environment variable, replace YOUR_CONTENT_SAFETY_KEY with one of the keys for your resource.
To set the CONTENT_SAFETY_ENDPOINT environment variable, replace YOUR_CONTENT_SAFETY_ENDPOINT with the endpoint for your resource.
Važno
Use API keys with caution. Don't include the API key directly in your code, and never post it publicly. If you use an API key, store it securely in Azure Key Vault. For more information about using API keys securely in your apps, see API keys with Azure Key Vault.
After you add the environment variables, you might need to restart any running programs that will read the environment variables, including the console window.
After you add the environment variables, run source ~/.bashrc from your console window to make the changes effective.
Analyze image content
Open ContentSafetyQuickstart.java in your preferred editor or IDE and paste in the following code. Replace the source variable with the path to your sample image.
Once you have your Azure subscription, create a Content Safety resource in the Azure portal to get your key and endpoint. Enter a unique name for your resource, select your subscription, and select a resource group, supported region (see Region availability), and supported pricing tier. Then select Create.
The resource takes a few minutes to deploy. After it finishes, Select go to resource. In the left pane, under Resource Management, select Subscription Key and Endpoint. The endpoint and either of the keys are used to call APIs.
Set up application
Create a new Node.js application. In a console window (such as cmd, PowerShell, or Bash), create a new directory for your app, and navigate to it.
Console
mkdir myapp && cd myapp
Run the npm init command to create a node application with a package.json file.
Console
npm init
Also create a /resources folder at the root of your project, and add a sample image to it.
Install the client SDK
Install the @azure-rest/ai-content-safety npm package:
Console
npm install @azure-rest/ai-content-safety
Also install the dotenv module to use environment variables:
Console
npm install dotenv
Your app's package.json file will be updated with the dependencies.
Create environment variables
In this example, you'll write your credentials to environment variables on the local machine running the application.
To set the environment variable for your key and endpoint, open a console window and follow the instructions for your operating system and development environment.
To set the CONTENT_SAFETY_KEY environment variable, replace YOUR_CONTENT_SAFETY_KEY with one of the keys for your resource.
To set the CONTENT_SAFETY_ENDPOINT environment variable, replace YOUR_CONTENT_SAFETY_ENDPOINT with the endpoint for your resource.
Važno
Use API keys with caution. Don't include the API key directly in your code, and never post it publicly. If you use an API key, store it securely in Azure Key Vault. For more information about using API keys securely in your apps, see API keys with Azure Key Vault.
After you add the environment variables, you might need to restart any running programs that will read the environment variables, including the console window.
After you add the environment variables, run source ~/.bashrc from your console window to make the changes effective.
Analyze image content
Create a new file in your directory, index.js. Open it in your preferred editor or IDE and paste in the following code. Replace the image_path variable with the path to your sample image.
JavaScript
const ContentSafetyClient = require("@azure-rest/ai-content-safety").default,
{ isUnexpected } = require("@azure-rest/ai-content-safety");
const { AzureKeyCredential } = require("@azure/core-auth");
const fs = require("fs");
const path = require("path");
// Load the .env file if it existsrequire("dotenv").config();
asyncfunctionmain() {
// get endpoint and key from environment variablesconst endpoint = process.env["CONTENT_SAFETY_ENDPOINT"];
const key = process.env["CONTENT_SAFETY_KEY"];
const credential = new AzureKeyCredential(key);
const client = ContentSafetyClient(endpoint, credential);
// replace with your own sample image file path const image_path = path.resolve(__dirname, "./resources/image.jpg");
const imageBuffer = fs.readFileSync(image_path);
const base64Image = imageBuffer.toString("base64");
const analyzeImageOption = { image: { content: base64Image } };
const analyzeImageParameters = { body: analyzeImageOption };
const result = await client.path("/image:analyze").post(analyzeImageParameters);
if (isUnexpected(result)) {
throw result;
}
for (let i = 0; i < result.body.categoriesAnalysis.length; i++) {
const imageCategoriesAnalysisOutput = result.body.categoriesAnalysis[i];
console.log(
imageCategoriesAnalysisOutput.category,
" severity: ",
imageCategoriesAnalysisOutput.severity
);
}
}
main().catch((err) => {
console.error("The sample encountered an error:", err);
});
Run the application with the node command on your quickstart file.
Console
node index.js
Output
Console
Hate severity: 0
SelfHarm severity: 0
Sexual severity: 0
Violence severity: 0
Clean up resources
If you want to clean up and remove an Azure AI services subscription, you can delete the resource or resource group. Deleting the resource group also deletes any other resources associated with it.
Pridružite se seriji susreta kako biste s kolegama programerima i stručnjacima izgradili skalabilna rješenja umjetne inteligencije temeljena na stvarnim slučajevima upotrebe.
The cloud-based Azure AI Content Safety API provides developers with access to advanced algorithms for processing images and text and flagging content that is potentially offensive, risky, or otherwise undesirable.