Manage Git repositories in Visual Studio
The Git Repository window provides a full-screen Git experience that helps you manage your Git repository and stay up to date with your team's projects. For example, you might need to reset, revert, or cherry-pick commits, or just clean your commit history. The Git Repository window is also a great place to visualize and manage your branches.
Version control with Visual Studio is easy with Git. And, you can work remotely with the Git provider of your choice, such as GitHub or Azure DevOps. Or, you can work locally with no provider at all.
Open the Git Repository window
To open the Git Repository window, choose View > Git repository (or press Ctrl+0, Ctrl+R), or press Ctrl+Q and under Features, search for Git repo.
Change the last commit (amend)
Updating the last commit is called amending in Git, and it's a common use case. Sometimes you just need to update your commit message, or you might need to include a last-minute change.
You can amend a commit on the command line by using the following command:
git commit --amend
The Git Repository window makes it easy to update your most recent commit message. Open the commit details of the last commit by double-clicking it, and then select the Edit option next to the commit message.

When you finish editing your commit message, select Amend.

If you need to include code changes to your last commit, you can do that in the Git Changes window. Select the Amend checkbox and then commit your changes.

To learn more about amending, including how to change commit messages other than the most recent one, see Git Tools - Rewriting History on the Git website.
Merge commits (squash)
To merge a series of commits, Git provides an option to squash commits down into a single commit. This option can be helpful if you make frequent commits and end up with a long list of commits that you want to clean up before pushing to a remote repository.
You can squash two commits on the command line by using the following command:
git rebase -i HEAD~2
Then update pick to squash, save, and update the commit message.

To merge commits in Visual Studio, use the Ctrl key to select multiple commits that you want to merge. Then right-click and select Squash Commits. Visual Studio automatically combines your commit messages, but sometimes it's better to provide an updated message. After you review and update your commit message, select the Squash button.

To learn more about squashing, see Git Tools - Rewriting History on the Git website.
Merge and rebase branches
If you're using Git branches to work on different features, at some point you'll need to include updates introduced to other branches. This can happen while you're still working on your feature branch. It can also happen when you're done working on your feature branch and need to keep your changes by adding them to a different branch. In Git, you can include these updates by merging or rebasing branches.
Note
The following instructions use New_Feature as an example name for a feature branch. Replace it with the name of your own branch.
To merge the main branch into your feature branch on the command line, use the following commands:
git checkout New_Feature
git merge main
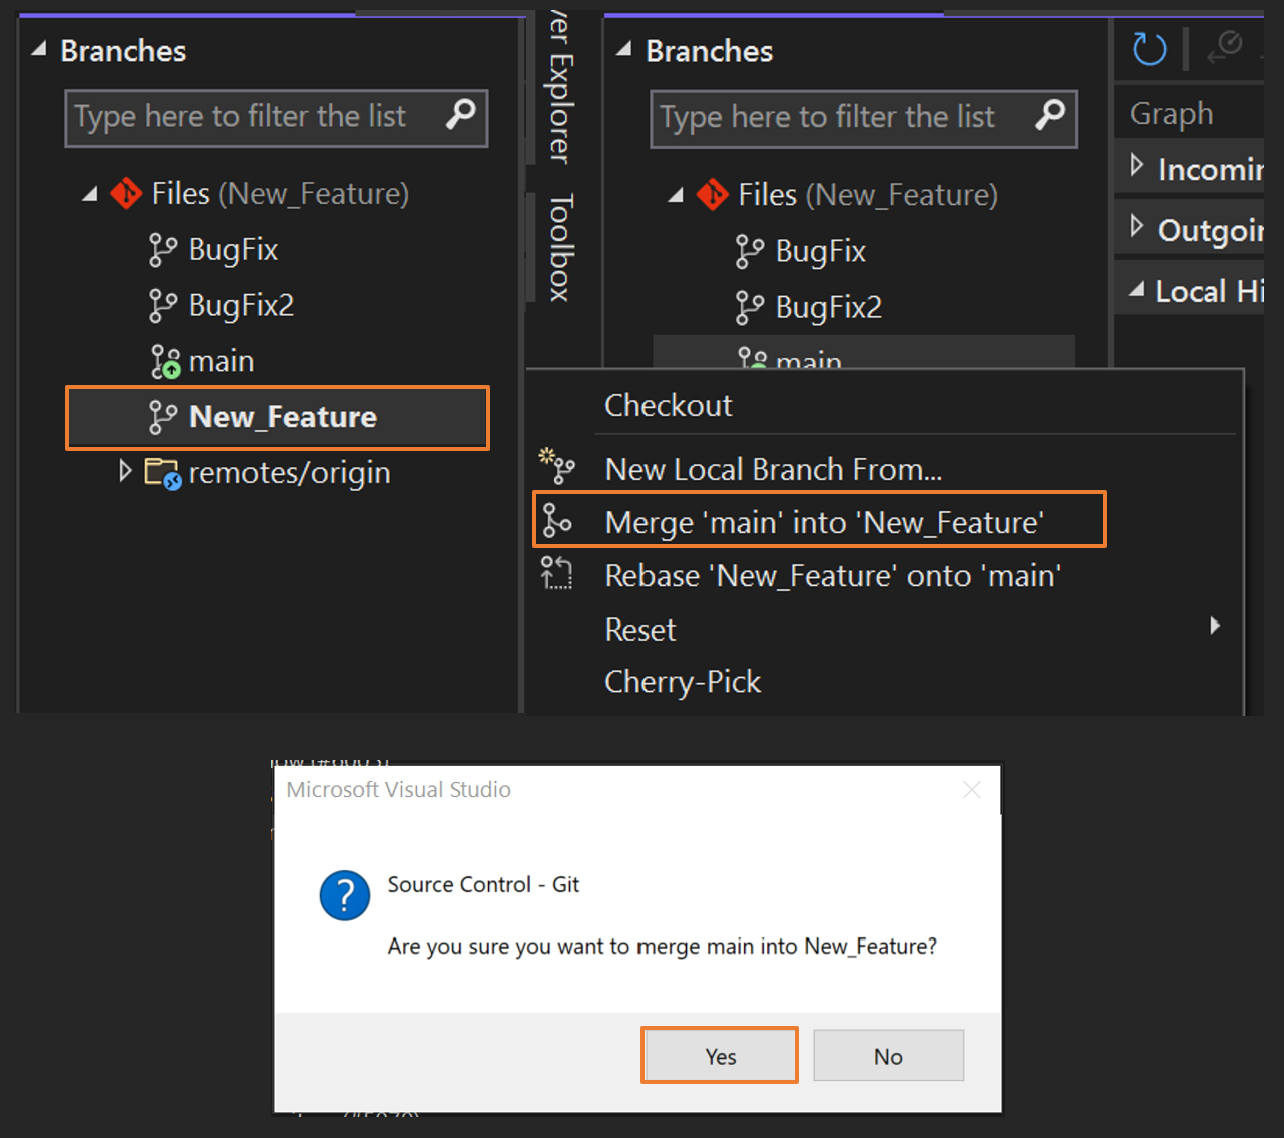
To do the same in Visual Studio, check out the feature branch by double-clicking it in the branch list. Then right-click main and select Merge 'main' into 'New_Feature'.
To rebase the main branch into your feature branch on the command line, use the following commands:
git checkout New_Feature
git rebase main
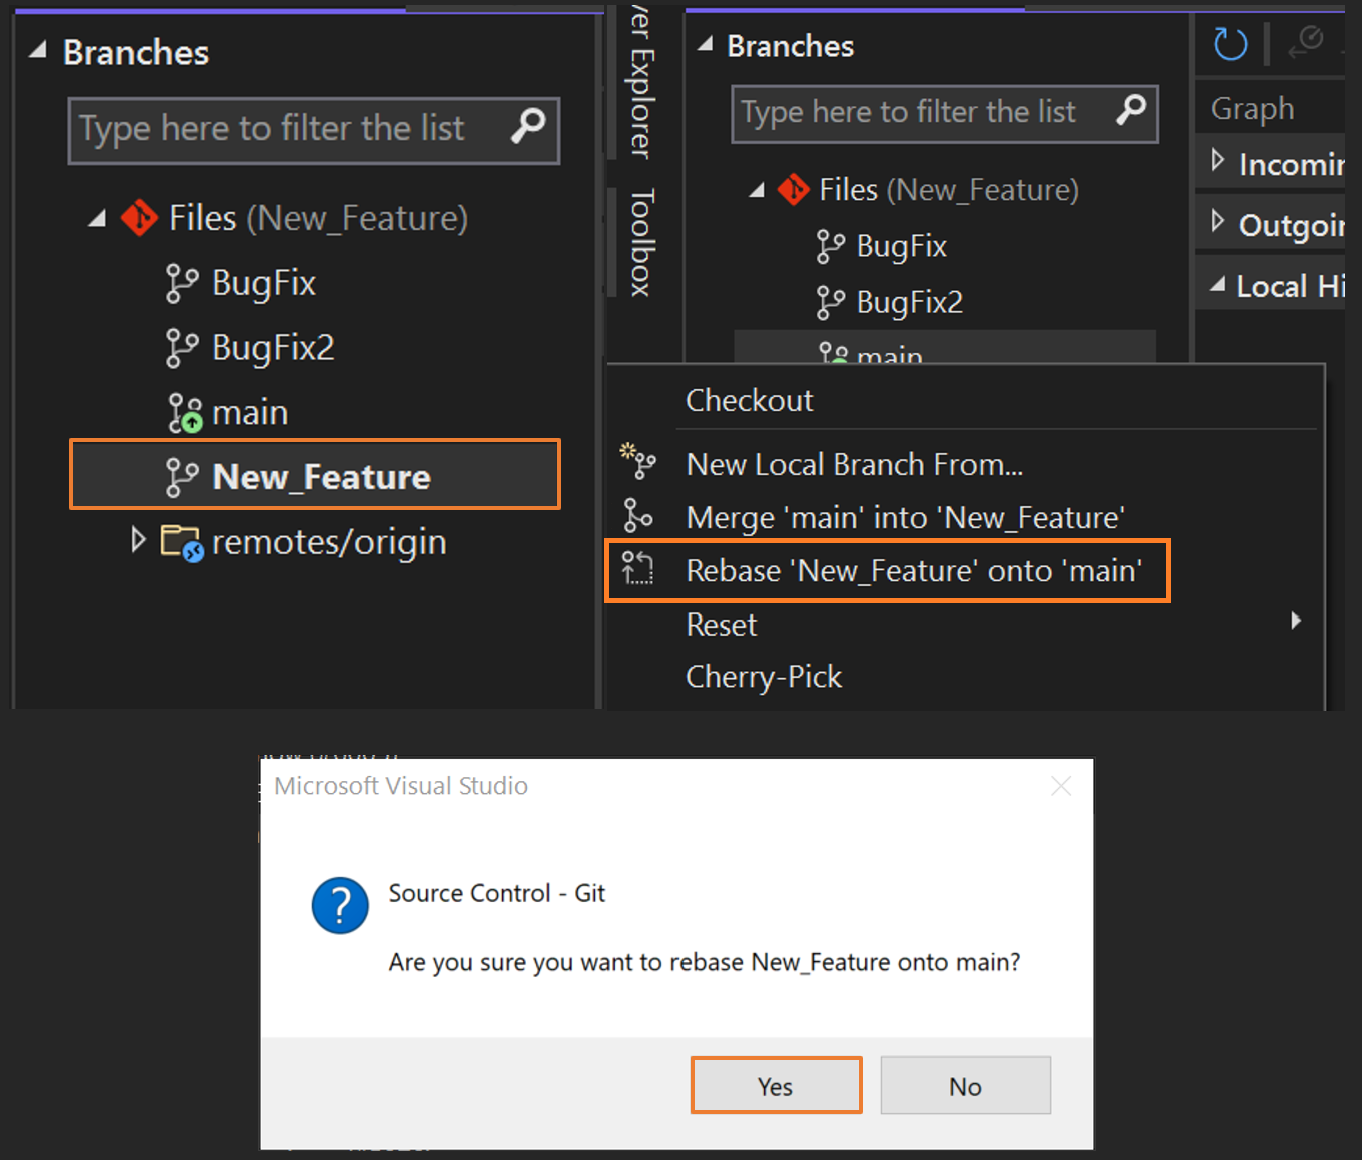
To do the same in Visual Studio, check out the feature branch by double-clicking it in the branch list. Then right-click main and select Rebase 'New_Feature' onto 'main'.
To learn more about merging, rebasing, and branching in general, see Git Branching on the Git website.
Copy commits (cherry-pick)
Copy commits from one branch to another by using the cherry-pick option. Unlike a merge or rebase, cherry-picking brings only the changes from the commits that you select, instead of all the changes in a branch. Cherry-picking is a great way to tackle these common problems:
- Accidentally committing in the wrong branch. Cherry-pick the changes over to the correct branch and then reset the original branch to the previous commit.
- Pulling out a set of commits made in a feature branch, so you merge them back to your main branch sooner.
- Porting in specific commits from the main branch without rebasing your branch.
To copy changes from a commit to your current branch by using the command line, use the following command:
git cherry-pick 7599e530
To do the same in Visual Studio, preview the branch that you want to cherry-pick a commit from by selecting it with a single click. Then right-click the targeted commit and select Cherry-Pick.

When the operation is complete, Visual Studio shows a success message. The commit that you cherry-picked appears in the Outgoing section.
To learn more about cherry-picking commits, see the Git webpage for the cherry-pick command.
Revert changes
Use the revert command to undo the changes made in commits pushed to shared branches. The revert command creates a new commit that undoes the changes made on a previous commit. The revert command doesn't rewrite the repository history, which makes it safe to use when you're working with others.
To revert changes made in a commit by using the command line, use the following commands. Replace the example ID with the ID of a real commit in your branch.
git revert 53333305
git commit
In the previous example, the commands will undo the changes made in commit 53333305 and create a new commit on the branch. The original commit is still in the Git history. To do the same in Visual Studio, right-click the commit you want to revert and then select Revert. After you confirm your action and the operation is complete, Visual Studio displays a success message and a new commit appears in the Outgoing section.

Select the new commit to confirm that it undoes the changes of the reverted commit.

To learn more about reverting changes, see the Git webpage for the revert command.
Reset a branch to a previous state
Use the reset command to bring a branch in your local repository back to the contents of a previous commit. This action discards all changes that have happened since the commit that you're resetting your branch to.
Warning
Don't reset shared branches, because you might delete other people's work. Use the revert command instead.
To reset a branch to a previous state by using the command line, use the following command. Replace the example ID with the ID of a real commit in your branch.
git reset --hard 53333305
The --hard part of the command tells Git to reset the files to the state of the previous commit and discard any staged changes. To do the same in Visual Studio, right-click the commit that you want to reset your branch to, and then select Reset > Delete Changes (--hard).

To learn more about resetting branches, see the Git webpage for the reset command.
Related content
Visszajelzés
Hamarosan elérhető: 2024-ben fokozatosan kivezetjük a GitHub-problémákat a tartalom visszajelzési mechanizmusaként, és lecseréljük egy új visszajelzési rendszerre. További információ: https://aka.ms/ContentUserFeedback.
Visszajelzés küldése és megtekintése a következőhöz: