Import and export glossary terms
This article describes how to work with the business glossary in Microsoft Purview. It provides steps to create a business glossary term in the Microsoft Purview Data Catalog. It also shows you how to import and export glossary terms by using .CSV files, and how to delete terms that you no longer need.
Import terms into the glossary
The Microsoft Purview Data Catalog provides a template .CSV file for you to import terms from the catalog into your glossary. Duplicate terms include both spelling and capitalization, because term names are case-sensitive.
Open the Microsoft Purview Data Catalog.
If you're using the classic Microsoft Purview portal, select Glossary. If you're using the new Microsoft Purview portal under Business glossary, select Glossaries.
Select the glossary where you want to import terms.
- In the Microsoft Purview portal, select View terms and then select Import terms.
- In the classic governance portal, select Import terms.
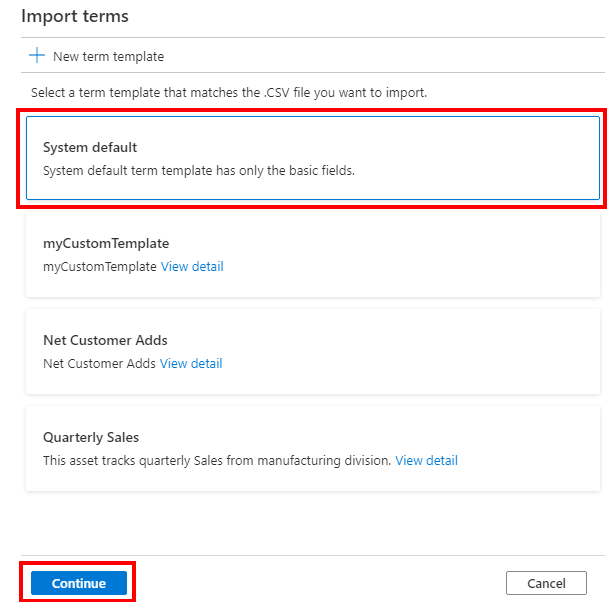
Select the template, or templates, for the terms you want to import, and then select Continue.
You can select multiple templates and import terms for different templates from a single .csv file.
Download the .csv template and use it to enter the terms that you want to add.
Give your template file a name that starts with a letter and includes only letters, numbers, spaces, an underscore (_), or other non-ASCII Unicode characters. Special characters in the file name will create an error.
Important
The system supports only importing columns that are available in the template. The System default template will have all the default attributes.
Custom term templates define out-of-the box attributes and additional custom attributes. Therefore, the .CSV file differs in the total number of columns and the column names, depending on the term template that you select. You can also review the file for problems after upload.
If you want to upload a file with a rich text definition, be sure to enter the definition with markup tags and populate the column
IsDefinitionRichTexttotruein the .CSV file.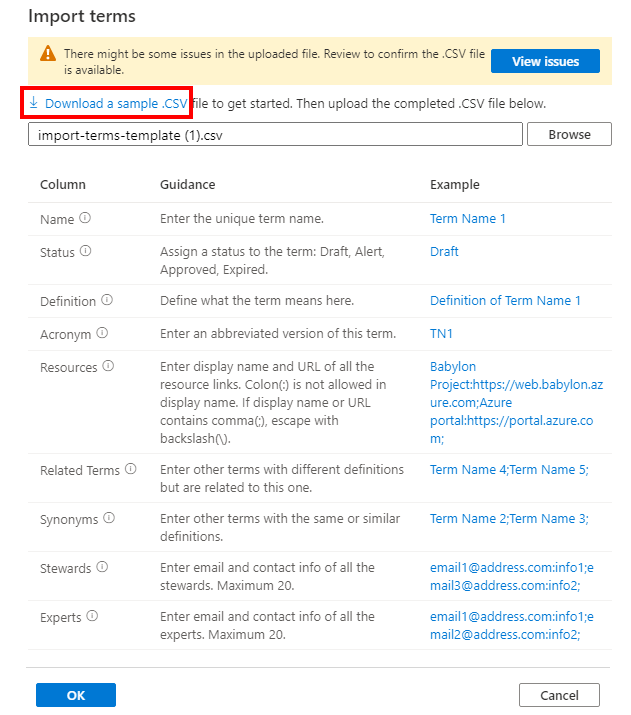
After you finish filling out your .CSV file, select your file to import, and then select OK.
The system will upload the file and add all the terms to your selected glossary.
Important
The email address for an expert or steward should be the primary address of the user from the Microsoft Entra group. Alternate emails, user principal names, and non-Azure AD emails are not yet supported.
Export terms from the glossary
When you're in any of your glossaries, the Export terms button is disabled by default. After you select the terms that you want to export, the Export terms button is enabled.
Note
Selected terms don't need to be from the same term template to be able to export them.
Select Export terms to download the selected terms.

Important
The import process currently doesn't support updating the parent of a term.
Business terms with approval workflow enabled
If workflows are enabled on a term, then any import actions for the term will go through an approval before they're saved in the data catalog.
When an import approval workflow is enabled for the Microsoft Purview glossary, you'll see Submit for approval instead of OK in the Import window when you're importing terms via .CSV file. Selecting Submit for approval triggers the workflow. However, the terms in the file won't be updated in the catalog until all the approvals are met.
Next steps
- For more information about glossary terms, see the glossary reference.
- For more information about approval workflows of the business glossary, see Approval workflow for business terms.
Visszajelzés
Hamarosan elérhető: 2024-ben fokozatosan kivezetjük a GitHub-problémákat a tartalom visszajelzési mechanizmusaként, és lecseréljük egy új visszajelzési rendszerre. További információ: https://aka.ms/ContentUserFeedback.
Visszajelzés küldése és megtekintése a következőhöz: