Create, list, update, and delete Microsoft Purview DevOps policies
DevOps policies are a type of Microsoft Purview access policies. You can use them to manage access to system metadata on data sources that have been registered for Data policy enforcement in Microsoft Purview.
You can configure DevOps policies directly from the Microsoft Purview governance portal. After they're saved, they're automatically published and then enforced by the data source. Microsoft Purview policies manage only access for Microsoft Entra principals.
This guide covers the configuration steps in Microsoft Purview to provision access to database system metadata by using the DevOps policy actions for the SQL Performance Monitor and SQL Security Auditor roles. It shows how to create, list, update, and delete DevOps policies.
Prerequisites
An Azure account with an active subscription. Create an account for free.
A new or existing Microsoft Purview account. Follow this quickstart guide to create one.
Configuration
Before you author policies in the Microsoft Purview policy portal, you need to configure the data sources so that they can enforce those policies:
- Follow any policy-specific prerequisites for your source. Check the table of Microsoft Purview supported data sources and select the link in the Access policy column for sources where access policies are available. Follow any steps listed in the "Access policy" and "Prerequisites" sections.
- Register the data source in Microsoft Purview. Follow the "Prerequisites" and "Register" sections of the source pages for your resources.
- Turn on the Data policy enforcement toggle in the data source registration. For more information, including additional permissions that you need for this step, see Enable Data policy enforcement on your Microsoft Purview sources.
Create a new DevOps policy
To create a DevOps policy, first ensure that you have the Microsoft Purview Policy Author role at the root collection level. Check the section on managing Microsoft Purview role assignments in this guide. Then, follow these steps:
Sign in to the Microsoft Purview governance portal.
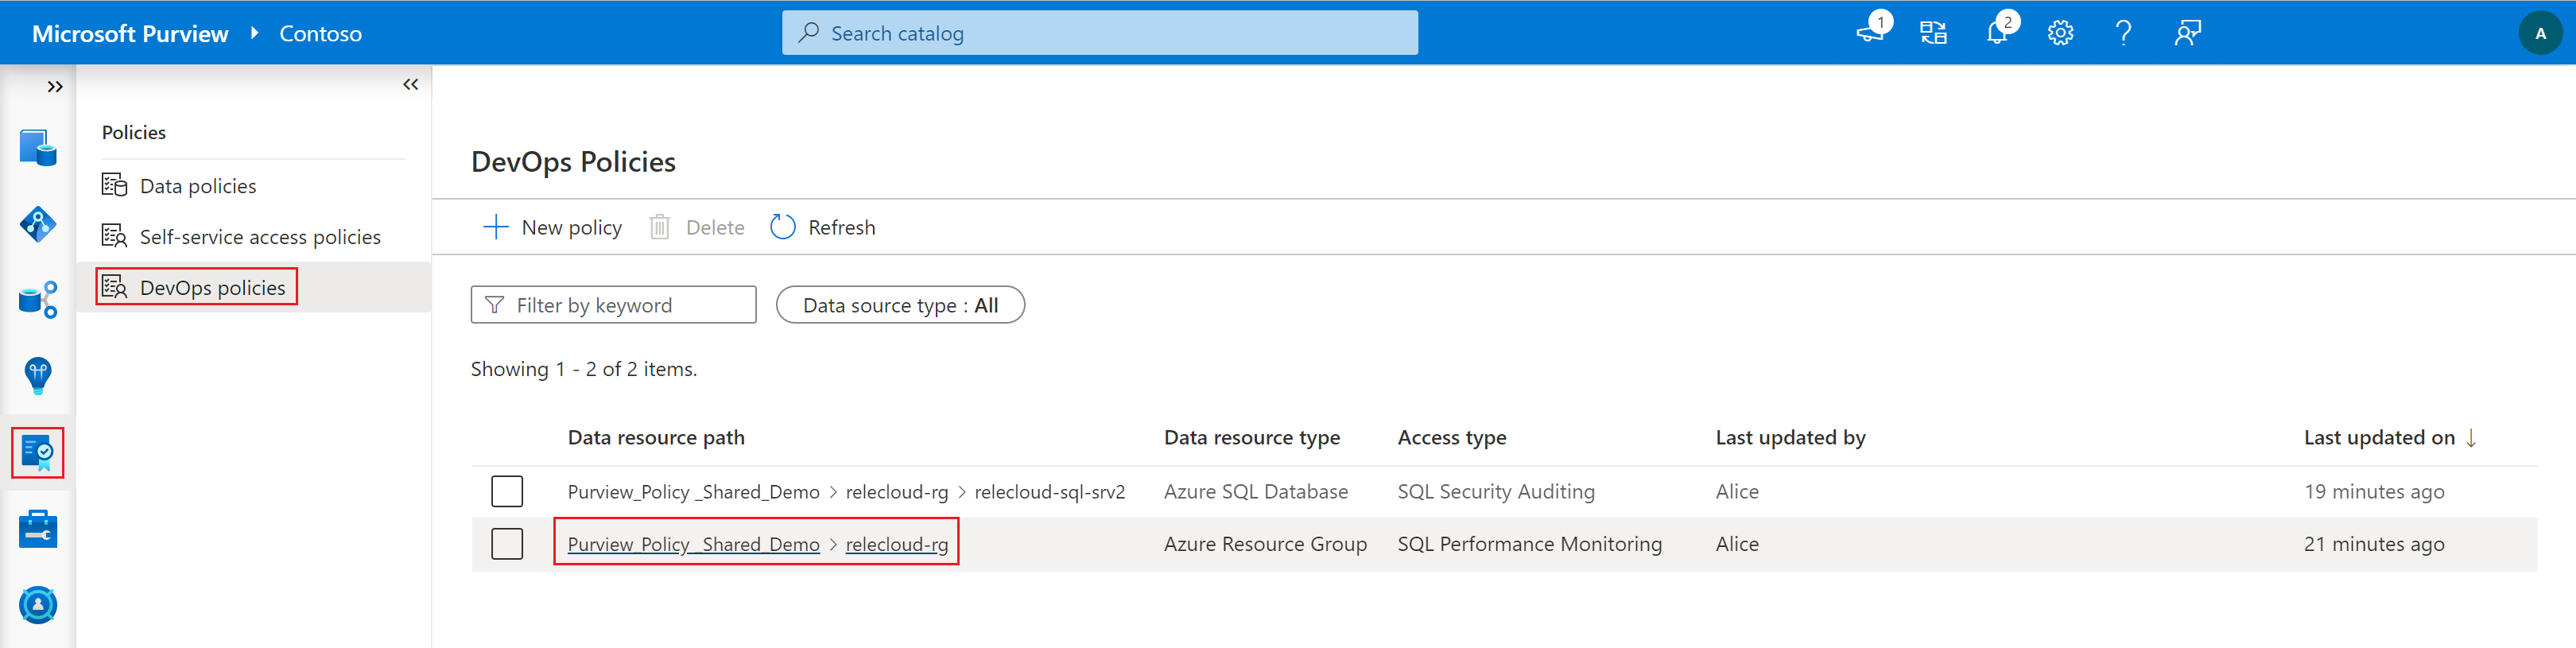
On the left pane, select Data policy. Then select DevOps policies.
Select the New policy button.
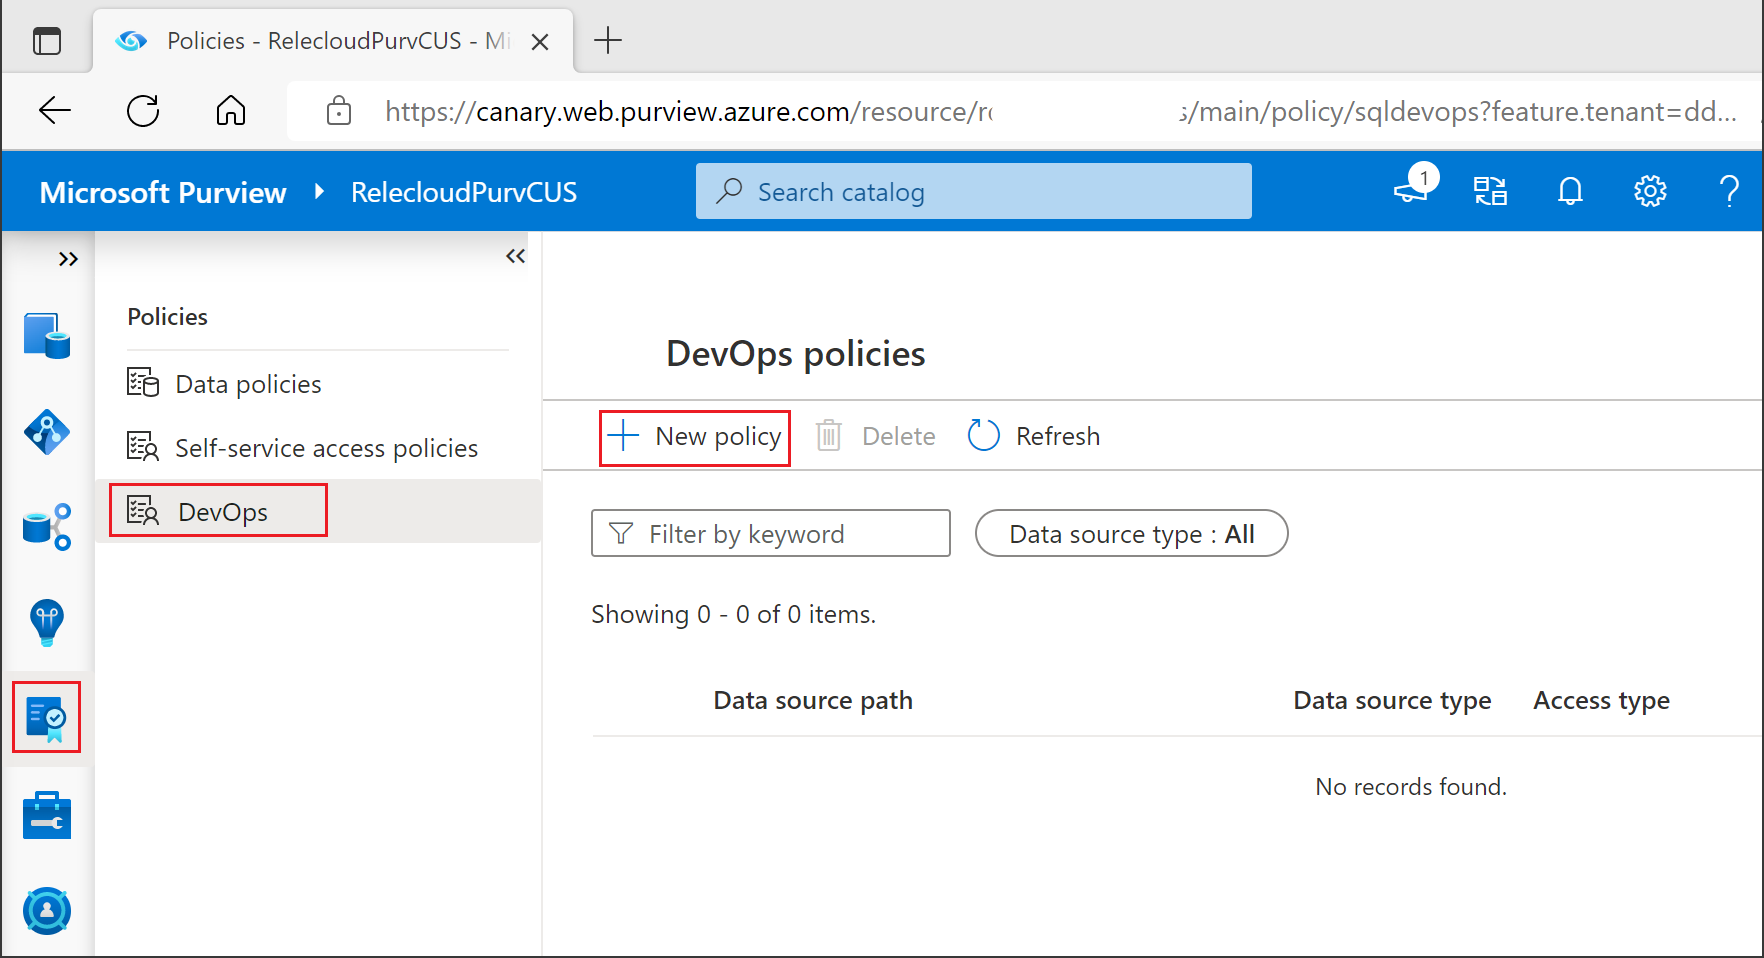
The policy detail panel opens.
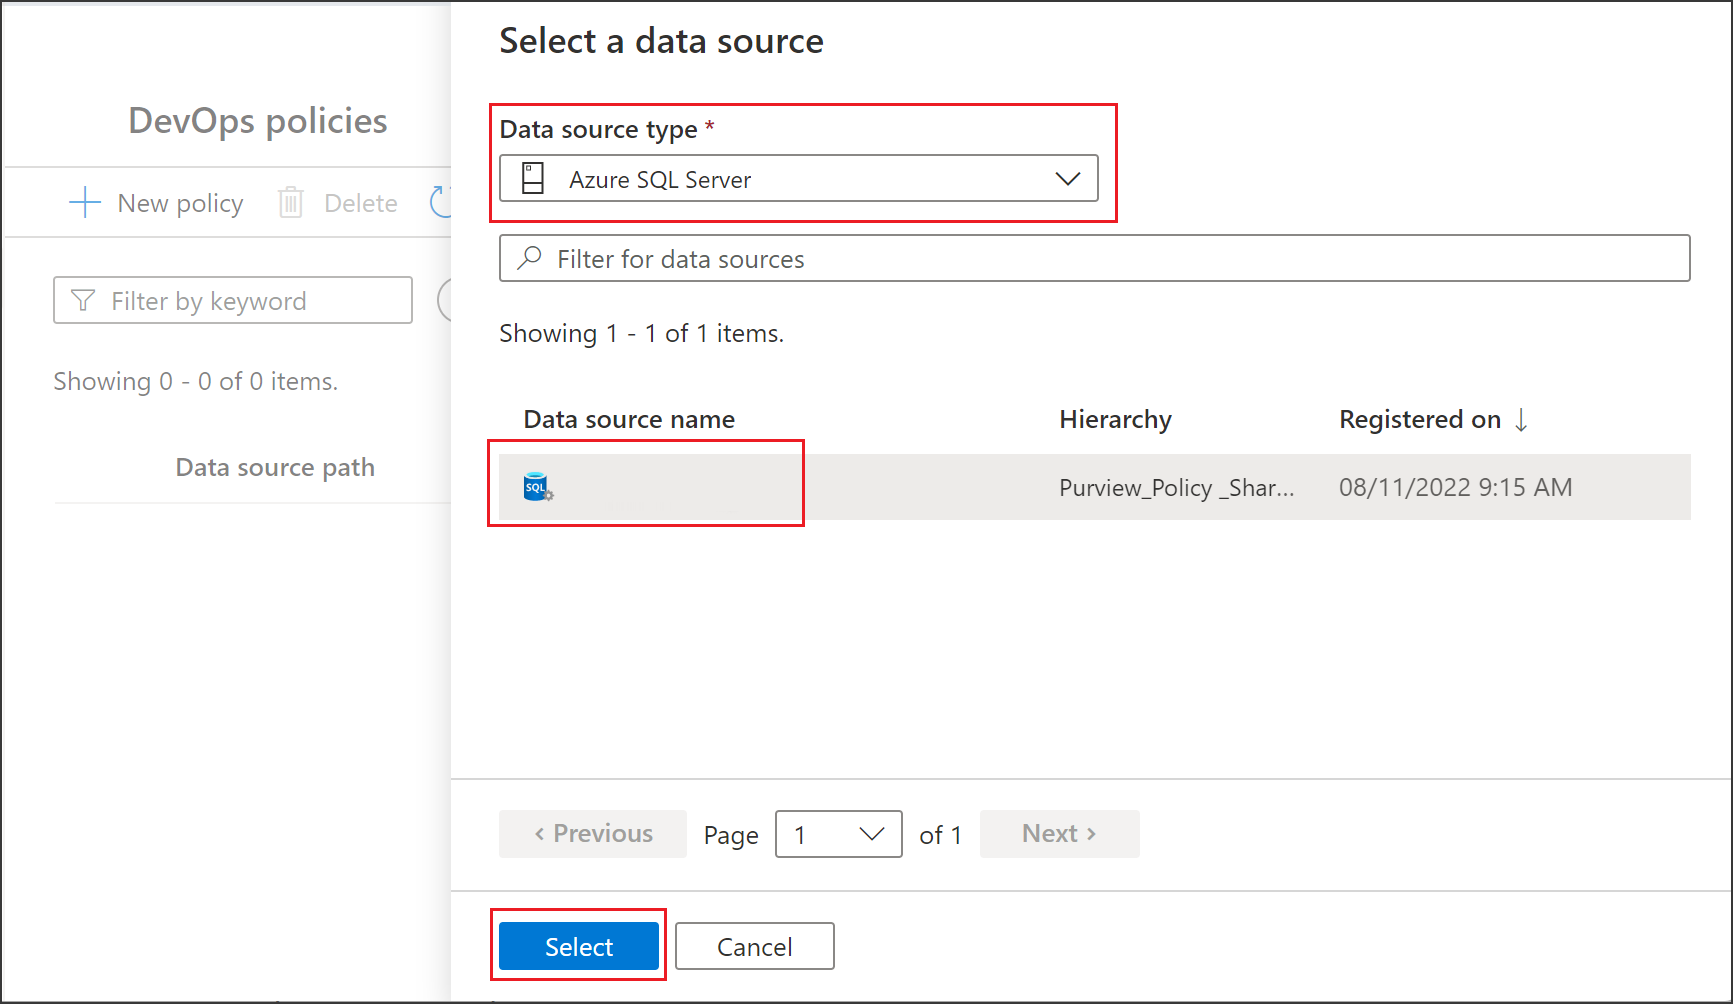
For Data source type, select a data source. Under Data source name, select one of the listed data sources. Then click Select to return to the New Policy pane.
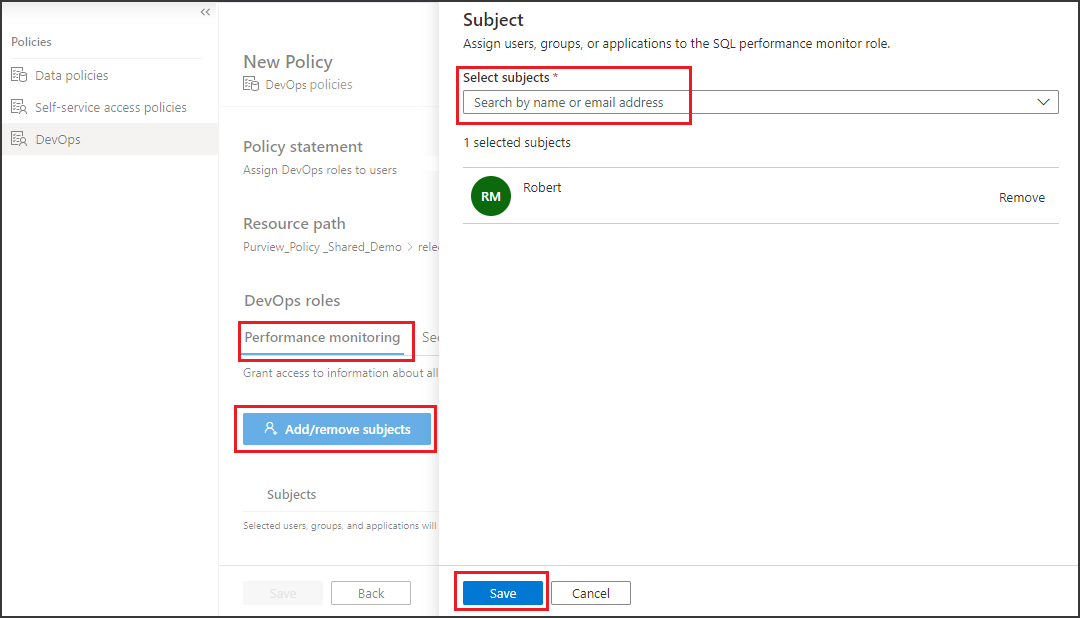
Select one of two roles, Performance monitoring or Security auditing. Then select Add/remove subjects to open the Subject panel.
In the Select subjects box, enter the name of a Microsoft Entra principal (user, group, or service principal). Microsoft 365 groups are supported, but updates to group membership take up to one hour to be reflected in Microsoft Entra ID. Keep adding or removing subjects until you're satisfied, and then select Save.
Select Save to save the policy. The policy is published automatically. Enforcement starts at the data source within five minutes.
List DevOps policies
To list DevOps policies, first ensure that you have one of the following Microsoft Purview roles at the root collection level: Policy Author, Data Source Admin, Data Curator, or Data Reader. Check the section on managing Microsoft Purview role assignments in this guide. Then, follow these steps:
Sign in to the Microsoft Purview governance portal.
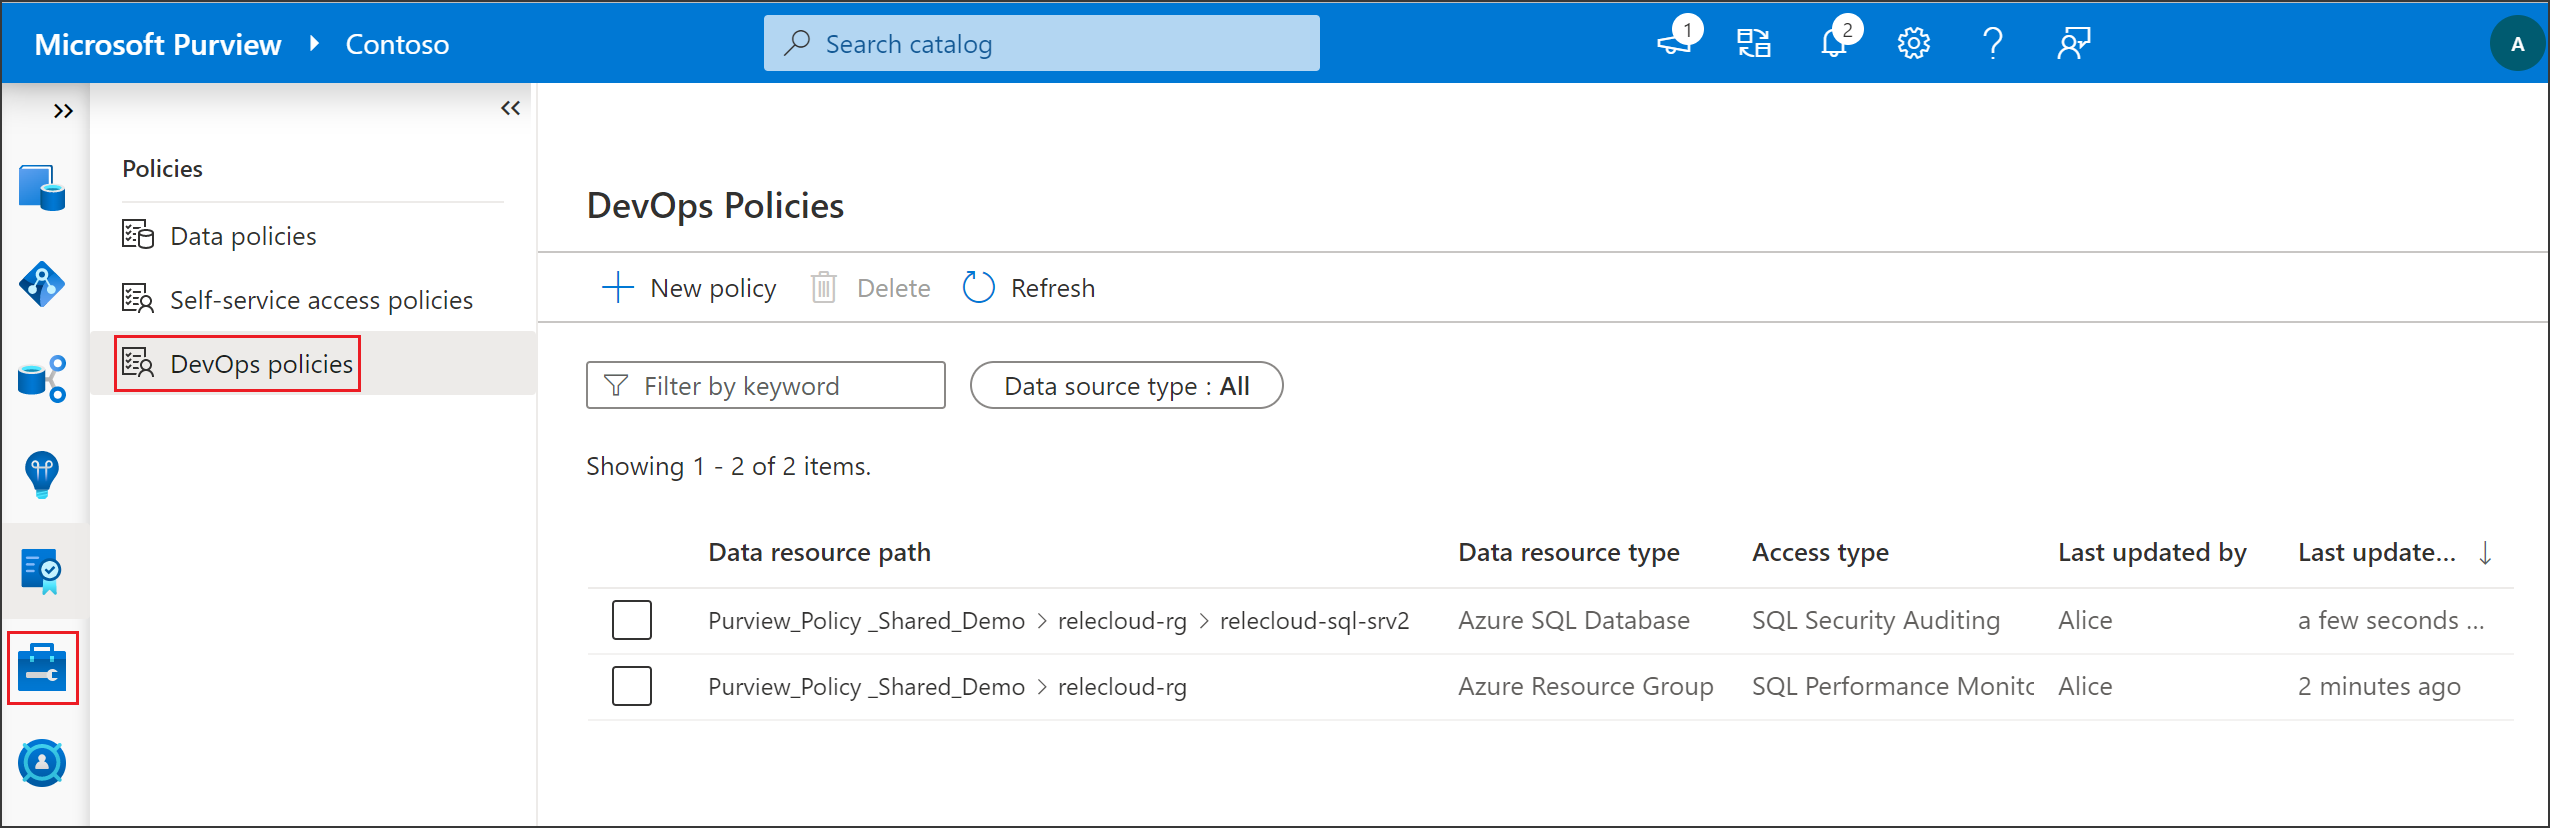
On the left pane, select Data policy. Then select DevOps policies.
The DevOps Policies pane lists any policies that have been created.
Update a DevOps policy
To update a DevOps policy, first ensure that you have the Microsoft Purview Policy Author role at the root collection level. Check the section on managing Microsoft Purview role assignments in this guide. Then, follow these steps:
Sign in to the Microsoft Purview governance portal.
On the left pane, select Data policy. Then select DevOps policies.
On the DevOps Policies pane, open the policy details for one of the policies by selecting it from its data resource path.
On the pane for policy details, select Edit.
Make your changes, and then select Save.
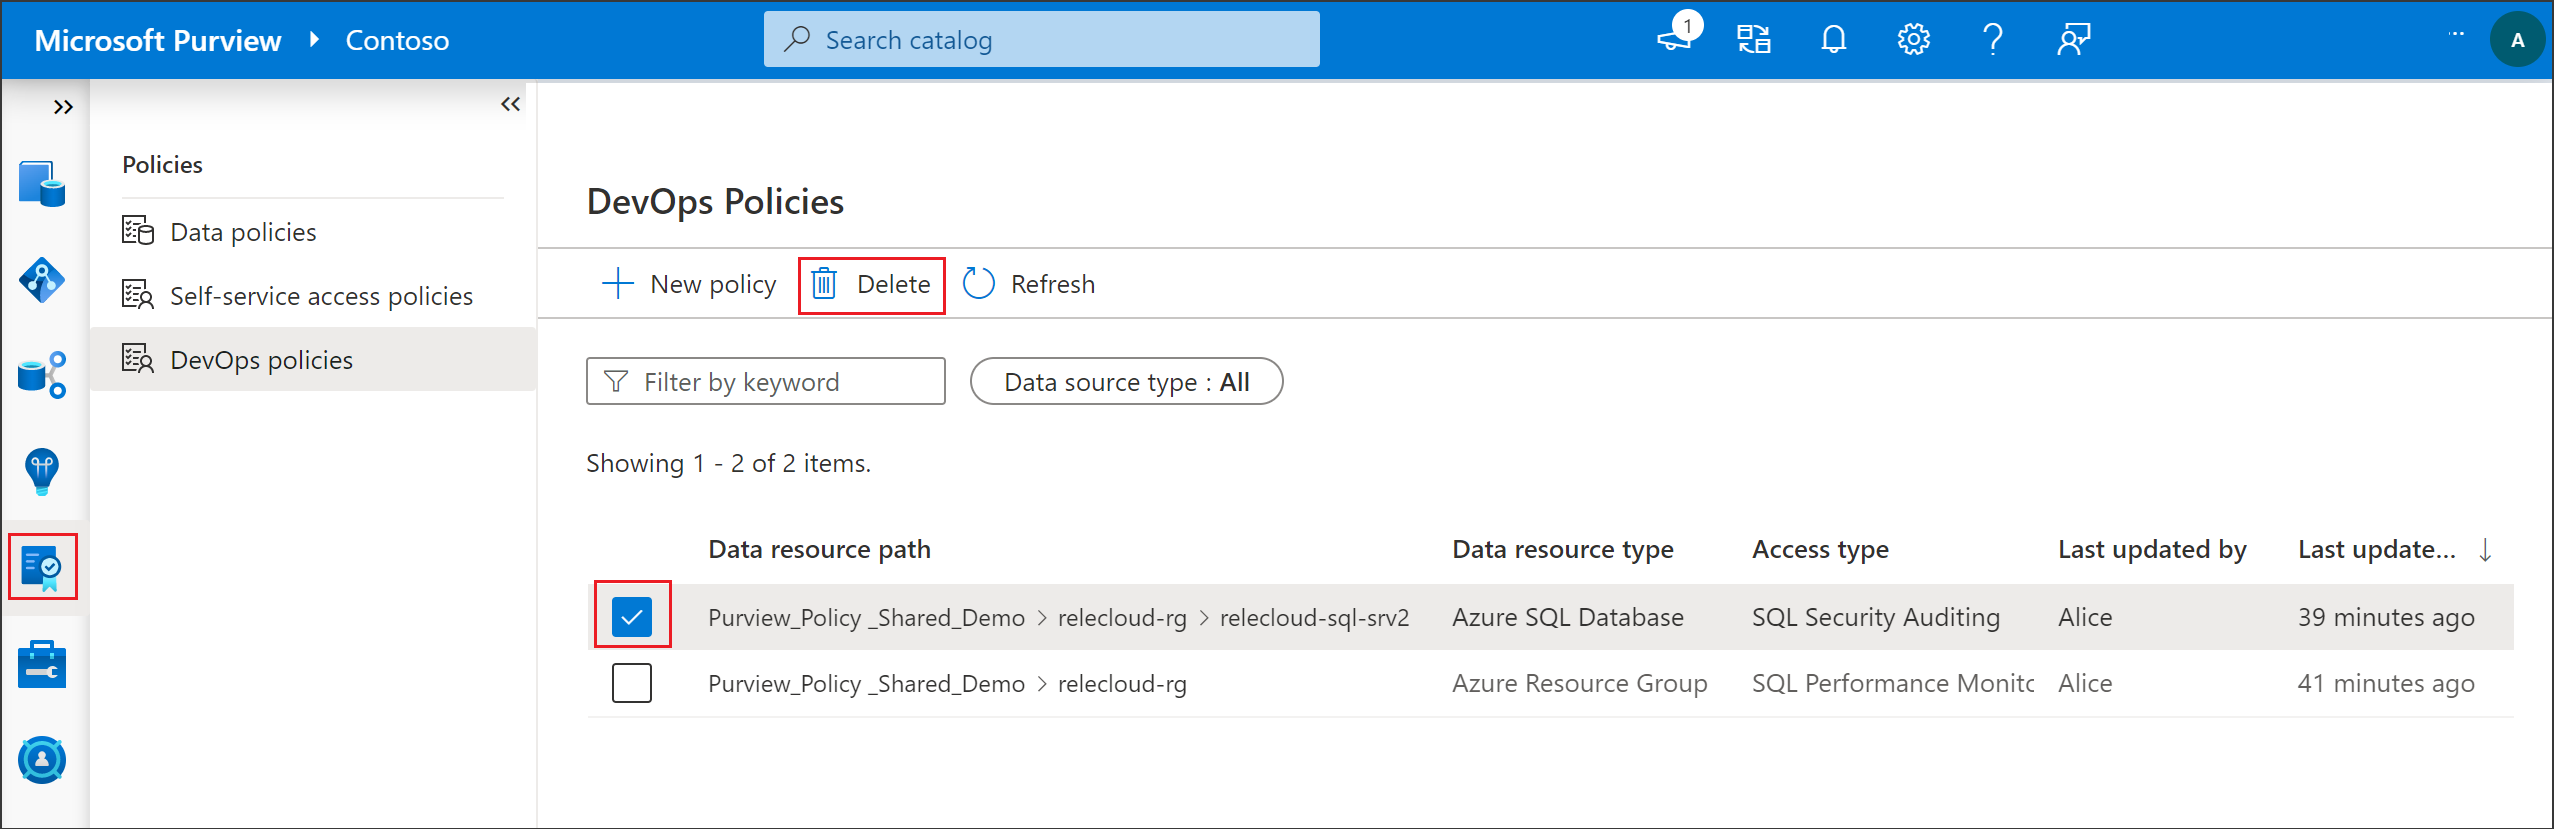
Delete a DevOps policy
To delete a DevOps policy, first ensure that you have the Microsoft Purview Policy Author role at the root collection level. Check the section on managing Microsoft Purview role assignments in this guide. Then, follow these steps:
Sign in to the Microsoft Purview governance portal.
On the left pane, select Data policy. Then select DevOps policies.
Select the checkbox for one of the policies, and then select Delete.
Test the DevOps policy
After you create a policy, any of the Microsoft Entra users that you selected as subjects can now connect to the data sources in the scope of the policy. To test, use SQL Server Management Studio (SSMS) or any SQL client and try to query some dynamic management views (DMVs) and dynamic management functions (DMFs). The following sections list a few examples. For more examples, consult the mapping of popular DMVs and DMFs in What can I accomplish with Microsoft Purview DevOps policies?.
If you require more troubleshooting, see the Next steps section in this guide.
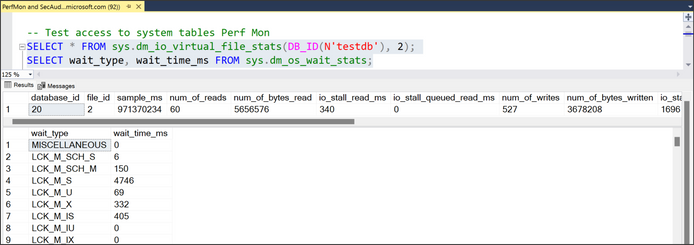
Test SQL Performance Monitor access
If you provided the subjects of the policy for the SQL Performance Monitor role, you can issue the following commands:
-- Returns I/O statistics for data and log files
SELECT * FROM sys.dm_io_virtual_file_stats(DB_ID(N'testdb'), 2)
-- Waits encountered by threads that executed. Used to diagnose performance issues
SELECT wait_type, wait_time_ms FROM sys.dm_os_wait_stats
Test SQL Security Auditor access
If you provided the subjects of the policy for the SQL Security Auditor role, you can issue the following commands from SSMS or any SQL client:
-- Returns the current state of the audit
SELECT * FROM sys.dm_server_audit_status
-- Returns information about the encryption state of a database and its associated database encryption keys
SELECT * FROM sys.dm_database_encryption_keys
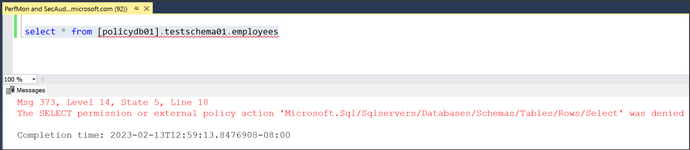
Ensure no access to user data
Try to access a table in one of the databases by using the following command:
-- Test access to user data
SELECT * FROM [databaseName].schemaName.tableName
The Microsoft Entra principal that you're testing with should be denied, which means the data is protected from insider threats.
Role definition detail
The following table maps Microsoft Purview data policy roles to specific actions in SQL data sources.
| Microsoft Purview policy role | Actions in data sources |
|---|---|
| SQL Performance Monitor | Microsoft.Sql/Sqlservers/Connect |
| Microsoft.Sql/Sqlservers/Databases/Connect | |
| Microsoft.Sql/Sqlservers/Databases/SystemViewsAndFunctions/DatabasePerformanceState/Rows/Select | |
| Microsoft.Sql/Sqlservers/SystemViewsAndFunctions/ServerPerformanceState/Rows/Select | |
| Microsoft.Sql/Sqlservers/Databases/SystemViewsAndFunctions/DatabaseGeneralMetadata/Rows/Select | |
| Microsoft.Sql/Sqlservers/SystemViewsAndFunctions/ServerGeneralMetadata/Rows/Select | |
| Microsoft.Sql/Sqlservers/Databases/DBCCs/ViewDatabasePerformanceState/Execute | |
| Microsoft.Sql/Sqlservers/DBCCs/ViewServerPerformanceState/Execute | |
| Microsoft.Sql/Sqlservers/Databases/ExtendedEventSessions/Create | |
| Microsoft.Sql/Sqlservers/Databases/ExtendedEventSessions/Options/Alter | |
| Microsoft.Sql/Sqlservers/Databases/ExtendedEventSessions/Events/Add | |
| Microsoft.Sql/Sqlservers/Databases/ExtendedEventSessions/Events/Drop | |
| Microsoft.Sql/Sqlservers/Databases/ExtendedEventSessions/State/Enable | |
| Microsoft.Sql/Sqlservers/Databases/ExtendedEventSessions/State/Disable | |
| Microsoft.Sql/Sqlservers/Databases/ExtendedEventSessions/Drop | |
| Microsoft.Sql/Sqlservers/Databases/ExtendedEventSessions/Target/Add | |
| Microsoft.Sql/Sqlservers/Databases/ExtendedEventSessions/Target/Drop | |
| Microsoft.Sql/Sqlservers/ExtendedEventSessions/Create | |
| Microsoft.Sql/Sqlservers/ExtendedEventSessions/Options/Alter | |
| Microsoft.Sql/Sqlservers/ExtendedEventSessions/Events/Add | |
| Microsoft.Sql/Sqlservers/ExtendedEventSessions/Events/Drop | |
| Microsoft.Sql/Sqlservers/ExtendedEventSessions/State/Enable | |
| Microsoft.Sql/Sqlservers/ExtendedEventSessions/State/Disable | |
| Microsoft.Sql/Sqlservers/ExtendedEventSessions/Drop | |
| Microsoft.Sql/Sqlservers/ExtendedEventSessions/Target/Add | |
| Microsoft.Sql/Sqlservers/ExtendedEventSessions/Target/Drop | |
| SQL Security Auditor | Microsoft.Sql/Sqlservers/Connect |
| Microsoft.Sql/Sqlservers/Databases/Connect | |
| Microsoft.Sql/sqlservers/SystemViewsAndFunctions/ServerSecurityState/rows/select | |
| Microsoft.Sql/Sqlservers/Databases/SystemViewsAndFunctions/DatabaseSecurityState/rows/select | |
| Microsoft.Sql/sqlservers/SystemViewsAndFunctions/ServerSecurityMetadata/rows/select | |
| Microsoft.Sql/Sqlservers/Databases/SystemViewsAndFunctions/DatabaseSecurityMetadata/rows/select | |
Next steps
Check the following blogs, videos, and related articles:
- Blog: Microsoft Purview DevOps policies for Azure SQL Database is now generally available
- Blog: Inexpensive solution for managing access to SQL health, performance, and security information
- Blog: Microsoft Purview DevOps policies enable at-scale access provisioning for IT operations
- Blog: Microsoft Purview DevOps policies API is now public
- Video: Prerequisite for policies: The "Data policy enforcement" option
- Video: Quick overview of DevOps policies
- Video: Deep dive for DevOps policies
- Article: Microsoft Purview DevOps policies concept guide
- Article: Microsoft Purview DevOps policies on Azure Arc-enabled SQL Server
- Article: Microsoft Purview DevOps policies on Azure SQL Database
- Article: Microsoft Purview DevOps policies on entire resource groups or subscriptions
- Article: Troubleshoot Microsoft Purview policies for SQL data sources
Visszajelzés
Hamarosan: 2024-ben fokozatosan kivezetjük a GitHub-problémákat a tartalom visszajelzési mechanizmusaként, és lecseréljük egy új visszajelzési rendszerre. További információ: https://aka.ms/ContentUserFeedback.
Visszajelzés küldése és megtekintése a következőhöz: