Latihan - Memberi nilai awal akun penyimpanan dan database
Anda memperbarui alur untuk membuat dan menyebarkan aplikasi situs web aplikasi ke Azure App Service yang didefinisikan dalam file Bicep Anda. Tetapi, tahap uji asap gagal karena database belum berfungsi. Di unit ini, Anda menyebarkan server logis dan database Azure SQL baru, dan mengonfigurasi alur Anda untuk membangun dan menyebarkan skema database. Anda juga memperbarui alur untuk menambahkan beberapa contoh data produk untuk lingkungan pengujian Anda sehingga tim Anda dapat mencoba situs web.
Dalam prosesnya, Anda melakukan tugas-tugas berikut:
- Menambahkan kontainer blob ke akun penyimpanan Azure.
- Menambahkan server logis dan database Azure SQL.
- Memperbarui tahap build untuk membuat proyek database menjadi file DACPAC.
- Menambahkan variabel baru ke grup variabel Anda untuk server logis dan database Azure SQL.
- Memperbarui tahap penyebaran Anda untuk menggunakan variabel baru sebagai nilai parameter.
- Menambahkan langkah-langkah alur baru untuk menyebarkan file DACPAC Anda.
- Menjalankan alur dan melihat situs web.
Menambahkan kontainer penyimpanan
File Bicep Anda sudah mendefinisikan akun penyimpanan, tetapi tidak menentukan kontainer blob. Di sini, Anda menambahkan kontainer blob ke file Bicep Anda. Anda juga memberikan nama akun penyimpanan dan kontainer blob ke aplikasi dengan menggunakan pengaturan konfigurasinya. Dengan begitu, aplikasi mengetahui akun penyimpanan mana yang harus diakses.
Di Visual Studio Code, buka file main.bicep di folder deploy.
Di bawah variabel yang menentukan nama sumber daya (di dekat Baris 27), tambahkan definisi variabel baru untuk nama kontainer penyimpanan blob:
var storageAccountImagesBlobContainerName = 'toyimages'Perbarui sumber daya
storageAccountuntuk menentukan kontainer blob:resource storageAccount 'Microsoft.Storage/storageAccounts@2022-09-01' = { name: storageAccountName location: location kind: 'StorageV2' sku: environmentConfigurationMap[environmentType].storageAccount.sku resource blobService 'blobServices' = { name: 'default' resource storageAccountImagesBlobContainer 'containers' = { name: storageAccountImagesBlobContainerName properties: { publicAccess: 'Blob' } } } }Perbarui properti aplikasi
appSettingsuntuk menambahkan tiga pengaturan aplikasi baru untuk nama akun penyimpanan, titik akhir blob, dan nama kontainer blob:resource appServiceApp 'Microsoft.Web/sites@2022-03-01' = { name: appServiceAppName location: location properties: { serverFarmId: appServicePlan.id httpsOnly: true siteConfig: { appSettings: [ { name: 'APPINSIGHTS_INSTRUMENTATIONKEY' value: applicationInsights.properties.InstrumentationKey } { name: 'APPLICATIONINSIGHTS_CONNECTION_STRING' value: applicationInsights.properties.ConnectionString } { name: 'ReviewApiUrl' value: reviewApiUrl } { name: 'ReviewApiKey' value: reviewApiKey } { name: 'StorageAccountName' value: storageAccount.name } { name: 'StorageAccountBlobEndpoint' value: storageAccount.properties.primaryEndpoints.blob } { name: 'StorageAccountImagesContainerName' value: storageAccount::blobService::storageAccountImagesBlobContainer.name } ] } } }Di akhir file, tambahkan output baru untuk mengekspos nama akun penyimpanan dan kontainer blob:
output storageAccountName string = storageAccount.name
output storageAccountImagesBlobContainerName string = storageAccount::blobService::storageAccountImagesBlobContainer.name
Simpan perubahan Anda ke file tersebut.
Lakukan perubahan Anda ke repositori Git, tetapi jangan mendorongnya. Di terminal Visual Studio Code, jalankan perintah berikut:
git add .
git commit -m "Add storage container"
Menambahkan server logis dan database Azure SQL
File Bicep Anda saat ini tidak menggunakan server logis atau database Azure SQL. Di bagian ini, Anda menambahkan sumber daya ini ke file Bicep.
Dalam file main.bicep, tambahkan dua parameter baru di
reviewApiKeybawah parameter :@description('The administrator login username for the SQL server.') param sqlServerAdministratorLogin string @secure() @description('The administrator login password for the SQL server.') param sqlServerAdministratorLoginPassword stringDi bawah variabel yang menentukan nama sumber daya, tambahkan variabel baru untuk menentukan nama server logis dan database Azure SQL Anda:
var sqlServerName = 'toy-website-${resourceNameSuffix}'
var sqlDatabaseName = 'Toys'
Di bawah variabel yang baru saja Anda tambahkan, tentukan variabel baru yang membuat string koneksi agar aplikasi mengakses database:
// Define the connection string to access Azure SQL.
var sqlDatabaseConnectionString = 'Server=tcp:${sqlServer.properties.fullyQualifiedDomainName},1433;Initial Catalog=${sqlDatabase.name};Persist Security Info=False;User ID=${sqlServerAdministratorLogin};Password=${sqlServerAdministratorLoginPassword};MultipleActiveResultSets=False;Encrypt=True;TrustServerCertificate=False;Connection Timeout=30;'
Catatan
Untuk mempermudah, aplikasi menggunakan proses masuk administrator dan kata sandi untuk mengakses database. Namun, ini bukan praktik yang baik untuk solusi produksi. Lebih baik menggunakan identitas terkelola App Service untuk mengakses database, dan memberikan identitas terkelola izin minimum yang dibutuhkan oleh aplikasi. Kami menautkan ke informasi selengkapnya di halaman Ringkasan.
Di dekat akhir file, di atas output, tambahkan server logis Azure SQL dan sumber daya database:
resource sqlServer 'Microsoft.Sql/servers@2022-05-01-preview' = { name: sqlServerName location: location properties: { administratorLogin: sqlServerAdministratorLogin administratorLoginPassword: sqlServerAdministratorLoginPassword } } resource sqlServerFirewallRule 'Microsoft.Sql/servers/firewallRules@2022-05-01-preview' = { parent: sqlServer name: 'AllowAllWindowsAzureIps' properties: { endIpAddress: '0.0.0.0' startIpAddress: '0.0.0.0' } } resource sqlDatabase 'Microsoft.Sql/servers/databases@2022-05-01-preview' = { parent: sqlServer name: sqlDatabaseName location: location sku: environmentConfigurationMap[environmentType].sqlDatabase.sku }environmentConfigurationMapPerbarui variabel untuk menentukan nilai yangskuakan digunakan untuk database Anda untuk setiap lingkungan:var environmentConfigurationMap = { Production: { appServicePlan: { sku: { name: 'S1' capacity: 1 } } storageAccount: { sku: { name: 'Standard_LRS' } } sqlDatabase: { sku: { name: 'Standard' tier: 'Standard' } } } Test: { appServicePlan: { sku: { name: 'F1' } } storageAccount: { sku: { name: 'Standard_GRS' } } sqlDatabase: { sku: { name: 'Standard' tier: 'Standard' } } } }Tambahkan pengaturan aplikasi lain ke aplikasi App Service Anda untuk database string koneksi:
resource appServiceApp 'Microsoft.Web/sites@2022-03-01' = {
  name: appServiceAppName
  location: location
  properties: {
    serverFarmId: appServicePlan.id
    httpsOnly: true
    siteConfig: {
      appSettings: [
        {
          name: 'APPINSIGHTS_INSTRUMENTATIONKEY'
          value: applicationInsights.properties.InstrumentationKey
        }
        {
          name: 'APPLICATIONINSIGHTS_CONNECTION_STRING'
          value: applicationInsights.properties.ConnectionString
        }
        {
          name: 'ReviewApiUrl'
          value: reviewApiUrl
        }
        {
          name: 'ReviewApiKey'
          value: reviewApiKey
        }
        {
          name: 'StorageAccountName'
          value: storageAccount.name
        }
        {
          name: 'StorageAccountBlobEndpoint'
          value: storageAccount.properties.primaryEndpoints.blob
        }
        {
          name: 'StorageAccountImagesContainerName'
          value: storageAccount::blobService::storageAccountImagesBlobContainer.name
        }
        {
          name: 'SqlDatabaseConnectionString'
          value: sqlDatabaseConnectionString
        }
      ]
    }
  }
}
Di bagian bawah file, tambahkan output untuk mengekspos nama host server logis Azure SQL dan nama database:
output appServiceAppName string = appServiceApp.name
output appServiceAppHostName string = appServiceApp.properties.defaultHostName
output storageAccountName string = storageAccount.name
output storageAccountImagesBlobContainerName string = storageAccount::blobService::storageAccountImagesBlobContainer.name
output sqlServerFullyQualifiedDomainName string = sqlServer.properties.fullyQualifiedDomainName
output sqlDatabaseName string = sqlDatabase.name
Simpan perubahan Anda ke file tersebut.
Menambahkan langkah build baru untuk proyek database
Pengembang situs web Anda menyiapkan proyek database Visual Studio yang menyebarkan dan mengonfigurasi tabel database situs web Anda. Di sini, Anda memperbarui tahap Build alur Anda untuk membuat proyek database menjadi file DACPAC dan menerbitkannya sebagai artefak alur.
Buka file build.yml di folder deploy/pipeline-templates.
Untuk membuat proyek database Visual Studio, salin file DACPAC yang dibuat ke folder penahapan, dan terbitkan sebagai artefak alur, tambahkan langkah berikut:
jobs:
- job: Build
  displayName: Build application and database
  pool:
    vmImage: windows-latest

  steps:

  # Build, copy, and publish the website.
  - task: DotNetCoreCLI@2
    displayName: Build publishable website
    inputs:
      command: 'publish'
      publishWebProjects: true

  - task: CopyFiles@2
    displayName: Copy publishable website
    inputs:
      sourceFolder: '$(Build.SourcesDirectory)/src/ToyCompany/ToyCompany.Website/bin'
      contents: '**/publish.zip'
      targetFolder: '$(Build.ArtifactStagingDirectory)/website'
      flattenFolders: true

  - task: PublishBuildArtifacts@1
    displayName: Publish website as pipeline artifact
    inputs:
      pathToPublish: '$(Build.ArtifactStagingDirectory)/website'
      artifactName: 'website'

  # Build, copy, and publish the DACPAC file.
  - task: VSBuild@1
    displayName: Build Visual Studio solution
    inputs:
      solution: '$(Build.SourcesDirectory)/src/ToyCompany/ToyCompany.Database/ToyCompany.Database.sqlproj'

  - task: CopyFiles@2
    displayName: Copy DACPAC
    inputs:
      sourceFolder: '$(Build.SourcesDirectory)/src/ToyCompany/ToyCompany.Database/bin'
      contents: '**/*.dacpac'
      targetFolder: '$(Build.ArtifactStagingDirectory)/database'
      flattenFolders: true

  - task: PublishBuildArtifacts@1
    displayName: Publish DACPAC as pipeline artifact
    inputs:
      pathToPublish: '$(Build.ArtifactStagingDirectory)/database'
      artifactName: 'database'
Simpan perubahan Anda ke file tersebut.
Menambahkan nilai ke grup variabel
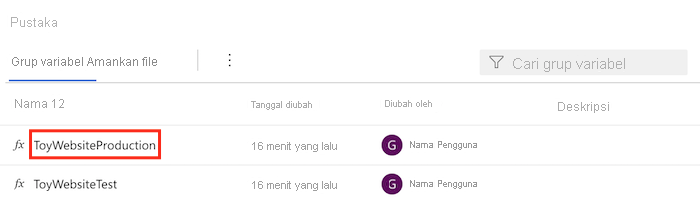
Di browser Anda, buka Alur>Pustaka.
Pilih grup variabel ToyWebsiteProduction.
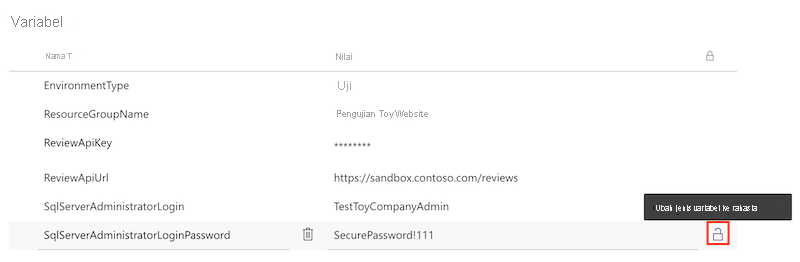
Tambahkan variabel berikut ke grup variabel:
Nama Nilai SqlServerAdministratorLogin ToyCompanyAdmin SqlServerAdministratorLoginPassword SecurePassword!111 Pilih ikon gembok di samping variabel SqlServerAdministratorLoginPassword. Fitur ini memberi tahu Azure Pipelines untuk memperlakukan nilai variabel dengan aman.
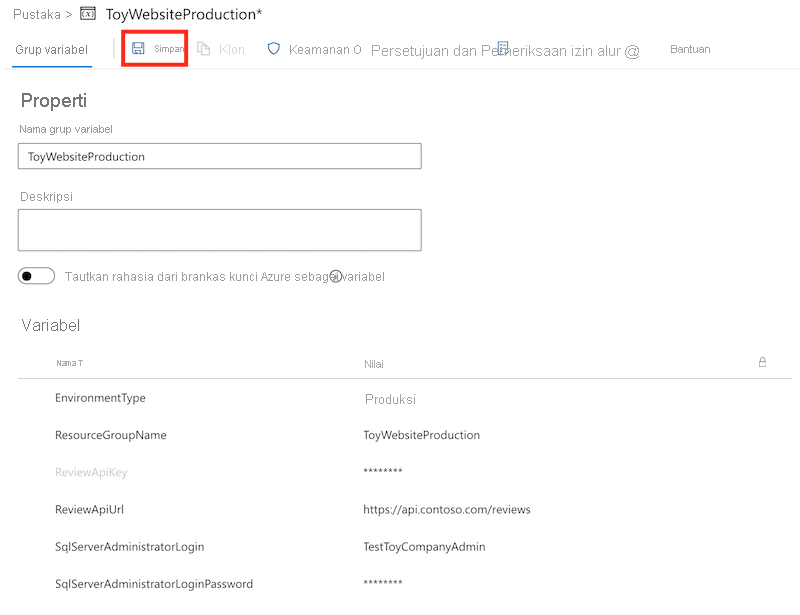
Simpan grup variabel.
Ulangi proses untuk menambahkan variabel berikut ke grup variabel ToyWebsiteTest:
Nama Nilai SqlServerAdministratorLogin TestToyCompanyAdmin SqlServerAdministratorLoginPassword SecurePassword!999 Ingatlah untuk memilih ikon gembok di samping variabel SqlServerAdministratorLoginPassword dan simpan grup variabel.
Menambahkan nilai parameter ke tahap Validasi dan Pratinjau
File Bicep sekarang memiliki dua parameter wajib baru: sqlServerAdministratorLogin dan sqlServerAdministratorLoginPassword. Di sini, Anda menyebarkan nilai parameter tersebut dari kelompok variabel Anda, untuk tahap Validasi dan Pratinjau.
Di Visual Studio Code, buka file deploy.yml di folder deploy/pipeline-templates.
Perbarui langkah RunPreflightValidation tahap Validasi dengan menambahkan parameter baru.
- task: AzureResourceManagerTemplateDeployment@3
  name: RunPreflightValidation
  displayName: Run preflight validation
  inputs:
    connectedServiceName: ToyWebsite${{parameters.environmentType}}
    location: ${{parameters.deploymentDefaultLocation}}
    deploymentMode: Validation
    resourceGroupName: $(ResourceGroupName)
    csmFile: deploy/main.bicep
    overrideParameters: >
      -environmentType $(EnvironmentType)
      -reviewApiUrl $(ReviewApiUrl)
      -reviewApiKey $(ReviewApiKey)
      -sqlServerAdministratorLogin $(SqlServerAdministratorLogin)
      -sqlServerAdministratorLoginPassword $(SqlServerAdministratorLoginPassword)
Perbarui langkah RunWhatIf tahap Pratinjau dengan menambahkan parameter baru.
inlineScript: |
  az deployment group what-if \
    --resource-group $(ResourceGroupName) \
    --template-file deploy/main.bicep \
    --parameters environmentType=$(EnvironmentType) \
                 reviewApiUrl=$(ReviewApiUrl) \
                 reviewApiKey=$(ReviewApiKey) \
                 sqlServerAdministratorLogin=$(SqlServerAdministratorLogin) \
                 sqlServerAdministratorLoginPassword=$(SqlServerAdministratorLoginPassword)
Penting
Pastikan untuk menambahkan karakter backslash (
\) di akhir baris yang menetapkan nilai parameterreviewApiKey, dan pada baris berikutnya. Karakter\menunjukkan bahwa ada baris lebih lanjut yang merupakan bagian dari perintah Azure CLI yang sama.
Menambahkan nilai parameter ke tahap Sebarkan
Perbarui langkah DeployBicepFile tahap Deploy dengan menambahkan parameter baru:
- task: AzureResourceManagerTemplateDeployment@3
  name: DeployBicepFile
  displayName: Deploy Bicep file
  inputs:
    connectedServiceName: ToyWebsite${{parameters.environmentType}}
    deploymentName: $(Build.BuildNumber)
    location: ${{parameters.deploymentDefaultLocation}}
    resourceGroupName: $(ResourceGroupName)
    csmFile: deploy/main.bicep
    overrideParameters: >
      -environmentType $(EnvironmentType)
      -reviewApiUrl $(ReviewApiUrl)
      -reviewApiKey $(ReviewApiKey)
      -sqlServerAdministratorLogin $(SqlServerAdministratorLogin)
      -sqlServerAdministratorLoginPassword $(SqlServerAdministratorLoginPassword)
    deploymentOutputs: deploymentOutputs
Buat variabel alur yang berisi nilai output Bicep yang baru saja Anda tambahkan untuk akun penyimpanan dan sumber daya Azure SQL:
- bash: |
    echo "##vso[task.setvariable variable=appServiceAppName]$(echo $DEPLOYMENT_OUTPUTS | jq -r '.appServiceAppName.value')"
    echo "##vso[task.setvariable variable=appServiceAppHostName;isOutput=true]$(echo $DEPLOYMENT_OUTPUTS | jq -r '.appServiceAppHostName.value')"
    echo "##vso[task.setvariable variable=storageAccountName]$(echo $DEPLOYMENT_OUTPUTS | jq -r '.storageAccountName.value')"
    echo "##vso[task.setvariable variable=storageAccountImagesBlobContainerName]$(echo $DEPLOYMENT_OUTPUTS | jq -r '.storageAccountImagesBlobContainerName.value')"
    echo "##vso[task.setvariable variable=sqlServerFullyQualifiedDomainName]$(echo $DEPLOYMENT_OUTPUTS | jq -r '.sqlServerFullyQualifiedDomainName.value')"
    echo "##vso[task.setvariable variable=sqlDatabaseName]$(echo $DEPLOYMENT_OUTPUTS | jq -r '.sqlDatabaseName.value')"
  name: SaveDeploymentOutputs
  displayName: Save deployment outputs into variables
  env:
    DEPLOYMENT_OUTPUTS: $(deploymentOutputs)
Menambahkan langkah penyebaran database
Di bagian ini, Anda menentukan langkah yang diperlukan untuk menyebarkan komponen database situs web Anda. Pertama, Anda menambahkan langkah untuk menyebarkan file DACPAC yang dibuat sebelumnya oleh alur. Kemudian, Anda menambahkan data sampel ke database dan akun penyimpanan, tetapi hanya untuk lingkungan nonproduksi.
Di bawah langkah DeployWebsiteApp dalam tahap Sebarkan, tambahkan langkah baru untuk menyebarkan file DACPAC:
- task: SqlAzureDacpacDeployment@1
  name: DeploySqlDatabaseDacpac
  displayName: Deploy DACPAC to database
  inputs:
    ConnectedServiceNameARM: ToyWebsite${{parameters.environmentType}}
    authenticationType: 'server'
    serverName: $(sqlServerFullyQualifiedDomainName)
    databaseName: $(sqlDatabaseName)
    sqlUsername: $(SqlServerAdministratorLogin)
    sqlPassword: $(SqlServerAdministratorLoginPassword)
    deployType: 'DacpacTask'
    deploymentAction: 'Publish'
    dacpacFile: '$(Pipeline.Workspace)/database/ToyCompany.Database.dacpac'
Di bawah langkah yang baru saja Anda tambahkan, tentukan langkah untuk memberi nilai awal database dengan data sampel.
- ${{ if ne(parameters.environmentType, 'Production') }}:
  - task: SqlAzureDacpacDeployment@1
    name: AddTestDataToDatabase
    displayName: Add test data to database
    inputs:
      ConnectedServiceNameARM: ToyWebsite${{parameters.environmentType}}
      authenticationType: 'server'
      serverName: $(sqlServerFullyQualifiedDomainName)
      databaseName: $(sqlDatabaseName)
      sqlUsername: $(SqlServerAdministratorLogin)
      sqlPassword: $(SqlServerAdministratorLoginPassword)
      deployType: 'sqlTask'
      sqlFile: 'deploy/sample-data/Toys.sql'
Perhatikan bahwa langkah ini memiliki kondisi yang diterapkan padanya sehingga hanya berjalan untuk lingkungan nonproduksi.
Di bawah langkah yang baru saja Anda tambahkan, dan masih dalam cakupan kondisi, tambahkan langkah untuk mengunggah beberapa gambar mainan sampel ke kontainer blob dengan menggunakan Azure CLI:
- task: AzureCLI@2
  name: UploadSampleImages
  displayName: Upload sample images
  inputs:
    azureSubscription: ToyWebsite${{parameters.environmentType}}
    scriptType: 'bash'
    scriptLocation: 'inlineScript'
    inlineScript: |
      az storage blob upload-batch \
        --account-name $(storageAccountName) \
        --destination $(storageAccountImagesBlobContainerName) \
        --source 'deploy/sample-data/toyimages'
Memverifikasi file dan melakukan perubahan Anda
Verifikasi bahwa file main.bicep Anda terlihat seperti ini:
@description('The location into which your Azure resources should be deployed.')
param location string = resourceGroup().location

@description('Select the type of environment you want to provision. Allowed values are Production and Test.')
@allowed([
  'Production'
  'Test'
])
param environmentType string

@description('A unique suffix to add to resource names that need to be globally unique.')
@maxLength(13)
param resourceNameSuffix string = uniqueString(resourceGroup().id)

@description('The URL to the product review API.')
param reviewApiUrl string

@secure()
@description('The API key to use when accessing the product review API.')
param reviewApiKey string

@description('The administrator login username for the SQL server.')
param sqlServerAdministratorLogin string

@secure()
@description('The administrator login password for the SQL server.')
param sqlServerAdministratorLoginPassword string

// Define the names for resources.
var appServiceAppName = 'toy-website-${resourceNameSuffix}'
var appServicePlanName = 'toy-website'
var logAnalyticsWorkspaceName = 'workspace-${resourceNameSuffix}'
var applicationInsightsName = 'toywebsite'
var storageAccountName = 'mystorage${resourceNameSuffix}'
var storageAccountImagesBlobContainerName = 'toyimages'
var sqlServerName = 'toy-website-${resourceNameSuffix}'
var sqlDatabaseName = 'Toys'

// Define the connection string to access Azure SQL.
var sqlDatabaseConnectionString = 'Server=tcp:${sqlServer.properties.fullyQualifiedDomainName},1433;Initial Catalog=${sqlDatabase.name};Persist Security Info=False;User ID=${sqlServerAdministratorLogin};Password=${sqlServerAdministratorLoginPassword};MultipleActiveResultSets=False;Encrypt=True;TrustServerCertificate=False;Connection Timeout=30;'

// Define the SKUs for each component based on the environment type.
var environmentConfigurationMap = {
  Production: {
    appServicePlan: {
      sku: {
        name: 'S1'
        capacity: 1
      }
    }
    storageAccount: {
      sku: {
        name: 'Standard_LRS'
      }
    }
    sqlDatabase: {
      sku: {
        name: 'Standard'
        tier: 'Standard'
      }
    }
  }
  Test: {
    appServicePlan: {
      sku: {
        name: 'F1'
      }
    }
    storageAccount: {
      sku: {
        name: 'Standard_GRS'
      }
    }
    sqlDatabase: {
      sku: {
        name: 'Standard'
        tier: 'Standard'
      }
    }
  }
}

resource appServicePlan 'Microsoft.Web/serverfarms@2022-03-01' = {
  name: appServicePlanName
  location: location
  sku: environmentConfigurationMap[environmentType].appServicePlan.sku
}

resource appServiceApp 'Microsoft.Web/sites@2022-03-01' = {
  name: appServiceAppName
  location: location
  properties: {
    serverFarmId: appServicePlan.id
    httpsOnly: true
    siteConfig: {
      appSettings: [
        {
          name: 'APPINSIGHTS_INSTRUMENTATIONKEY'
          value: applicationInsights.properties.InstrumentationKey
        }
        {
          name: 'APPLICATIONINSIGHTS_CONNECTION_STRING'
          value: applicationInsights.properties.ConnectionString
        }
        {
          name: 'ReviewApiUrl'
          value: reviewApiUrl
        }
        {
          name: 'ReviewApiKey'
          value: reviewApiKey
        }
        {
          name: 'StorageAccountName'
          value: storageAccount.name
        }
        {
          name: 'StorageAccountBlobEndpoint'
          value: storageAccount.properties.primaryEndpoints.blob
        }
        {
          name: 'StorageAccountImagesContainerName'
          value: storageAccount::blobService::storageAccountImagesBlobContainer.name
        }
        {
          name: 'SqlDatabaseConnectionString'
          value: sqlDatabaseConnectionString
        }
      ]
    }
  }
}

resource logAnalyticsWorkspace 'Microsoft.OperationalInsights/workspaces@2022-10-01' = {
  name: logAnalyticsWorkspaceName
  location: location
}

resource applicationInsights 'Microsoft.Insights/components@2020-02-02' = {
  name: applicationInsightsName
  location: location
  kind: 'web'
  properties: {
    Application_Type: 'web'
    Request_Source: 'rest'
    Flow_Type: 'Bluefield'
    WorkspaceResourceId: logAnalyticsWorkspace.id
  }
}

resource storageAccount 'Microsoft.Storage/storageAccounts@2022-09-01' = {
  name: storageAccountName
  location: location
  kind: 'StorageV2'
  sku: environmentConfigurationMap[environmentType].storageAccount.sku

  resource blobService 'blobServices' = {
    name: 'default'

    resource storageAccountImagesBlobContainer 'containers' = {
      name: storageAccountImagesBlobContainerName

      properties: {
        publicAccess: 'Blob'
      }
    }
  }
}

resource sqlServer 'Microsoft.Sql/servers@2022-05-01-preview' = {
  name: sqlServerName
  location: location
  properties: {
    administratorLogin: sqlServerAdministratorLogin
    administratorLoginPassword: sqlServerAdministratorLoginPassword
  }
}

resource sqlServerFirewallRule 'Microsoft.Sql/servers/firewallRules@2022-05-01-preview' = {
  parent: sqlServer
  name: 'AllowAllWindowsAzureIps'
  properties: {
    endIpAddress: '0.0.0.0'
    startIpAddress: '0.0.0.0'
  }
}

resource sqlDatabase 'Microsoft.Sql/servers/databases@2022-05-01-preview' = {
  parent: sqlServer
  name: sqlDatabaseName
  location: location
  sku: environmentConfigurationMap[environmentType].sqlDatabase.sku
}

output appServiceAppName string = appServiceApp.name
output appServiceAppHostName string = appServiceApp.properties.defaultHostName
output storageAccountName string = storageAccount.name
output storageAccountImagesBlobContainerName string = storageAccount::blobService::storageAccountImagesBlobContainer.name
output sqlServerFullyQualifiedDomainName string = sqlServer.properties.fullyQualifiedDomainName
output sqlDatabaseName string = sqlDatabase.name
Jika tidak, perbarui agar sesuai dengan isi file.
Verifikasi bahwa file deploy.yml Anda terlihat seperti ini:
parameters:
- name: environmentType
  type: string
- name: deploymentDefaultLocation
  type: string
  default: westus3

stages:

- ${{ if ne(parameters.environmentType, 'Production') }}:
  - stage: Validate_${{parameters.environmentType}}
    displayName: Validate (${{parameters.environmentType}} Environment)
    jobs:
    - job: ValidateBicepCode
      displayName: Validate Bicep code
      variables:
      - group: ToyWebsite${{parameters.environmentType}}
      steps:
        - task: AzureResourceManagerTemplateDeployment@3
          name: RunPreflightValidation
          displayName: Run preflight validation
          inputs:
            connectedServiceName: ToyWebsite${{parameters.environmentType}}
            location: ${{parameters.deploymentDefaultLocation}}
            deploymentMode: Validation
            resourceGroupName: $(ResourceGroupName)
            csmFile: deploy/main.bicep
            overrideParameters: >
              -environmentType $(EnvironmentType)
              -reviewApiUrl $(ReviewApiUrl)
              -reviewApiKey $(ReviewApiKey)
              -sqlServerAdministratorLogin $(SqlServerAdministratorLogin)
              -sqlServerAdministratorLoginPassword $(SqlServerAdministratorLoginPassword)

- ${{ if eq(parameters.environmentType, 'Production') }}:
  - stage: Preview_${{parameters.environmentType}}
    displayName: Preview (${{parameters.environmentType}} Environment)
    jobs:
    - job: PreviewAzureChanges
      displayName: Preview Azure changes
      variables:
      - group: ToyWebsite${{parameters.environmentType}}
      steps:
        - task: AzureCLI@2
          name: RunWhatIf
          displayName: Run what-if
          inputs:
            azureSubscription: ToyWebsite${{parameters.environmentType}}
            scriptType: 'bash'
            scriptLocation: 'inlineScript'
            inlineScript: |
              az deployment group what-if \
                --resource-group $(ResourceGroupName) \
                --template-file deploy/main.bicep \
                --parameters environmentType=$(EnvironmentType) \
                             reviewApiUrl=$(ReviewApiUrl) \
                             reviewApiKey=$(ReviewApiKey) \
                             sqlServerAdministratorLogin=$(SqlServerAdministratorLogin) \
                             sqlServerAdministratorLoginPassword=$(SqlServerAdministratorLoginPassword)

- stage: Deploy_${{parameters.environmentType}}
  displayName: Deploy (${{parameters.environmentType}} Environment)
  jobs:
  - deployment: DeployWebsite
    displayName: Deploy website
    pool:
      vmImage: windows-latest
    variables:
    - group: ToyWebsite${{parameters.environmentType}}
    environment: ${{parameters.environmentType}}
    strategy:
      runOnce:
        deploy:
          steps:
            - checkout: self

            - task: AzureResourceManagerTemplateDeployment@3
              name: DeployBicepFile
              displayName: Deploy Bicep file
              inputs:
                connectedServiceName: ToyWebsite${{parameters.environmentType}}
                deploymentName: $(Build.BuildNumber)
                location: ${{parameters.deploymentDefaultLocation}}
                resourceGroupName: $(ResourceGroupName)
                csmFile: deploy/main.bicep
                overrideParameters: >
                  -environmentType $(EnvironmentType)
                  -reviewApiUrl $(ReviewApiUrl)
                  -reviewApiKey $(ReviewApiKey)
                  -sqlServerAdministratorLogin $(SqlServerAdministratorLogin)
                  -sqlServerAdministratorLoginPassword $(SqlServerAdministratorLoginPassword)
                deploymentOutputs: deploymentOutputs

            - bash: |
                echo "##vso[task.setvariable variable=appServiceAppName]$(echo $DEPLOYMENT_OUTPUTS | jq -r '.appServiceAppName.value')"
                echo "##vso[task.setvariable variable=appServiceAppHostName;isOutput=true]$(echo $DEPLOYMENT_OUTPUTS | jq -r '.appServiceAppHostName.value')"
                echo "##vso[task.setvariable variable=storageAccountName]$(echo $DEPLOYMENT_OUTPUTS | jq -r '.storageAccountName.value')"
                echo "##vso[task.setvariable variable=storageAccountImagesBlobContainerName]$(echo $DEPLOYMENT_OUTPUTS | jq -r '.storageAccountImagesBlobContainerName.value')"
                echo "##vso[task.setvariable variable=sqlServerFullyQualifiedDomainName]$(echo $DEPLOYMENT_OUTPUTS | jq -r '.sqlServerFullyQualifiedDomainName.value')"
                echo "##vso[task.setvariable variable=sqlDatabaseName]$(echo $DEPLOYMENT_OUTPUTS | jq -r '.sqlDatabaseName.value')"
              name: SaveDeploymentOutputs
              displayName: Save deployment outputs into variables
              env:
                DEPLOYMENT_OUTPUTS: $(deploymentOutputs)

            - task: AzureRmWebAppDeployment@4
              name: DeployWebsiteApp
              displayName: Deploy website
              inputs:
                appType: webApp
                ConnectionType: AzureRM
                azureSubscription: ToyWebsite${{parameters.environmentType}}
                ResourceGroupName: $(ResourceGroupName)
                WebAppName: $(appServiceAppName)
                Package: '$(Pipeline.Workspace)/website/publish.zip'

            - task: SqlAzureDacpacDeployment@1
              name: DeploySqlDatabaseDacpac
              displayName: Deploy DACPAC to database
              inputs:
                ConnectedServiceNameARM: ToyWebsite${{parameters.environmentType}}
                authenticationType: 'server'
                serverName: $(sqlServerFullyQualifiedDomainName)
                databaseName: $(sqlDatabaseName)
                sqlUsername: $(SqlServerAdministratorLogin)
                sqlPassword: $(SqlServerAdministratorLoginPassword)
                deployType: 'DacpacTask'
                deploymentAction: 'Publish'
                dacpacFile: '$(Pipeline.Workspace)/database/ToyCompany.Database.dacpac'

            - ${{ if ne(parameters.environmentType, 'Production') }}:
              - task: SqlAzureDacpacDeployment@1
                name: AddTestDataToDatabase
                displayName: Add test data to database
                inputs:
                  ConnectedServiceNameARM: ToyWebsite${{parameters.environmentType}}
                  authenticationType: 'server'
                  serverName: $(sqlServerFullyQualifiedDomainName)
                  databaseName: $(sqlDatabaseName)
                  sqlUsername: $(SqlServerAdministratorLogin)
                  sqlPassword: $(SqlServerAdministratorLoginPassword)
                  deployType: 'sqlTask'
                  sqlFile: 'deploy/sample-data/Toys.sql'

              - task: AzureCLI@2
                name: UploadSampleImages
                displayName: Upload sample images
                inputs:
                  azureSubscription: ToyWebsite${{parameters.environmentType}}
                  scriptType: 'bash'
                  scriptLocation: 'inlineScript'
                  inlineScript: |
                    az storage blob upload-batch \
                      --account-name $(storageAccountName) \
                      --destination $(storageAccountImagesBlobContainerName) \
                      --source 'deploy/sample-data/toyimages'

- stage: SmokeTest_${{parameters.environmentType}}
  displayName: Smoke Test (${{parameters.environmentType}} Environment)
  jobs:
  - job: SmokeTest
    displayName: Smoke test
    variables:
      appServiceAppHostName: $[ stageDependencies.Deploy_${{parameters.environmentType}}.DeployWebsite.outputs['DeployWebsite.SaveDeploymentOutputs.appServiceAppHostName'] ]
    steps:
      - task: PowerShell@2
        name: RunSmokeTests
        displayName: Run smoke tests
        inputs:
          targetType: inline
          script: |
            $container = New-PesterContainer `
              -Path 'deploy/Website.Tests.ps1' `
              -Data @{ HostName = '$(appServiceAppHostName)' }
            Invoke-Pester `
              -Container $container `
              -CI

      - task: PublishTestResults@2
        name: PublishTestResults
        displayName: Publish test results
        condition: always()
        inputs:
          testResultsFormat: NUnit
          testResultsFiles: 'testResults.xml'
Jika tidak, perbarui agar sesuai dengan isi file.
Simpan perubahan Anda ke file tersebut.
Berkomitmen dan dorong perubahan Anda ke repositori Git Anda. Di terminal Visual Studio Code, jalankan perintah berikut:
git add .
git commit -m "Add SQL database"
git push
Menjalankan alur
Di browser Anda, buka Alur.
Pilih proses terbaru dari alur Anda.
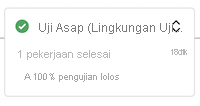
Tunggu hingga semua tahap untuk lingkungan uji berhasil diselesaikan. Perhatikan bahwa uji asap sekarang juga berhasil.
Tunggu alur dijeda lagi sebelum tahap Pratinjau (Lingkungan Produksi), karena perlu izin ke grup variabel yang berbeda kali ini.
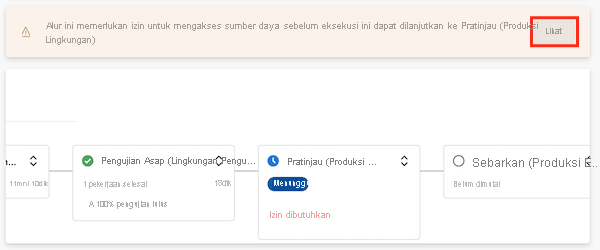
Pilih Tampilkan, lalu pilih Izinkan>Izinkan.
Tahap Pratinjau (Lingkungan Produksi) berhasil diselesaikan.
Pantau alur saat menyelesaikan tahap akhir.
Tahap Sebarkan (Lingkungan Produksi) berhasil diselesaikan, dan tahap Uji Asap (Lingkungan Produksi) juga berhasil diselesaikan.

Menampilkan situs web
Pilih tahap Sebarkan (Lingkungan Uji) untuk membuka log alur.
Pilih langkah Sebarkan situs web.
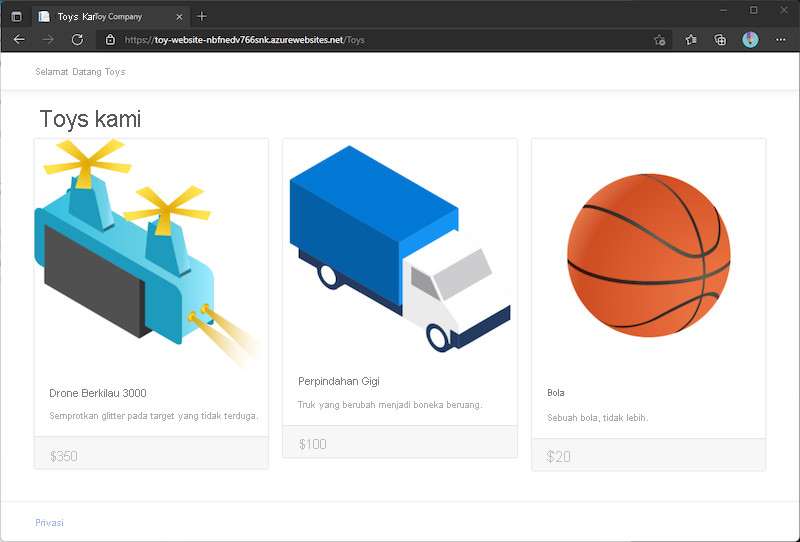
Tahan tombol Ctrl (⌘ di macOS) dan pilih URL aplikasi App Service, membukanya di tab browser baru.

Pilih Mainan.

Perhatikan bahwa data sampel ditampilkan di lingkungan uji.
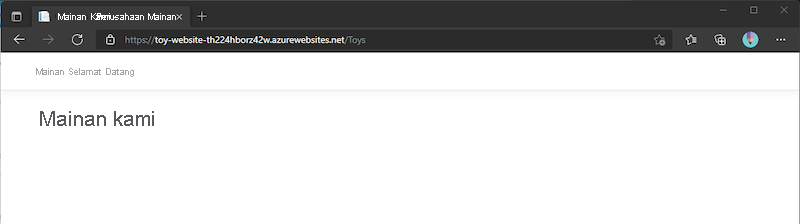
Ulangi proses sebelumnya untuk aplikasi tahap Sebarkan (Lingkungan Produksi).
Perhatikan bahwa tidak ada data sampel yang ditampilkan di lingkungan produksi.
Membersihkan sumber daya
Setelah latihan selesai, Anda harus menghapus sumber daya sehingga Anda tidak ditagih untuk mereka.
Di terminal Visual Studio Code, jalankan perintah berikut:
az group delete --resource-group ToyWebsiteTest --yes --no-wait
az group delete --resource-group ToyWebsiteProduction --yes --no-wait
Grup sumber daya dihapus di latar belakang.
Remove-AzResourceGroup -Name ToyWebsiteTest -Force
Remove-AzResourceGroup -Name ToyWebsiteProduction -Force