Latihan - Menyebarkan aplikasi web
Di perusahaan mainan Anda, tim pengembangan situs web telah berkomitmen versi terbaru situs web ke repositori Git Anda. Sekarang, Anda siap memperbarui alur kerja untuk membangun situs web, dan menyebarkannya ke Azure App Service.
Dalam prosesnya, Anda akan:
- Tambahkan alur kerja baru untuk pekerjaan build.
- Perbarui alur kerja untuk menyertakan pekerjaan build.
- Menambahkan uji asap baru.
- Perbarui tugas penyebaran untuk menyebarkan aplikasi.
- Jalankan alur kerja.
Tambahkan alur kerja yang dapat digunakan kembali untuk pekerjaan build
Di sini, Anda menambahkan definisi pekerjaan baru yang berisi langkah-langkah yang diperlukan untuk membuat aplikasi situs web.
Buka Visual Studio Code.
Di folder .github/workflows, buat file baru bernama build.yml.

Tambahkan konten berikut ke file alur kerja build.yml:
name: build-website

on:
  workflow_call:

jobs:
  build-application:
    name: Build application
    runs-on: ubuntu-latest
    steps:
    - uses: actions/checkout@v3

    - name: Install .NET Core
      uses: actions/setup-dotnet@v3
      with:
        dotnet-version: 3.1

    - name: Build publishable website
      run: |
        dotnet publish --configuration Release
      working-directory: ./src/ToyCompany/ToyCompany.Website

    - name: Zip publishable website
      run: |
        zip -r publish.zip .
      working-directory: ./src/ToyCompany/ToyCompany.Website/bin/Release/netcoreapp3.1/publish

    - name: Upload website as workflow artifact
      uses: actions/upload-artifact@v3
      with:
        name: website
        path: ./src/ToyCompany/ToyCompany.Website/bin/Release/netcoreapp3.1/publish/publish.zip
Pekerjaan menginstal .NET SDK untuk membangun solusi. Kemudian, hal ini menjalankan langkah pembuatan untuk mengubah kode sumber aplikasi situs web menjadi file terkumpulkan yang siap dijalankan di Azure. Pekerjaan kemudian mengompresi artefak yang dikumpulkan dan mengunggahnya sebagai artefak alur kerja.
Simpan perubahan Anda ke file tersebut.
Menambahkan pekerjaan build ke alur kerja
Buka file workflow.yml.
Di bawah baris pekerjaan:, sebelum pekerjaan lint, tambahkan pekerjaan baru bernama build yang menggunakan alur kerja yang dapat digunakan kembali yang baru saja Anda tentukan:
name: deploy-toy-website-end-to-end
concurrency: toy-company

on:
  push:
    branches:
      - main
  workflow_dispatch:

permissions:
  id-token: write
  contents: read

jobs:

  # Build the application and database.
  build:
    uses: ./.github/workflows/build.yml

  # Lint the Bicep file.
  lint:
    uses: ./.github/workflows/lint.yml
Perbarui tugas deploy-test agar bergantung pada pekerjaan build yang baru:
# Deploy to the test environment.
deploy-test:
  uses: ./.github/workflows/deploy.yml
  needs: [build, lint]
  with:
    environmentType: Test
    resourceGroupName: ToyWebsiteTest
    reviewApiUrl: https://sandbox.contoso.com/reviews
  secrets:
    AZURE_CLIENT_ID: ${{ secrets.AZURE_CLIENT_ID_TEST }}
    AZURE_TENANT_ID: ${{ secrets.AZURE_TENANT_ID }}
    AZURE_SUBSCRIPTION_ID: ${{ secrets.AZURE_SUBSCRIPTION_ID }}
    reviewApiKey: ${{ secrets.REVIEW_API_KEY_TEST }}
Perbarui pekerjaan deploy-production agar juga bergantung pada pekerjaan build dan lint.
# Deploy to the production environment.
deploy-production:
  uses: ./.github/workflows/deploy.yml
  needs:
  - lint
  - build
  - deploy-test
  with:
    environmentType: Production
    resourceGroupName: ToyWebsiteProduction
    reviewApiUrl: https://api.contoso.com/reviews
  secrets:
    AZURE_CLIENT_ID: ${{ secrets.AZURE_CLIENT_ID_PRODUCTION }}
    AZURE_TENANT_ID: ${{ secrets.AZURE_TENANT_ID }}
    AZURE_SUBSCRIPTION_ID: ${{ secrets.AZURE_SUBSCRIPTION_ID }}
    reviewApiKey: ${{ secrets.REVIEW_API_KEY_PRODUCTION }}
Karena penyebaran produksi tergantung pada penyebaran pengujian, Anda tidak perlu menentukan dependensi secara ketat. Namun, ini adalah praktik yang baik untuk menjadi eksplisit, untuk menghindari alur kerja Anda berjalan dengan tidak benar jika Anda menyusun ulang atau menghapus pekerjaan atau lingkungan Anda.
Perhatikan bahwa Anda menentukan daftar
needsdalam dua cara berbeda - dependensi penyebaran lingkungan pengujian Anda dicantumkan pada satu baris, dan lingkungan produksi Anda dengan menggunakan daftar multibaris. Kedua pendekatan tersebut setara.Simpan perubahan Anda ke file tersebut.
Memperbarui file uji asap
Pengembang situs web telah menambahkan titik akhir kesehatan ke situs web. Titik akhir ini memeriksa bahwa situs web sedang online dan dapat mencapai database. Di sini, Anda menambahkan smoke test baru untuk menjalankan pemeriksaan kesehatan dari alur kerja penyebaran Anda.
Buka file Website.Tests.ps1 di folder deploy.
Tambahkan kasus uji baru yang meminta pemeriksaan kesehatan. Kasus uji gagal jika kode respons bukan 200, yang menunjukkan keberhasilan:
param(
  [Parameter(Mandatory)]
  [ValidateNotNullOrEmpty()]
  [string] $HostName
)

Describe 'Toy Website' {

    It 'Serves pages over HTTPS' {
      $request = [System.Net.WebRequest]::Create("https://$HostName/")
      $request.AllowAutoRedirect = $false
      $request.GetResponse().StatusCode |
        Should -Be 200 -Because "the website requires HTTPS"
    }

    It 'Does not serves pages over HTTP' {
      $request = [System.Net.WebRequest]::Create("http://$HostName/")
      $request.AllowAutoRedirect = $false
      $request.GetResponse().StatusCode |
        Should -BeGreaterOrEqual 300 -Because "HTTP is not secure"
    }

    It 'Returns a success code from the health check endpoint' {
      $response = Invoke-WebRequest -Uri "https://$HostName/health" -SkipHttpErrorCheck
      Write-Host $response.Content
      $response.StatusCode |
        Should -Be 200 -Because "the website and configuration should be healthy"
    }

}
Simpan perubahan Anda ke file tersebut.
Menambahkan output ke file Bicep
Anda akan segera menambahkan langkah penyebaran yang menerbitkan situs web ke Azure App Service. Langkah penerbitan memerlukan nama aplikasi App Service. Di sini, Anda mengekspos nama aplikasi sebagai output dari file Bicep.
Buka file main.bicep di folder deploy.
Di akhir konten file, tambahkan nama aplikasi App Service sebagai output:
output appServiceAppName string = appServiceApp.name
output appServiceAppHostName string = appServiceApp.properties.defaultHostName
Simpan perubahan Anda ke file tersebut.
Memperbarui pekerjaan penyebaran untuk menyebarkan output
Sekarang, Anda perlu memperbarui pekerjaan deploy untuk mengambil nilai output dari penyebaran Bicep dan membuatnya tersedia untuk alur kerja lainnya.
Buka file deploy.yml di folder .github/workflows.
Dalam definisi pekerjaan deploy, tambahkan output baru untuk
appServiceAppName:deploy: needs: validate environment: ${{ inputs.environmentType }} runs-on: ubuntu-latest outputs: appServiceAppName: ${{ steps.deploy.outputs.appServiceAppName }} appServiceAppHostName: ${{ steps.deploy.outputs.appServiceAppHostName }} steps:Catatan
Saat mulai menggunakan file YAML Anda di Visual Studio Code, Anda mungkin melihat beberapa garis berlekuk-lekuk merah yang memberi tahu Anda bahwa ada masalah. Ini karena ekstensi Visual Studio Code untuk file YAML terkadang salah menebak skema file.
Anda dapat mengabaikan masalah yang dilaporkan ekstensi. Atau Anda dapat menambahkan kode berikut ke bagian atas file untuk menekan tebakan ekstensi:
# yaml-language-server: $schema=./deploy.yml
Menambahkan pekerjaan untuk menyebarkan situs web
Di bawah definisi pekerjaan deploy, dan di atas definisi pekerjaan smoke-test, tentukan pekerjaan baru untuk menyebarkan situs web ke App Service:
deploy-website:
  needs: deploy
  environment: ${{ inputs.environmentType }}
  runs-on: ubuntu-latest
  steps:
  - uses: actions/download-artifact@v3
  - uses: azure/login@v1
    name: Sign in to Azure
    with:
      client-id: ${{ secrets.AZURE_CLIENT_ID }}
      tenant-id: ${{ secrets.AZURE_TENANT_ID }}
      subscription-id: ${{ secrets.AZURE_SUBSCRIPTION_ID }}
  - uses: azure/webapps-deploy@v2
    name: Deploy website
    with:
      app-name: ${{ needs.deploy.outputs.appServiceAppName }}
      package: website/publish.zip
Catatan
Hati-hati dengan indentasi file YAML, pastikan bahwa pekerjaan baru diindentasi pada tingkat yang sama dengan pekerjaan
deploy. Jika Anda tidak yakin, salin seluruh isi file deploy.yml dari contoh di langkah berikutnya.Perhatikan bahwa pekerjaan tersebut bergantung pada pekerjaan deploy dengan menggunakan kata kunci
needs. Dependensi ini memastikan situs web tidak disebarkan sampai infrastruktur siap. Hal ini juga memungkinkan pekerjaan mengakses outputappServiceAppNamedari pekerjaan deploy.Perhatikan juga bahwa pekerjaan ini mencakup langkah-langkah untuk mengunduh artefak alur kerja dan masuk ke Azure. Setiap pekerjaan berjalan pada runnernya sendiri, jadi harus mandiri.
Simpan perubahan Anda ke file tersebut.
Memverifikasi isi file deploy.yml, dan melakukan perubahan Anda
Verifikasi bahwa file deploy.yml Anda terlihat seperti contoh berikut:
name: deploy

on:
  workflow_call:
    inputs:
      environmentType:
        required: true
        type: string
      resourceGroupName:
        required: true
        type: string
      reviewApiUrl:
        required: true
        type: string
    secrets:
      AZURE_CLIENT_ID:
        required: true
      AZURE_TENANT_ID:
        required: true
      AZURE_SUBSCRIPTION_ID:
        required: true
      reviewApiKey:
        required: true

jobs:
  validate:
     runs-on: ubuntu-latest
     steps:
     - uses: actions/checkout@v3
     - uses: azure/login@v1
       name: Sign in to Azure
       with:
         client-id: ${{ secrets.AZURE_CLIENT_ID }}
         tenant-id: ${{ secrets.AZURE_TENANT_ID }}
         subscription-id: ${{ secrets.AZURE_SUBSCRIPTION_ID }}
     - if: inputs.environmentType != 'Production'
       uses: azure/arm-deploy@v1
       name: Run preflight validation
       with:
         deploymentName: ${{ github.run_number }}
         resourceGroupName: ${{ inputs.resourceGroupName }}
         template: ./deploy/main.bicep
         parameters: >
           environmentType=${{ inputs.environmentType }}
           reviewApiUrl=${{ inputs.reviewApiUrl }}
           reviewApiKey=${{ secrets.reviewApiKey }}
         deploymentMode: Validate
     - if: inputs.environmentType == 'Production'
       uses: azure/arm-deploy@v1
       name: Run what-if
       with:
         failOnStdErr: false
         resourceGroupName: ${{ inputs.resourceGroupName }}
         template: ./deploy/main.bicep
         parameters: >
           environmentType=${{ inputs.environmentType }}
           reviewApiUrl=${{ inputs.reviewApiUrl }}
           reviewApiKey=${{ secrets.reviewApiKey }}
         additionalArguments: --what-if

  deploy:
    needs: validate
    environment: ${{ inputs.environmentType }}
    runs-on: ubuntu-latest
    outputs:
      appServiceAppName: ${{ steps.deploy.outputs.appServiceAppName }}
      appServiceAppHostName: ${{ steps.deploy.outputs.appServiceAppHostName }}
    steps:
    - uses: actions/checkout@v3
    - uses: azure/login@v1
      name: Sign in to Azure
      with:
        client-id: ${{ secrets.AZURE_CLIENT_ID }}
        tenant-id: ${{ secrets.AZURE_TENANT_ID }}
        subscription-id: ${{ secrets.AZURE_SUBSCRIPTION_ID }}
    - uses: azure/arm-deploy@v1
      id: deploy
      name: Deploy Bicep file
      with:
        failOnStdErr: false
        deploymentName: ${{ github.run_number }}
        resourceGroupName: ${{ inputs.resourceGroupName }}
        template: ./deploy/main.bicep
        parameters: >
           environmentType=${{ inputs.environmentType }}
           reviewApiUrl=${{ inputs.reviewApiUrl }}
           reviewApiKey=${{ secrets.reviewApiKey }}

  deploy-website:
    needs: deploy
    environment: ${{ inputs.environmentType }}
    runs-on: ubuntu-latest
    steps:
    - uses: actions/download-artifact@v3
    - uses: azure/login@v1
      name: Sign in to Azure
      with:
        client-id: ${{ secrets.AZURE_CLIENT_ID }}
        tenant-id: ${{ secrets.AZURE_TENANT_ID }}
        subscription-id: ${{ secrets.AZURE_SUBSCRIPTION_ID }}
    - uses: azure/webapps-deploy@v2
      name: Deploy website
      with:
        app-name: ${{ needs.deploy.outputs.appServiceAppName }}
        package: website/publish.zip

  smoke-test:
    runs-on: ubuntu-latest
    needs: deploy
    steps:
    - uses: actions/checkout@v3
    - run: |
        $container = New-PesterContainer `
          -Path 'deploy/Website.Tests.ps1' `
          -Data @{ HostName = '${{needs.deploy.outputs.appServiceAppHostName}}' }
        Invoke-Pester `
          -Container $container `
          -CI
      name: Run smoke tests
      shell: pwsh
Simpan perubahan Anda ke file tersebut.
Di terminal Visual Studio Code, lakukan dan dorong perubahan Anda ke repositori Git dengan menjalankan perintah berikut:
git add .
git commit -m "Build and deploy website application"
git push
Ini adalah pertama kalinya Anda mendorong ke repositori ini, jadi Anda mungkin diminta untuk masuk.
Di Windows, ketik 1 untuk mengautentikasi menggunakan browser web, dan pilih Enter.
Di macOS, pilih Otorisasi.
Jendela browser muncul. Anda mungkin perlu masuk ke GitHub lagi. Pilih Otorisasi.
Jalankan alur kerja
Di browser Anda, buka Tindakan.
Eksekusi pertama alur kerja Anda, yang berlabel Penerapan awal, ditampilkan sebagai kegagalan. GitHub otomatis menjalankan alur kerja saat Anda membuat repositori. Ini gagal karena rahasianya belum siap pada saat itu. Anda dapat mengabaikan kegagalan ini.
Pilih alur kerja deploy-toy-website-end-to-end.
Pilih eksekusi alur kerja terbaru Anda.
Tunggu hingga pekerjaan build berhasil diselesaikan.

Tunggu hingga pekerjaan deploy-test / deploy berhasil diselesaikan.
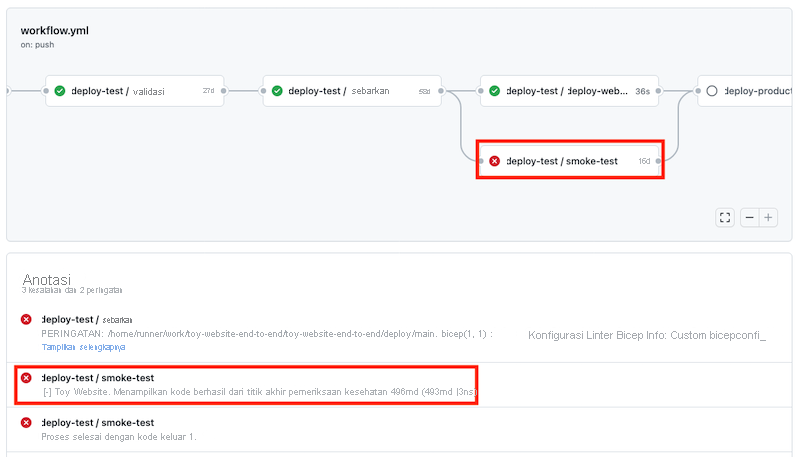
Beberapa peringatan tercantum dalam panel Anotasi. Semua peringatan ini adalah karena cara Bicep menulis pesan informasi ke log alur kerja. Anda dapat mengabaikan peringatan ini.
Alur kerja kemudian menjalankan pekerjaan deploy-test / smoke-test, tetapi smoke test gagal:
Pilih pekerjaan deploy-test / smoke-test untuk membuka log alur kerja.
Pilih langkah Jalankan smoke test untuk melihat bagian terkait dari log alur kerja:
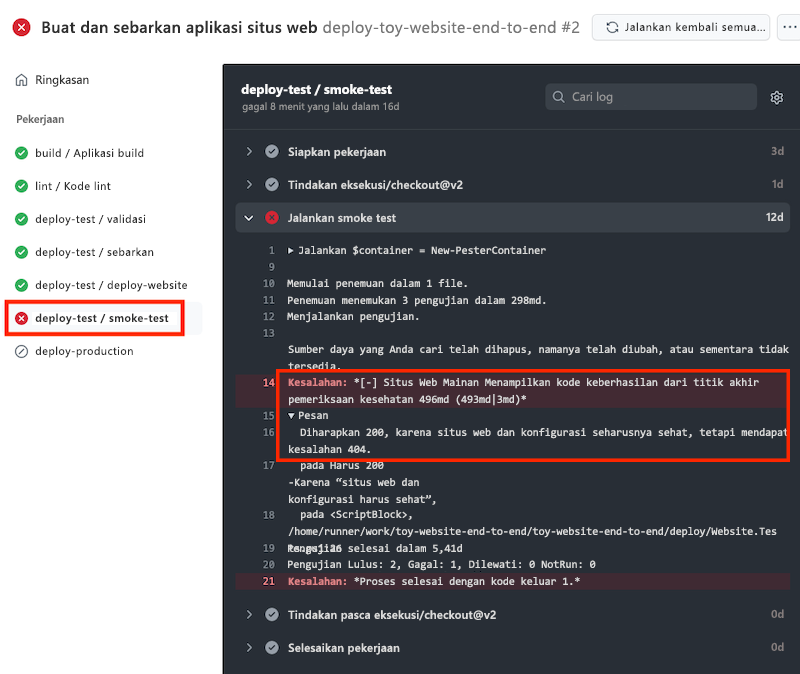
Perhatikan bahwa log alur kerja menunjukkan situs web dan konfigurasi tidak sehat. Ada masalah pada komunikasi aplikasi dengan Azure SQL Database. Anda belum menyebarkan atau mengonfigurasi database, itulah sebabnya situs web tidak dapat mengaksesnya. Anda akan segera memperbaiki masalah ini.