Set up and manage Topics
You can use the Microsoft 365 admin center to set up and configure Topics.
It is important to plan the best way to set up and configure topics in your environment. Be sure to read Plan for Topics before you begin the procedures in this article.
You must be subscribed to a license that includes Topics and be a global administrator, or both SharePoint administrator and groups administrator to access the Microsoft 365 admin center and set up Topics.
Important
If you have configured SharePoint to require managed devices, you must set up Topics from a managed device.
Assign licenses
You must assign licenses for the users who will be using Topics. Only users with a license can see information on topics including highlights, topic cards, topic pages and the topic center.
To assign licenses:
In the Microsoft 365 admin center, under Users, select Active users.
Select the users that you want to license, and select Licenses and apps.
Under Licenses, select Viva Topics.
Under Apps, make sure Graph Connectors Search with Index (Viva Topics) and Viva Topics are both selected.

Select Save changes.
It may take up to an hour for users to get access to Topics after the licenses are assigned.
Note that users must also have an Exchange Online license to use Topics.
Set up Topics
Note
The first time topic discovery is enabled, it may take up to two weeks for all suggested topics to appear in the Manage Topics view. Topic discovery continues as new content or updates to content are made. It is normal to have fluctuations in the number of suggested topics in your organization as Viva Topics evaluates new information.
To set up Topics:
In the Microsoft 365 admin center, select Setup, and then choose Microsoft Viva.

Select Viva Topics.

This will take you to the Topics admin page. Choose Deploy Topics in 2 steps to enable Topics for your organization. This will bring up the setup pane.

Alternative setup path
You can take either path through your Microsoft 365 admin center to set up Topics.
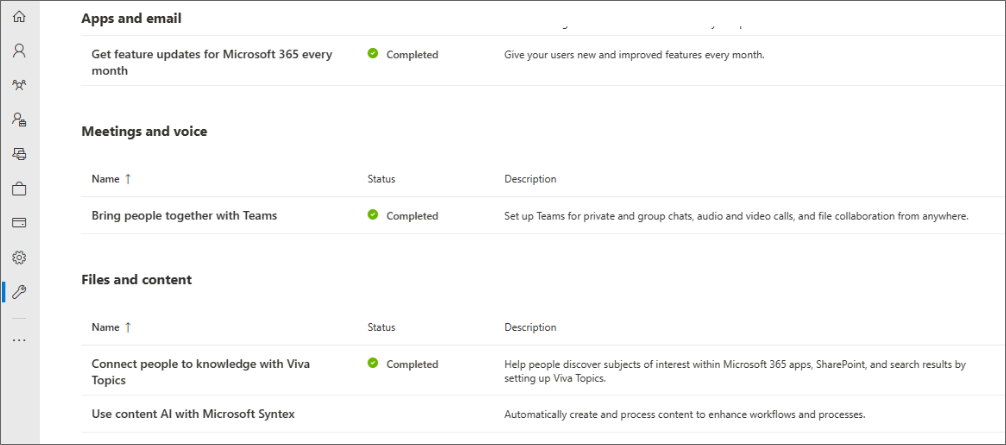
In the Microsoft 365 admin center, select Setup.
Under Files and content, select Connect people to knowledge with Viva Topics.
This will take you to the Viva Topics admin page. Choose Deploy Topics in 2 steps to enable Topics for your organization. This will bring up the setup pane.
Note
When you set up Topics, some settings will be chosen by default. You can change these settings after you complete your setup.. Learn more about why some settings are recommended by default.
Choose SharePoint sites
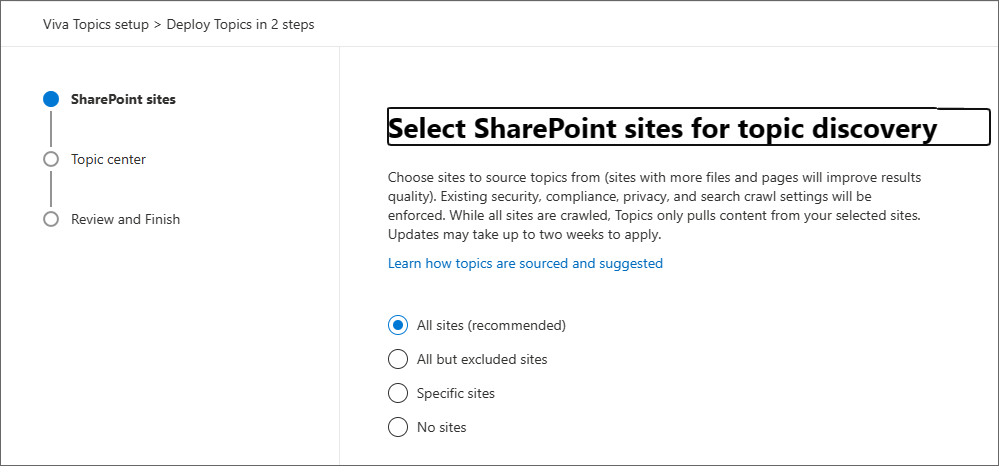
Choose which SharePoint sites Topics can source information from.
- All sites: All SharePoint sites in your organization. This includes current and future sites.
- All, except selected sites: Type the names of the sites you want to exclude. You can also upload a list of sites that you want to opt out from discovery. Sites created in future will be included as sources for topic discovery.
- Only selected sites: Type the names of the sites you want to include. You can also upload a list of sites. Sites created in the future will not be included as sources for topic discovery.
- No sites: Do not include any SharePoint sites.
Then choose Next.
Create your topic center
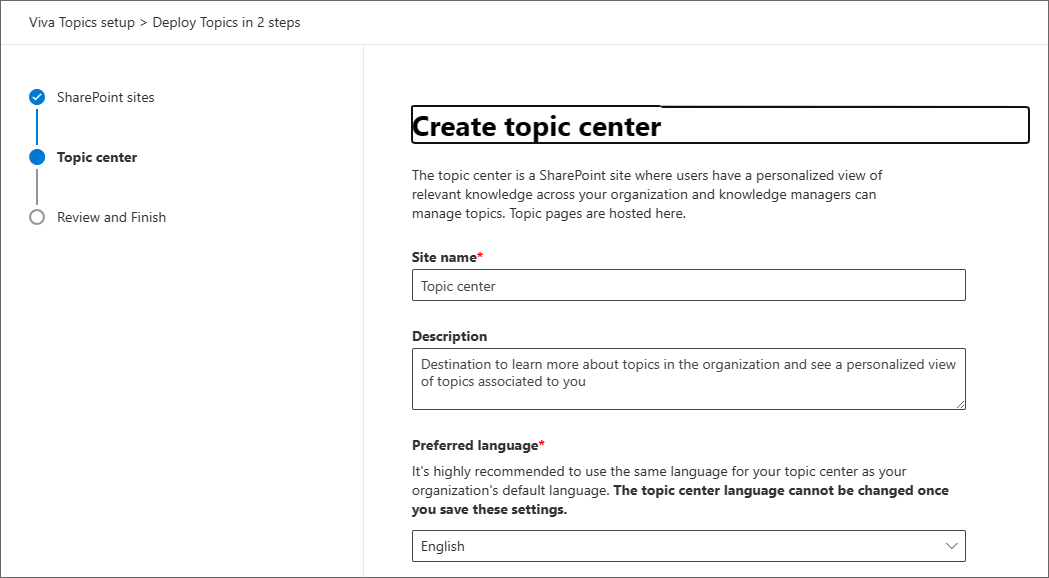
On the Topic center page, you can create your topic center site where users can view topic pages and manage topics.
Under Site name, enter a name for your topic center.
Enter a description for your topic center.
Choose your preferred language for the topic center. It's recommended to use the same language as your organization's default language.
Important
You can't change your topic center language once you've saved these settings.
Choose Next.
Review and finish
Review the settings you've chosen. Once everything is correct, choose Finish. You can manage your settings later by going back to your Topics setup page and choosing Manage Topics.
Note that topics won't show up for your users immediately.You can monitor the number of topics found in your analytics page.
By default, the only person who can manage Topics for your organization is the admin. You can change this setting by following the steps to manage topics and going to the Topic permissions section.
Manage topics
In the Microsoft 365 admin center, select Setup, and then choose Microsoft Viva.
Select Viva Topics.
This will take you to the Viva Topics admin page. Choose Manage Settings.
Important
Default settings are noted with an asterisk (*).
Topic discovery
On the Topic discovery page, you'll choose how Viva Topics sources and identifies topics.
In the Select SharePoint topic sources section, select which SharePoint sites will be crawled as sources for your topics during discovery. Choose from:
- All sites: All SharePoint sites in your organization. This includes current and future sites.*
- All, except selected sites: Type the names of the sites you want to exclude. You can also upload a list of sites that you want to opt out from discovery. Sites created in future will be included as sources for topic discovery.
- Only selected sites: Type the names of the sites you want to include. You can also upload a list of sites. Sites created in the future will not be included as sources for topic discovery.
- No sites: Do not include any SharePoint sites.
Select Save.
In the Select data connection sources section, choose any additional sources you want Viva Topics to source topics from. Learn more about eligible connection sources. No data sources are selected by default.
In the Exclude topics by name section, you can add names of topics you want to exclude from topic discovery. Use this setting to prevent sensitive information from being included as topics. The options are:
- Don't exclude any topics*
- Exclude topics by name
- To exclude topics by name, download and fill out the CSV file with the topics you want excluded.
- In the CSV template, enter the following information about the topics you want to exclude:
- Name: Type the name of the topic you want to exclude. There are two ways to do this:
- Exact match: You can include the exact name or acronym (for example, Contoso or ATL).
- Partial match: You can exclude all topics that have a specific word in it. For example, arc will exclude all topics with the word arc in it, such as Arc circle, Plasma arc welding, or Training arc. Note that it will not exclude topics in which the text is included as part of a word, such as Architecture.
- Stands for (optional): If you want to exclude an acronym, type the words the acronym stands for.
- MatchType-Exact/Partial: Type whether the name you entered was an exact or partial match type.
- Name: Type the name of the topic you want to exclude. There are two ways to do this:
- Upload your completed file and choose Save.
Enable the Everyone in my organization option
For Topic visibility and Topic permissions, you'll have the option to choose who can see, create, edit, and manage topics. It's recommended to choose Everyone in my organization.
If the Everyone in my organization option isn't available for any of your settings, you can enable it with the following PowerShell cmdlet:
Set-SPOTenant -ShowEveryoneExceptExternalUsersClaim $True
Learn more about ShowEveryoneExceptExternalUsersClaim
If you want to keep this option disabled, it's recommended to choose the broadest possible group of users.
Topic visibility
On the Topic visibility page, you'll choose who can see topics.
Note
While this setting allows you to select any user in your organization, only users who have Topic Experiences licenses assigned to them are able to view topics.
Choose Edit to make changes to who can see topics.
Select one of the following options:
- Everyone in my organization Learn how to enable this option if it's greyed out.
- Only selected people or security groups
- No one
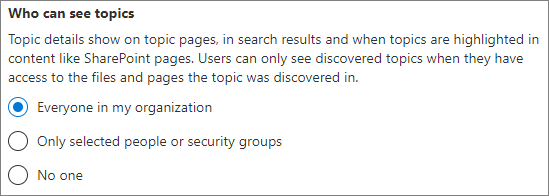
Select Save.
Topic permissions
Note
If you make changes to user roles and permissions the changes will take at least an hour to take effect.
In the Topic permissions page, you choose who can create, edit, and manage topics.

First, go to the Who can create and edit topics section. You can select:
- Everyone in my organization Learn how to enable this option if it's greyed out.
- Only selected people or security groups
- No one
Select Save.
Then, go to the Who can manage topics section. You can select:
- Everyone in my organization Learn how to enable this option if it's greyed out.
- Only selected people or security groups The default selection is Admin.
Select Save.
If you chose Only selected people or security groups, type the name of the person or group and then select it when it appears. Repeat until you've added everyone who should be able to manage topics.
Select Save.
Topic center
On the Topic center page, you can create your topic center site where users can view topic pages and manage topics.

Under Topic center name, choose Edit.
Pick a name for your topic center. Then select Save. The default name is Topic Center.
Next go to the Site address section. Here you can determine the URL of your topic center. Select Save.
Important
You can change the site name later, but you can't change the URL after you complete the wizard.
Review your settings
Once you've chosen all your settings you can close out the Manage Viva Topics pane. You can change your settings at any time by repeating the same process from your Microsoft 365 admin center.
Access to EWS Exchange
If your organization has controlled access to EWS Exchange, this will impact the Viva Topics product. Add "VivaTopicsApi" as the user agent string in EWSAllowList.
Control access to EWS for your organization:
Manage topic experiences
Once you have set up Topics, you can change the settings that you chose during setup in the Microsoft 365 admin center. Manage other areas in topics:
Note
If you update user roles and permissions, these changes can take over an hour to take effect.
- Manage topic discovery in Microsoft Viva Topics
- Manage topic visibility in Microsoft Viva Topics
- Manage topic permissions in Microsoft Viva Topics
- Change the name of the topic center in Microsoft Viva Topics
You can also add Viva Topics as an app in Teams.
Resources for your users
Saran dan Komentar
Segera hadir: Sepanjang tahun 2024 kami akan menghentikan penggunaan GitHub Issues sebagai mekanisme umpan balik untuk konten dan menggantinya dengan sistem umpan balik baru. Untuk mengetahui informasi selengkapnya, lihat: https://aka.ms/ContentUserFeedback.
Kirim dan lihat umpan balik untuk