Nota
L'accesso a questa pagina richiede l'autorizzazione. È possibile provare ad accedere o modificare le directory.
L'accesso a questa pagina richiede l'autorizzazione. È possibile provare a modificare le directory.
Many organizations have proprietary systems, internal databases, and line-of-business applications that hold critical operational data. By using custom federated connectors, you can bring this data into Microsoft 365 Copilot by using Model Context Protocol (MCP), unlocking real-time access and natural language interaction for your organization's unique workflows. After you connect your data source, users can interact with the data in real time by using natural language - just as they do with Microsoft 365 data.
A custom federated connector starts with a Model Context Protocol (MCP) server that exposes tools for Microsoft 365 Copilot to access data or take actions in your internal systems. The MCP server acts as a bridge between Microsoft 365 Copilot and your internal systems. To keep access secure and user-scoped, custom federated connectors use industry-standard authentication.
Prerequisites
Before you begin, make sure you have the following items:
- An MCP server URL with the tools you want to make available in Copilot exposed (for example,
search,fetch,query, or tools that create, update, or delete data). - Network access
- If your MCP server restricts incoming traffic by source IP address, allow the static egress IP addresses used by Microsoft 365 Copilot. Static egress is enabled by default; no manifest flag is required.
- Admin permissions
- Global Administrator or AI Administrator role in the Microsoft 365 admin center.
- An appropriate Microsoft Entra admin role for single sign-on (SSO) authentication.
- Access to the Teams Developer Portal.
- Developer and legal information
- Developer name: The developer or company name.
- Website URL: Link to documentation for the MCP server.
- Privacy policy URL: Link to the MCP server privacy policy.
- Terms of use URL: Link to the MCP server terms of use.
- Authentication setup
- If your data source requires authentication, set up authentication before you create the connector.
Set up authentication
Custom federated connectors support three authentication methods. Choose the method that matches your data source.
| Method | Use case | Setup required |
|---|---|---|
| Microsoft Entra SSO | Users authenticate with their Microsoft 365 credentials. | Microsoft Entra app registration and Teams Developer Portal registration. |
| OAuth 2.0 | Users authenticate with a third-party identity provider. | OAuth app in the source system and Teams Developer Portal registration. |
| No Auth | Users don't need to authenticate. | None |
Microsoft Entra SSO
Microsoft Entra SSO simplifies access management by letting users sign in to your MCP server with their existing Microsoft Entra credentials, so they don't need extra credentials. To use this option, your MCP server or API must use Microsoft Entra ID for access control.
To set up Microsoft Entra SSO:
- Update the Microsoft Entra app registration.
- Add the new token audience to your API.
- Register an SSO client in the Teams Developer Portal.
When registration finishes, the Teams Developer Portal generates a Microsoft Entra SSO registration ID. Copy this ID - you need it when you configure the connector.
OAuth 2.0
Use OAuth 2.0 when your data source authenticates with an external identity provider.
Register your app with the OAuth 2.0 provider
Before you begin, register your app with your OAuth 2.0 provider to get a client ID and secret. If your provider requires you to specify allowed redirect URIs during app registration, include the following URI: https://teams.microsoft.com/api/platform/v1.0/oAuthRedirect.
Copy the following credentials from your OAuth provider:
- Client ID
- Client secret
Register the OAuth app in the Teams Developer Portal
Sign in to the Teams Developer Portal.
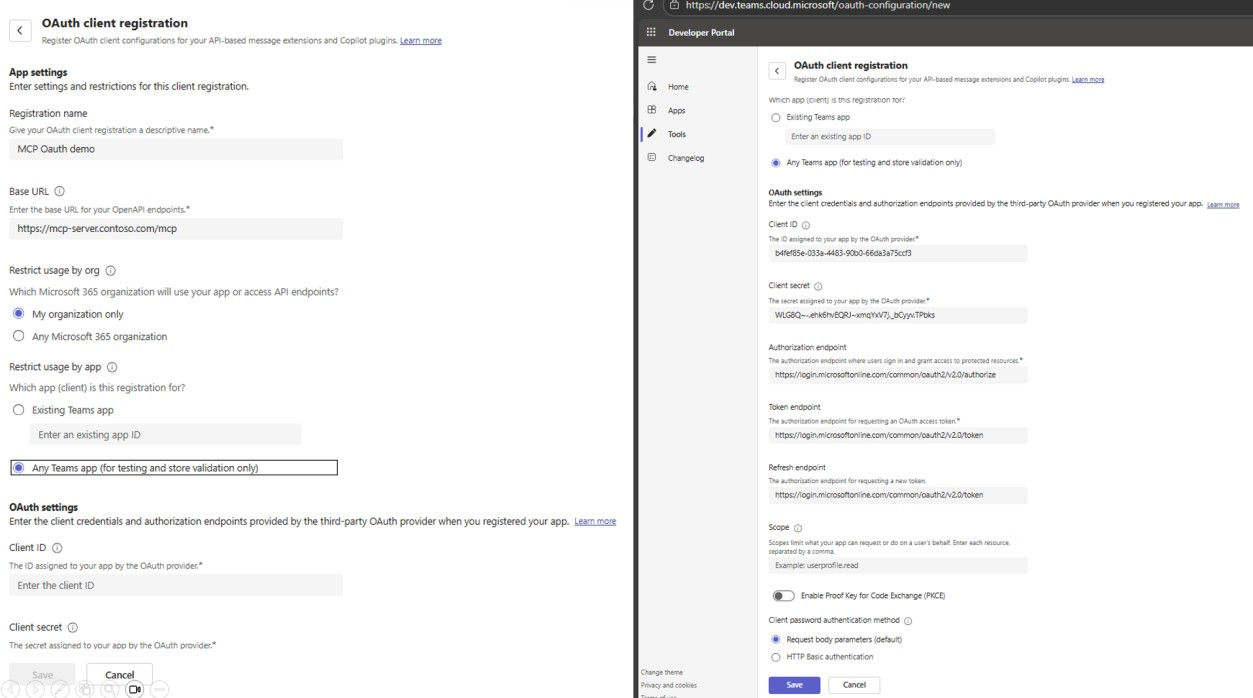
Select Tools > OAuth Client Registration.
Select + New OAuth connection.
Enter the connection details:
Field Value Name A descriptive name for your data source. Client ID The client ID from your OAuth provider. Client secret The client secret from your OAuth provider. Authorization endpoint The URL your app uses to request an authorization code. Token endpoint The URL your app uses to redeem a code for an access token. Refresh endpoint The URL your app uses to refresh the access token. Scopes The permission scopes that your API defines for access. (Optional) Enable Proof Key for Code Exchange (PKCE) if your OAuth provider supports it.
Select Save.
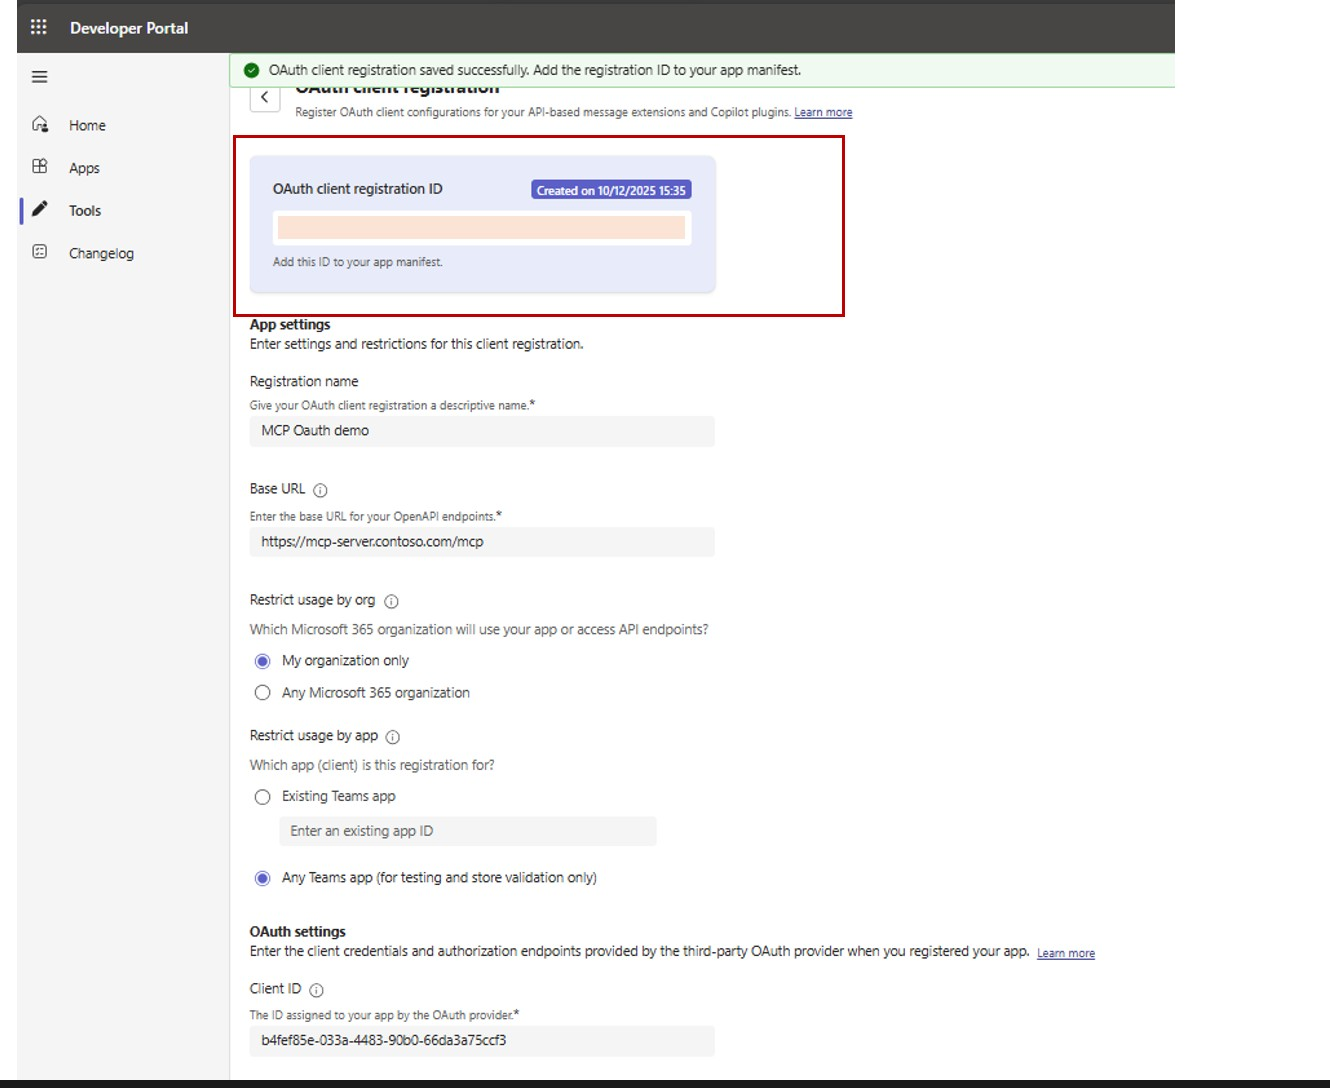
After the registration is saved, the Teams Developer Portal displays the OAuth client registration ID. Copy this ID—you'll need it when you configure the connector.
Create the connector
After you set up authentication, create the connector in the Microsoft 365 admin center.
Sign in to the Microsoft 365 admin center.
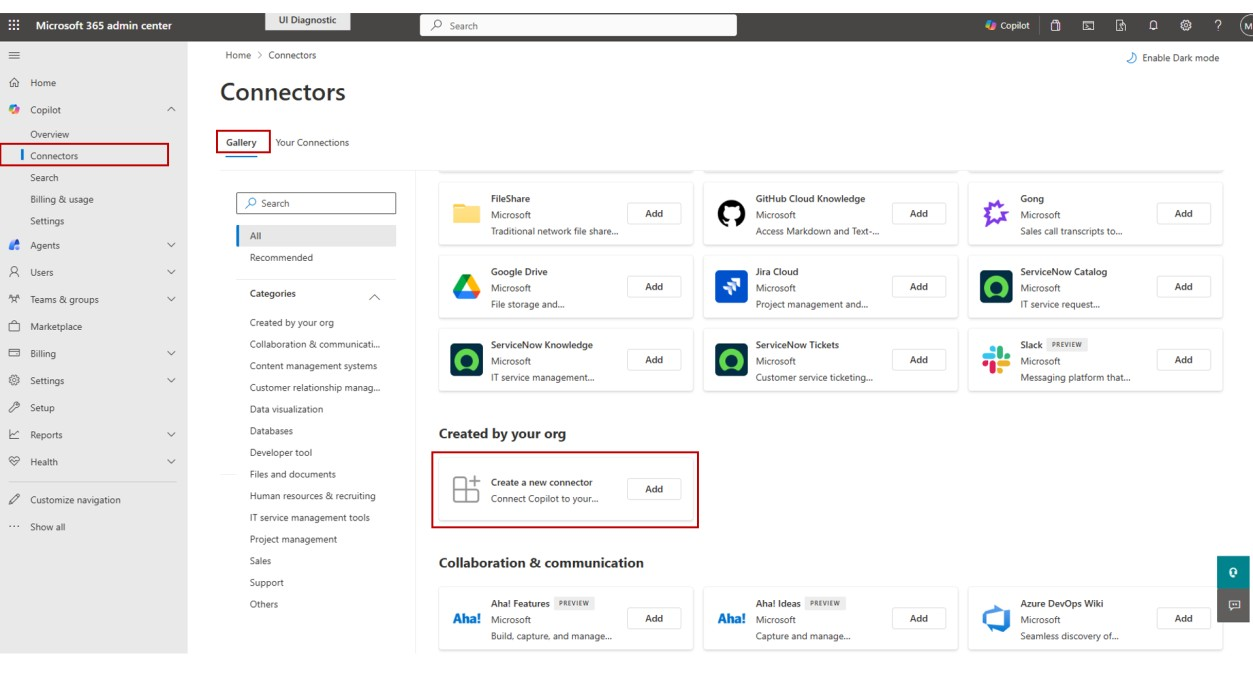
In the left pane, select Copilot > Connectors.
Select the Gallery tab.
Under Created by your org, find the Create a new connector tile and select Add.
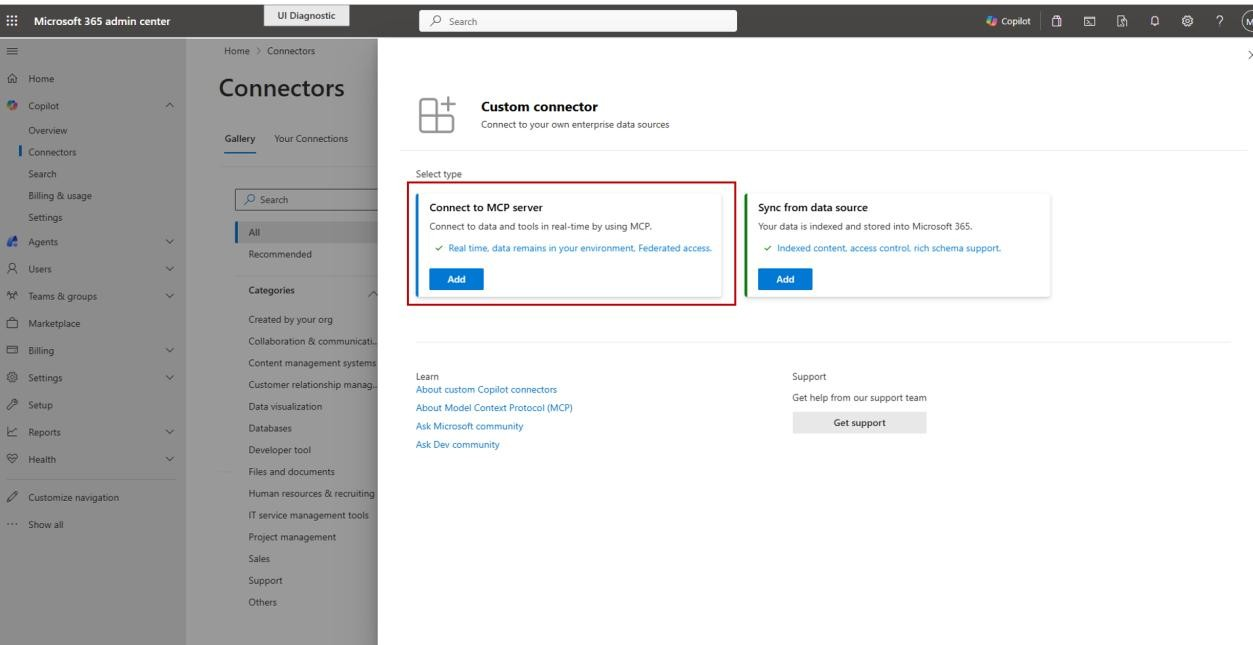
On the Custom connector page, under Connect to MCP server, select Add.
Enter the following information about your connector.
Field Description Example Display name The user-facing name for your connector. Company Intranet Description A summary of your data source and the information it provides. Company policies, procedures, and internal support resources. Base URL Your MCP server endpoint. https://mcp.contoso.comAs a best practice, use the connector description generation skill to create a clear, specific description of your data source that helps Copilot identify relevant capabilities and provide high-quality responses. Follow the linked instructions to save and use the skill, review the generated text, then add it in the Description field.
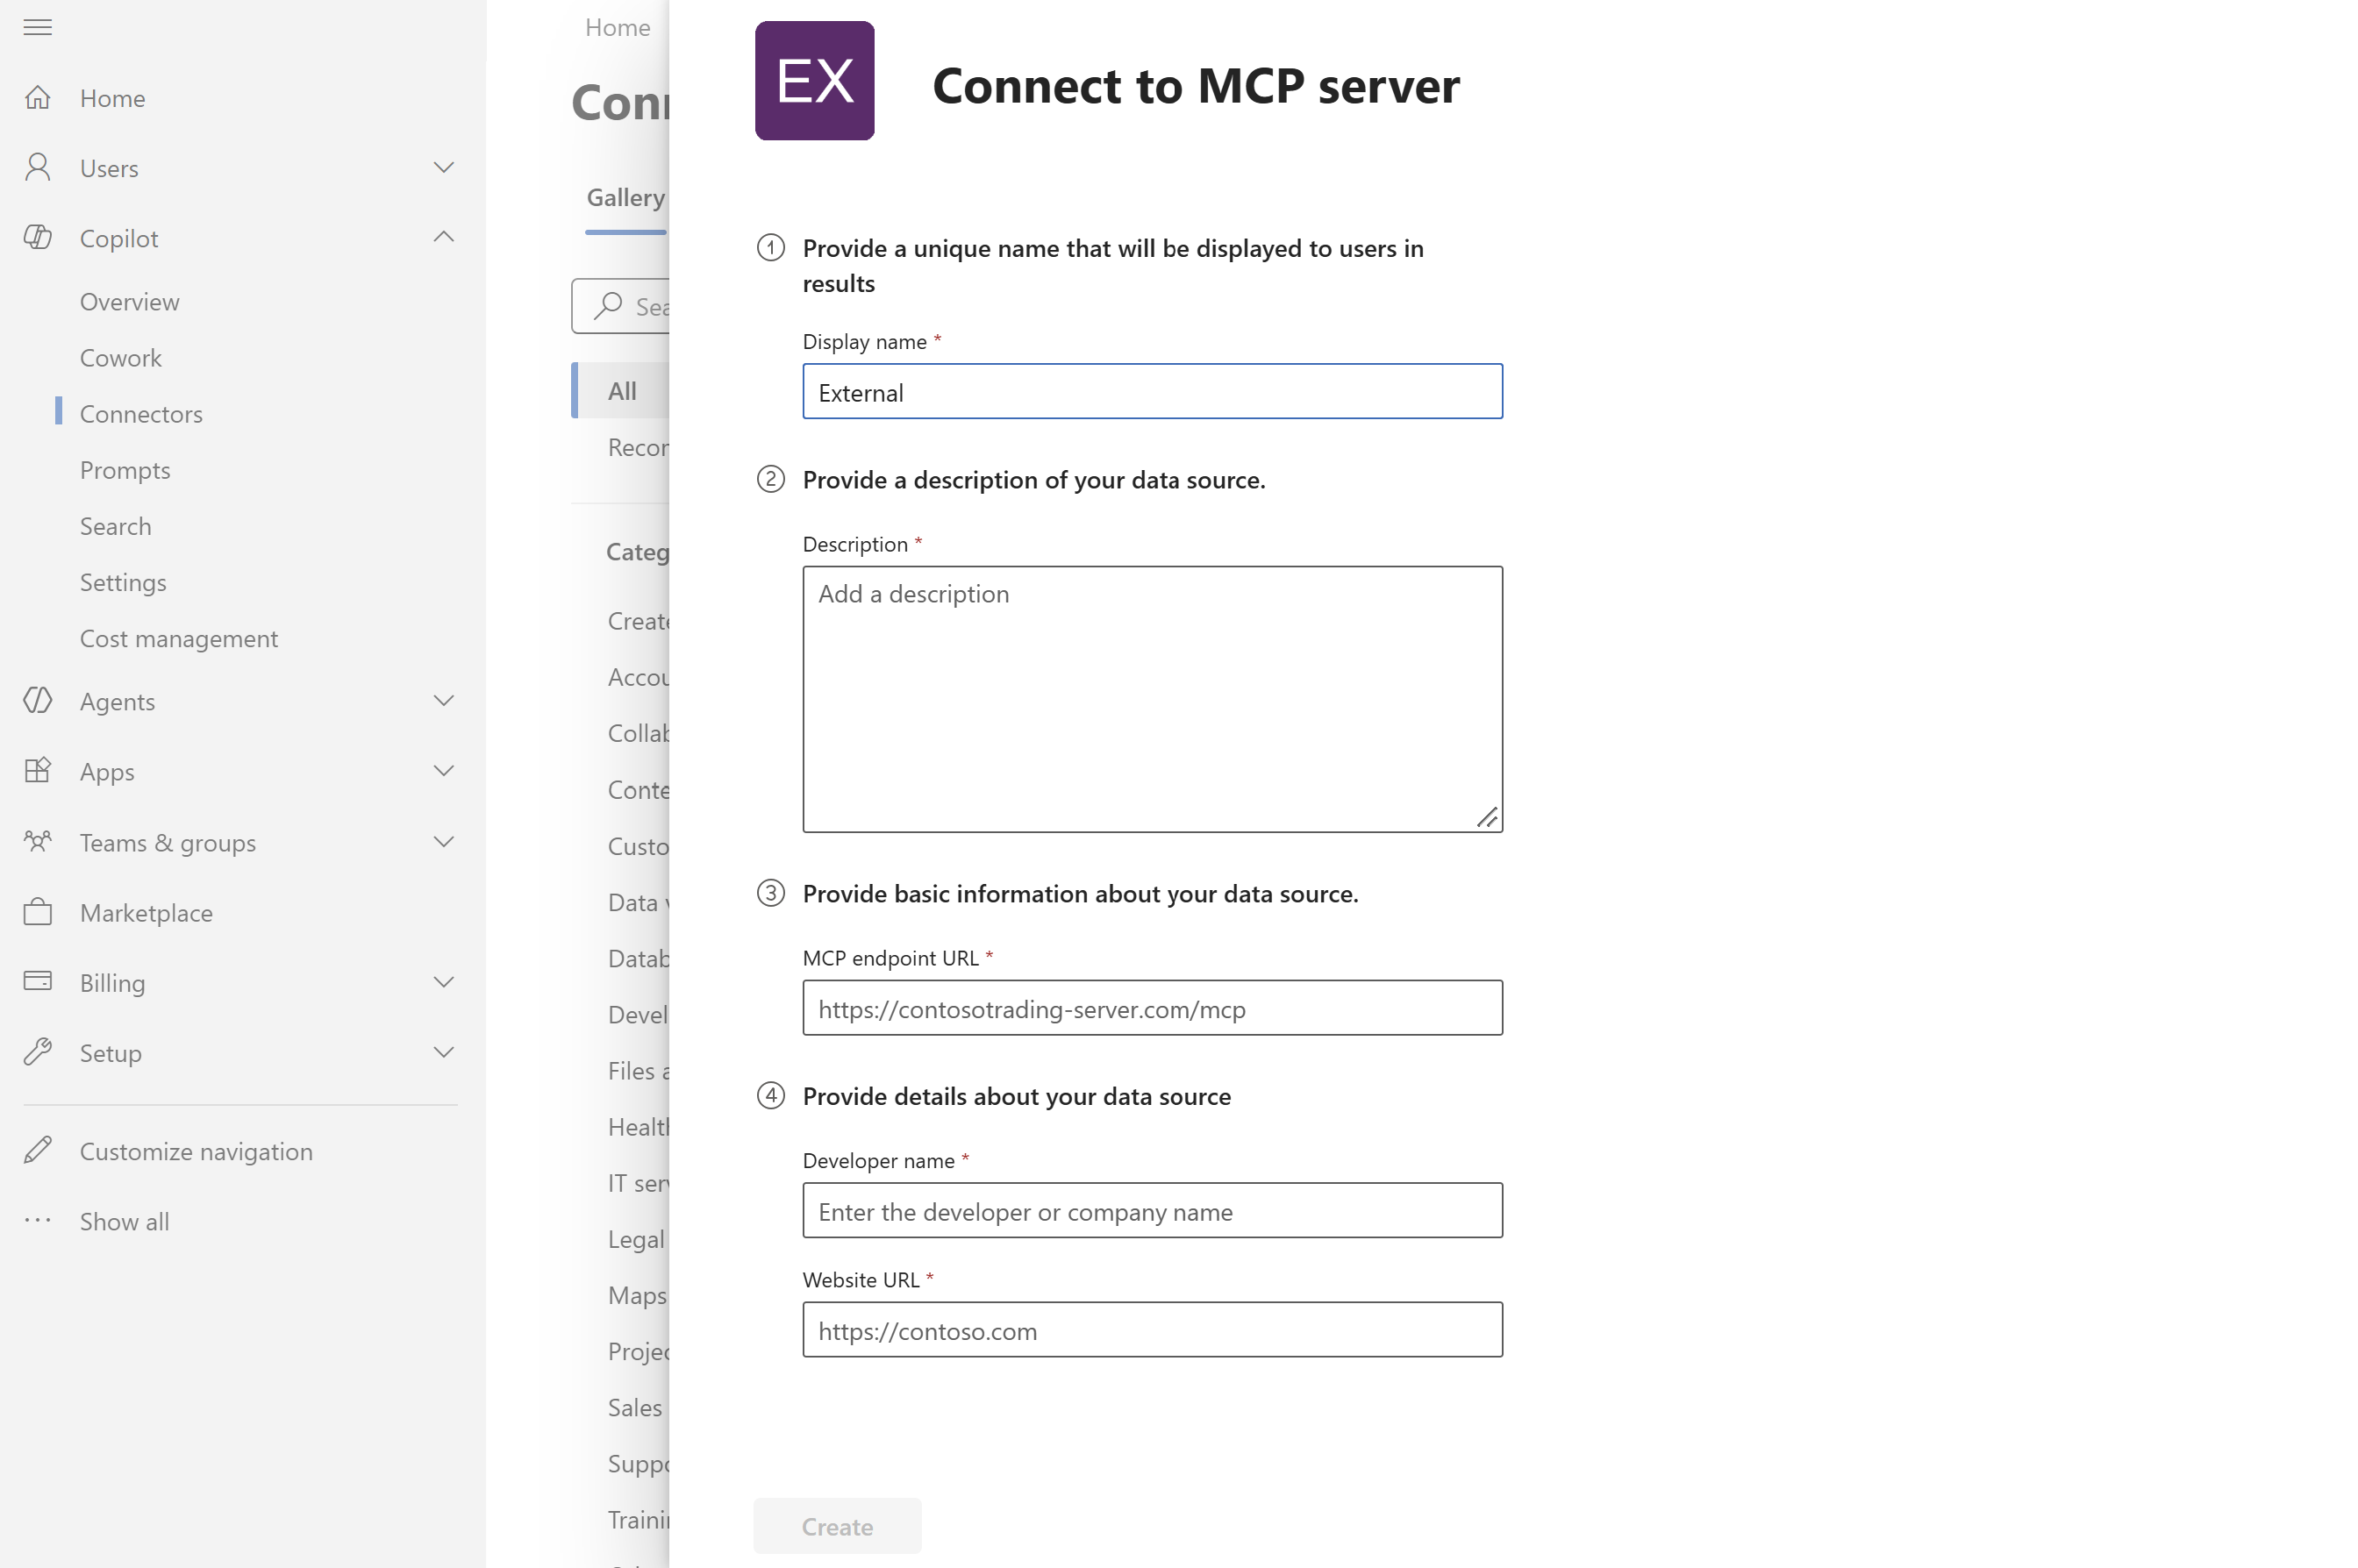
Enter the registration ID that matches the authentication method you set up previously:
- For Microsoft Entra SSO, enter the SSO registration ID from the Teams Developer Portal.
- For OAuth 2.0, enter the OAuth registration ID from the Teams Developer Portal.
Select Save to create the connector.
Manage the connector
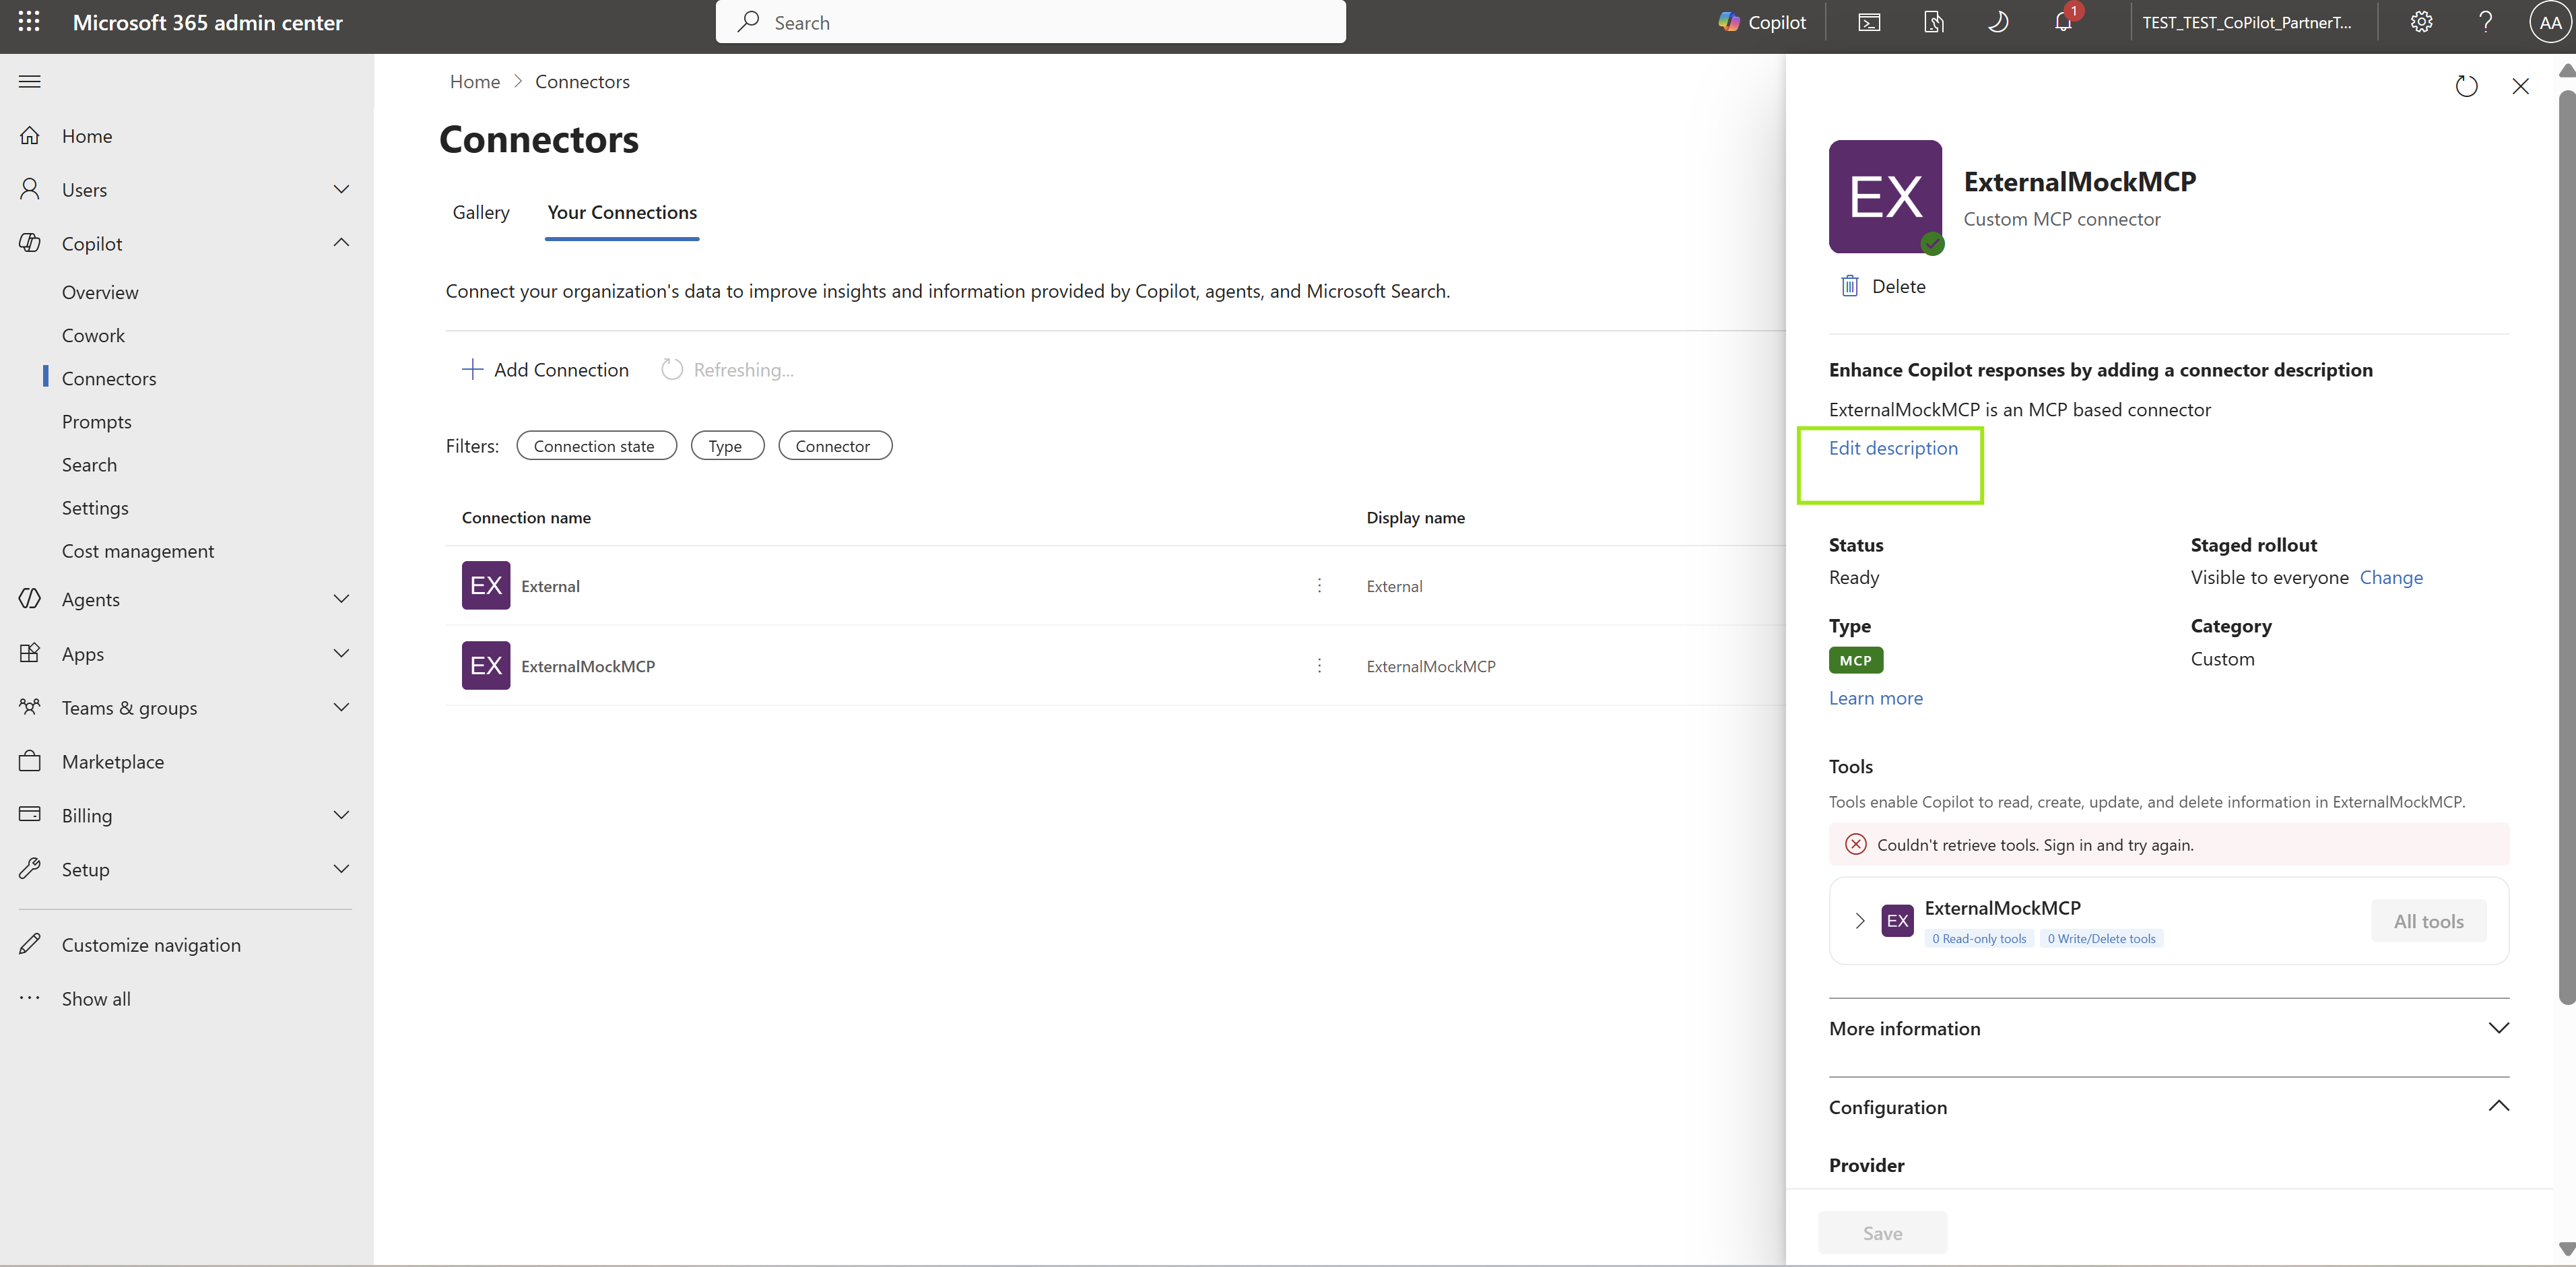
After you create a connector, it appears in the Your Connections list. From there, you can roll it out to users and manage its lifecycle.
To update the description later, open the connector from Your Connections, select Edit description in the details pane, and update the text. To refresh the description, use the connector description generation skill. Select Save to apply the change.
The Allow agents and plugins built by your organization setting in Agents > Settings > Agent and plugin access governs custom connectors. If you clear that option, the connector isn't available to users until you stage it individually. Agents > Settings > User access also limits availability.
Stage the rollout
You can deploy the connector to selected users or groups before you release it to everyone in the tenant:
- Select your connector.
- Select Staged rollout.
- Choose Users or Groups.
- Add the test users or groups.
- When you're ready to release the connector, select Deploy to all users.
Note
Deploy to all users makes the connector available to everyone included in User access (Agents > Settings > User access). If you set User access to specific users or groups, or to No users, the connector is available only to those users, or to no one.
Enable, disable, or delete the connector
From the Your Connections list, you can take the following actions.
| Action | Result |
|---|---|
| Enable | Makes the connector available to its staged audience, within the users allowed by User access. |
| Disable | Pauses the connector without removing its configuration. |
| Block (Agents > Tools) | Same as Disable. |
| Delete | Permanently removes the connector and its configuration. |
Note
Changes can take up to 10 minutes to take effect across Microsoft 365 experiences. Refresh the admin center if staging changes don't appear. Users might need to refresh Copilot or start a new conversation.
Frequently asked questions
Controls and terminology
What's the difference between disabling, blocking, uninstalling, and deleting a connector?
Disable (Copilot > Connectors > Your connections) pauses the connector without removing its configuration. You can enable it again. Block (Agents > Tools) has the same effect as Disable. Uninstall applies to agents in the Agent store and doesn't apply to federated connectors. Delete permanently removes a custom connector and its configuration. You can't undo it.
Can I hide a connector without deleting it?
Yes. Disable it, or set its staged rollout to No users. The configuration is kept, and admins can still see it in Your connections.
Can I delete pre-enabled Microsoft connectors?
No. You can't delete connectors from the Connectors Gallery. To remove them from users, disable them, set staged rollout to No users, or clear Allow agents and plugins built by Microsoft. You can only delete custom connectors your organization created.
Do "Installed for" or agent sharing settings apply to federated connectors?
No. Use staged rollout and User access.
Which admin page should I use for each control?
- Copilot > Connectors > Your connections: Enable, disable, stage, or delete connectors.
- Agents > Settings: Configure Agent and plugin access and User access.
- Agents > Tools: Block or unblock connectors and tools.
Precedence and scoping
Which setting takes priority: tenant-wide control, User access, or connector-level access?
All of them must allow the user. Agent and plugin access decides whether a connector type is available; a connector you turn on individually overrides it. User access sets the maximum population. Staged rollout narrows access within that population. If any one is restrictive, the user can't use the connector.
Why can administrators see a connector that users cannot?
Admins can see every connector in Your connections for governance, even when it's disabled, blocked, staged to No users, or its type is cleared in Agent and plugin access. Users see a connector only when every control allows them.
A connector shows "Visible to everyone," but users can't see it. Why?
User access or staged rollout is more restrictive. If User access is set to No users or to specific groups, or the connector is staged to No users, the visibility label alone doesn't grant access.
How do I restrict connectors to specific users or groups?
For all connectors, set User access to Specific users or groups. For one connector, use Staged rollout in Your connections. A user needs to be included in both.
How do I disable all connectors but allow one connector for selected users?
- Clear the relevant publisher types in Agent and plugin access (or set staged rollout to No users on each connector).
- Open the connector you want in Your connections and stage it to the users or groups.
- Make sure those users are included in User access.
How do I block third-party connectors but allow Microsoft connectors?
In Agents > Settings > Agent and plugin access, keep Allow agents and plugins built by Microsoft selected and clear Allow agents and plugins built by external publishers. Existing partner connectors are set to No users, and new partner connectors aren't available.
How are custom MCP connectors controlled?
By Allow agents and plugins built by your organization, User access, and the connector's own enable/disable and staged rollout settings. Admins can also delete custom connectors.
Does the User access setting apply to federated connectors?
Yes, including connectors delivered as Microsoft 365 app packages.
Defaults and new connectors
Do newly released connectors inherit my tenant's current setting?
Yes. If you clear the publisher type in Agent and plugin access, new connectors of that type aren't available. If you select the publisher type, new connectors follow the default rollout to everyone in User access.
Why is a new connector's visibility or staging off by default?
If you clear the connector's publisher type in Agent and plugin access, its staged rollout starts at No users. If you set User access to No users, the connector is unavailable to everyone.
Why did a connector become enabled again after I disabled it?
Common causes include:
- The publisher type is still selected in Agent and plugin access, so a new version or republished connector follows the default rollout.
- An admin changed Agent and plugin access back on.
Turn off the publisher type in Agent and plugin access or set the connector's staged rollout to No users. If it re-enables without any admin change, open a support case.
What happens to existing connectors when I change Agent and plugin access (formerly Allowed agent types)?
Clearing a type sets the staged rollout of that type's existing connectors to No users; admins can still see them. Selecting the type again restores availability.
Timing and refresh
How long do enable or disable changes take to appear?
Up to 10 minutes across Microsoft 365 experiences.
Do users need to sign out or refresh Copilot after a setting changes?
Users don't need to sign out. They might need to refresh Copilot or start a new conversation to see the change. Admins should refresh the admin center.
User experience and troubleshooting
If I disable a connector, will users still see it in Copilot Chat Sources?
No. After the change propagates, a disabled connector doesn't appear in Sources. If it still appears after the propagation time, refresh and check the Known behavior list.
Why does a connector show different states in Sources, Agents > Tools, and Your connections?
Each page shows a different control: Your connections shows the connector-level enable and staging state; Agents > Tools shows block status; Sources shows only what the signed-in user can use after all controls are applied. A connector can be enabled in Your connections and still be unavailable to a user because of User access or Agent and plugin access.
Why can an entitled user not find or use an enabled connector?
Check in order:
- The publisher type is allowed in Agent and plugin access, or the connector is turned on individually.
- The connector is enabled and not blocked in Agents > Tools.
- The user is included in User access.
- The user is included in staged rollout, directly or through group membership.
- The user has a Microsoft 365 Copilot license.
- The propagation time has passed and the user has refreshed Copilot.
- The user has connected (signed in) to the connector in Settings > Sources, if it requires authentication.
Why does a federated connector work only for the administrator?
Usually, the connector is staged only to the admin, User access targets a group the admin is in, or other users haven't connected to the service in Settings > Sources. Check staged rollout and User access, and ask users to connect.
Why is a connector missing from the Connectors Gallery or Your connections?
Possible causes include: the connector's publisher type is cleared in Agent and plugin access, so it isn't available in the Connectors Gallery; the connector isn't available in your cloud or region (for example, GCC); the connector hasn't been published to your tenant yet; or your admin role doesn't have access. Admins can still see connectors in Your connections for governance, even when their publisher type is cleared.
How do I verify that a connector is really disabled for end users?
Confirm the connector's state in Your connections, Agents > Tools, Agent and plugin access, and User access. Then sign in as a test user who isn't an admin, open Copilot Chat > Settings > Sources, and confirm the connector isn't listed. Also confirm Copilot doesn't use the connector when prompted.