ASP.NET Core で証明書認証を構成する
Microsoft.AspNetCore.Authentication.Certificate には、ASP.NET Core 用の証明書認証に似た実装が含まれています。 証明書の認証は、ASP.NET Core に到達するずっと前に TLS レベルで実行されます。 より正確には、証明書を検証し、その証明書を ClaimsPrincipal に解決できるイベントを提供するのは、認証ハンドラーです。
証明書認証用にサーバーを構成する "必要があります"。これには、IIS、Kestrel、Azure Web Apps、または使用している他のすべてのものが含まれます。
プロキシとロード バランサーのシナリオ
証明書認証はステートフルなシナリオであり、主に、プロキシまたはロード バランサーによってクライアントとサーバーの間のトラフィックが処理されない場合に使用されます。 プロキシまたはロード バランサーが使用されている場合は、プロキシまたはロード バランサーが以下である場合にのみ、証明書認証は機能します。
- 認証を処理します。
- 認証情報を処理するアプリにユーザー認証情報を渡します (要求ヘッダーなど)。
プロキシやロード バランサーが使用されている環境で証明書認証の代わりになるのは、OpenID Connect (OIDC) を使用する Active Directory フェデレーション サービス (ADFS) です。
はじめに
HTTPS 証明書を取得して適用し、証明書を要求するようにサーバーを構成 します。
Web アプリケーションの場合:
- Microsoft.AspNetCore.Authentication.Certificate NuGet パッケージへの参照を追加します。
Program.csで、builder.Services.AddAuthentication(CertificateAuthenticationDefaults.AuthenticationScheme).AddCertificate(...);を呼び出します。 要求と一緒に送信されたクライアント証明書に対して補助的な検証を行うには、OnCertificateValidatedのデリゲートを指定します。 その情報をClaimsPrincipalに変換して、context.Principalプロパティに設定します。
認証が失敗した場合、このハンドラーからは、予想される 401 (Unauthorized) ではなく 403 (Forbidden) 応答が返されます。 これは、認証は最初の TLS 接続の間に行われる必要があるためです。 ハンドラーに達したときでは遅すぎます。 匿名接続から証明書を使用するものに、接続をアップグレードする方法はありません。
証明書から作成された ClaimsPrincipal に HttpContext.User を設定するには UseAuthentication が必要です。 次に例を示します。
var builder = WebApplication.CreateBuilder(args);

builder.Services.AddAuthentication(
        CertificateAuthenticationDefaults.AuthenticationScheme)
    .AddCertificate();

var app = builder.Build();

app.UseAuthentication();

app.MapGet("/", () => "Hello World!");

app.Run();
前の例では、証明書認証を追加する既定の方法が示されています。 ハンドラーにより、証明書の共通プロパティを使用してユーザー プリンシパルが作成されます。
証明書の検証を構成する
CertificateAuthenticationOptions ハンドラーには、証明書に対して実行する必要のある最小限の検証が組み込まれています。 これらの各設定は既定で有効になっています。
AllowedCertificateTypes = Chained、SelfSigned、または All (Chained | SelfSigned)
既定値:CertificateTypes.Chained
このチェックでは、適切な証明書の種類のみが許可されていることが検証されます。 アプリで自己署名証明書が使われている場合は、このオプションを CertificateTypes.All または CertificateTypes.SelfSigned に設定する必要があります。
ChainTrustValidationMode
既定値: X509ChainTrustMode.System
クライアントによって提示される証明書は、信頼されたルート証明書にチェーンする必要があります。 このチェックでは、これらのルート証明書を含む信頼ストアを制御します。
既定では、ハンドラーはシステム信頼ストアを使用します。 提示されたクライアント証明書を、システム信頼ストアに表示されないルート証明書にチェーンする必要がある場合は、このオプションを X509ChainTrustMode.CustomRootTrust に設定して、ハンドラーで CustomTrustStore を使用できます。
CustomTrustStore
既定値: 空の X509Certificate2Collection
ハンドラーの ChainTrustValidationMode プロパティが X509ChainTrustMode.CustomRootTrust に設定されている場合、この X509Certificate2Collection には、信頼されたルート (信頼されたルートを含む) までのクライアント証明書の検証に使用されるすべての証明書が含まれます。
クライアントが複数レベルの証明書チェーンの一部である証明書を提示する場合は、CustomTrustStore チェーン内のすべての発行証明書を含める必要があります。
ValidateCertificateUse
既定値:true
このチェックでは、クライアントから提示された証明書にクライアント認証の拡張キー使用法 (EKU) があること、または EKU がまったくないことが検証されます。 仕様として、EKU が指定されていない場合は、すべての EKU が有効であると見なされます。
ValidateValidityPeriod
既定値:true
このチェックでは、証明書が有効期間内であることが検証されます。 要求ごとに、ハンドラーによって、提示されたときに有効だった証明書が、現在のセッションの間に期限切れになっていないことが確認されます。
RevocationFlag
既定値:X509RevocationFlag.ExcludeRoot
チェーン内で失効チェックを行う証明書を指定するフラグ。
失効チェックは、証明書がルート証明書にチェーンされている場合にのみ行われます。
RevocationMode
既定値:X509RevocationMode.Online
失効チェックの実行方法を指定するフラグ。
オンライン チェックを指定すると、証明機関への接続中に長い遅延が発生する可能性があります。
失効チェックは、証明書がルート証明書にチェーンされている場合にのみ行われます。
特定のパスでのみ証明書を要求するようにアプリを構成することはできますか?
これはできません。 証明書の交換は、HTTPS の会話の開始時に行われることを思い出してください。これは、その接続で最初の要求が受信される前にサーバーによって行われるため、いずれかの要求フィールドに基づいてスコープを設定することはできません。
ハンドラーのイベント
ハンドラーには、次の 2 つのイベントがあります。
OnAuthenticationFailed: 認証の間に例外が発生し、ユーザーがそれに対応できる場合に、呼び出されます。OnCertificateValidated: 証明書が検証され、検証に合格し、既定のプリンシパルが作成された後に、呼び出されます。 このイベントを使用すると、独自の検証を実行し、プリンシパルを補強したり置き換えたりすることができます。 次に例を示します。証明書がサービスで認識されているかどうかを確認する。
独自のプリンシパルを構築する。 次の例を考えてみましょう。
builder.Services.AddAuthentication(
        CertificateAuthenticationDefaults.AuthenticationScheme)
    .AddCertificate(options =>
    {
        options.Events = new CertificateAuthenticationEvents
        {
            OnCertificateValidated = context =>
            {
                var claims = new[]
                {
                    new Claim(
                        ClaimTypes.NameIdentifier,
                        context.ClientCertificate.Subject,
                        ClaimValueTypes.String, context.Options.ClaimsIssuer),
                    new Claim(
                        ClaimTypes.Name,
                        context.ClientCertificate.Subject,
                        ClaimValueTypes.String, context.Options.ClaimsIssuer)
                };

                context.Principal = new ClaimsPrincipal(
                    new ClaimsIdentity(claims, context.Scheme.Name));
                context.Success();

                return Task.CompletedTask;
            }
        };
    });
インバウンド証明書が追加の検証を満たしていない場合は、失敗の理由を指定して context.Fail("failure reason") を呼び出します。
機能を向上させるには、データベースまたは他の種類のユーザー ストアに接続する依存関係の挿入に登録されているサービスを呼び出す必要があります。 デリゲートに渡されたコンテキストを使って、サービスにアクセスします。 次の例を考えてみましょう。
builder.Services.AddAuthentication(
        CertificateAuthenticationDefaults.AuthenticationScheme)
    .AddCertificate(options =>
    {
        options.Events = new CertificateAuthenticationEvents
        {
            OnCertificateValidated = context =>
            {
                var validationService = context.HttpContext.RequestServices
                    .GetRequiredService<ICertificateValidationService>();

                if (validationService.ValidateCertificate(context.ClientCertificate))
                {
                    var claims = new[]
                    {
                        new Claim(
                            ClaimTypes.NameIdentifier,
                            context.ClientCertificate.Subject,
                            ClaimValueTypes.String, context.Options.ClaimsIssuer),
                        new Claim(
                            ClaimTypes.Name,
                            context.ClientCertificate.Subject,
                            ClaimValueTypes.String, context.Options.ClaimsIssuer)
                    };

                    context.Principal = new ClaimsPrincipal(
                        new ClaimsIdentity(claims, context.Scheme.Name));
                    context.Success();
                }

                return Task.CompletedTask;
            }
        };
    });
概念的には、証明書の検証は認可に関する問題です。 OnCertificateValidated の内部ではなく、認可ポリシーにたとえば発行者やサムプリントのチェックを追加しても、まったく問題ありません。
証明書を要求するようにサーバーを構成する
Kestrel
Program.cs で、Kestrel を次のように構成します。
var builder = WebApplication.CreateBuilder(args);

builder.Services.Configure<KestrelServerOptions>(options =>
{
    options.ConfigureHttpsDefaults(options =>
        options.ClientCertificateMode = ClientCertificateMode.RequireCertificate);
});
Note
ConfigureHttpsDefaults を呼び出すListenListen を呼び出すことで作成されるエンドポイントには既定値が適用されません。
IIS
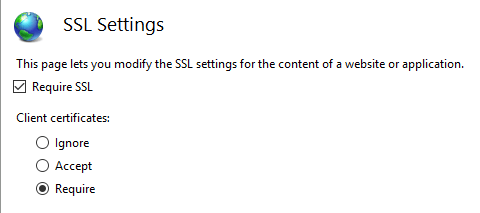
IIS マネージャーで、次の手順を実行します。
- [接続] タブでご自分のサイトを選びます。
- [機能ビュー] ウィンドウで、[SSL 設定] オプションをダブルクリックします。
- [SSL が必要] チェック ボックスをオンにし、[クライアント証明書] セクションの [必要] ラジオ ボタンを選びます。
Azure とカスタム Web プロキシ
証明書転送ミドルウェアの構成方法については、ホストとデプロイに関するドキュメントをご覧ください。
Azure Web Apps で証明書認証を使用する
Azure で転送を構成する必要はありません。 転送構成は、証明書転送ミドルウェアによって設定されます。
Note
このシナリオでは、証明書転送ミドルウェアが必要です。
詳しくは、「Azure App Service の自分のコードから TLS/SSL 証明書を使用する」 (Azure ドキュメント) をご覧ください。
カスタム Web プロキシで証明書認証を使用する
AddCertificateForwarding メソッドを使って、次のものを指定します。
- クライアント ヘッダー名。
- 証明書を読み込む方法 (
HeaderConverterプロパティを使用)。
カスタム Web プロキシでは、証明書はカスタム要求ヘッダーとして渡されます (例: X-SSL-CERT)。 それを使うには、Program.cs で証明書の転送を構成します。
builder.Services.AddCertificateForwarding(options =>
{
    options.CertificateHeader = "X-SSL-CERT";

    options.HeaderConverter = headerValue =>
    {
        X509Certificate2? clientCertificate = null;

        if (!string.IsNullOrWhiteSpace(headerValue))
        {
            clientCertificate = new X509Certificate2(StringToByteArray(headerValue));
        }

        return clientCertificate!;

        static byte[] StringToByteArray(string hex)
        {
            var numberChars = hex.Length;
            var bytes = new byte[numberChars / 2];

            for (int i = 0; i < numberChars; i += 2)
            {
                bytes[i / 2] = Convert.ToByte(hex.Substring(i, 2), 16);
            }

            return bytes;
        }
    };
});
アプリが、構成 proxy_set_header ssl-client-cert $ssl_client_escaped_cert を使用して NGINX によってリバース プロキシされている場合、または NGINX イングレスを使って Kubernetes にデプロイされている場合は、クライアント証明書は URL エンコード形式でアプリに渡されます。 証明書を使うには、次のようにデコードします。
builder.Services.AddCertificateForwarding(options =>
{
    options.CertificateHeader = "ssl-client-cert";

    options.HeaderConverter = (headerValue) =>
    {
        X509Certificate2? clientCertificate = null;

        if (!string.IsNullOrWhiteSpace(headerValue))
        {
            clientCertificate = X509Certificate2.CreateFromPem(
                WebUtility.UrlDecode(headerValue));
        }

        return clientCertificate!;
    };
});
Program.cs にミドルウェアを追加します。 UseCertificateForwarding は、UseAuthentication と UseAuthorization の呼び出しの前に呼び出されます。
var app = builder.Build();

app.UseCertificateForwarding();

app.UseAuthentication();
app.UseAuthorization();
別のクラスを使って、検証ロジックを実装できます。 この例では同じ自己署名証明書が使われているので、自分の証明書のみを使用できることを確認します。 クライアント証明書とサーバー証明書の両方のサムプリントが一致することを検証します。そうしないと、任意の証明書を使用でき、認証に十分になります。 これは AddCertificate メソッド内で使われます。 また、中間証明書または子証明書を使っている場合は、ここでサブジェクトまたは発行者を検証できます。
using System.Security.Cryptography.X509Certificates;

namespace CertAuthSample.Snippets;

public class SampleCertificateValidationService : ICertificateValidationService
{
    public bool ValidateCertificate(X509Certificate2 clientCertificate)
    {
        // Don't hardcode passwords in production code.
        // Use a certificate thumbprint or Azure Key Vault.
        var expectedCertificate = new X509Certificate2(
            Path.Combine("/path/to/pfx"), "1234");

        return clientCertificate.Thumbprint == expectedCertificate.Thumbprint;
    }
}
証明書と IHttpClientFactory を使用して HttpClient を実装する
次の例では、ハンドラーの ClientCertificates プロパティを使用して、クライアント証明書が HttpClientHandler に追加されます。 その後、ConfigurePrimaryHttpMessageHandler メソッドを使用して、HttpClient の名前付きインスタンスでこのハンドラーを使用できます。 これは、Program.cs で設定されます。
var clientCertificate =
    new X509Certificate2(
      Path.Combine(_environment.ContentRootPath, "sts_dev_cert.pfx"), "1234");

builder.Services.AddHttpClient("namedClient", c =>
{
}).ConfigurePrimaryHttpMessageHandler(() =>
{
    var handler = new HttpClientHandler();
    handler.ClientCertificates.Add(clientCertificate);
    return handler;
});
その後、IHttpClientFactory を使用して、名前付きインスタンスおよびハンドラーと証明書を取得できます。 インスタンスを取得するために、CreateClient メソッドと、Program.cs で定義されているクライアントの名前が使用されます。 必要に応じて、クライアントを使用して HTTP 要求を送信できます。
public class SampleHttpService
{
    private readonly IHttpClientFactory _httpClientFactory;

    public SampleHttpService(IHttpClientFactory httpClientFactory)
        => _httpClientFactory = httpClientFactory;

    public async Task<JsonDocument> GetAsync()
    {
        var httpClient = _httpClientFactory.CreateClient("namedClient");
        var httpResponseMessage = await httpClient.GetAsync("https://example.com");

        if (httpResponseMessage.IsSuccessStatusCode)
        {
            return JsonDocument.Parse(
                await httpResponseMessage.Content.ReadAsStringAsync());
        }

        throw new ApplicationException($"Status code: {httpResponseMessage.StatusCode}");
    }
}
正しい証明書がサーバーに送信された場合は、データが返されます。 証明書が送信されなかった場合、または間違った証明書が送信された場合は、HTTP 403 状態コードが返されます。
PowerShell で証明書を作成する
証明書の作成は、このフローを設定するときに最も難しい部分です。 ルート証明書は、New-SelfSignedCertificate PowerShell コマンドレットを使って作成できます。 証明書を作成するときは、強力なパスワードを使います。 次されているように、KeyUsageProperty パラメーターと KeyUsage パラメーターを追加することが重要です。
ルート CA を作成する
New-SelfSignedCertificate -DnsName "root_ca_dev_damienbod.com", "root_ca_dev_damienbod.com" -CertStoreLocation "cert:\LocalMachine\My" -NotAfter (Get-Date).AddYears(20) -FriendlyName "root_ca_dev_damienbod.com" -KeyUsageProperty All -KeyUsage CertSign, CRLSign, DigitalSignature

$mypwd = ConvertTo-SecureString -String "1234" -Force -AsPlainText

Get-ChildItem -Path cert:\localMachine\my\"The thumbprint..." | Export-PfxCertificate -FilePath C:\git\root_ca_dev_damienbod.pfx -Password $mypwd

Export-Certificate -Cert cert:\localMachine\my\"The thumbprint..." -FilePath root_ca_dev_damienbod.crt
Note
-DnsName パラメーターの値は、アプリのデプロイ ターゲットと一致する必要があります。 たとえば、開発用の "localhost" などです。
信頼されたルートをインストールする
ルート証明書は、ホスト システムで信頼されている必要があります。 証明機関によって作成されていないルート証明書は、既定では信頼されません。 Windows で証明書のルート証明書を信頼する方法については、こちらの質問を参照してください。
中間証明機関の証明書
これで、ルート証明書から中間証明書を作成できます。 これはすべてのユース ケースで必要なわけではありませんが、多くの証明書を作成する必要がある場合や、証明書のグループをアクティブ化または無効化することが必要な場合があります。 証明書の基本的な制約でパスの長さを設定するには、TextExtension パラメーターが必要です。
その後、Windows ホスト システム内の信頼された中間証明書に、中間証明書を追加できます。
$mypwd = ConvertTo-SecureString -String "1234" -Force -AsPlainText

$parentcert = ( Get-ChildItem -Path cert:\LocalMachine\My\"The thumbprint of the root..." )

New-SelfSignedCertificate -certstorelocation cert:\localmachine\my -dnsname "intermediate_dev_damienbod.com" -Signer $parentcert -NotAfter (Get-Date).AddYears(20) -FriendlyName "intermediate_dev_damienbod.com" -KeyUsageProperty All -KeyUsage CertSign, CRLSign, DigitalSignature -TextExtension @("2.5.29.19={text}CA=1&pathlength=1")

Get-ChildItem -Path cert:\localMachine\my\"The thumbprint..." | Export-PfxCertificate -FilePath C:\git\AspNetCoreCertificateAuth\Certs\intermediate_dev_damienbod.pfx -Password $mypwd

Export-Certificate -Cert cert:\localMachine\my\"The thumbprint..." -FilePath intermediate_dev_damienbod.crt
中間証明書から子証明書を作成する
中間証明書から子証明書を作成できます。 これはエンド エンティティであり、さらに多くの子証明書を作成する必要はありません。
$parentcert = ( Get-ChildItem -Path cert:\LocalMachine\My\"The thumbprint from the Intermediate certificate..." )

New-SelfSignedCertificate -certstorelocation cert:\localmachine\my -dnsname "child_a_dev_damienbod.com" -Signer $parentcert -NotAfter (Get-Date).AddYears(20) -FriendlyName "child_a_dev_damienbod.com"

$mypwd = ConvertTo-SecureString -String "1234" -Force -AsPlainText

Get-ChildItem -Path cert:\localMachine\my\"The thumbprint..." | Export-PfxCertificate -FilePath C:\git\AspNetCoreCertificateAuth\Certs\child_a_dev_damienbod.pfx -Password $mypwd

Export-Certificate -Cert cert:\localMachine\my\"The thumbprint..." -FilePath child_a_dev_damienbod.crt
ルート証明書から子証明書を作成する
子証明書は、ルート証明書から直接作成することもできます。
$rootcert = ( Get-ChildItem -Path cert:\LocalMachine\My\"The thumbprint from the root cert..." )

New-SelfSignedCertificate -certstorelocation cert:\localmachine\my -dnsname "child_a_dev_damienbod.com" -Signer $rootcert -NotAfter (Get-Date).AddYears(20) -FriendlyName "child_a_dev_damienbod.com"

$mypwd = ConvertTo-SecureString -String "1234" -Force -AsPlainText

Get-ChildItem -Path cert:\localMachine\my\"The thumbprint..." | Export-PfxCertificate -FilePath C:\git\AspNetCoreCertificateAuth\Certs\child_a_dev_damienbod.pfx -Password $mypwd

Export-Certificate -Cert cert:\localMachine\my\"The thumbprint..." -FilePath child_a_dev_damienbod.crt
ルート - 中間証明書 - 証明書の例
$mypwdroot = ConvertTo-SecureString -String "1234" -Force -AsPlainText
$mypwd = ConvertTo-SecureString -String "1234" -Force -AsPlainText

New-SelfSignedCertificate -DnsName "root_ca_dev_damienbod.com", "root_ca_dev_damienbod.com" -CertStoreLocation "cert:\LocalMachine\My" -NotAfter (Get-Date).AddYears(20) -FriendlyName "root_ca_dev_damienbod.com" -KeyUsageProperty All -KeyUsage CertSign, CRLSign, DigitalSignature

Get-ChildItem -Path cert:\localMachine\my\0C89639E4E2998A93E423F919B36D4009A0F9991 | Export-PfxCertificate -FilePath C:\git\root_ca_dev_damienbod.pfx -Password $mypwdroot

Export-Certificate -Cert cert:\localMachine\my\0C89639E4E2998A93E423F919B36D4009A0F9991 -FilePath root_ca_dev_damienbod.crt

$rootcert = ( Get-ChildItem -Path cert:\LocalMachine\My\0C89639E4E2998A93E423F919B36D4009A0F9991 )

New-SelfSignedCertificate -certstorelocation cert:\localmachine\my -dnsname "child_a_dev_damienbod.com" -Signer $rootcert -NotAfter (Get-Date).AddYears(20) -FriendlyName "child_a_dev_damienbod.com" -KeyUsageProperty All -KeyUsage CertSign, CRLSign, DigitalSignature -TextExtension @("2.5.29.19={text}CA=1&pathlength=1")

Get-ChildItem -Path cert:\localMachine\my\BA9BF91ED35538A01375EFC212A2F46104B33A44 | Export-PfxCertificate -FilePath C:\git\AspNetCoreCertificateAuth\Certs\child_a_dev_damienbod.pfx -Password $mypwd

Export-Certificate -Cert cert:\localMachine\my\BA9BF91ED35538A01375EFC212A2F46104B33A44 -FilePath child_a_dev_damienbod.crt

$parentcert = ( Get-ChildItem -Path cert:\LocalMachine\My\BA9BF91ED35538A01375EFC212A2F46104B33A44 )

New-SelfSignedCertificate -certstorelocation cert:\localmachine\my -dnsname "child_b_from_a_dev_damienbod.com" -Signer $parentcert -NotAfter (Get-Date).AddYears(20) -FriendlyName "child_b_from_a_dev_damienbod.com"

Get-ChildItem -Path cert:\localMachine\my\141594A0AE38CBBECED7AF680F7945CD51D8F28A | Export-PfxCertificate -FilePath C:\git\AspNetCoreCertificateAuth\Certs\child_b_from_a_dev_damienbod.pfx -Password $mypwd

Export-Certificate -Cert cert:\localMachine\my\141594A0AE38CBBECED7AF680F7945CD51D8F28A -FilePath child_b_from_a_dev_damienbod.crt
ルート、中間、または子証明書を使用するときは、必要に応じてサムプリントまたは PublicKey を使って証明書を検証できます。
using System.Security.Cryptography.X509Certificates;

namespace CertAuthSample.Snippets;

public class SampleCertificateThumbprintsValidationService : ICertificateValidationService
{
    private readonly string[] validThumbprints = new[]
    {
        "141594A0AE38CBBECED7AF680F7945CD51D8F28A",
        "0C89639E4E2998A93E423F919B36D4009A0F9991",
        "BA9BF91ED35538A01375EFC212A2F46104B33A44"
    };

    public bool ValidateCertificate(X509Certificate2 clientCertificate)
        => validThumbprints.Contains(clientCertificate.Thumbprint);
}
証明書検証のキャッシュ
ASP.NET Core 5.0 以降のバージョンでは、検証結果のキャッシュを有効にする機能がサポートされています。 検証は負荷の大きい操作であり、キャッシュすることで証明書認証のパフォーマンスが大幅に向上します。
既定では、証明書認証のキャッシュは無効になっています。 キャッシュを有効にするには、Program.cs で AddCertificateCache を呼び出します。
builder.Services.AddAuthentication(
        CertificateAuthenticationDefaults.AuthenticationScheme)
    .AddCertificate()
    .AddCertificateCache(options =>
    {
        options.CacheSize = 1024;
        options.CacheEntryExpiration = TimeSpan.FromMinutes(2);
    });
キャッシュの既定の実装では、結果はメモリに格納されます。 ICertificateValidationCache を実装し、依存関係の挿入でそれを登録することにより、独自のキャッシュを提供できます。 たとえば、「 services.AddSingleton<ICertificateValidationCache, YourCache>() 」のように入力します。
オプションのクライアント証明書
このセクションでは、証明書でアプリのサブセットを保護する必要があるアプリについて説明します。 たとえば、アプリの Razor ページやコントローラーにクライアント証明書が必要な場合があります。 これには、クライアント証明書の次のような特徴に伴う課題があります。
- HTTP の機能ではなく、TLS の機能です。
- 接続ごとに、通常は HTTP データが使用可能になる前の接続の開始時に、ネゴシエートされます。
オプションのクライアント証明書を実装するには、次の 2 つの方法があります。
- 別のホスト名 (SNI) の使用とリダイレクト。 構成作業は増えますが、ほとんどの環境とプロトコルで動作するので推奨されます。
- HTTP 要求の間の再ネゴシエーション。 これにはいくつかの制限があり、推奨されません。
個別のホスト (SNI)
接続の開始時には、Server Name Indication (SNI)† だけがわかっています。 クライアント証明書は、1 つのホストで必要とされ、別のホストでは必要とされないように、ホスト名ごとに構成できます。
- ドメインとサブドメインのバインドを設定します。
- たとえば、
contoso.comとmyClient.contoso.comでバインドを設定します。 クライアント証明書は、contoso.comホストでは必要ありませんが、myClient.contoso.comでは必要です。 - 詳細については次を参照してください:
- たとえば、
ASP.NET Core 5 以降では、オプションのクライアント証明書を取得するためのリダイレクトについて、いっそう便利なサポートが追加されています。 詳しくは、「Optional certificates sample (オプションの証明書のサンプル)」をご覧ください。
- クライアント証明書が必要だが持っていない Web アプリに対する要求の場合:
- クライアント証明書で保護されたサブドメインを使って、同じページにリダイレクトします。
- たとえば、
myClient.contoso.com/requestedPageにリダイレクトします。myClient.contoso.com/requestedPageへの要求はcontoso.com/requestedPageとは異なるホスト名なので、クライアントによって別の接続が確立され、クライアント証明書が提供されます。 - 詳細については、「ASP.NET Core での認可の概要」を参照してください。
† Server Name Indication (SNI) は、SSL ネゴシエーションの一部として仮想ドメインを含めるための TLS 拡張機能です。 これは実質的に、仮想ドメイン名 (またはホスト名) を使用してネットワーク エンドポイントを識別できることを意味します。
再ネゴシエーション
TLS の再ネゴシエーションは、クライアントとサーバーが個々の接続の暗号化要件を再評価できるプロセスです。これには、以前に提供されなかった場合のクライアント証明書の要求が含まれます。 TLS の再ネゴシエーションはセキュリティ リスクであり、次の理由から推奨されません。
- HTTP/1.1 では、サーバーは、最初に、再ネゴシエーションの対象の接続が明確であることを確認するため、POST 要求本文など、転送中の HTTP データをバッファーに入れるか使用する必要があります。 そうしないと、再ネゴシエーションの応答が停止したり、失敗したりする可能性があります。
- HTTP/2 と HTTP/3 では、再ネゴシエーションは明示的に禁止されています。
- 再ネゴシエーションに関連するセキュリティ リスクがあります。 TLS 1.3 では、接続全体の再ネゴシエーションが削除され、接続の開始後にクライアント証明書のみを要求する新しい拡張機能に置き換えられました。 このメカニズムは、同じ API を使用して公開されており、やはりバッファーと HTTP プロトコルのバージョンについて以前の制約を受けます。
この機能の実装と構成は、サーバーやフレームワークのバージョンによって異なります。
IIS
クライアント証明書のネゴシエーションは、ユーザーに代わって IIS で管理されます。 アプリケーションのサブセクションで SslRequireCert オプションを有効にして、それらの要求についてクライアント証明書をネゴシエートすることができます。 詳しくは、IIS のドキュメントで構成に関するページをご覧ください。
IIS により、要求本文のデータは構成されているサイズ制限に達するまで自動的にバッファーに格納された後、再ネゴシエーションが行われます。 制限を超える要求は、413 の応答で拒否されます。 この制限の既定値は 48 KB であり、uploadReadAheadSize を設定することで構成できます。
HttpSys
HttpSys には、クライアント証明書のネゴシエーションを制御する 2 つの設定があり、両方とも設定する必要があります。 1 つ目は、http add sslcert clientcertnegotiation=enable/disable の下の netsh.exe 内にあります。 このフラグは、接続の開始時にクライアント証明書をネゴシエートする必要があるかどうか、およびオプションのクライアント証明書の場合にそれを disable に設定する必要があるかどうかを示します。 詳しくは、netsh のドキュメントをご覧ください。
もう 1 つの設定は ClientCertificateMethod です。 AllowRenegotation に設定すると、要求の間にクライアント証明書を再ネゴシエートできます。
注 アプリケーションでは、再ネゴシエーションを試みる前に、要求本文のデータをバッファーに入れるか使用する必要があります。そうしないと、要求が応答しなくなる可能性があります。
アプリケーションでは、最初に ClientCertificate プロパティを調べて、証明書が使用可能かどうかを確認できます。 使用できない場合は、GetClientCertificateAsync を呼び出してネゴシエートする前に、要求本文が使用されていることを確認します。 クライアントが証明書の提供を拒否した場合、GetClientCertificateAsync から null 証明書が返される可能性があることに注意してください。
注 .NET 6 では、ClientCertificate プロパティの動作が変更されました。 詳細については、こちらの GitHub の問題のページを参照してください。
Kestrel
Kestrel は、ClientCertificateMode オプションを使用して、クライアント証明書のネゴシエーションを制御します。
ClientCertificateMode.DelayCertificate は、.NET 6 以降で使用できる新しいオプションです。 設定すると、アプリで ClientCertificate プロパティを調べて、証明書が使用可能かどうかを確認できます。 使用できない場合は、GetClientCertificateAsync を呼び出してネゴシエートする前に、要求本文が使用されていることを確認します。 クライアントが証明書の提供を拒否した場合、GetClientCertificateAsync から null 証明書が返される可能性があることに注意してください。
注 アプリケーションでは、再ネゴシエーションを試みる前に、要求本文のデータをバッファーに入れるか使用する必要があります。そうしないと、GetClientCertificateAsync で InvalidOperationException: Client stream needs to be drained before renegotiation. がスローされる可能性があります。
プログラムでホストごとに TLS の設定を構成する場合は、.NET 6 以降で利用できる新しい UseHttps のオーバーロードがあります。これは、TlsHandshakeCallbackOptions を受け取り、TlsHandshakeCallbackContext.AllowDelayedClientCertificateNegotation 介してクライアント証明書の再ネゴシエーションを制御します。
Microsoft.AspNetCore.Authentication.Certificate には、ASP.NET Core 用の証明書認証に似た実装が含まれています。 証明書の認証は、ASP.NET Core に到達するずっと前に TLS レベルで実行されます。 より正確には、証明書を検証し、その証明書を ClaimsPrincipal に解決できるイベントを提供するのは、認証ハンドラーです。
証明書認証用にサーバーを構成します。これには、IIS、Kestrel、Azure Web Apps、または使用している他のすべてのものが含まれます。
プロキシとロード バランサーのシナリオ
証明書認証はステートフルなシナリオであり、主に、プロキシまたはロード バランサーによってクライアントとサーバーの間のトラフィックが処理されない場合に使用されます。 プロキシまたはロード バランサーが使用されている場合は、プロキシまたはロード バランサーが以下である場合にのみ、証明書認証は機能します。
- 認証を処理します。
- 認証情報を処理するアプリにユーザー認証情報を渡します (要求ヘッダーなど)。
プロキシやロード バランサーが使用されている環境で証明書認証の代わりになるのは、OpenID Connect (OIDC) を使用する Active Directory フェデレーション サービス (ADFS) です。
はじめに
HTTPS 証明書を取得して適用し、証明書を要求するようにサーバーを構成 します。
Web アプリで、Microsoft.AspNetCore.Authentication.Certificate パッケージへの参照を追加します。 次に、Startup.ConfigureServices メソッドで、オプションを指定して services.AddAuthentication(CertificateAuthenticationDefaults.AuthenticationScheme).AddCertificate(...); を呼び出し、要求で送信されたクライアント証明書に対して補助的な検証を実行するための OnCertificateValidated のデリゲートを提供します。 その情報を ClaimsPrincipal に変換して、context.Principal プロパティに設定します。
認証が失敗した場合、このハンドラーからは、予想される 401 (Unauthorized) ではなく 403 (Forbidden) 応答が返されます。 これは、認証は最初の TLS 接続の間に行われる必要があるためです。 ハンドラーに達したときでは遅すぎます。 匿名接続から証明書を使用するものに、接続をアップグレードする方法はありません。
また、Startup.Configure メソッドに app.UseAuthentication(); を追加します。 そうしないと、 HttpContext.User が証明書から作成された ClaimsPrincipal に設定されません。 次に例を示します。
public void ConfigureServices(IServiceCollection services)
{
    services.AddAuthentication(
        CertificateAuthenticationDefaults.AuthenticationScheme)
        .AddCertificate()
        // Adding an ICertificateValidationCache results in certificate auth caching the results.
        // The default implementation uses a memory cache.
        .AddCertificateCache();

    // All other service configuration
}

public void Configure(IApplicationBuilder app, IHostingEnvironment env)
{
    app.UseAuthentication();

    // All other app configuration
}
前の例では、証明書認証を追加する既定の方法が示されています。 ハンドラーにより、証明書の共通プロパティを使用してユーザー プリンシパルが作成されます。
証明書の検証を構成する
CertificateAuthenticationOptions ハンドラーには、証明書に対して実行する必要のある最小限の検証が組み込まれています。 これらの各設定は既定で有効になっています。
AllowedCertificateTypes = Chained、SelfSigned、または All (Chained | SelfSigned)
既定値:CertificateTypes.Chained
このチェックでは、適切な証明書の種類のみが許可されていることが検証されます。 アプリで自己署名証明書が使われている場合は、このオプションを CertificateTypes.All または CertificateTypes.SelfSigned に設定する必要があります。
ValidateCertificateUse
既定値:true
このチェックでは、クライアントから提示された証明書にクライアント認証の拡張キー使用法 (EKU) があること、または EKU がまったくないことが検証されます。 仕様として、EKU が指定されていない場合は、すべての EKU が有効であると見なされます。
ValidateValidityPeriod
既定値:true
このチェックでは、証明書が有効期間内であることが検証されます。 要求ごとに、ハンドラーによって、提示されたときに有効だった証明書が、現在のセッションの間に期限切れになっていないことが確認されます。
RevocationFlag
既定値:X509RevocationFlag.ExcludeRoot
チェーン内で失効チェックを行う証明書を指定するフラグ。
失効チェックは、証明書がルート証明書にチェーンされている場合にのみ行われます。
RevocationMode
既定値:X509RevocationMode.Online
失効チェックの実行方法を指定するフラグ。
オンライン チェックを指定すると、証明機関への接続中に長い遅延が発生する可能性があります。
失効チェックは、証明書がルート証明書にチェーンされている場合にのみ行われます。
特定のパスでのみ証明書を要求するようにアプリを構成することはできますか?
これはできません。 証明書の交換は、HTTPS の会話の開始時に行われることを思い出してください。これは、その接続で最初の要求が受信される前にサーバーによって行われるため、いずれかの要求フィールドに基づいてスコープを設定することはできません。
ハンドラーのイベント
ハンドラーには、次の 2 つのイベントがあります。
OnAuthenticationFailed: 認証の間に例外が発生し、ユーザーがそれに対応できる場合に、呼び出されます。OnCertificateValidated: 証明書が検証され、検証に合格し、既定のプリンシパルが作成された後に、呼び出されます。 このイベントを使用すると、独自の検証を実行し、プリンシパルを補強したり置き換えたりすることができます。 次に例を示します。証明書がサービスで認識されているかどうかを確認する。
独自のプリンシパルを構築する。
Startup.ConfigureServicesでの次の例を検討してください。services.AddAuthentication( CertificateAuthenticationDefaults.AuthenticationScheme) .AddCertificate(options => { options.Events = new CertificateAuthenticationEvents { OnCertificateValidated = context => { var claims = new[] { new Claim( ClaimTypes.NameIdentifier, context.ClientCertificate.Subject, ClaimValueTypes.String, context.Options.ClaimsIssuer), new Claim(ClaimTypes.Name, context.ClientCertificate.Subject, ClaimValueTypes.String, context.Options.ClaimsIssuer) }; context.Principal = new ClaimsPrincipal( new ClaimsIdentity(claims, context.Scheme.Name)); context.Success(); return Task.CompletedTask; } }; });
インバウンド証明書が追加の検証を満たしていない場合は、失敗の理由を指定して context.Fail("failure reason") を呼び出します。
実際の機能の場合は、おそらく、データベースまたは他の種類のユーザー ストアに接続する依存関係の挿入に登録されているサービスを呼び出す必要があります。 デリゲートに渡されたコンテキストを使って、サービスにアクセスします。 Startup.ConfigureServices での次の例を検討してください。
services.AddAuthentication(
    CertificateAuthenticationDefaults.AuthenticationScheme)
    .AddCertificate(options =>
    {
        options.Events = new CertificateAuthenticationEvents
        {
            OnCertificateValidated = context =>
            {
                var validationService =
                    context.HttpContext.RequestServices
                        .GetRequiredService<ICertificateValidationService>();

                if (validationService.ValidateCertificate(
                    context.ClientCertificate))
                {
                    var claims = new[]
                    {
                        new Claim(
                            ClaimTypes.NameIdentifier,
                            context.ClientCertificate.Subject,
                            ClaimValueTypes.String,
                            context.Options.ClaimsIssuer),
                        new Claim(
                            ClaimTypes.Name,
                            context.ClientCertificate.Subject,
                            ClaimValueTypes.String,
                            context.Options.ClaimsIssuer)
                    };

                    context.Principal = new ClaimsPrincipal(
                        new ClaimsIdentity(claims, context.Scheme.Name));
                    context.Success();
                }

                return Task.CompletedTask;
            }
        };
    });
概念的には、証明書の検証は認可に関する問題です。 OnCertificateValidated の内部ではなく、認可ポリシーにたとえば発行者やサムプリントのチェックを追加しても、まったく問題ありません。
証明書を要求するようにサーバーを構成する
Kestrel
Program.cs で、Kestrel を次のように構成します。
public static void Main(string[] args)
{
    CreateHostBuilder(args).Build().Run();
}

public static IHostBuilder CreateHostBuilder(string[] args)
{
    return Host.CreateDefaultBuilder(args)
        .ConfigureWebHostDefaults(webBuilder =>
        {
            webBuilder.UseStartup<Startup>();
            webBuilder.ConfigureKestrel(o =>
            {
                o.ConfigureHttpsDefaults(o =>
                    o.ClientCertificateMode =  ClientCertificateMode.RequireCertificate);
            });
        });
}
Note
ConfigureHttpsDefaults を呼び出すListenListen を呼び出すことで作成されるエンドポイントには既定値が適用されません。
IIS
IIS マネージャーで、次の手順を実行します。
- [接続] タブでご自分のサイトを選びます。
- [機能ビュー] ウィンドウで、[SSL 設定] オプションをダブルクリックします。
- [SSL が必要] チェック ボックスをオンにし、[クライアント証明書] セクションの [必要] ラジオ ボタンを選びます。
Azure とカスタム Web プロキシ
証明書転送ミドルウェアの構成方法については、ホストとデプロイに関するドキュメントをご覧ください。
Azure Web Apps で証明書認証を使用する
Azure で転送を構成する必要はありません。 転送構成は、証明書転送ミドルウェアによって設定されます。
Note
このシナリオでは、証明書転送ミドルウェアが必要です。
詳しくは、「Azure App Service の自分のコードから TLS/SSL 証明書を使用する」 (Azure ドキュメント) をご覧ください。
カスタム Web プロキシで証明書認証を使用する
AddCertificateForwarding メソッドを使って、次のものを指定します。
- クライアント ヘッダー名。
- 証明書を読み込む方法 (
HeaderConverterプロパティを使用)。
カスタム Web プロキシでは、証明書はカスタム要求ヘッダーとして渡されます (例: X-SSL-CERT)。 それを使うには、Startup.ConfigureServices で証明書の転送を構成します。
public void ConfigureServices(IServiceCollection services)
{
    services.AddCertificateForwarding(options =>
    {
        options.CertificateHeader = "X-SSL-CERT";
        options.HeaderConverter = (headerValue) =>
        {
            X509Certificate2 clientCertificate = null;

            if(!string.IsNullOrWhiteSpace(headerValue))
            {
                byte[] bytes = StringToByteArray(headerValue);
                clientCertificate = new X509Certificate2(bytes);
            }

            return clientCertificate;
        };
    });
}

private static byte[] StringToByteArray(string hex)
{
    int NumberChars = hex.Length;
    byte[] bytes = new byte[NumberChars / 2];

    for (int i = 0; i < NumberChars; i += 2)
    {
        bytes[i / 2] = Convert.ToByte(hex.Substring(i, 2), 16);
    }

    return bytes;
}
アプリが、構成 proxy_set_header ssl-client-cert $ssl_client_escaped_cert を使用して NGINX によってリバース プロキシされている場合、または NGINX イングレスを使って Kubernetes にデプロイされている場合は、クライアント証明書は URL エンコード形式でアプリに渡されます。 証明書を使うには、次のようにデコードします。
Startup.ConfigureServices (Startup.cs):
services.AddCertificateForwarding(options =>
{
    options.CertificateHeader = "ssl-client-cert";
    options.HeaderConverter = (headerValue) =>
    {
        X509Certificate2 clientCertificate = null;

        if (!string.IsNullOrWhiteSpace(headerValue))
        {
            string certPem = WebUtility.UrlDecode(headerValue);
            clientCertificate = X509Certificate2.CreateFromPem(certPem);
        }

        return clientCertificate;
    };
});
その後、Startup.Configure メソッドによってミドルウェアが追加されます。 UseCertificateForwarding は、UseAuthentication と UseAuthorization の呼び出しの前に呼び出されます。
public void Configure(IApplicationBuilder app, IWebHostEnvironment env)
{
    ...

    app.UseRouting();

    app.UseCertificateForwarding();
    app.UseAuthentication();
    app.UseAuthorization();

    app.UseEndpoints(endpoints =>
    {
        endpoints.MapControllers();
    });
}
別のクラスを使って、検証ロジックを実装できます。 この例では同じ自己署名証明書が使われているので、自分の証明書のみを使用できることを確認します。 クライアント証明書とサーバー証明書の両方のサムプリントが一致することを検証します。そうしないと、任意の証明書を使用でき、認証に十分になります。 これは AddCertificate メソッド内で使われます。 また、中間証明書または子証明書を使っている場合は、ここでサブジェクトまたは発行者を検証できます。
using System.IO;
using System.Security.Cryptography.X509Certificates;

namespace AspNetCoreCertificateAuthApi
{
    public class MyCertificateValidationService
    {
        public bool ValidateCertificate(X509Certificate2 clientCertificate)
        {
            // Do not hardcode passwords in production code
            // Use thumbprint or key vault
            var cert = new X509Certificate2(
                Path.Combine("sts_dev_cert.pfx"), "1234");

            if (clientCertificate.Thumbprint == cert.Thumbprint)
            {
                return true;
            }

            return false;
        }
    }
}
証明書と HttpClientHandler を使用して HttpClient を実装する
HttpClientHandler は、HttpClient クラスのコンストラクターに直接追加できます。 HttpClient のインスタンスを作成するときは注意が必要です。 その後、HttpClient によって要求ごとに証明書が送信されます。
private async Task<JsonDocument> GetApiDataUsingHttpClientHandler()
{
    var cert = new X509Certificate2(Path.Combine(_environment.ContentRootPath, "sts_dev_cert.pfx"), "1234");
    var handler = new HttpClientHandler();
    handler.ClientCertificates.Add(cert);
    var client = new HttpClient(handler);

    var request = new HttpRequestMessage()
    {
        RequestUri = new Uri("https://localhost:44379/api/values"),
        Method = HttpMethod.Get,
    };
    var response = await client.SendAsync(request);
    if (response.IsSuccessStatusCode)
    {
        var responseContent = await response.Content.ReadAsStringAsync();
        var data = JsonDocument.Parse(responseContent);
        return data;
    }

    throw new ApplicationException($"Status code: {response.StatusCode}, Error: {response.ReasonPhrase}");
}
証明書と IHttpClientFactory の名前付き HttpClient を使用して HttpClient を実装する
次の例では、ハンドラーの ClientCertificates プロパティを使用して、クライアント証明書が HttpClientHandler に追加されます。 その後、ConfigurePrimaryHttpMessageHandler メソッドを使用して、HttpClient の名前付きインスタンスでこのハンドラーを使用できます。 これは、Startup.ConfigureServices で設定されます。
var clientCertificate =
    new X509Certificate2(
      Path.Combine(_environment.ContentRootPath, "sts_dev_cert.pfx"), "1234");

services.AddHttpClient("namedClient", c =>
{
}).ConfigurePrimaryHttpMessageHandler(() =>
{
    var handler = new HttpClientHandler();
    handler.ClientCertificates.Add(clientCertificate);
    return handler;
});
その後、IHttpClientFactory を使用して、名前付きインスタンスおよびハンドラーと証明書を取得できます。 インスタンスを取得するには、CreateClient メソッドと、Startup クラスで定義されているクライアントの名前が使用されます。 必要に応じてクライアントを使用して、HTTP 要求を送信できます。
private readonly IHttpClientFactory _clientFactory;

public ApiService(IHttpClientFactory clientFactory)
{
    _clientFactory = clientFactory;
}

private async Task<JsonDocument> GetApiDataWithNamedClient()
{
    var client = _clientFactory.CreateClient("namedClient");

    var request = new HttpRequestMessage()
    {
        RequestUri = new Uri("https://localhost:44379/api/values"),
        Method = HttpMethod.Get,
    };
    var response = await client.SendAsync(request);
    if (response.IsSuccessStatusCode)
    {
        var responseContent = await response.Content.ReadAsStringAsync();
        var data = JsonDocument.Parse(responseContent);
        return data;
    }

    throw new ApplicationException($"Status code: {response.StatusCode}, Error: {response.ReasonPhrase}");
}
正しい証明書がサーバーに送信された場合は、データが返されます。 証明書が送信されなかった場合、または間違った証明書が送信された場合は、HTTP 403 状態コードが返されます。
PowerShell で証明書を作成する
証明書の作成は、このフローを設定するときに最も難しい部分です。 ルート証明書は、New-SelfSignedCertificate PowerShell コマンドレットを使って作成できます。 証明書を作成するときは、強力なパスワードを使います。 次されているように、KeyUsageProperty パラメーターと KeyUsage パラメーターを追加することが重要です。
ルート CA を作成する
New-SelfSignedCertificate -DnsName "root_ca_dev_damienbod.com", "root_ca_dev_damienbod.com" -CertStoreLocation "cert:\LocalMachine\My" -NotAfter (Get-Date).AddYears(20) -FriendlyName "root_ca_dev_damienbod.com" -KeyUsageProperty All -KeyUsage CertSign, CRLSign, DigitalSignature

$mypwd = ConvertTo-SecureString -String "1234" -Force -AsPlainText

Get-ChildItem -Path cert:\localMachine\my\"The thumbprint..." | Export-PfxCertificate -FilePath C:\git\root_ca_dev_damienbod.pfx -Password $mypwd

Export-Certificate -Cert cert:\localMachine\my\"The thumbprint..." -FilePath root_ca_dev_damienbod.crt
Note
-DnsName パラメーターの値は、アプリのデプロイ ターゲットと一致する必要があります。 たとえば、開発用の "localhost" などです。
信頼されたルートをインストールする
ルート証明書は、ホスト システムで信頼されている必要があります。 証明機関によって作成されていないルート証明書は、既定では信頼されません。 Windows で証明書のルート証明書を信頼する方法については、こちらの質問を参照してください。
中間証明機関の証明書
これで、ルート証明書から中間証明書を作成できます。 これはすべてのユース ケースで必要なわけではありませんが、多くの証明書を作成する必要がある場合や、証明書のグループをアクティブ化または無効化することが必要な場合があります。 証明書の基本的な制約でパスの長さを設定するには、TextExtension パラメーターが必要です。
その後、Windows ホスト システム内の信頼された中間証明書に、中間証明書を追加できます。
$mypwd = ConvertTo-SecureString -String "1234" -Force -AsPlainText

$parentcert = ( Get-ChildItem -Path cert:\LocalMachine\My\"The thumbprint of the root..." )

New-SelfSignedCertificate -certstorelocation cert:\localmachine\my -dnsname "intermediate_dev_damienbod.com" -Signer $parentcert -NotAfter (Get-Date).AddYears(20) -FriendlyName "intermediate_dev_damienbod.com" -KeyUsageProperty All -KeyUsage CertSign, CRLSign, DigitalSignature -TextExtension @("2.5.29.19={text}CA=1&pathlength=1")

Get-ChildItem -Path cert:\localMachine\my\"The thumbprint..." | Export-PfxCertificate -FilePath C:\git\AspNetCoreCertificateAuth\Certs\intermediate_dev_damienbod.pfx -Password $mypwd

Export-Certificate -Cert cert:\localMachine\my\"The thumbprint..." -FilePath intermediate_dev_damienbod.crt
中間証明書から子証明書を作成する
中間証明書から子証明書を作成できます。 これはエンド エンティティであり、さらに多くの子証明書を作成する必要はありません。
$parentcert = ( Get-ChildItem -Path cert:\LocalMachine\My\"The thumbprint from the Intermediate certificate..." )

New-SelfSignedCertificate -certstorelocation cert:\localmachine\my -dnsname "child_a_dev_damienbod.com" -Signer $parentcert -NotAfter (Get-Date).AddYears(20) -FriendlyName "child_a_dev_damienbod.com"

$mypwd = ConvertTo-SecureString -String "1234" -Force -AsPlainText

Get-ChildItem -Path cert:\localMachine\my\"The thumbprint..." | Export-PfxCertificate -FilePath C:\git\AspNetCoreCertificateAuth\Certs\child_a_dev_damienbod.pfx -Password $mypwd

Export-Certificate -Cert cert:\localMachine\my\"The thumbprint..." -FilePath child_a_dev_damienbod.crt
ルート証明書から子証明書を作成する
子証明書は、ルート証明書から直接作成することもできます。
$rootcert = ( Get-ChildItem -Path cert:\LocalMachine\My\"The thumbprint from the root cert..." )

New-SelfSignedCertificate -certstorelocation cert:\localmachine\my -dnsname "child_a_dev_damienbod.com" -Signer $rootcert -NotAfter (Get-Date).AddYears(20) -FriendlyName "child_a_dev_damienbod.com"

$mypwd = ConvertTo-SecureString -String "1234" -Force -AsPlainText

Get-ChildItem -Path cert:\localMachine\my\"The thumbprint..." | Export-PfxCertificate -FilePath C:\git\AspNetCoreCertificateAuth\Certs\child_a_dev_damienbod.pfx -Password $mypwd

Export-Certificate -Cert cert:\localMachine\my\"The thumbprint..." -FilePath child_a_dev_damienbod.crt
ルート - 中間証明書 - 証明書の例
$mypwdroot = ConvertTo-SecureString -String "1234" -Force -AsPlainText
$mypwd = ConvertTo-SecureString -String "1234" -Force -AsPlainText

New-SelfSignedCertificate -DnsName "root_ca_dev_damienbod.com", "root_ca_dev_damienbod.com" -CertStoreLocation "cert:\LocalMachine\My" -NotAfter (Get-Date).AddYears(20) -FriendlyName "root_ca_dev_damienbod.com" -KeyUsageProperty All -KeyUsage CertSign, CRLSign, DigitalSignature

Get-ChildItem -Path cert:\localMachine\my\0C89639E4E2998A93E423F919B36D4009A0F9991 | Export-PfxCertificate -FilePath C:\git\root_ca_dev_damienbod.pfx -Password $mypwdroot

Export-Certificate -Cert cert:\localMachine\my\0C89639E4E2998A93E423F919B36D4009A0F9991 -FilePath root_ca_dev_damienbod.crt

$rootcert = ( Get-ChildItem -Path cert:\LocalMachine\My\0C89639E4E2998A93E423F919B36D4009A0F9991 )

New-SelfSignedCertificate -certstorelocation cert:\localmachine\my -dnsname "child_a_dev_damienbod.com" -Signer $rootcert -NotAfter (Get-Date).AddYears(20) -FriendlyName "child_a_dev_damienbod.com" -KeyUsageProperty All -KeyUsage CertSign, CRLSign, DigitalSignature -TextExtension @("2.5.29.19={text}CA=1&pathlength=1")

Get-ChildItem -Path cert:\localMachine\my\BA9BF91ED35538A01375EFC212A2F46104B33A44 | Export-PfxCertificate -FilePath C:\git\AspNetCoreCertificateAuth\Certs\child_a_dev_damienbod.pfx -Password $mypwd

Export-Certificate -Cert cert:\localMachine\my\BA9BF91ED35538A01375EFC212A2F46104B33A44 -FilePath child_a_dev_damienbod.crt

$parentcert = ( Get-ChildItem -Path cert:\LocalMachine\My\BA9BF91ED35538A01375EFC212A2F46104B33A44 )

New-SelfSignedCertificate -certstorelocation cert:\localmachine\my -dnsname "child_b_from_a_dev_damienbod.com" -Signer $parentcert -NotAfter (Get-Date).AddYears(20) -FriendlyName "child_b_from_a_dev_damienbod.com"

Get-ChildItem -Path cert:\localMachine\my\141594A0AE38CBBECED7AF680F7945CD51D8F28A | Export-PfxCertificate -FilePath C:\git\AspNetCoreCertificateAuth\Certs\child_b_from_a_dev_damienbod.pfx -Password $mypwd

Export-Certificate -Cert cert:\localMachine\my\141594A0AE38CBBECED7AF680F7945CD51D8F28A -FilePath child_b_from_a_dev_damienbod.crt
ルート証明書、中間証明書、または子証明書を使用するときは、必要に応じて Thumbprint または PublicKey を使って証明書を検証できます。
using System.Collections.Generic;
using System.IO;
using System.Security.Cryptography.X509Certificates;

namespace AspNetCoreCertificateAuthApi
{
    public class MyCertificateValidationService
    {
        public bool ValidateCertificate(X509Certificate2 clientCertificate)
        {
            return CheckIfThumbprintIsValid(clientCertificate);
        }

        private bool CheckIfThumbprintIsValid(X509Certificate2 clientCertificate)
        {
            var listOfValidThumbprints = new List<string>
            {
                "141594A0AE38CBBECED7AF680F7945CD51D8F28A",
                "0C89639E4E2998A93E423F919B36D4009A0F9991",
                "BA9BF91ED35538A01375EFC212A2F46104B33A44"
            };

            if (listOfValidThumbprints.Contains(clientCertificate.Thumbprint))
            {
                return true;
            }

            return false;
        }
    }
}
証明書検証のキャッシュ
ASP.NET Core 5.0 以降のバージョンでは、検証結果のキャッシュを有効にする機能がサポートされています。 検証は負荷の大きい操作であり、キャッシュすることで証明書認証のパフォーマンスが大幅に向上します。
既定では、証明書認証のキャッシュは無効になっています。 キャッシュを有効にするには、Startup.ConfigureServices で AddCertificateCache を呼び出します。
public void ConfigureServices(IServiceCollection services)
{
    services.AddAuthentication(
        CertificateAuthenticationDefaults.AuthenticationScheme)
            .AddCertificate()
            .AddCertificateCache(options =>
            {
                options.CacheSize = 1024;
                options.CacheEntryExpiration = TimeSpan.FromMinutes(2);
            });
}
キャッシュの既定の実装では、結果はメモリに格納されます。 ICertificateValidationCache を実装し、依存関係の挿入でそれを登録することにより、独自のキャッシュを提供できます。 たとえば、「 services.AddSingleton<ICertificateValidationCache, YourCache>() 」のように入力します。
オプションのクライアント証明書
このセクションでは、証明書でアプリのサブセットを保護する必要があるアプリについて説明します。 たとえば、アプリの Razor ページやコントローラーにクライアント証明書が必要な場合があります。 これには、クライアント証明書の次のような特徴に伴う課題があります。
- HTTP の機能ではなく、TLS の機能です。
- 接続ごとに、通常は HTTP データが使用可能になる前の接続の開始時に、ネゴシエートされます。
オプションのクライアント証明書を実装するには、次の 2 つの方法があります。
- 別のホスト名 (SNI) の使用とリダイレクト。 構成作業は増えますが、ほとんどの環境とプロトコルで動作するので推奨されます。
- HTTP 要求の間の再ネゴシエーション。 これにはいくつかの制限があり、推奨されません。
個別のホスト (SNI)
接続の開始時には、Server Name Indication (SNI)† だけがわかっています。 クライアント証明書は、1 つのホストで必要とされ、別のホストでは必要とされないように、ホスト名ごとに構成できます。
- ドメインとサブドメインのバインドを設定します。
- たとえば、
contoso.comとmyClient.contoso.comでバインドを設定します。 クライアント証明書は、contoso.comホストでは必要ありませんが、myClient.contoso.comでは必要です。 - 詳細については次を参照してください:
- たとえば、
ASP.NET Core 5 以降では、オプションのクライアント証明書を取得するためのリダイレクトについて、いっそう便利なサポートが追加されています。 詳しくは、「Optional certificates sample (オプションの証明書のサンプル)」をご覧ください。
- クライアント証明書が必要だが持っていない Web アプリに対する要求の場合:
- クライアント証明書で保護されたサブドメインを使って、同じページにリダイレクトします。
- たとえば、
myClient.contoso.com/requestedPageにリダイレクトします。myClient.contoso.com/requestedPageへの要求はcontoso.com/requestedPageとは異なるホスト名なので、クライアントによって別の接続が確立され、クライアント証明書が提供されます。 - 詳細については、「ASP.NET Core での認可の概要」を参照してください。
† Server Name Indication (SNI) は、SSL ネゴシエーションの一部として仮想ドメインを含めるための TLS 拡張機能です。 これは実質的に、仮想ドメイン名 (またはホスト名) を使用してネットワーク エンドポイントを識別できることを意味します。
再ネゴシエーション
TLS の再ネゴシエーションは、クライアントとサーバーが個々の接続の暗号化要件を再評価できるプロセスです。これには、以前に提供されなかった場合のクライアント証明書の要求が含まれます。 TLS の再ネゴシエーションはセキュリティ リスクであり、次の理由から推奨されません。
- HTTP/1.1 では、サーバーは、最初に、再ネゴシエーションの対象の接続が明確であることを確認するため、POST 要求本文など、転送中の HTTP データをバッファーに入れるか使用する必要があります。 そうしないと、再ネゴシエーションの応答が停止したり、失敗したりする可能性があります。
- HTTP/2 と HTTP/3 では、再ネゴシエーションは明示的に禁止されています。
- 再ネゴシエーションに関連するセキュリティ リスクがあります。 TLS 1.3 では、接続全体の再ネゴシエーションが削除され、接続の開始後にクライアント証明書のみを要求する新しい拡張機能に置き換えられました。 このメカニズムは、同じ API を使用して公開されており、やはりバッファーと HTTP プロトコルのバージョンについて以前の制約を受けます。
この機能の実装と構成は、サーバーやフレームワークのバージョンによって異なります。
IIS
クライアント証明書のネゴシエーションは、ユーザーに代わって IIS で管理されます。 アプリケーションのサブセクションで SslRequireCert オプションを有効にして、それらの要求についてクライアント証明書をネゴシエートすることができます。 詳しくは、IIS のドキュメントで構成に関するページをご覧ください。
IIS により、要求本文のデータは構成されているサイズ制限に達するまで自動的にバッファーに格納された後、再ネゴシエーションが行われます。 制限を超える要求は、413 の応答で拒否されます。 この制限の既定値は 48 KB であり、uploadReadAheadSize を設定することで構成できます。
HttpSys
HttpSys には、クライアント証明書のネゴシエーションを制御する 2 つの設定があり、両方とも設定する必要があります。 1 つ目は、http add sslcert clientcertnegotiation=enable/disable の下の netsh.exe 内にあります。 このフラグは、接続の開始時にクライアント証明書をネゴシエートする必要があるかどうか、およびオプションのクライアント証明書の場合にそれを disable に設定する必要があるかどうかを示します。 詳しくは、netsh のドキュメントをご覧ください。
もう 1 つの設定は ClientCertificateMethod です。 AllowRenegotation に設定すると、要求の間にクライアント証明書を再ネゴシエートできます。
注 アプリケーションでは、再ネゴシエーションを試みる前に、要求本文のデータをバッファーに入れるか使用する必要があります。そうしないと、要求が応答しなくなる可能性があります。
AllowRenegotation を有効にすると、ClientCertificate プロパティにアクセスするとき、再ネゴシエーションが同期的に行われる可能性があるという、既知の問題があります。 これを回避するには、GetClientCertificateAsync メソッドを呼び出します。 これは .NET 6 で対処済みです。 詳細については、こちらの GitHub の問題のページを参照してください。 クライアントが証明書の提供を拒否した場合、GetClientCertificateAsync から null 証明書が返される可能性があることに注意してください。
Kestrel
Kestrel は、ClientCertificateMode オプションを使用して、クライアント証明書のネゴシエーションを制御します。
.NET 5 以前の Kestrel では、クライアント証明書を取得するための接続の開始後の再ネゴシエーションはサポートされていません。 この機能は .NET 6 で追加されました。
Microsoft.AspNetCore.Authentication.Certificate には、ASP.NET Core 用の証明書認証に似た実装が含まれています。 証明書の認証は、ASP.NET Core に到達するずっと前に TLS レベルで実行されます。 より正確には、証明書を検証し、その証明書を ClaimsPrincipal に解決できるイベントを提供するのは、認証ハンドラーです。
証明書認証用にサーバーを構成します。これには、IIS、Kestrel、Azure Web Apps、または使用している他のすべてのものが含まれます。
プロキシとロード バランサーのシナリオ
証明書認証はステートフルなシナリオであり、主に、プロキシまたはロード バランサーによってクライアントとサーバーの間のトラフィックが処理されない場合に使用されます。 プロキシまたはロード バランサーが使用されている場合は、プロキシまたはロード バランサーが以下である場合にのみ、証明書認証は機能します。
- 認証を処理します。
- 認証情報を処理するアプリにユーザー認証情報を渡します (要求ヘッダーなど)。
プロキシやロード バランサーが使用されている環境で証明書認証の代わりになるのは、OpenID Connect (OIDC) を使用する Active Directory フェデレーション サービス (ADFS) です。
はじめに
HTTPS 証明書を取得して適用し、証明書を要求するようにサーバーを構成 します。
Web アプリで、Microsoft.AspNetCore.Authentication.Certificate パッケージへの参照を追加します。 次に、Startup.ConfigureServices メソッドで、オプションを指定して services.AddAuthentication(CertificateAuthenticationDefaults.AuthenticationScheme).AddCertificate(...); を呼び出し、要求で送信されたクライアント証明書に対して補助的な検証を実行するための OnCertificateValidated のデリゲートを提供します。 その情報を ClaimsPrincipal に変換して、context.Principal プロパティに設定します。
認証が失敗した場合、このハンドラーからは、予想される 401 (Unauthorized) ではなく 403 (Forbidden) 応答が返されます。 これは、認証は最初の TLS 接続の間に行われる必要があるためです。 ハンドラーに達したときでは遅すぎます。 匿名接続から証明書を使用するものに、接続をアップグレードする方法はありません。
また、Startup.Configure メソッドに app.UseAuthentication(); を追加します。 そうしないと、 HttpContext.User が証明書から作成された ClaimsPrincipal に設定されません。 次に例を示します。
public void ConfigureServices(IServiceCollection services)
{
    services.AddAuthentication(
        CertificateAuthenticationDefaults.AuthenticationScheme)
        .AddCertificate();

    // All other service configuration
}

public void Configure(IApplicationBuilder app, IHostingEnvironment env)
{
    app.UseAuthentication();

    // All other app configuration
}
前の例では、証明書認証を追加する既定の方法が示されています。 ハンドラーにより、証明書の共通プロパティを使用してユーザー プリンシパルが作成されます。
証明書の検証を構成する
CertificateAuthenticationOptions ハンドラーには、証明書に対して実行する必要のある最小限の検証が組み込まれています。 これらの各設定は既定で有効になっています。
AllowedCertificateTypes = Chained、SelfSigned、または All (Chained | SelfSigned)
既定値:CertificateTypes.Chained
このチェックでは、適切な証明書の種類のみが許可されていることが検証されます。 アプリで自己署名証明書が使われている場合は、このオプションを CertificateTypes.All または CertificateTypes.SelfSigned に設定する必要があります。
ValidateCertificateUse
既定値:true
このチェックでは、クライアントから提示された証明書にクライアント認証の拡張キー使用法 (EKU) があること、または EKU がまったくないことが検証されます。 仕様として、EKU が指定されていない場合は、すべての EKU が有効であると見なされます。
ValidateValidityPeriod
既定値:true
このチェックでは、証明書が有効期間内であることが検証されます。 要求ごとに、ハンドラーによって、提示されたときに有効だった証明書が、現在のセッションの間に期限切れになっていないことが確認されます。
RevocationFlag
既定値:X509RevocationFlag.ExcludeRoot
チェーン内で失効チェックを行う証明書を指定するフラグ。
失効チェックは、証明書がルート証明書にチェーンされている場合にのみ行われます。
RevocationMode
既定値:X509RevocationMode.Online
失効チェックの実行方法を指定するフラグ。
オンライン チェックを指定すると、証明機関への接続中に長い遅延が発生する可能性があります。
失効チェックは、証明書がルート証明書にチェーンされている場合にのみ行われます。
特定のパスでのみ証明書を要求するようにアプリを構成することはできますか?
これはできません。 証明書の交換は、HTTPS の会話の開始時に行われることを思い出してください。これは、その接続で最初の要求が受信される前にサーバーによって行われるため、いずれかの要求フィールドに基づいてスコープを設定することはできません。
ハンドラーのイベント
ハンドラーには、次の 2 つのイベントがあります。
OnAuthenticationFailed: 認証の間に例外が発生し、ユーザーがそれに対応できる場合に、呼び出されます。OnCertificateValidated: 証明書が検証され、検証に合格し、既定のプリンシパルが作成された後に、呼び出されます。 このイベントを使用すると、独自の検証を実行し、プリンシパルを補強したり置き換えたりすることができます。 次に例を示します。証明書がサービスで認識されているかどうかを確認する。
独自のプリンシパルを構築する。
Startup.ConfigureServicesでの次の例を検討してください。services.AddAuthentication( CertificateAuthenticationDefaults.AuthenticationScheme) .AddCertificate(options => { options.Events = new CertificateAuthenticationEvents { OnCertificateValidated = context => { var claims = new[] { new Claim( ClaimTypes.NameIdentifier, context.ClientCertificate.Subject, ClaimValueTypes.String, context.Options.ClaimsIssuer), new Claim(ClaimTypes.Name, context.ClientCertificate.Subject, ClaimValueTypes.String, context.Options.ClaimsIssuer) }; context.Principal = new ClaimsPrincipal( new ClaimsIdentity(claims, context.Scheme.Name)); context.Success(); return Task.CompletedTask; } }; });
インバウンド証明書が追加の検証を満たしていない場合は、失敗の理由を指定して context.Fail("failure reason") を呼び出します。
実際の機能の場合は、おそらく、データベースまたは他の種類のユーザー ストアに接続する依存関係の挿入に登録されているサービスを呼び出す必要があります。 デリゲートに渡されたコンテキストを使って、サービスにアクセスします。 Startup.ConfigureServices での次の例を検討してください。
services.AddAuthentication(
    CertificateAuthenticationDefaults.AuthenticationScheme)
    .AddCertificate(options =>
    {
        options.Events = new CertificateAuthenticationEvents
        {
            OnCertificateValidated = context =>
            {
                var validationService =
                    context.HttpContext.RequestServices
                        .GetRequiredService<ICertificateValidationService>();

                if (validationService.ValidateCertificate(
                    context.ClientCertificate))
                {
                    var claims = new[]
                    {
                        new Claim(
                            ClaimTypes.NameIdentifier,
                            context.ClientCertificate.Subject,
                            ClaimValueTypes.String,
                            context.Options.ClaimsIssuer),
                        new Claim(
                            ClaimTypes.Name,
                            context.ClientCertificate.Subject,
                            ClaimValueTypes.String,
                            context.Options.ClaimsIssuer)
                    };

                    context.Principal = new ClaimsPrincipal(
                        new ClaimsIdentity(claims, context.Scheme.Name));
                    context.Success();
                }

                return Task.CompletedTask;
            }
        };
    });
概念的には、証明書の検証は認可に関する問題です。 OnCertificateValidated の内部ではなく、認可ポリシーにたとえば発行者やサムプリントのチェックを追加しても、まったく問題ありません。
証明書を要求するようにサーバーを構成する
Kestrel
Program.cs で、Kestrel を次のように構成します。
public static void Main(string[] args)
{
    CreateHostBuilder(args).Build().Run();
}

public static IHostBuilder CreateHostBuilder(string[] args)
{
    return Host.CreateDefaultBuilder(args)
        .ConfigureWebHostDefaults(webBuilder =>
        {
            webBuilder.UseStartup<Startup>();
            webBuilder.ConfigureKestrel(o =>
            {
                o.ConfigureHttpsDefaults(o =>
                    o.ClientCertificateMode =  ClientCertificateMode.RequireCertificate);
            });
        });
}
Note
ConfigureHttpsDefaults を呼び出すListenListen を呼び出すことで作成されるエンドポイントには既定値が適用されません。
IIS
IIS マネージャーで、次の手順を実行します。
- [接続] タブでご自分のサイトを選びます。
- [機能ビュー] ウィンドウで、[SSL 設定] オプションをダブルクリックします。
- [SSL が必要] チェック ボックスをオンにし、[クライアント証明書] セクションの [必要] ラジオ ボタンを選びます。
Azure とカスタム Web プロキシ
証明書転送ミドルウェアの構成方法については、ホストとデプロイに関するドキュメントをご覧ください。
Azure Web Apps で証明書認証を使用する
Azure で転送を構成する必要はありません。 転送構成は、証明書転送ミドルウェアによって設定されます。
Note
このシナリオでは、証明書転送ミドルウェアが必要です。
詳しくは、「Azure App Service の自分のコードから TLS/SSL 証明書を使用する」 (Azure ドキュメント) をご覧ください。
カスタム Web プロキシで証明書認証を使用する
AddCertificateForwarding メソッドを使って、次のものを指定します。
- クライアント ヘッダー名。
- 証明書を読み込む方法 (
HeaderConverterプロパティを使用)。
カスタム Web プロキシでは、証明書はカスタム要求ヘッダーとして渡されます (例: X-SSL-CERT)。 それを使うには、Startup.ConfigureServices で証明書の転送を構成します。
public void ConfigureServices(IServiceCollection services)
{
    services.AddCertificateForwarding(options =>
    {
        options.CertificateHeader = "X-SSL-CERT";
        options.HeaderConverter = (headerValue) =>
        {
            X509Certificate2 clientCertificate = null;

            if(!string.IsNullOrWhiteSpace(headerValue))
            {
                byte[] bytes = StringToByteArray(headerValue);
                clientCertificate = new X509Certificate2(bytes);
            }

            return clientCertificate;
        };
    });
}

private static byte[] StringToByteArray(string hex)
{
    int NumberChars = hex.Length;
    byte[] bytes = new byte[NumberChars / 2];

    for (int i = 0; i < NumberChars; i += 2)
    {
        bytes[i / 2] = Convert.ToByte(hex.Substring(i, 2), 16);
    }

    return bytes;
}
アプリが、構成 proxy_set_header ssl-client-cert $ssl_client_escaped_cert を使用して NGINX によってリバース プロキシされている場合、または NGINX イングレスを使って Kubernetes にデプロイされている場合は、クライアント証明書は URL エンコード形式でアプリに渡されます。 証明書を使うには、次のようにデコードします。
Startup.cs の先頭に System.Net の名前空間を追加します。
using System.Net;
Startup.ConfigureServices:
services.AddCertificateForwarding(options =>
{
    options.CertificateHeader = "ssl-client-cert";
    options.HeaderConverter = (headerValue) =>
    {
        X509Certificate2 clientCertificate = null;

        if (!string.IsNullOrWhiteSpace(headerValue))
        {
            var bytes = UrlEncodedPemToByteArray(headerValue);
            clientCertificate = new X509Certificate2(bytes);
        }

        return clientCertificate;
    };
});
UrlEncodedPemToByteArray メソッドを追加します。
private static byte[] UrlEncodedPemToByteArray(string urlEncodedBase64Pem)
{
    var base64Pem = WebUtility.UrlDecode(urlEncodedBase64Pem);
    var base64Cert = base64Pem
        .Replace("-----BEGIN CERTIFICATE-----", string.Empty)
        .Replace("-----END CERTIFICATE-----", string.Empty)
        .Trim();

    return Convert.FromBase64String(base64Cert);
}
その後、Startup.Configure メソッドによってミドルウェアが追加されます。 UseCertificateForwarding は、UseAuthentication と UseAuthorization の呼び出しの前に呼び出されます。
public void Configure(IApplicationBuilder app, IWebHostEnvironment env)
{
    ...

    app.UseRouting();

    app.UseCertificateForwarding();
    app.UseAuthentication();
    app.UseAuthorization();

    app.UseEndpoints(endpoints =>
    {
        endpoints.MapControllers();
    });
}
別のクラスを使って、検証ロジックを実装できます。 この例では同じ自己署名証明書が使われているので、自分の証明書のみを使用できることを確認します。 クライアント証明書とサーバー証明書の両方のサムプリントが一致することを検証します。そうしないと、任意の証明書を使用でき、認証に十分になります。 これは AddCertificate メソッド内で使われます。 また、中間証明書または子証明書を使っている場合は、ここでサブジェクトまたは発行者を検証できます。
using System.IO;
using System.Security.Cryptography.X509Certificates;

namespace AspNetCoreCertificateAuthApi
{
    public class MyCertificateValidationService
    {
        public bool ValidateCertificate(X509Certificate2 clientCertificate)
        {
            // Do not hardcode passwords in production code
            // Use thumbprint or key vault
            var cert = new X509Certificate2(
                Path.Combine("sts_dev_cert.pfx"), "1234");

            if (clientCertificate.Thumbprint == cert.Thumbprint)
            {
                return true;
            }

            return false;
        }
    }
}
証明書と HttpClientHandler を使用して HttpClient を実装する
HttpClientHandler は、HttpClient クラスのコンストラクターに直接追加できます。 HttpClient のインスタンスを作成するときは注意が必要です。 その後、HttpClient によって要求ごとに証明書が送信されます。
private async Task<JsonDocument> GetApiDataUsingHttpClientHandler()
{
    var cert = new X509Certificate2(Path.Combine(_environment.ContentRootPath, "sts_dev_cert.pfx"), "1234");
    var handler = new HttpClientHandler();
    handler.ClientCertificates.Add(cert);
    var client = new HttpClient(handler);

    var request = new HttpRequestMessage()
    {
        RequestUri = new Uri("https://localhost:44379/api/values"),
        Method = HttpMethod.Get,
    };
    var response = await client.SendAsync(request);
    if (response.IsSuccessStatusCode)
    {
        var responseContent = await response.Content.ReadAsStringAsync();
        var data = JsonDocument.Parse(responseContent);
        return data;
    }

    throw new ApplicationException($"Status code: {response.StatusCode}, Error: {response.ReasonPhrase}");
}
証明書と IHttpClientFactory の名前付き HttpClient を使用して HttpClient を実装する
次の例では、ハンドラーの ClientCertificates プロパティを使用して、クライアント証明書が HttpClientHandler に追加されます。 その後、ConfigurePrimaryHttpMessageHandler メソッドを使用して、HttpClient の名前付きインスタンスでこのハンドラーを使用できます。 これは、Startup.ConfigureServices で設定されます。
var clientCertificate =
    new X509Certificate2(
      Path.Combine(_environment.ContentRootPath, "sts_dev_cert.pfx"), "1234");

services.AddHttpClient("namedClient", c =>
{
}).ConfigurePrimaryHttpMessageHandler(() =>
{
    var handler = new HttpClientHandler();
    handler.ClientCertificates.Add(clientCertificate);
    return handler;
});
その後、IHttpClientFactory を使用して、名前付きインスタンスおよびハンドラーと証明書を取得できます。 インスタンスを取得するには、CreateClient メソッドと、Startup クラスで定義されているクライアントの名前が使用されます。 必要に応じてクライアントを使用して、HTTP 要求を送信できます。
private readonly IHttpClientFactory _clientFactory;

public ApiService(IHttpClientFactory clientFactory)
{
    _clientFactory = clientFactory;
}

private async Task<JsonDocument> GetApiDataWithNamedClient()
{
    var client = _clientFactory.CreateClient("namedClient");

    var request = new HttpRequestMessage()
    {
        RequestUri = new Uri("https://localhost:44379/api/values"),
        Method = HttpMethod.Get,
    };
    var response = await client.SendAsync(request);
    if (response.IsSuccessStatusCode)
    {
        var responseContent = await response.Content.ReadAsStringAsync();
        var data = JsonDocument.Parse(responseContent);
        return data;
    }

    throw new ApplicationException($"Status code: {response.StatusCode}, Error: {response.ReasonPhrase}");
}
正しい証明書がサーバーに送信された場合は、データが返されます。 証明書が送信されなかった場合、または間違った証明書が送信された場合は、HTTP 403 状態コードが返されます。
PowerShell で証明書を作成する
証明書の作成は、このフローを設定するときに最も難しい部分です。 ルート証明書は、New-SelfSignedCertificate PowerShell コマンドレットを使って作成できます。 証明書を作成するときは、強力なパスワードを使います。 次されているように、KeyUsageProperty パラメーターと KeyUsage パラメーターを追加することが重要です。
ルート CA を作成する
New-SelfSignedCertificate -DnsName "root_ca_dev_damienbod.com", "root_ca_dev_damienbod.com" -CertStoreLocation "cert:\LocalMachine\My" -NotAfter (Get-Date).AddYears(20) -FriendlyName "root_ca_dev_damienbod.com" -KeyUsageProperty All -KeyUsage CertSign, CRLSign, DigitalSignature

$mypwd = ConvertTo-SecureString -String "1234" -Force -AsPlainText

Get-ChildItem -Path cert:\localMachine\my\"The thumbprint..." | Export-PfxCertificate -FilePath C:\git\root_ca_dev_damienbod.pfx -Password $mypwd

Export-Certificate -Cert cert:\localMachine\my\"The thumbprint..." -FilePath root_ca_dev_damienbod.crt
Note
-DnsName パラメーターの値は、アプリのデプロイ ターゲットと一致する必要があります。 たとえば、開発用の "localhost" などです。
信頼されたルートをインストールする
ルート証明書は、ホスト システムで信頼されている必要があります。 証明機関によって作成されていないルート証明書は、既定では信頼されません。 Windows で証明書のルート証明書を信頼する方法については、こちらの質問を参照してください。
中間証明機関の証明書
これで、ルート証明書から中間証明書を作成できます。 これはすべてのユース ケースで必要なわけではありませんが、多くの証明書を作成する必要がある場合や、証明書のグループをアクティブ化または無効化することが必要な場合があります。 証明書の基本的な制約でパスの長さを設定するには、TextExtension パラメーターが必要です。
その後、Windows ホスト システム内の信頼された中間証明書に、中間証明書を追加できます。
$mypwd = ConvertTo-SecureString -String "1234" -Force -AsPlainText

$parentcert = ( Get-ChildItem -Path cert:\LocalMachine\My\"The thumbprint of the root..." )

New-SelfSignedCertificate -certstorelocation cert:\localmachine\my -dnsname "intermediate_dev_damienbod.com" -Signer $parentcert -NotAfter (Get-Date).AddYears(20) -FriendlyName "intermediate_dev_damienbod.com" -KeyUsageProperty All -KeyUsage CertSign, CRLSign, DigitalSignature -TextExtension @("2.5.29.19={text}CA=1&pathlength=1")

Get-ChildItem -Path cert:\localMachine\my\"The thumbprint..." | Export-PfxCertificate -FilePath C:\git\AspNetCoreCertificateAuth\Certs\intermediate_dev_damienbod.pfx -Password $mypwd

Export-Certificate -Cert cert:\localMachine\my\"The thumbprint..." -FilePath intermediate_dev_damienbod.crt
中間証明書から子証明書を作成する
中間証明書から子証明書を作成できます。 これはエンド エンティティであり、さらに多くの子証明書を作成する必要はありません。
$parentcert = ( Get-ChildItem -Path cert:\LocalMachine\My\"The thumbprint from the Intermediate certificate..." )

New-SelfSignedCertificate -certstorelocation cert:\localmachine\my -dnsname "child_a_dev_damienbod.com" -Signer $parentcert -NotAfter (Get-Date).AddYears(20) -FriendlyName "child_a_dev_damienbod.com"

$mypwd = ConvertTo-SecureString -String "1234" -Force -AsPlainText

Get-ChildItem -Path cert:\localMachine\my\"The thumbprint..." | Export-PfxCertificate -FilePath C:\git\AspNetCoreCertificateAuth\Certs\child_a_dev_damienbod.pfx -Password $mypwd

Export-Certificate -Cert cert:\localMachine\my\"The thumbprint..." -FilePath child_a_dev_damienbod.crt
ルート証明書から子証明書を作成する
子証明書は、ルート証明書から直接作成することもできます。
$rootcert = ( Get-ChildItem -Path cert:\LocalMachine\My\"The thumbprint from the root cert..." )

New-SelfSignedCertificate -certstorelocation cert:\localmachine\my -dnsname "child_a_dev_damienbod.com" -Signer $rootcert -NotAfter (Get-Date).AddYears(20) -FriendlyName "child_a_dev_damienbod.com"

$mypwd = ConvertTo-SecureString -String "1234" -Force -AsPlainText

Get-ChildItem -Path cert:\localMachine\my\"The thumbprint..." | Export-PfxCertificate -FilePath C:\git\AspNetCoreCertificateAuth\Certs\child_a_dev_damienbod.pfx -Password $mypwd

Export-Certificate -Cert cert:\localMachine\my\"The thumbprint..." -FilePath child_a_dev_damienbod.crt
ルート - 中間証明書 - 証明書の例
$mypwdroot = ConvertTo-SecureString -String "1234" -Force -AsPlainText
$mypwd = ConvertTo-SecureString -String "1234" -Force -AsPlainText

New-SelfSignedCertificate -DnsName "root_ca_dev_damienbod.com", "root_ca_dev_damienbod.com" -CertStoreLocation "cert:\LocalMachine\My" -NotAfter (Get-Date).AddYears(20) -FriendlyName "root_ca_dev_damienbod.com" -KeyUsageProperty All -KeyUsage CertSign, CRLSign, DigitalSignature

Get-ChildItem -Path cert:\localMachine\my\0C89639E4E2998A93E423F919B36D4009A0F9991 | Export-PfxCertificate -FilePath C:\git\root_ca_dev_damienbod.pfx -Password $mypwdroot

Export-Certificate -Cert cert:\localMachine\my\0C89639E4E2998A93E423F919B36D4009A0F9991 -FilePath root_ca_dev_damienbod.crt

$rootcert = ( Get-ChildItem -Path cert:\LocalMachine\My\0C89639E4E2998A93E423F919B36D4009A0F9991 )

New-SelfSignedCertificate -certstorelocation cert:\localmachine\my -dnsname "child_a_dev_damienbod.com" -Signer $rootcert -NotAfter (Get-Date).AddYears(20) -FriendlyName "child_a_dev_damienbod.com" -KeyUsageProperty All -KeyUsage CertSign, CRLSign, DigitalSignature -TextExtension @("2.5.29.19={text}CA=1&pathlength=1")

Get-ChildItem -Path cert:\localMachine\my\BA9BF91ED35538A01375EFC212A2F46104B33A44 | Export-PfxCertificate -FilePath C:\git\AspNetCoreCertificateAuth\Certs\child_a_dev_damienbod.pfx -Password $mypwd

Export-Certificate -Cert cert:\localMachine\my\BA9BF91ED35538A01375EFC212A2F46104B33A44 -FilePath child_a_dev_damienbod.crt

$parentcert = ( Get-ChildItem -Path cert:\LocalMachine\My\BA9BF91ED35538A01375EFC212A2F46104B33A44 )

New-SelfSignedCertificate -certstorelocation cert:\localmachine\my -dnsname "child_b_from_a_dev_damienbod.com" -Signer $parentcert -NotAfter (Get-Date).AddYears(20) -FriendlyName "child_b_from_a_dev_damienbod.com"

Get-ChildItem -Path cert:\localMachine\my\141594A0AE38CBBECED7AF680F7945CD51D8F28A | Export-PfxCertificate -FilePath C:\git\AspNetCoreCertificateAuth\Certs\child_b_from_a_dev_damienbod.pfx -Password $mypwd

Export-Certificate -Cert cert:\localMachine\my\141594A0AE38CBBECED7AF680F7945CD51D8F28A -FilePath child_b_from_a_dev_damienbod.crt
ルート証明書、中間証明書、または子証明書を使用するときは、必要に応じて Thumbprint または PublicKey を使って証明書を検証できます。
using System.Collections.Generic;
using System.IO;
using System.Security.Cryptography.X509Certificates;

namespace AspNetCoreCertificateAuthApi
{
    public class MyCertificateValidationService
    {
        public bool ValidateCertificate(X509Certificate2 clientCertificate)
        {
            return CheckIfThumbprintIsValid(clientCertificate);
        }

        private bool CheckIfThumbprintIsValid(X509Certificate2 clientCertificate)
        {
            var listOfValidThumbprints = new List<string>
            {
                "141594A0AE38CBBECED7AF680F7945CD51D8F28A",
                "0C89639E4E2998A93E423F919B36D4009A0F9991",
                "BA9BF91ED35538A01375EFC212A2F46104B33A44"
            };

            if (listOfValidThumbprints.Contains(clientCertificate.Thumbprint))
            {
                return true;
            }

            return false;
        }
    }
}
オプションのクライアント証明書
このセクションでは、証明書でアプリのサブセットを保護する必要があるアプリについて説明します。 たとえば、アプリの Razor ページやコントローラーにクライアント証明書が必要な場合があります。 これには、クライアント証明書の次のような特徴に伴う課題があります。
- HTTP の機能ではなく、TLS の機能です。
- 接続ごとに、通常は HTTP データが使用可能になる前の接続の開始時に、ネゴシエートされます。
オプションのクライアント証明書を実装するには、次の 2 つの方法があります。
- 別のホスト名 (SNI) の使用とリダイレクト。 構成作業は増えますが、ほとんどの環境とプロトコルで動作するので推奨されます。
- HTTP 要求の間の再ネゴシエーション。 これにはいくつかの制限があり、推奨されません。
個別のホスト (SNI)
接続の開始時には、Server Name Indication (SNI)† だけがわかっています。 クライアント証明書は、1 つのホストで必要とされ、別のホストでは必要とされないように、ホスト名ごとに構成できます。
- ドメインとサブドメインのバインドを設定します。
- たとえば、
contoso.comとmyClient.contoso.comでバインドを設定します。 クライアント証明書は、contoso.comホストでは必要ありませんが、myClient.contoso.comでは必要です。 - 詳細については次を参照してください:
- ASP.NET Core の Kestrel Web サーバー:
- ListenOptions.UseHttps
- ClientCertificateMode
- 現在、Kestrel では、1 つのバインディングで複数の TLS 構成はサポートされておらず、一意の ID またはポートを持つ 2 つのバインディングが必要であることに注意してください。 詳細については、こちらの GitHub の問題のページを参照してください。
- IIS
- HTTP.sys: Windows Server を構成する
- ASP.NET Core の Kestrel Web サーバー:
- たとえば、
ASP.NET Core 5 以降では、オプションのクライアント証明書を取得するためのリダイレクトについて、いっそう便利なサポートが追加されています。 詳しくは、「Optional certificates sample (オプションの証明書のサンプル)」をご覧ください。
- クライアント証明書が必要だが持っていない Web アプリに対する要求の場合:
- クライアント証明書で保護されたサブドメインを使って、同じページにリダイレクトします。
- たとえば、
myClient.contoso.com/requestedPageにリダイレクトします。myClient.contoso.com/requestedPageへの要求はcontoso.com/requestedPageとは異なるホスト名なので、クライアントによって別の接続が確立され、クライアント証明書が提供されます。 - 詳細については、「ASP.NET Core での認可の概要」を参照してください。
† Server Name Indication (SNI) は、SSL ネゴシエーションの一部として仮想ドメインを含めるための TLS 拡張機能です。 これは実質的に、仮想ドメイン名 (またはホスト名) を使用してネットワーク エンドポイントを識別できることを意味します。
再ネゴシエーション
TLS の再ネゴシエーションは、クライアントとサーバーが個々の接続の暗号化要件を再評価できるプロセスです。これには、以前に提供されなかった場合のクライアント証明書の要求が含まれます。 TLS の再ネゴシエーションはセキュリティ リスクであり、次の理由から推奨されません。
- HTTP/1.1 では、サーバーは、最初に、再ネゴシエーションの対象の接続が明確であることを確認するため、POST 要求本文など、転送中の HTTP データをバッファーに入れるか使用する必要があります。 そうしないと、再ネゴシエーションの応答が停止したり、失敗したりする可能性があります。
- HTTP/2 と HTTP/3 では、再ネゴシエーションは明示的に禁止されています。
- 再ネゴシエーションに関連するセキュリティ リスクがあります。 TLS 1.3 では、接続全体の再ネゴシエーションが削除され、接続の開始後にクライアント証明書のみを要求する新しい拡張機能に置き換えられました。 このメカニズムは、同じ API を使用して公開されており、やはりバッファーと HTTP プロトコルのバージョンについて以前の制約を受けます。
この機能の実装と構成は、サーバーやフレームワークのバージョンによって異なります。
IIS
クライアント証明書のネゴシエーションは、ユーザーに代わって IIS で管理されます。 アプリケーションのサブセクションで SslRequireCert オプションを有効にして、それらの要求についてクライアント証明書をネゴシエートすることができます。 詳しくは、IIS のドキュメントで構成に関するページをご覧ください。
IIS により、要求本文のデータは構成されているサイズ制限に達するまで自動的にバッファーに格納された後、再ネゴシエーションが行われます。 制限を超える要求は、413 の応答で拒否されます。 この制限の既定値は 48 KB であり、uploadReadAheadSize を設定することで構成できます。
HttpSys
HttpSys には、クライアント証明書のネゴシエーションを制御する 2 つの設定があり、両方とも設定する必要があります。 1 つ目は、http add sslcert clientcertnegotiation=enable/disable の下の netsh.exe 内にあります。 このフラグは、接続の開始時にクライアント証明書をネゴシエートする必要があるかどうか、およびオプションのクライアント証明書の場合にそれを disable に設定する必要があるかどうかを示します。 詳しくは、netsh のドキュメントをご覧ください。
もう 1 つの設定は ClientCertificateMethod です。 AllowRenegotation に設定すると、要求の間にクライアント証明書を再ネゴシエートできます。
注 アプリケーションでは、再ネゴシエーションを試みる前に、要求本文のデータをバッファーに入れるか使用する必要があります。そうしないと、要求が応答しなくなる可能性があります。
AllowRenegotation を有効にすると、ClientCertificate プロパティにアクセスするとき、再ネゴシエーションが同期的に行われる可能性があるという、既知の問題があります。 これを回避するには、GetClientCertificateAsync メソッドを呼び出します。 これは .NET 6 で対処済みです。 詳細については、こちらの GitHub の問題のページを参照してください。 クライアントが証明書の提供を拒否した場合、GetClientCertificateAsync から null 証明書が返される可能性があることに注意してください。
Kestrel
Kestrel は、ClientCertificateMode オプションを使用して、クライアント証明書のネゴシエーションを制御します。
.NET 5 以前の Kestrel では、クライアント証明書を取得するための接続の開始後の再ネゴシエーションはサポートされていません。 この機能は .NET 6 で追加されました。
オプションのクライアント証明書に関する質問、コメント、その他のフィードバックは、こちらの GitHub ディスカッションのイシューでお知らせください。
ASP.NET Core
フィードバック
以下は間もなく提供いたします。2024 年を通じて、コンテンツのフィードバック メカニズムとして GitHub の issue を段階的に廃止し、新しいフィードバック システムに置き換えます。 詳細については、「https://aka.ms/ContentUserFeedback」を参照してください。
フィードバックの送信と表示