ASDK の Azure への登録
Azure Stack Development Kit (ASDK) インストールを Azure に登録して Azure からマーケットプレース項目をダウンロードしたり、Microsoft に返送するコマース データを設定したりできます。 マーケットプレース シンジケーションを含む、Azure Stack Hub のすべての機能をサポートするには、登録が必要です。 マーケットプレース シンジケーションや使用状況レポートなどの Azure Stack Hub の重要な機能をテストできるようにするには、登録が必要です。 Azure Stack Hub を登録すると、使用状況が Azure コマースにレポートされます。 使用状況は、登録に使用したサブスクリプションの下に表示されます。 ただし、ASDK のユーザーは、レポートする使用状況に対して課金されることはありません。
自分の ASDK を登録しない場合、ASDK を登録するように勧める警告アラート "アクティブ化が必要" が表示されます。 これは正しい動作です。
前提条件
次の手順を使って Azure に ASDK を登録する前に、デプロイ後の構成の記事の説明に従って Azure Stack Hub PowerShell をインストールし、Azure Stack Hub ツールをダウンロードしたことを確認します。
Azure に ASDK を登録するために使用されるコンピューター上で、PowerShell 言語モードを FullLanguage に設定する必要もあります。 現在の言語モードが完全に設定されていることを確認するには、PowerShell ウィンドウを管理者特権で開き、次の PowerShell コマンドを実行します。
$ExecutionContext.SessionState.LanguageMode
出力で FullLanguage が確実に返されるようにします。 その他の言語モードが返される場合は、別のコンピューターで再登録を実行するか、言語モードを FullLanguage に設定してから続行する必要があります。
登録に使用するMicrosoft Entra アカウントには、Azure サブスクリプションへのアクセス権があり、そのサブスクリプションに関連付けられているディレクトリに ID アプリとサービス プリンシパルを作成するためのアクセス許可が必要です。 全体管理者の資格情報を使用するのではなく、登録に使用するサービス アカウントを作成することで、Azure Stack Hub を Azure に登録することをお勧めします。
ASDK の登録
次の手順に従って、ASDK を Azure に登録します。
注意
これらすべての手順は、特権エンドポイントにアクセスできるコンピューターから実行する必要があります。 ASDK の場合は、ASDK のホスト コンピューターです。
管理者特権の PowerShell プロンプトを開きます。
次の PowerShell コマンドレットを実行し、Azure に ASDK インストールを登録します。 Azure 課金サブスクリプション ID とローカル ASDK インストールの両方にサインインします。 Azure 課金サブスクリプション ID をまだ持っていない場合は、こちらから無料の Azure アカウントを作成できます。 Azure Stack Hub を登録しても、Azure サブスクリプションに課金されることはありません。
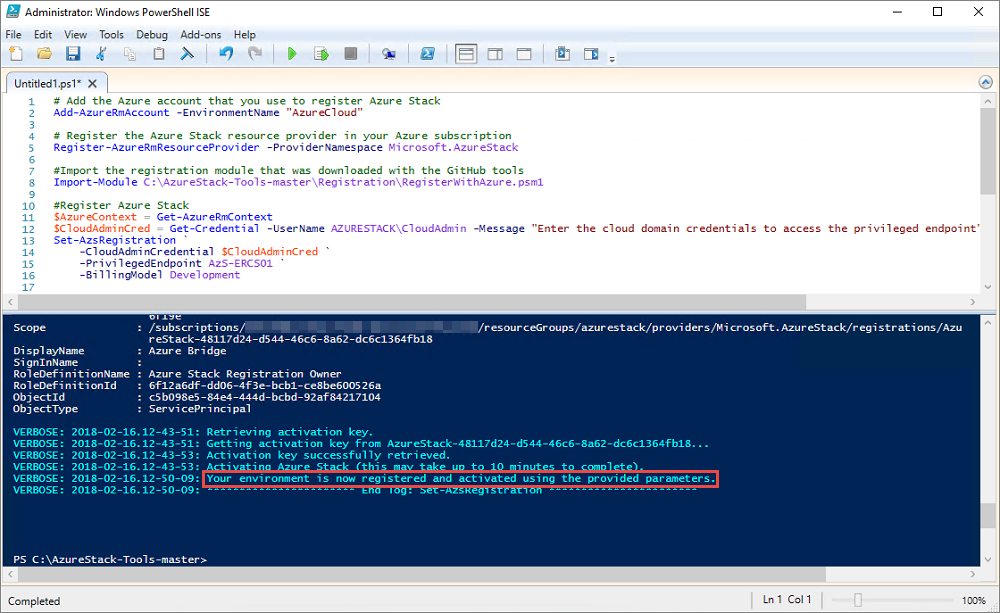
Set-AzsRegistration コマンドレットを実行するときに、登録用の一意の名前を設定します。 RegistrationName パラメーターの既定値は AzureStackRegistration です。 ただし、Azure Stack Hub の複数のインスタンスに同じ名前を使用すると、スクリプトは失敗します。# Add the Azure cloud subscription environment name. # Supported environment names are AzureCloud, AzureChinaCloud, or AzureUSGovernment depending which Azure subscription you're using. Connect-AzAccount -EnvironmentName "<environment name>" # Register the Azure Stack Hub resource provider in your Azure subscription Register-AzResourceProvider -ProviderNamespace Microsoft.AzureStack # Import the registration module that was downloaded with the GitHub tools Import-Module C:\AzureStack-Tools-az\Registration\RegisterWithAzure.psm1 # If you have multiple subscriptions, run the following command to select the one you want to use: # Get-AzSubscription -SubscriptionID "<subscription ID>" | Select-AzSubscription # Register Azure Stack Hub $AzureContext = Get-AzContext $CloudAdminCred = Get-Credential -UserName AZURESTACK\CloudAdmin -Message "Enter the credentials to access the privileged endpoint." $RegistrationName = "<unique-registration-name>" Set-AzsRegistration ` -PrivilegedEndpointCredential $CloudAdminCred ` -PrivilegedEndpoint AzS-ERCS01 ` -BillingModel Development ` -RegistrationName $RegistrationName ` -UsageReportingEnabled:$trueスクリプトが完了すると、 「Your environment is now registered and activated using the provided parameters. (提供されたパラメーターを使用して環境が登録され、アクティブ化されました。)」 というメッセージが表示されます。
切断された環境での登録
切断された (インターネット接続のない) 環境で Azure Stack Hub を登録している場合は、Azure Stack Hub 環境から登録トークンを取得してから、Azure に接続できるコンピューターでそのトークンを使用して、登録して、ASDK 環境のアクティベーション リソースを作成する必要があります。
重要
このような手順を使用して Azure Stack Hub を登録する前に、デプロイ後の構成の記事に従って、ASDK ホスト コンピューターと、Azure への接続と登録に使用されるインターネット アクセスを備えたコンピューターの両方に PowerShell for Azure Stack Hub をインストールし、Azure Stack Hub ツールをダウンロードしておきます。
Azure Stack Hub 環境から登録トークンを取得する
ASDK ホスト コンピューターで、管理者として PowerShell を起動し、Azure Stack Hub ツールをダウンロードしたときに作成された AzureStack-Tools-az ディレクトリ内の Registration フォルダーに移動します。 次の PowerShell コマンドを使用して RegisterWithAzure.psm1 モジュールをインポートし、Get-AzsRegistrationToken コマンドレットを使用して登録トークンを取得します。
# Import the registration module that was downloaded with the GitHub tools
Import-Module C:\AzureStack-Tools-az\Registration\RegisterWithAzure.psm1

# Create registration token
$CloudAdminCred = Get-Credential -UserName AZURESTACK\CloudAdmin -Message "Enter the credentials to access the privileged endpoint."
# File path to save the token. This example saves the file as C:\RegistrationToken.txt.
$FilePathForRegistrationToken = "$env:SystemDrive\RegistrationToken.txt"
$RegistrationToken = Get-AzsRegistrationToken -PrivilegedEndpointCredential $CloudAdminCred `
-UsageReportingEnabled:$false `
-PrivilegedEndpoint AzS-ERCS01 `
-BillingModel Development `
-MarketplaceSyndicationEnabled:$false `
-TokenOutputFilePath $FilePathForRegistrationToken
インターネット接続されたコンピューターで使用するためにこの登録トークンを保存します。 $FilePathForRegistrationToken パラメーターによって作成されたファイルからファイルまたはテキストをコピーできます。
Azure に接続して登録する
インターネット接続されたコンピューターで、次の PowerShell コマンドを使用して RegisterWithAzure.psm1 モジュールをインポートしてから、作成した登録トークンと一意の登録名で Register-AzsEnvironment コマンドレットを使用して Azure に登録します。
# Add the Azure cloud subscription environment name.
# Supported environment names are AzureCloud, AzureChinaCloud or AzureUSGovernment depending which Azure subscription you are using.
Connect-AzAccount -EnvironmentName "<environment name>"

# If you have multiple subscriptions, run the following command to select the one you want to use:
# Get-AzSubscription -SubscriptionID "<subscription ID>" | Select-AzSubscription

# Register the Azure Stack Hub resource provider in your Azure subscription
Register-AzResourceProvider -ProviderNamespace Microsoft.AzureStack

# Import the registration module that was downloaded with the GitHub tools
Import-Module C:\AzureStack-Tools-az\Registration\RegisterWithAzure.psm1

# Register with Azure
# This example uses the C:\RegistrationToken.txt file.
$registrationToken = Get-Content -Path "$env:SystemDrive\RegistrationToken.txt"
$RegistrationName = "<unique-registration-name>"
Register-AzsEnvironment -RegistrationToken $registrationToken `
-RegistrationName $RegistrationName
または、Get-Content コマンドレットを使用して、登録トークンが含まれているファイルを示すことができます。
# Add the Azure cloud subscription environment name.
# Supported environment names are AzureCloud, AzureChinaCloud or AzureUSGovernment depending which Azure subscription you are using.
Connect-AzAccount -EnvironmentName "<environment name>"

# If you have multiple subscriptions, run the following command to select the one you want to use:
# Get-AzSubscription -SubscriptionID "<subscription ID>" | Select-AzSubscription

# Register the Azure Stack Hub resource provider in your Azure subscription
Register-AzResourceProvider -ProviderNamespace Microsoft.AzureStack

# Import the registration module that was downloaded with the GitHub tools
Import-Module C:\AzureStack-Tools-az\Registration\RegisterWithAzure.psm1

# Register with Azure
# This example uses the C:\RegistrationToken.txt file.
$registrationToken = Get-Content -Path "$env:SystemDrive\RegistrationToken.txt"
Register-AzsEnvironment -RegistrationToken $registrationToken `
-RegistrationName $RegistrationName
登録が完了すると、次のようなメッセージが表示されます。Your Azure Stack Hub environment is now registered with Azure. (Azure Stack Hub 環境が Azure に登録されました。)
重要
PowerShell ウィンドウを閉じないでください。
今後参照できるように登録トークンと登録リソース名を保存します。
Azure の登録リソースからアクティブ化キーを取得する
この場合もインターネット接続されたコンピューター、および同じ PowerShell コンソール ウィンドウを使用して、Azure に登録したときに作成された登録リソースからアクティブ化キーを取得します。
アクティブ化キーを取得するには、次の PowerShell コマンドを実行します。 前の手順で Azure に登録するときに指定したものと同じ一意の登録名の値を使用します。
$RegistrationResourceName = "<unique-registration-name>"
# File path to save the activation key. This example saves the file as C:\ActivationKey.txt.
$KeyOutputFilePath = "$env:SystemDrive\ActivationKey.txt"
$ActivationKey = Get-AzsActivationKey -RegistrationName $RegistrationResourceName `
-KeyOutputFilePath $KeyOutputFilePath
Azure Stack Hub にアクティブ化リソースを作成する
Get-AzsActivationKey から作成されたアクティブ化キーのファイルまたはテキストを使用して Azure Stack Hub 環境に戻ります。 次の PowerShell コマンドを実行して、そのアクティブ化キーを使用して Azure Stack Hub でアクティブ化リソースを作成します。
# Import the registration module that was downloaded with the GitHub tools
Import-Module C:\AzureStack-Tools-az\Registration\RegisterWithAzure.psm1

$CloudAdminCred = Get-Credential -UserName AZURESTACK\CloudAdmin -Message "Enter the credentials to access the privileged endpoint."
$ActivationKey = "<activation key>"
New-AzsActivationResource -PrivilegedEndpointCredential $CloudAdminCred `
-PrivilegedEndpoint AzS-ERCS01 `
-ActivationKey $ActivationKey
または、Get-Content コマンドレットを使用して、登録トークンが含まれているファイルを示すことができます。
# Import the registration module that was downloaded with the GitHub tools
Import-Module C:\AzureStack-Tools-az\Registration\RegisterWithAzure.psm1

$CloudAdminCred = Get-Credential -UserName AZURESTACK\CloudAdmin -Message "Enter the credentials to access the privileged endpoint."
# This example uses the C:\ActivationKey.txt file.
$ActivationKey = Get-Content -Path "$env:SystemDrive\Activationkey.txt"
New-AzsActivationResource -PrivilegedEndpointCredential $CloudAdminCred `
-PrivilegedEndpoint AzS-ERCS01 `
-ActivationKey $ActivationKey
アクティブ化が完了すると、次のようなメッセージが表示されます。Your environment has finished the registration and activation process. (環境で登録とアクティブ化プロセスが終了しました。)
登録が成功したことを確認する
Azure Stack Hub の登録に成功したことは、 [Region management](リージョン管理) タイルを使用して確認できます。 このタイルは、管理者ポータルの既定のダッシュボードにあります。
Azure Stack Hub 管理者ポータル
https://adminportal.local.azurestack.externalにサインインします。ダッシュボードで、 [Region management](リージョン管理) を選択します。
![Azure Stack Hub 管理者ポータルの [リージョン管理] タイル](media/asdk-register/admin1sm.png?view=azs-2005 "[リージョン管理] タイル")
[プロパティ] を選択します。 このブレードには、環境の状態と詳細が表示されます。 [登録済み] 状態と [未登録] 状態とがあります。 登録済みである場合は、Azure Stack Hub の登録に使用した Azure サブスクリプション ID が、登録のリソース グループおよび名前と共に表示されます。
![Azure Stack Hub 管理者ポータルの [リージョン管理] タイル](media/asdk-register/admin1.png?view=azs-2005#lightbox "[リージョン管理] タイル")
登録リソースを移動する
同じサブスクリプションのリソース グループ間で登録リソースを移動する操作は、サポートされています。 新しいリソース グループへのリソースの移動については、「リソースを新しいリソース グループまたはサブスクリプションに移動する」を参照してください。
次のステップ
フィードバック
以下は間もなく提供いたします。2024 年を通じて、コンテンツのフィードバック メカニズムとして GitHub の issue を段階的に廃止し、新しいフィードバック システムに置き換えます。 詳細については、「https://aka.ms/ContentUserFeedback」を参照してください。
フィードバックの送信と表示