Asignio による Azure Active Directory B2C の多要素認証を構成する
Microsoft Entra ID (Azure AD B2C) 認証を Asignio と統合する方法について説明します。 この統合を利用することで、ソフト バイオメトリクスを使ったパスワードレスの多要素認証エクスペリエンスを顧客に提供できます。 Asignio によるユーザー認証では、特許取得済みの Asignio Signature とライブ顔認証が使用されています。 変更可能な生体署名によるオムニチャネル認証を通じて、パスワードの使用、詐欺、フィッシング、資格情報の使い回しを減らすことができます。
開始する前に
ポリシーの種類のセレクターを使って、ポリシーの種類を指定します。 Azure AD B2C には、アプリケーションの操作方法を定義する 2 つの方法があります。
- 定義済みのユーザー フロー
- 構成可能なカスタム ポリシー
この記事で用いられている手順は、方法ごとに異なります。
詳細情報:
前提条件
Azure サブスクリプション。
お持ちでない場合は、Azure 無料アカウントを取得してください
Azure サブスクリプションにリンクされている Azure AD B2C テナント
Asignio によって発行される Asignio クライアント ID とクライアント シークレット。
これらのトークンは、モバイルまたは Web アプリケーションを Asignio に登録することで得られます。
カスタム ポリシーの場合
「チュートリアル: Azure AD B2C でユーザー フローとカスタム ポリシーを作成する」を完了する
シナリオの説明
この統合には、次のコンポーネントが含まれています。
- Azure AD B2C - ユーザー資格情報を検証する承認サーバー
- Web またはモバイル アプリケーション - Asignio MFA を使用してセキュリティで保護する対象
- Asignio Web アプリケーション - 署名となる生体情報をユーザーのタッチ デバイスで収集
次の図は、この実装を示したものです。
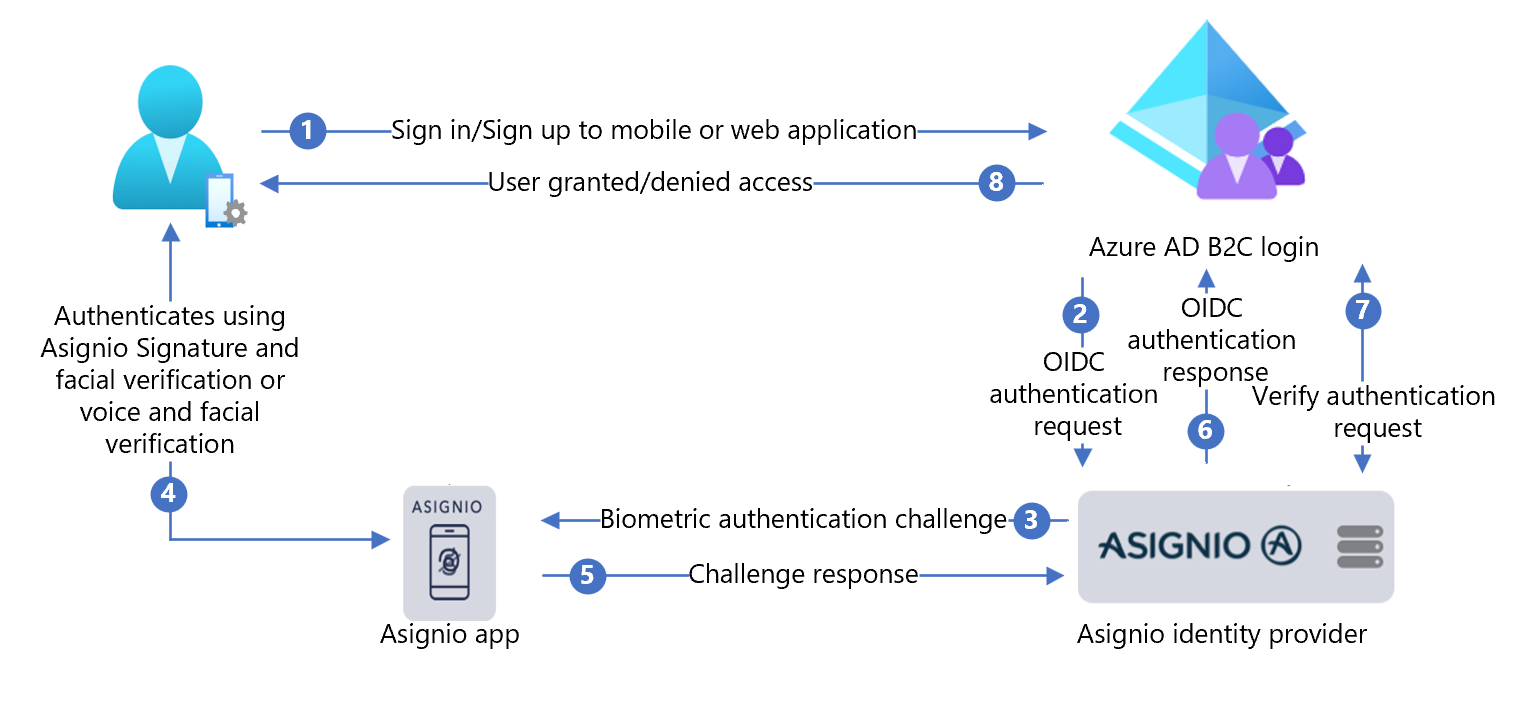
- ユーザーがそのモバイルまたは Web アプリケーションで Azure AD B2C のサインイン ページを開き、サインインまたはサインアップします。
- Azure AD B2C は、OpenID Connect (OIDC) 要求を使用してユーザーを Asignio にリダイレクトします。
- ユーザーは、生体認証サインインを行うために Asignio Web アプリケーションにリダイレクトされます。 ユーザーは Asignio Signature が未登録である場合、SMS ワンタイム パスワード (OTP) を使った認証を使用することができます。 認証されると、ユーザーには Asignio Signature を作成するための登録リンクが届きます。
- ユーザーは、その Asignio Signature と顔認証または声と顔認証を使用し、認証を行います。
- チャレンジ応答が Asignio に送信されます。
- Asignio が、Azure AD B2C サインインへの OIDC 応答を返します。
- Azure AD B2C が、認証データの受け取りを確認するために認証確認要求を Asignio に送信します。
- ユーザーは、アプリケーションへのアクセスを許可または拒否されます。
Asignio を使用してアプリケーションを構成する
Asignio を使用したアプリケーションの構成は、Asignio Partner Administration サイトで行います。
- asignio.com の Asignio Partner Administration ページに移動して、組織へのアクセスを要求します。
- 資格情報を使用して、Asignio Partner Administration にサインインします。
- Azure AD B2C テナントを使用して、Azure AD B2C アプリケーションのレコードを作成します。 Azure AD B2C と Asignio を連携させている場合、接続されたアプリケーションは Azure AD B2C によって管理されます。 Asignio アプリは、Azure portal 内のアプリを表します。
- Asignio Partner Administration サイトで、クライアント ID とクライアント シークレットを生成します。
- クライアント ID とクライアント シークレットをメモしておきます。 これらは後で使用します。 Asignio に、クライアント シークレットは保存されません。
- 認証後にユーザーが誘導される、サイト内のリダイレクト URI を入力します。 次の URI パターンを使用します。
[https://<your-b2c-domain>.b2clogin.com/<your-b2c-domain>.onmicrosoft.com/oauth2/authresp].
- 会社のロゴをアップロードします。 これは、ユーザーがサインインする際の Asignio 認証に表示されます。
Azure AD B2C で Web アプリケーションを登録する
管理するテナントにアプリケーションを登録すると、Azure AD B2C と対話できるようになります。
詳しくはこちら: Active Directory B2C で使用できるアプリケーションの種類
このチュートリアルでは、ブラウザー外に持ち出すことができないデコードされたトークン コンテンツを含む Microsoft Web アプリケーション、https://jwt.ms を登録します。
Web アプリケーションを登録し、ID トークンの暗黙的な許可を有効にする
「チュートリアル: Azure Active Directory B2C に Web アプリケーションを登録する」を完了します
Azure AD B2C で ID プロバイダーとして Asignio を構成する
次の手順では、Azure サブスクリプションを持つ Microsoft Entra テナントを使います。
- Azure AD B2C テナントの全体管理者として、Azure portal にサインインします。
- Azure portal のツール バーで、[ディレクトリとサブスクリプション] を選択します。
- ポータルの [設定] | [ディレクトリとサブスクリプション] の [ディレクトリ名] の一覧で、お使いの Microsoft Entra ディレクトリを見つけます。
- [切り替え] を選択します。
- Azure portal の左上にある [すべてのサービス] を選択します。
- Azure AD B2C を検索して選択します。
- Azure portal で、 [Azure AD B2C] を検索して選択します。
- 左側のメニューから [ID プロバイダー] を選択します。
- [新しい OpenID Connect プロバイダー] を選択します。
- [ID プロバイダーの種類]>[OpenID Connect] の順に選択します。
- [名前] に、Asignio のサインイン名または選択した名前を入力します。
- [メタデータ URL] に
https://authorization.asignio.com/.well-known/openid-configurationを入力します。 - [クライアント ID] に、生成したクライアント ID を入力します。
- [クライアント ID] に、生成したクライアント シークレットを入力します。
- [スコープ] には、OpenID 電子メールのプロファイルを使用します。
- [応答の種類] で [コード] を使用します。
- [応答モード] には、[クエリ] を使用します。
- ドメイン ヒントには、
https://asignio.comを使用します。 - [OK] を選択します。
- [この ID プロバイダーの要求をマップする] を選択します。
- [ユーザー ID] には、sub を使用します。
- [表示名] には、name を使用します。
- [指定された名前] には、given_name を使用します。
- [姓] には、family_name を使用します。
- [電子メール] には、Email を使用します。
- [保存] を選択します。
ユーザー フロー ポリシーを作成する
- Azure AD B2C テナントの [ポリシー] で、 [ユーザー フロー] を選択します。
- [新しいユーザー フロー] を選択します。
- [サインアップとサインイン] のユーザー フロー タイプを選択します。
- [推奨バージョン] を選択します。
- [作成] を選択します
- ユーザー フローの [名前] (
AsignioSignupSigninなど) を入力します。 - [ID プロバイダー] の [ローカル アカウント] で、[なし] を選択します。 このアクションにより、メールとパスワードベースの認証が無効になります。
- [カスタム ID プロバイダー] で、作成した Asignio ID プロバイダーを選択します。
- [作成] を選択します
ユーザー フローをテストする
- Azure AD B2C テナントで、 [ユーザー フロー] を選択します。
- 作成したユーザー フローを選択します。
- [アプリケーション] で、登録した Web アプリケーションを選択します。 [返信 URL] は
https://jwt.msです。 - [ユーザー フローを実行します] を選択します。
- ブラウザーが Asignio のサインイン ページにリダイレクトされます。
- サインイン画面が表示されます。
- 下部にある [Asignio] 認証を選択します。
Asignio Signature がある場合は、認証のプロンプトを完了します。 それ以外の場合は、SMS OTP 経由で認証するためにデバイスの電話番号を指定します。 リンクを使用して、Asignio Signature を登録します。
- ブラウザーは
https://jwt.msにリダイレクトされます。 Azure AD B2C によって返されたトークンの内容が表示されます。
Asignio ポリシー キーを作成する
- Azure AD B2C テナントに、生成したクライアント シークレットを格納します。
- Azure portal にサインインします。
- ポータルのツール バーで、[ディレクトリとサブスクリプション] を選択します。
- ポータルの [設定] | [ディレクトリとサブスクリプション] の [ディレクトリ名] の一覧で、お使いの Azure AD B2C ディレクトリを見つけます。
- [切り替え] を選択します。
- Azure portal の左上にある [すべてのサービス] を選択します。
- Azure AD B2C を検索して選択します。
- [概要] ページで、 [Identity Experience Framework] を選択します。
- [ポリシー キー] を選択します。
- [追加] を選択します。
- [オプション] には [手動] を選択します。
- ポリシー キーのポリシー キー名を入力します。 プレフィックス
B2C_1A_がキー名に追加されます。 - [シークレット] に、メモしたクライアント シークレットを入力します。
- [キー使用法] には [署名] を選択します。
- [作成] を選択します
ID プロバイダーとして Asignio を構成する
ヒント
開始する前に、Azure AD B2C ポリシーが構成されていることを確認します。 そうでない場合は、「カスタム ポリシー スターター パック」の手順に従います。
ユーザーが Asignio を使用してサインインできるようにするには、Azure AD B2C がエンドポイント経由で通信できるクレーム プロバイダーとして Asignio を定義します。 エンドポイントは、デバイス上のデジタル ID を使用してユーザー認証を検証するために Azure AD B2C によって使用されるクレームを提供します。
クレーム プロバイダーとして Asignio を追加する
GitHub からカスタム ポリシー スターター パックを取得し、LocalAccounts スターター パック内の XML ファイルを実際の Azure AD B2C テナントの名前で更新します。
zip active-directory-b2c-custom-policy-starterpack をダウンロードするか、次のようにリポジトリを複製します。
git clone https://github.com/Azure-Samples/active-directory-b2c-custom-policy-starterpackLocalAccounts ディレクトリ内のファイルで、
yourtenantという文字列を Azure AD B2C テナントの名前に置き換えます。LocalAccounts/ TrustFrameworkExtensions.xml を開きます。
ClaimsProviders 要素を見つけます。 存在しない場合は、ルート要素
TrustFrameworkPolicyの下に追加します。次の例のような新しい ClaimsProvider を追加します。
 <ClaimsProvider>
   <Domain>contoso.com</Domain>
   <DisplayName>Asignio</DisplayName>
   <TechnicalProfiles>
     <TechnicalProfile Id="Asignio-Oauth2">
       <DisplayName>Asignio</DisplayName>
       <Description>Login with your Asignio account</Description>
       <Protocol Name="OAuth2" />
       <Metadata>
         <Item Key="ProviderName">authorization.asignio.com</Item>
         <Item Key="authorization_endpoint">https://authorization.asignio.com/authorize</Item>
         <Item Key="AccessTokenEndpoint">https://authorization.asignio.com/token</Item>
         <Item Key="ClaimsEndpoint">https://authorization.asignio.com/userinfo</Item>
         <Item Key="ClaimsEndpointAccessTokenName">access_token</Item>
         <Item Key="BearerTokenTransmissionMethod">AuthorizationHeader</Item>
         <Item Key="HttpBinding">POST</Item>
         <Item Key="scope">openid profile email</Item>
         <Item Key="UsePolicyInRedirectUri">0</Item>
         <!-- Update the Client ID below to the Asignio Application ID -->
         <Item Key="client_id">00000000-0000-0000-0000-000000000000</Item>
         <Item Key="IncludeClaimResolvingInClaimsHandling">true</Item>


         <!-- trying to add additional claim-->
         <!--Insert b2c-extensions-app application ID here, for example: 11111111-1111-1111-1111-111111111111-->
         <Item Key="11111111-1111-1111-1111-111111111111"></Item>
         <!--Insert b2c-extensions-app application ObjectId here, for example: 22222222-2222-2222-2222-222222222222-->
         <Item Key="22222222-2222-2222-2222-222222222222"></Item>
         <!-- The key below allows you to specify each of the Azure AD tenants that can be used to sign in. Update the GUIDs below for each tenant. -->
         <!--<Item Key="ValidTokenIssuerPrefixes">https://login.microsoftonline.com/11111111-1111-1111-1111-111111111111</Item>-->
         <!-- The commented key below specifies that users from any tenant can sign-in. Uncomment if you would like anyone with an Azure AD account to be able to     sign in. -->
         <Item Key="ValidTokenIssuerPrefixes">https://login.microsoftonline.com/</Item>
       </Metadata>
       <CryptographicKeys>
         <Key Id="client_secret" StorageReferenceId="B2C_1A_AsignioSecret" />
       </CryptographicKeys>
       <OutputClaims>
         <OutputClaim ClaimTypeReferenceId="issuerUserId" PartnerClaimType="sub" />
         <OutputClaim ClaimTypeReferenceId="tenantId" PartnerClaimType="tid" AlwaysUseDefaultValue="true" DefaultValue="{Policy:TenantObjectId}" />
         <OutputClaim ClaimTypeReferenceId="authenticationSource" DefaultValue="socialIdpAuthentication" AlwaysUseDefaultValue="true" />
         <OutputClaim ClaimTypeReferenceId="identityProvider" PartnerClaimType="iss" DefaultValue="https://authorization.asignio.com" />
         <OutputClaim ClaimTypeReferenceId="identityProviderAccessToken" PartnerClaimType="{oauth2:access_token}" />
         <OutputClaim ClaimTypeReferenceId="givenName" PartnerClaimType="given_name" />
         <OutputClaim ClaimTypeReferenceId="surName" PartnerClaimType="family_name" />
         <OutputClaim ClaimTypeReferenceId="displayName" PartnerClaimType="name" />
         <OutputClaim ClaimTypeReferenceId="email" PartnerClaimType="email" />
       </OutputClaims>
       <OutputClaimsTransformations>
         <OutputClaimsTransformation ReferenceId="CreateRandomUPNUserName" />
         <OutputClaimsTransformation ReferenceId="CreateUserPrincipalName" />
         <OutputClaimsTransformation ReferenceId="CreateAlternativeSecurityId" />
         <OutputClaimsTransformation ReferenceId="CreateSubjectClaimFromAlternativeSecurityId" />
       </OutputClaimsTransformations>
       <UseTechnicalProfileForSessionManagement ReferenceId="SM-SocialLogin" />
     </TechnicalProfile>
   </TechnicalProfiles>
 </ClaimsProvider>
client_id を、メモした Asignio アプリケーション ID に設定します。
client_secret セクションを作成したポリシー キーで更新します。
B2C_1A_AsignioSecretの例を次に示します。<Key Id="client_secret" StorageReferenceId="B2C_1A_AsignioSecret" />変更を保存します。
ユーザー体験を追加する
ID プロバイダーはサインイン ページにありません。
- カスタム ユーザー体験がある場合は、そのまま証明書利用者ポリシーの構成に進みます。それ以外の場合は、以下のようにテンプレート ユーザー体験をコピーします。
- スターター パックから、LocalAccounts/ TrustFrameworkBase.xml を開きます。
Id=SignUpOrSignInを含む UserJourney 要素を見つけて、その内容をコピーします。- LocalAccounts/ TrustFrameworkExtensions.xml を開きます。
- UserJourneys 要素を見つけます。 存在しない場合は、追加します。
- UserJourney 要素の内容を UserJourneys 要素の子として貼り付けます。
- ユーザー体験 ID の名前を変更します。 たとえば、「
Id=AsignioSUSI」のように入力します。
詳細情報: ユーザー体験
ユーザー体験に ID プロバイダーを追加する
新しい ID プロバイダーをユーザー体験に追加します。
- ユーザー体験内で、
Type=CombinedSignInAndSignUpまたはType=ClaimsProviderSelectionを含むオーケストレーション ステップ要素を見つけます。 これは通常、最初のオーケストレーション ステップです。 ClaimsProviderSelections 要素には、ユーザーのサインインに使用する ID プロバイダーの一覧が含まれています。 要素の順序により、サインイン ボタンの順序が制御されます。 - ClaimsProviderSelection XML 要素を追加します。
- TargetClaimsExchangeId の値をフレンドリ名に設定します。
- ClaimsExchange 要素を追加します。
- Id を、ターゲットの要求交換 ID の値に設定します。
- TechnicalProfileReferenceId の値を、作成した技術プロファイルの ID に更新します。
次の XML は、ID プロバイダーを使用したユーザー体験のオーケストレーション ステップを示しています。
    <UserJourney Id="AsignioSUSI">
      <OrchestrationSteps>
        <OrchestrationStep Order="1" Type="CombinedSignInAndSignUp" ContentDefinitionReferenceId="api.signuporsignin">
          <ClaimsProviderSelections>
            <ClaimsProviderSelection TargetClaimsExchangeId="AsignioExchange" />
            <ClaimsProviderSelection ValidationClaimsExchangeId="LocalAccountSigninEmailExchange" />
          </ClaimsProviderSelections>
          <ClaimsExchanges>
            <ClaimsExchange Id="LocalAccountSigninEmailExchange" TechnicalProfileReferenceId="SelfAsserted-LocalAccountSignin-Email" />
          </ClaimsExchanges>
        </OrchestrationStep>
        <!-- Check if the user has selected to sign in using one of the social providers -->
        <OrchestrationStep Order="2" Type="ClaimsExchange">
          <Preconditions>
            <Precondition Type="ClaimsExist" ExecuteActionsIf="true">
              <Value>objectId</Value>
              <Action>SkipThisOrchestrationStep</Action>
            </Precondition>
          </Preconditions>
          <ClaimsExchanges>
            <ClaimsExchange Id="AsignioExchange" TechnicalProfileReferenceId="Asignio-Oauth2" />
            <ClaimsExchange Id="SignUpWithLogonEmailExchange" TechnicalProfileReferenceId="LocalAccountSignUpWithLogonEmail" />
          </ClaimsExchanges>
        </OrchestrationStep>
        <OrchestrationStep Order="3" Type="ClaimsExchange">
          <Preconditions>
            <Precondition Type="ClaimEquals" ExecuteActionsIf="true">
              <Value>authenticationSource</Value>
              <Value>localAccountAuthentication</Value>
              <Action>SkipThisOrchestrationStep</Action>
            </Precondition>
          </Preconditions>
          <ClaimsExchanges>
            <ClaimsExchange Id="AADUserReadUsingAlternativeSecurityId" TechnicalProfileReferenceId="AAD-UserReadUsingAlternativeSecurityId-NoError" />
          </ClaimsExchanges>
        </OrchestrationStep>
        <!-- Show self-asserted page only if the directory does not have the user account already (i.e. we do not have an objectId). This can only happen when authentication happened using a social IDP. If local account was created or authentication done using ESTS in step 2, then an user account must exist in the directory by this time. -->
        <OrchestrationStep Order="4" Type="ClaimsExchange">
          <Preconditions>
            <Precondition Type="ClaimsExist" ExecuteActionsIf="true">
              <Value>objectId</Value>
              <Action>SkipThisOrchestrationStep</Action>
            </Precondition>
          </Preconditions>
          <ClaimsExchanges>
            <ClaimsExchange Id="SelfAsserted-Social" TechnicalProfileReferenceId="SelfAsserted-Social" />
          </ClaimsExchanges>
        </OrchestrationStep>
        <!-- This step reads any user attributes that we may not have received when authenticating using ESTS so they can be sent            in the token. -->
        <OrchestrationStep Order="5" Type="ClaimsExchange">
          <Preconditions>
            <Precondition Type="ClaimEquals" ExecuteActionsIf="true">
              <Value>authenticationSource</Value>
              <Value>socialIdpAuthentication</Value>
              <Action>SkipThisOrchestrationStep</Action>
            </Precondition>
          </Preconditions>
          <ClaimsExchanges>
            <ClaimsExchange Id="AADUserReadWithObjectId" TechnicalProfileReferenceId="AAD-UserReadUsingObjectId" />
          </ClaimsExchanges>
        </OrchestrationStep>
        <!-- The previous step (SelfAsserted-Social) could have been skipped if there were no attributes to collect from the user. So, in that case, create the user in the directory if one does not already exist (verified using objectId which would be set from the last step if account was created in the directory. -->
        <OrchestrationStep Order="6" Type="ClaimsExchange">
          <Preconditions>
            <Precondition Type="ClaimsExist" ExecuteActionsIf="true">
              <Value>objectId</Value>
              <Action>SkipThisOrchestrationStep</Action>
            </Precondition>
          </Preconditions>
          <ClaimsExchanges>
            <ClaimsExchange Id="AADUserWrite" TechnicalProfileReferenceId="AAD-UserWriteUsingAlternativeSecurityId" />
          </ClaimsExchanges>
        </OrchestrationStep>
        <OrchestrationStep Order="7" Type="SendClaims" CpimIssuerTechnicalProfileReferenceId="JwtIssuer" />
      </OrchestrationSteps>
      <ClientDefinition ReferenceId="DefaultWeb" />
    </UserJourney>
証明書利用者ポリシーを構成する
証明書利用者ポリシー (例: SignUpSignIn.xml) は、Azure AD B2C が実行するユーザー体験を指定します。
- 証明書利用者で、DefaultUserJourney 要素を見つけます。
- ID プロバイダーを追加したユーザー体験 ID と一致するように ReferenceId を更新します。
次の例では、AsignioSUSI ユーザー体験について、ReferenceId を AsignioSUSI に設定しています。
   <RelyingParty>
        <DefaultUserJourney ReferenceId="AsignioSUSI" />
        <TechnicalProfile Id="PolicyProfile">
          <DisplayName>PolicyProfile</DisplayName>
          <Protocol Name="OpenIdConnect" />
          <OutputClaims>
            <OutputClaim ClaimTypeReferenceId="displayName" />
            <OutputClaim ClaimTypeReferenceId="givenName" />
            <OutputClaim ClaimTypeReferenceId="surname" />
            <OutputClaim ClaimTypeReferenceId="email" />
            <OutputClaim ClaimTypeReferenceId="objectId" PartnerClaimType="sub"/>
            <OutputClaim ClaimTypeReferenceId="identityProvider" />
            <OutputClaim ClaimTypeReferenceId="tenantId" AlwaysUseDefaultValue="true" DefaultValue="{Policy:TenantObjectId}" />
            <OutputClaim ClaimTypeReferenceId="correlationId" DefaultValue="{Context:CorrelationId}" />
          </OutputClaims>
          <SubjectNamingInfo ClaimType="sub" />
        </TechnicalProfile>
      </RelyingParty>
カスタム ポリシーをアップロードする
- Azure portal にサインインします。
- ポータルのツール バーで、[ディレクトリとサブスクリプション] を選択します。
- ポータルの [設定] | [ディレクトリとサブスクリプション] の [ディレクトリ名] の一覧で、お使いの Azure AD B2C ディレクトリを見つけます。
- [切り替え] を選択します。
- Azure portal で、 [Azure AD B2C] を検索して選択します。
- [ポリシー] で [Identity Experience Framework] を選択します。
- [カスタム ポリシーのアップロード] を選択します。
- 次の順序で、変更した 2 つのポリシー ファイルをアップロードします。
- 拡張機能ポリシー (例:
TrustFrameworkExtensions.xml) - 証明書利用者ポリシー (
SignUpOrSignin.xmlなど)
カスタム ポリシーのテスト
- Azure AD B2C テナントで、[ポリシー] の下にある [Identity Experience Framework] を選択します。
- [カスタム ポリシー] で、AsignioSUSI を選択します。
- [アプリケーション] で、登録した Web アプリケーションを選択します。 [返信 URL] は
https://jwt.msです。 - [今すぐ実行] を選択します。
- ブラウザーが Asignio のサインイン ページにリダイレクトされます。
- サインイン画面が表示されます。
- 下部にある [Asignio] 認証を選択します。
Asignio Signature がある場合は、その Asignio Signature を使用して認証するよう求められます。 それ以外の場合は、SMS OTP 経由で認証するためにデバイスの電話番号を指定します。 リンクを使用して、Asignio Signature を登録します。
- ブラウザーは
https://jwt.msにリダイレクトされます。 Azure AD B2C によって返されたトークンの内容が表示されます。