Live Share キャンバスの概要
世界中の会議室や教室では、ホワイトボードはコラボレーションの重要な部分です。 しかし、現代では、ホワイトボードはもはや十分ではありません。 PowerPoint などの多数のデジタル ツールが現代におけるコラボレーションの焦点であるため、同じクリエイティブな可能性を実現することが不可欠です。
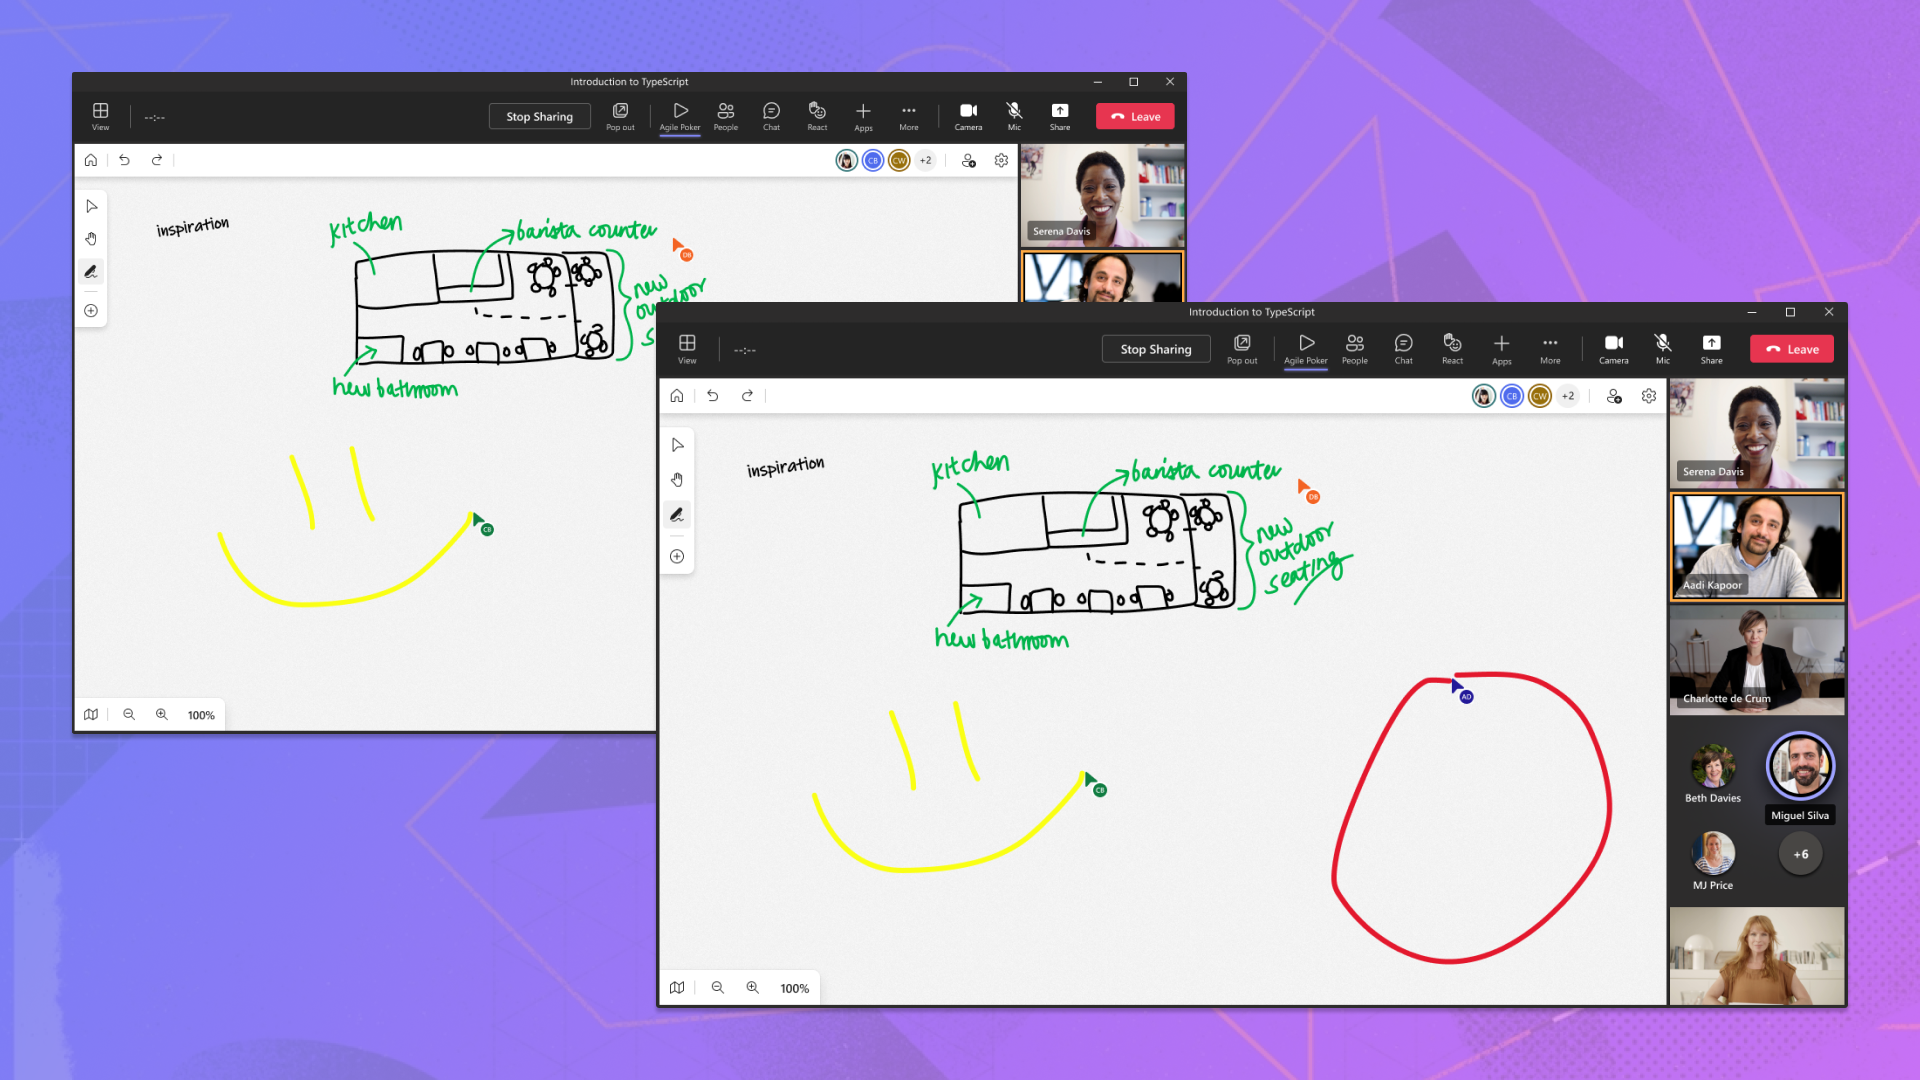
よりシームレスなコラボレーションを可能にするために、Microsoft はPowerPoint Liveを作成しました。これは、Microsoft Teams でのユーザーの働き方に有効になりました。 発表者は、ペン、蛍光ペン、レーザー ポインターを使用して、主要な概念に注意を引くために、すべてのユーザーが表示するスライドに注釈を付けることができます。 Live Share キャンバスを使用すると、アプリは最小限の労力でPowerPoint Live手描き入力ツールの機能を利用できます。
インストール
Live Share キャンバスは npm で発行された JavaScript パッケージであり、 npm または yarn を使用してダウンロードできます。 また、 を含む@microsoft/live-sharefluid-framework@fluidframework/azure-clientピアの依存関係もインストールする必要があります。 タブ アプリケーションで Live Share を使用している場合は、バージョン2.11.0以降もインストール@microsoft/teams-jsする必要があります。
npm install @microsoft/live-share @microsoft/live-share-canvas fluid-framework @fluidframework/azure-client --save
npm install @microsoft/teams-js --save
または
Yarn を使用して SDK の最新バージョンをアプリケーションに追加するには:
yarn add @microsoft/live-share @microsoft/live-share-canvas fluid-framework @fluidframework/azure-client
yarn add @microsoft/teams-js
パッケージの設定
Live Share キャンバスには、ターンキー コラボレーションを有効にする 2 つの主要なクラスがあります。 InkingManager と LiveCanvasです。 InkingManager は、アプリにフル機能 <canvas> の要素をアタッチする一方 LiveCanvas で、他の会議参加者とのリモート同期を管理します。 アプリを組み合わせて使用すると、わずか数行のコードでホワイトボードのような完全な機能を使用できます。
| クラス | 説明 |
|---|---|
| InkingManager | ペンまたは蛍光ペンのストローク、 <canvas> レーザー ポインター、線と矢印、消しゴムを自動的に管理する要素を に <div> アタッチするクラス。 API のセット (アクティブなツールを制御する) と基本的な構成設定を公開します。 |
| LiveCanvas | SharedObject Live Share セッションのすべてのユーザーのストロークとカーソル位置InkingManagerを同期するクラス。 |
例:
<body>
  <div id="canvas-host"></div>
</body>
import { LiveShareClient } from "@microsoft/live-share";
import { InkingManager, LiveCanvas } from "@microsoft/live-share-canvas";
import { LiveShareHost } from "@microsoft/teams-js";

// Setup the Fluid container
const host = LiveShareHost.create(host);
const liveShare = new LiveShareClient(host);
const schema = {
  initialObjects: { liveCanvas: LiveCanvas },
};
const { container } = await liveShare.joinContainer(schema);
const { liveCanvas } = container.initialObjects;

// Get the canvas host element
const canvasHostElement = document.getElementById("canvas-host");
const inkingManager = new InkingManager(canvasHostElement);

// Begin synchronization for LiveCanvas
await liveCanvas.initialize(inkingManager);

inkingManager.activate();
キャンバス ツールとカーソル
Live Share キャンバスを設定して同期できるようになったので、ペン ツールを選択するためのボタンなど、ユーザー操作用にキャンバスを構成できます。 このセクションでは、使用可能なツールとその使用方法について説明します。
手描き入力ツール
Live Share キャンバスの各手描き入力ツールは、ユーザーが描画する際にストロークをレンダリングします。 タッチ スクリーンまたはスタイラスを使用する場合、ツールは圧力のダイナミクスもサポートし、ストロークの幅に影響を与えます。 構成設定には、ブラシの色、太さ、図形、オプションの終了矢印が含まれます。
ペンツール
ペン ツールは、キャンバスに格納されているソリッド ストロークを描画します。 既定の先端図形は円です。
<div>
  <button id="pen">Enable Pen</button>
  <label for="pen-color">Select a color:</label>
  <input type="color" id="color" name="color" value="#000000" />
  <button id="pen-tip-size">Increase pen size</button>
</div>
import {
  InkingManager,
  InkingTool,
  fromCssColor,
} from "@microsoft/live-share-canvas";
// ...

// Change the selected tool to pen
document.getElementById("pen").onclick = () => {
  inkingManager.tool = InkingTool.pen;
};
// Change the selected color for pen
document.getElementById("pen-color").onchange = () => {
  const colorPicker = document.getElementById("color");
  inkingManager.penBrush.color = fromCssColor(colorPicker.value);
};
// Increase the tip size for pen
document.getElementById("pen-tip-size").onclick = () => {
  inkingManager.penBrush.tipSize = inkingManager.penBrush.tipSize + 1;
};
蛍光ペン ツール
蛍光ペン ツールは、キャンバスに格納されている半透明のストロークを描画します。 既定の先端図形は正方形です。
<div>
  <button id="highlighter">Enable Highlighter</button><br />
  <label for="highlighter-color">Select a color:</label>
  <input type="color" id="highlighter-color" name="highlighter-color" value="#FFFC00" />
  <button id="highlighter-tip-size">Increase tip size</button>
</div>
import {
  InkingManager,
  InkingTool,
  fromCssColor,
} from "@microsoft/live-share-canvas";
// ...

// Change the selected tool to highlighter
document.getElementById("highlighter").onclick = () => {
  inkingManager.tool = InkingTool.highlighter;
};
// Change the selected color for highlighter
document.getElementById("highlighter-color").onchange = () => {
  const colorPicker = document.getElementById("highlighter-color");
  inkingManager.highlighterBrush.color = fromCssColor(colorPicker.value);
};
// Increase the tip size for highlighter
document.getElementById("highlighter-tip-size").onclick = () => {
  inkingManager.highlighterBrush.tipSize = inkingManager.penBrush.tipSize + 1;
};
消しゴム ツール
消しゴム ツールは、パスを横切るストローク全体を消去します。
<div>
  <button id="eraser">Enable Eraser</button><br />
  <button id="eraser-size">Increase eraser size</button>
</div>
import {
  InkingManager,
  InkingTool,
} from "@microsoft/live-share-canvas";
// ...

// Change the selected tool to eraser
document.getElementById("eraser").onclick = () => {
  inkingManager.tool = InkingTool.eraser;
};
// Increase the tip size for eraser
document.getElementById("eraser-size").onclick = () => {
  inkingManager.eraserSize = inkingManager.eraserSize + 1;
};
ポイント消しゴム ツール
ポイント 消しゴム ツールは、既存のストロークを半分に分割することで、パスを横切るストローク内の個々のポイントを消去します。 このツールは計算コストが高く、ユーザーのフレーム レートが遅くなる可能性があります。
注:
ポイント 消しゴムは、通常の消しゴム ツールと同じ消しゴム ポイント サイズを共有します。
<div>
  <button id="point-eraser">Enable Point Eraser</button><br />
</div>
import {
  InkingManager,
  InkingTool,
} from "@microsoft/live-share-canvas";
// ...

// Change the selected tool to eraser
document.getElementById("point-eraser").onclick = () => {
  inkingManager.tool = InkingTool.pointEraser;
};
レーザー ポインター
レーザーポインターは、マウスを動かす際にレーザーの先端が後続の効果を持つので一意です。 ストロークを描画すると、完全にフェードアウトする前に、トレーリング エフェクトが短時間レンダリングされます。 このツールは、発表者がストロークを消去するためにツールを切り替える必要がないため、会議中に画面上の情報を指摘するのに最適です。
<div>
  <button id="laser">Enable Laser Pointer</button><br />
  <label for="laser-color">Select a color:</label>
  <input type="color" id="laser-color" name="laser-color" value="#000000" />
  <button id="laser-tip-size">Increase tip size</button>
</div>
import {
  InkingManager,
  InkingTool,
  fromCssColor,
} from "@microsoft/live-share-canvas";
// ...

// Change the selected tool to laser pointer
document.getElementById("laser").onclick = () => {
  inkingManager.tool = InkingTool.laserPointer;
};
// Change the selected color for laser pointer
document.getElementById("laser-color").onchange = () => {
  const colorPicker = document.getElementById("laser-color");
  inkingManager.laserPointerBrush.color = fromCssColor(colorPicker.value);
};
// Increase the tip size for laser pointer
document.getElementById("laser-tip-size").onclick = () => {
  inkingManager.laserPointerBrush.tipSize = inkingManager.laserPointerBrush.tipSize + 1;
};
線と矢印のツール
線ツールを使用すると、ユーザーは、端に適用できるオプションの矢印を使用して、ある点から別の点に直線を描画できます。
<div>
  <button id="line">Enable Line</button><br />
  <button id="line-arrow">Enable Arrow</button><br />
  <input type="color" id="line-color" name="line-color" value="#000000" />
  <button id="line-tip-size">Increase tip size</button>
</div>
import {
  InkingManager,
  InkingTool,
  fromCssColor,
} from "@microsoft/live-share-canvas";
// ...

// Change the selected tool to line
document.getElementById("line").onclick = () => {
  inkingManager.tool = InkingTool.line;
  inkingManager.lineBrush.endArrow = "none";
};
// Change the selected tool to line
document.getElementById("line-arrow").onclick = () => {
  inkingManager.tool = InkingTool.line;
  inkingManager.lineBrush.endArrow = "open";
};
// Change the selected color for lineBrush
document.getElementById("line-color").onclick = () => {
  const colorPicker = document.getElementById("line-color");
  inkingManager.lineBrush.color = fromCssColor(colorPicker.value);
};
// Increase the tip size for lineBrush
document.getElementById("line-tip-size").onclick = () => {
  inkingManager.lineBrush.tipSize = inkingManager.lineBrush.tipSize + 1;
};
すべてのストロークをクリアする
を呼び出 inkingManager.clear()すことで、キャンバス内のすべてのストロークをクリアできます。 これにより、キャンバスからすべてのストロークが削除されます。
生のストロークをインポートおよびエクスポートする
Live Share Canvas では、 からの InkingManager生のストロークのインポートとエクスポートがサポートされています。これにより、後のセッションで後で使用できるように、バック エンドにエクスポートできます。
// Export raw strokes
const strokes = inkingManager.exportRaw();

// Optionally clear out existing strokes, and import strokes
inkingManager.clear();
inkingManager.importRaw(strokes);
ストロークを SVG としてエクスポートする
内の InkingManager 図面全体をスケーラブルなベクター グラフィック (SVG) にエクスポートできます。 SVG の内容は文字列として返されます。これにより、.svg ファイル拡張子としてサーバーに格納できます。
// Export raw strokes
const svgText = inkingManager.exportSVG();
カーソル
アプリケーションでライブ カーソルを有効にすると、ユーザーがキャンバス上で互いのカーソル位置を追跡できます。 手描き入力ツールとは異なり、カーソルはクラスを介して LiveCanvas 完全に動作します。 必要に応じて、各ユーザーを識別するための名前と画像を指定できます。 カーソルは、個別に有効にすることも、手描き入力ツールを使用して有効にすることもできます。
// Optional. Set user display info
liveCanvas.onGetLocalUserPictureUrl = () => "YOUR USER PICTURE URI";
// Toggle Live Canvas cursor enabled state
liveCanvas.isCursorShared = !isCursorShared;
デバイス間での最適化
Web 上のほとんどのアプリケーションでは、コンテンツは画面サイズやアプリケーションの状態に応じて異なる方法でレンダリングされます。 アプリに対して正しく最適化されていない場合 InkingManager は、ストロークとカーソルがユーザーごとに異なる方法で表示される可能性があります。 Live Share キャンバスでは、簡単な API のセットがサポートされています。これにより、ストロークの <canvas> 位置をコンテンツと正しく合わせて調整できます。
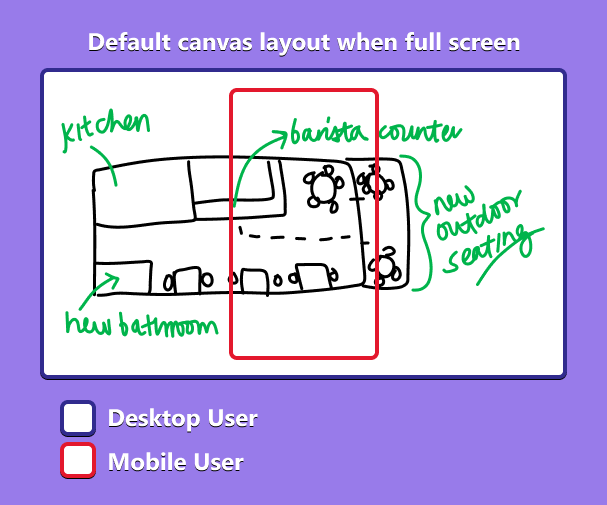
既定では、Live Share キャンバスはホワイトボード アプリとよく似て動作し、コンテンツは 1 倍のズーム レベルでビューポートに中央揃えされています。 コンテンツの一部のみが の表示範囲内 <canvas>でレンダリングされています。 概念的には、鳥瞰図からビデオを記録するようなものです。 カメラのビューポートが下の世界の一部を記録している間、現実世界はあらゆる方向にほぼ無限に伸びている。
この概念を視覚化するのに役立つ簡単な図を次に示します。
この動作は、次の方法でカスタマイズできます。
- 開始参照ポイントをキャンバスの左上隅に変更します。
- ビューポートのピクセル オフセット x と y 位置を変更します。
- ビューポートのスケール レベルを変更します。
注:
参照ポイント、オフセット、スケール レベルはクライアントに対してローカルであり、会議参加者間では同期されません。
例:
<body>
  <button id="pan-left">Pan left</button>
  <button id="pan-up">Pan up</button>
  <button id="pan-right">Pan right</button>
  <button id="pan-down">Pan down</button>
  <button id="zoom-out">Zoom out</button>
  <button id="zoom-in">Zoom in</button>
  <button id="change-reference">Change reference</button>
</body>
// ...

// Pan left
document.getElementById("pan-left").onclick = () => {
  inkingManager.offset = {
    x: inkingManager.offset.x - 10,
    y: inkingManager.offset.y,
  };
};
// Pan up
document.getElementById("pan-up").onclick = () => {
  inkingManager.offset = {
    x: inkingManager.offset.x,
    y: inkingManager.offset.y - 10,
  };
};
// Pan right
document.getElementById("pan-right").onclick = () => {
  inkingManager.offset = {
    x: inkingManager.offset.x + 10,
    y: inkingManager.offset.y,
  };
};
// Pan down
document.getElementById("pan-down").onclick = () => {
  inkingManager.offset = {
    x: inkingManager.offset.x,
    y: inkingManager.offset.y + 10,
  };
};
// Zoom out
document.getElementById("zoom-out").onclick = () => {
  if (inkingManager.scale > 0.1) {
    inkingManager.scale -= 0.1;
  }
};
// Zoom in
document.getElementById("zoom-in").onclick = () => {
  inkingManager.scale += 0.1;
};
// Change reference
document.getElementById("change-reference").onclick = () => {
  if (inkingManager.referencePoint === "center") {
    inkingManager.referencePoint = "topLeft";
  } else {
    inkingManager.referencePoint = "center";
  }
};
理想的なシナリオ
Web ページはすべての図形とサイズで表示されるため、すべてのシナリオをサポートするために Live Share キャンバスを作成することはできません。 このパッケージは、すべてのユーザーが同じコンテンツを同時に見ているシナリオに最適です。 すべてのコンテンツを画面に表示する必要はありませんが、デバイス間で線形にスケーリングされるコンテンツである必要があります。
Live Share キャンバスがアプリケーションに最適なオプションであるシナリオの例を次に示します。
- すべてのクライアントで同じ縦横比でレンダリングされる画像とビデオをオーバーレイします。
- 同じ回転角度からマップ、3D モデル、ホワイトボードを表示する。
ユーザーが異なるズーム レベルとオフセットでコンテンツを見ている場合でも、すべてのデバイスで同じコンテンツを表示できるため、どちらのシナリオでも問題なく機能します。 アプリのレイアウトやコンテンツが画面サイズに応じて変化し、すべての参加者に共通のビューを生成できない場合は、Live Share キャンバスがシナリオに適していない可能性があります。
コード サンプル
| サンプルの名前 | 説明 | JavaScript |
|---|---|---|
| Live Canvas のデモ | シンプルなホワイトボードアプリケーション。 | 表示 |
| React メディア テンプレート | 同期されたビデオ プレーヤー上に描画します。 | 表示 |
次の手順
関連項目
Platform Docs
フィードバック
以下は間もなく提供いたします。2024 年を通じて、コンテンツのフィードバック メカニズムとして GitHub の issue を段階的に廃止し、新しいフィードバック システムに置き換えます。 詳細については、「https://aka.ms/ContentUserFeedback」を参照してください。
フィードバックの送信と表示