Xamarin iOS アプリへのプッシュ通知の追加
概要
このチュートリアルでは、Xamarin.iOS クイック スタート プロジェクトにプッシュ通知を追加して、レコードが挿入されるたびにプッシュ通知が送信されるようにします。
ダウンロードしたクイック スタートのサーバー プロジェクトを使用しない場合は、プッシュ通知拡張機能パッケージを追加する必要があります。 詳細については、「Azure Mobile Apps 用 .NET バックエンド サーバー SDK の操作」を参照してください。
前提条件
- Xamarin.iOS のクイックスタート に関するチュートリアルを完了していること。
- 物理的な iOS デバイス iOS シミュレーターでは、プッシュ通知はサポートされていません。
Apple の開発者ポータルにプッシュ通知のアプリを登録する
- アプリのアプリ ID を登録します。 明示的なアプリ ID (ワイルドカード アプリ ID ではない) を作成し、バンドル ID の場合は、Xcode クイックスタート プロジェクトに含まれている正確なバンドル ID を使用します。 [Push Notifications (プッシュ通知)] チェック ボックスをオンにすることも重要です。
- 次に、プッシュ通知を構成するための準備として、"開発" または "配布" SSL 証明書を作成します。
プッシュ通知を送信するようにモバイル アプリを構成する
- お使いの Mac で、 Keychain Accessを起動します。 左側のナビゲーション バーで、[分類] の [自分の証明書] を開きます。 前のセクションでダウンロードした SSL 証明書を見つけ、その内容を開示します。 (秘密キーを選択せずに) 証明書のみを選択します。 次に、それをエクスポートします。
- Azure Portal で [すべて参照]>[App Services] の順に選択します。 次に、Mobile Apps バックエンドを選択します。
- [設定] で [App Service Push]\(App Service プッシュ\) を選択します。 次に、通知ハブの名前を選択します。
- [Apple Push Notification Servicesアップロード>に移動します。 アップロード .p12 ファイルを開き、(以前のクライアント SSL 証明書が実稼働かサンドボックスかによって異なる) 正しいモードを選択します。 すべての変更を保存します。
これで、iOS のプッシュ通知と連携するようにサービスが構成されました。
プッシュ通知を送信するようにサーバー プロジェクトを更新する
このセクションでは、Mobile Apps の既存のバックエンド プロジェクトのコードを更新して、新しい項目が追加されるたびにプッシュ通知を送信するようにします。 このプロセスは、Azure Notification Hubs のテンプレート機能を使用しており、クロスプラットフォームのプッシュを有効にします。 テンプレートを使用してさまざまなクライアントがプッシュ通知に登録されるため、1 つの汎用プッシュがすべてのクライアント プラットフォームに届きます。
次のいずれかの手順を選択します。これは、. NET のバック エンドまたはバック エンドの種類に一致するNode.js 選択します。
.NET バックエンド プロジェクト
Visual Studio で、サーバー プロジェクトを右クリックします。 次に、[NuGet パッケージの管理] を選択します。
Microsoft.Azure.NotificationHubsを検索し、 [インストール] を選択します。 このプロセスにより、バックエンドから通知を送信するための Notification Hubs ライブラリがインストールされます。サーバー プロジェクトで、ControllersTodoItemController.cs を開きます。> 次の using ステートメントを追加します。
using System.Collections.Generic;
using Microsoft.Azure.NotificationHubs;
using Microsoft.Azure.Mobile.Server.Config;
PostTodoItem メソッドで、次のコードを InsertAsync に対する呼び出しの後ろに追加します。
// Get the settings for the server project.
HttpConfiguration config = this.Configuration;
MobileAppSettingsDictionary settings =
    this.Configuration.GetMobileAppSettingsProvider().GetMobileAppSettings();

// Get the Notification Hubs credentials for the mobile app.
string notificationHubName = settings.NotificationHubName;
string notificationHubConnection = settings
    .Connections[MobileAppSettingsKeys.NotificationHubConnectionString].ConnectionString;

// Create a new Notification Hub client.
NotificationHubClient hub = NotificationHubClient
.CreateClientFromConnectionString(notificationHubConnection, notificationHubName);

// Send the message so that all template registrations that contain "messageParam"
// receive the notifications. This includes APNS, GCM, WNS, and MPNS template registrations.
Dictionary<string,string> templateParams = new Dictionary<string,string>();
templateParams["messageParam"] = item.Text + " was added to the list.";

try
{
    // Send the push notification and log the results.
    var result = await hub.SendTemplateNotificationAsync(templateParams);

    // Write the success result to the logs.
    config.Services.GetTraceWriter().Info(result.State.ToString());
}
catch (System.Exception ex)
{
    // Write the failure result to the logs.
    config.Services.GetTraceWriter()
        .Error(ex.Message, null, "Push.SendAsync Error");
}
このプロセスにより、新しい項目が挿入されたときに、item.Text を含むテンプレート通知が送信されます。
サーバー プロジェクトを発行します。
Node.js バックエンド プロジェクト
バックエンド プロジェクトを設定します。
todoitem.js 内の既存のコードを、次のコードに置き換えます。
var azureMobileApps = require('azure-mobile-apps'),
promises = require('azure-mobile-apps/src/utilities/promises'),
logger = require('azure-mobile-apps/src/logger');

var table = azureMobileApps.table();

table.insert(function (context) {
// For more information about the Notification Hubs JavaScript SDK,
// see https://aka.ms/nodejshubs.
logger.info('Running TodoItem.insert');

// Define the template payload.
var payload = '{"messageParam": "' + context.item.text + '" }';

// Execute the insert. The insert returns the results as a promise.
// Do the push as a post-execute action within the promise flow.
return context.execute()
    .then(function (results) {
        // Only do the push if configured.
        if (context.push) {
            // Send a template notification.
            context.push.send(null, payload, function (error) {
                if (error) {
                    logger.error('Error while sending push notification: ', error);
                } else {
                    logger.info('Push notification sent successfully!');
                }
            });
        }
        // Don't forget to return the results from the context.execute().
        return results;
    })
    .catch(function (error) {
        logger.error('Error while running context.execute: ', error);
    });
});

module.exports = table;
このプロセスにより、新しい項目が挿入されたときに、item.text を含むテンプレート通知が送信されます。
ローカル コンピューターでファイルを編集するときは、サーバー プロジェクトを再発行します。
Xamarin.iOS プロジェクトを構成する
Xamarin Studio での iOS プロジェクトの構成
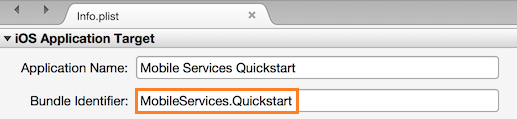
Xamarin.Studio で Info.plist を開き、新しいアプリ ID で前に作成したバンドル ID でバンドル識別子を更新します。
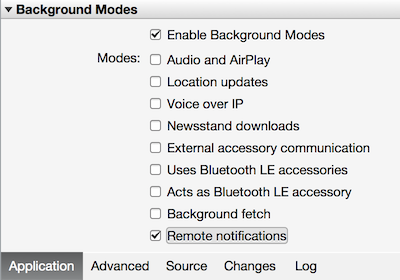
下にスクロールして [Background Modes (バックグラウンド モード)] に移動します。 [Enable Background Modes (バックグラウンド モードを有効にする)] と [Remote notifications (リモート通知)] の各チェック ボックスをオンにします。
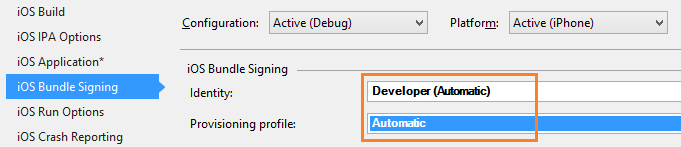
ソリューション パネルでプロジェクトをダブルクリックし、[Project Options (プロジェクト オプション)] を開きます。
[Build (ビルド)] で [iOS Bundle Signing (iOS バンドル署名)] を選択し、対応する ID とこのプロジェクトに対して設定したプロビジョニング プロファイルを選択します。
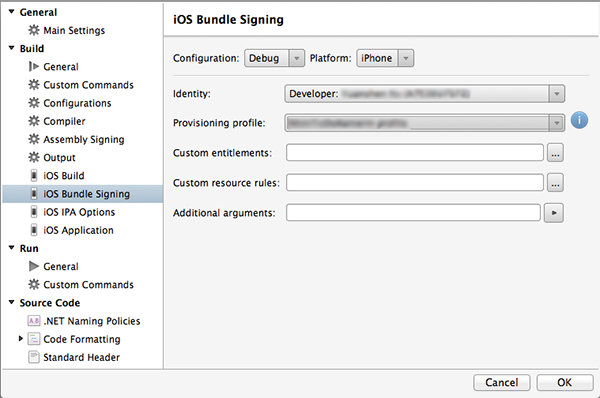
これで、プロジェクトではコード署名のために新しいプロファイルを使用するようになります。 公式の Xamarin デバイス プロビジョニングのドキュメントについては、 Xamarin デバイス プロビジョニングに関するページを参照してください。
Visual Studio での iOS プロジェクトの構成
Visual Studio で、プロジェクトを右クリックし、 [プロパティ]をクリックします。
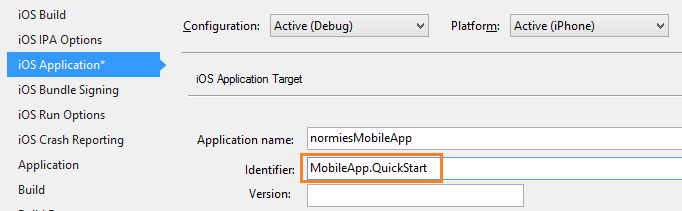
[プロパティ] ページで、[iOS アプリケーション] タブをクリックし、前に作成した ID で [識別子] を更新します。
[iOS Bundle Signing (iOS バンドル署名)] タブで、対応する ID とこのプロジェクトに対して設定したプロビジョニング プロファイルを選択します。
これで、プロジェクトではコード署名のために新しいプロファイルを使用するようになります。 公式の Xamarin デバイス プロビジョニングのドキュメントについては、 Xamarin デバイス プロビジョニングに関するページを参照してください。
Info.plist をダブルクリックして開き、[Background Modes (バックグラウンド モード)] の RemoteNotifications を有効にします。
アプリケーションにプッシュ通知を追加する
QSTodoService で次のプロパティを追加して、AppDelegate でモバイル クライアントを取得できるようにします。
public MobileServiceClient GetClient {
    get
    {
        return client;
    }
    private set
    {
        client = value;
    }
}
次の
usingステートメントを AppDelegate.cs ファイルの先頭に追加します。using Microsoft.WindowsAzure.MobileServices; using Newtonsoft.Json.Linq;AppDelegate で、FinishedLaunching イベントをオーバーライドします。
 public override bool FinishedLaunching(UIApplication application, NSDictionary launchOptions)
 {
     // registers for push for iOS8
     var settings = UIUserNotificationSettings.GetSettingsForTypes(
         UIUserNotificationType.Alert
         | UIUserNotificationType.Badge
         | UIUserNotificationType.Sound,
         new NSSet());

     UIApplication.SharedApplication.RegisterUserNotificationSettings(settings);
     UIApplication.SharedApplication.RegisterForRemoteNotifications();

     return true;
 }
同じファイルで、
RegisteredForRemoteNotificationsイベントをオーバーライドします。 このコードでは、サーバーでサポートされているすべてのプラットフォームに送信される単純なテンプレート通知を登録します。Notification Hubs を使用するテンプレートの詳細については、「 テンプレート」を参照してください。
public override void RegisteredForRemoteNotifications(UIApplication application, NSData deviceToken)
{
    MobileServiceClient client = QSTodoService.DefaultService.GetClient;

    const string templateBodyAPNS = "{\"aps\":{\"alert\":\"$(messageParam)\"}}";

    JObject templates = new JObject();
    templates["genericMessage"] = new JObject
    {
        {"body", templateBodyAPNS}
    };

    // Register for push with your mobile app
    var push = client.GetPush();
    push.RegisterAsync(deviceToken, templates);
}
次に、 DidReceivedRemoteNotification イベントをオーバーライドします。
 public override void DidReceiveRemoteNotification (UIApplication application, NSDictionary userInfo, Action<UIBackgroundFetchResult> completionHandler)
 {
     NSDictionary aps = userInfo.ObjectForKey(new NSString("aps")) as NSDictionary;

     string alert = string.Empty;
     if (aps.ContainsKey(new NSString("alert")))
         alert = (aps [new NSString("alert")] as NSString).ToString();

     //show alert
     if (!string.IsNullOrEmpty(alert))
     {
         UIAlertView avAlert = new UIAlertView("Notification", alert, null, "OK", null);
         avAlert.Show();
     }
 }
これで、アプリケーションがプッシュ通知をサポートするように更新されました。
アプリケーションでプッシュ通知をテストする
[実行] を押してプロジェクトをビルドし、iOS 対応のデバイスでアプリケーションを開始します。[OK] をクリックして、プッシュ通知を受け入れます。
Note
アプリケーションからのプッシュ通知を明示的に受け入れる必要があります。 これが必要であるのは、初めてアプリケーションを実行するときだけです。
アプリケーションで、タスクを入力し、プラス ( + ) アイコンをクリックします。
通知を受信した後、[OK] を クリックして 通知を閉じ、
手順 2. を繰り返してすぐにアプリケーションを閉じたら、通知が表示されることを確認します。
これで、このチュートリアルは終了です。