Azure Pipelines agents
TFS 2017 | TFS 2015
Note
In Microsoft Team Foundation Server (TFS) 2018 and previous versions, build and release pipelines are called definitions, runs are called builds, service connections are called service endpoints, stages are called environments, and jobs are called phases.
To build your code or deploy your software using Azure Pipelines, you need at least one agent. As you add more code and people, you'll eventually need more.
When your pipeline runs, the system begins one or more jobs. An agent is computing infrastructure with installed agent software that runs one job at a time.
Self-hosted agents
An agent that you set up and manage on your own to run jobs is a self-hosted agent. You can use self-hosted agents in Azure Pipelines or Azure DevOps Server, formerly named Team Foundation Server (TFS). Self-hosted agents give you more control to install dependent software needed for your builds and deployments. Also, machine-level caches and configuration persist from run to run, which can boost speed.
Note
Although multiple agents can be installed per machine, we strongly suggest to only install one agent per machine. Installing two or more agents may adversely affect performance and the result of your pipelines.
You can install the agent on Linux, macOS, or Windows machines. You can also install an agent on a Docker container. For more information about installing a self-hosted agent, see:
- macOS agent
- Linux agent (x64, ARM, ARM64, RHEL6)
- Windows agent (x64, x86)
- Docker agent
Note
On macOS, you need to clear the special attribute on the download archive to prevent Gatekeeper protection from displaying for each assembly in the tar file when ./config.sh is run. The following command clears the extended attribute on the file:
xattr -c vsts-agent-osx-x64-V.v.v.tar.gz  ## replace V.v.v with the version in the filename downloaded.

# then unpack the gzip tar file normally:

tar xvfz vsts-agent-osx-x64-V.v.v.tar.gz
After you've installed the agent on a machine, you can install any other software on that machine as required by your jobs.
Parallel jobs
You might need more parallel jobs to use multiple agents at the same time:
Capabilities
Every self-hosted agent has a set of capabilities that indicate what it can do. Capabilities are name-value pairs that are either automatically discovered by the agent software, in which case they are called system capabilities, or those that you define, in which case they are called user capabilities.
The agent software automatically determines various system capabilities such as the name of the machine, type of operating system, and versions of certain software installed on the machine. Also, environment variables defined in the machine automatically appear in the list of system capabilities.
Note
Storing environment variables as capabilities means that when an agent runs, the stored capability values are used to set the environment variables. Also, any changes to environment variables that are made while the agent is running won't be picked up and used by any task. If you have sensitive environment variables that change and you don't want them to be stored as capabilities, you can have them ignored by setting the VSO_AGENT_IGNORE environment variable, with a comma-delimited list of variables to ignore. For example, PATH is a critical variable that you might want to ignore if you're installing software.
When you author a pipeline, you specify certain demands of the agent. The system sends the job only to agents that have capabilities matching the demands specified in the pipeline. As a result, agent capabilities allow you to direct jobs to specific agents.
Note
Demands and capabilities are designed for use with self-hosted agents so that jobs can be matched with an agent that meets the requirements of the job. When using Microsoft-hosted agents, you select an image for the agent that matches the requirements of the job, so although it is possible to add capabilities to a Microsoft-hosted agent, you don't need to use capabilities with Microsoft-hosted agents.
Configure agent capabilities
You can view the details of an agent, including its version and system capabilities, and manage its user capabilities, by navigating to Agent pools and selecting the Capabilities tab for the desired agent.
In your web browser, navigate to Agent pools:
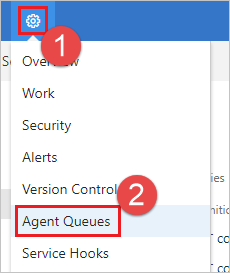
Navigate to your project and choose Settings (gear icon) > Agent Queues.
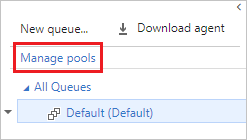
Choose Manage pools.
Navigate to the capabilities tab:
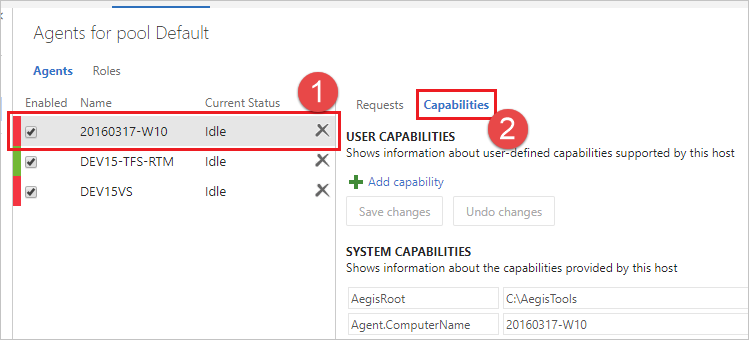
Select the desired agent, and choose the Capabilities tab.
To register a new capability with the agent, choose Add a new capability.
Tip
After you install new software on a self-hosted agent, you must restart the agent for the new capability to show up. For more information, see Restart Windows agent, Restart Linux agent, and Restart Mac agent.
Communication
Communication with TFS
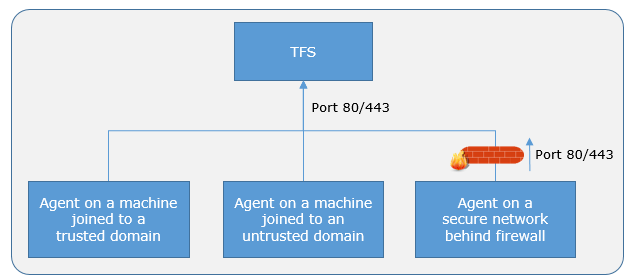
The agent communicates with Azure Pipelines or Azure DevOps Server to determine which job it needs to run, and to report the logs and job status. This communication is always initiated by the agent. All the messages from the agent to Azure Pipelines or Azure DevOps Server happen over HTTP or HTTPS, depending on how you configure the agent. This pull model allows the agent to be configured in different topologies as shown below.
Here is a common communication pattern between the agent and Azure Pipelines or Azure DevOps Server.
The user registers an agent with Azure Pipelines or Azure DevOps Server by adding it to an agent pool. You need to be an agent pool administrator to register an agent in that agent pool. The identity of agent pool administrator is needed only at the time of registration and is not persisted on the agent, nor is it used in any further communication between the agent and Azure Pipelines or Azure DevOps Server. Once the registration is complete, the agent downloads a listener OAuth token and uses it to listen to the job queue.
The agent listens to see if a new job request has been posted for it in the job queue in Azure Pipelines/Azure DevOps Server using an HTTP long poll. When a job is available, the agent downloads the job as well as a job-specific OAuth token. This token is generated by Azure Pipelines/Azure DevOps Server for the scoped identity specified in the pipeline. That token is short lived and is used by the agent to access resources (for example, source code) or modify resources (for example, upload test results) on Azure Pipelines or Azure DevOps Server within that job.
After the job is completed, the agent discards the job-specific OAuth token and goes back to checking if there is a new job request using the listener OAuth token.
The payload of the messages exchanged between the agent and Azure Pipelines/Azure DevOps Server are secured using asymmetric encryption. Each agent has a public-private key pair, and the public key is exchanged with the server during registration. The server uses the public key to encrypt the payload of the job before sending it to the agent. The agent decrypts the job content using its private key. This is how secrets stored in pipelines or variable groups are secured as they are exchanged with the agent.
Authentication
To register an agent, you need to be a member of the administrator role in the agent pool. The identity of agent pool administrator is needed only at the time of registration and is not persisted on the agent, and is not used in any subsequent communication between the agent and Azure Pipelines or Azure DevOps Server. In addition, you must be a local administrator on the server in order to configure the agent.
Your agent can authenticate to Azure DevOps Server or TFS using one of the following methods:
Personal Access Token (PAT):
Generate and use a PAT to connect an agent with Azure Pipelines or TFS 2017 and newer. PAT is the only scheme that works with Azure Pipelines. The PAT must have Agent Pools (read, manage) scope (for a deployment group agent, the PAT must have Deployment group (read, manage) scope), and while a single PAT can be used for registering multiple agents, the PAT is used only at the time of registering the agent, and not for subsequent communication. For more information, see the Authenticate with a personal access token (PAT) section in the Windows, Linux, or macOS self-hosted agents articles.
To use a PAT with Azure DevOps Server, your server must be configured with HTTPS. See Web site settings and security.
Integrated
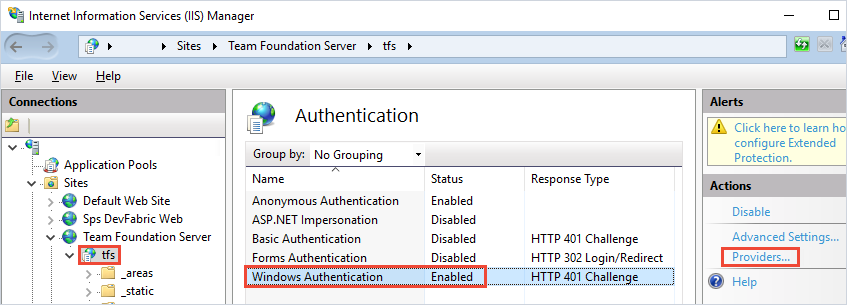
Connect a Windows agent to TFS using the credentials of the signed-in user through a Windows authentication scheme such as NTLM or Kerberos.
To use this method of authentication, you must first configure your TFS server.
Sign into the machine where you are running TFS.
Start Internet Information Services (IIS) Manager. Select your TFS site and make sure Windows Authentication is enabled with a valid provider such as NTLM or Kerberos.
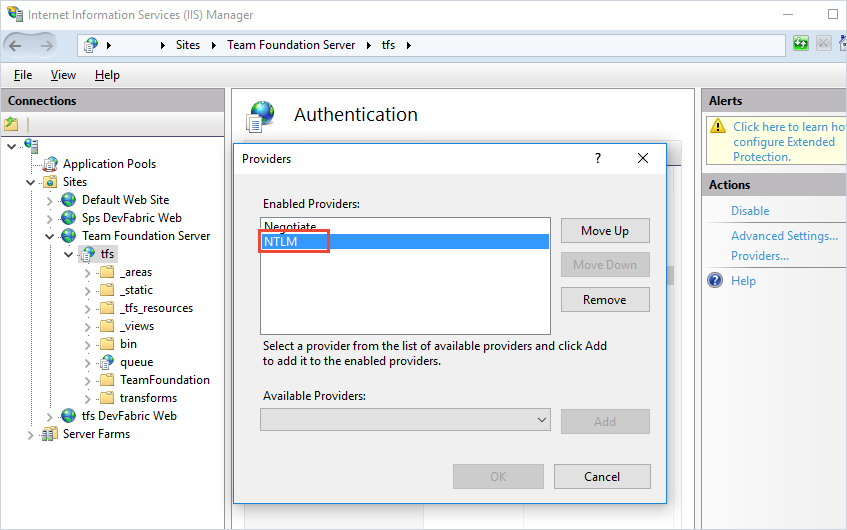
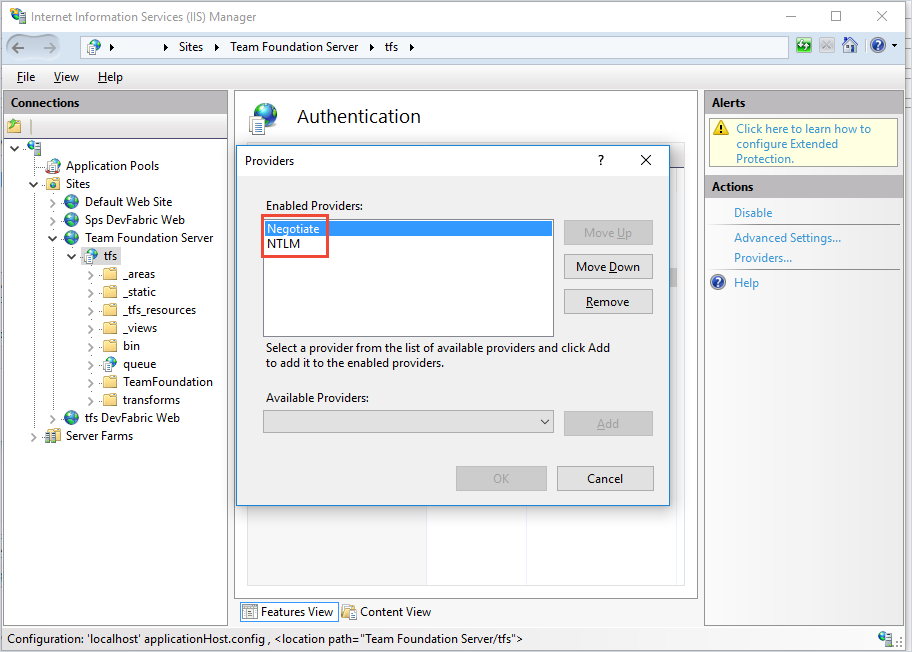
Negotiate
Connect to TFS as a user other than the signed-in user through a Windows authentication scheme such as NTLM or Kerberos.
To use this method of authentication, you must first configure your TFS server.
Log on to the machine where you are running TFS.
Start Internet Information Services (IIS) Manager. Select your TFS site and make sure Windows Authentication is enabled with the Negotiate provider and with another method such as NTLM or Kerberos.
Alternate
Connect to TFS using Basic authentication. To use this method, you must first configure HTTPS on TFS.
To use this method of authentication, you must configure your TFS server as follows:
Sign in to the machine where you are running TFS.
Configure basic authentication. See Using
tfxagainst Team Foundation Server 2015 using Basic Authentication.
Interactive vs. service
You can run your self-hosted agent as either a service or an interactive process. After you've configured the agent, we recommend you first try it in interactive mode to make sure it works. Then, for production use, we recommend you run the agent in one of the following modes so that it reliably remains in a running state. These modes also ensure that the agent starts automatically if the machine is restarted.
As a service. You can leverage the service manager of the operating system to manage the lifecycle of the agent. In addition, the experience for auto-upgrading the agent is better when it is run as a service.
As an interactive process with auto-logon enabled. In some cases, you might need to run the agent interactively for production use - such as to run UI tests. When the agent is configured to run in this mode, the screen saver is also disabled. Some domain policies may prevent you from enabling auto-logon or disabling the screen saver. In such cases, you may need to seek an exemption from the domain policy, or run the agent on a workgroup computer where the domain policies do not apply.
Note
There are security risks when you enable automatic logon or disable the screen saver because you enable other users to walk up to the computer and use the account that automatically logs on. If you configure the agent to run in this way, you must ensure the computer is physically protected; for example, located in a secure facility. If you use Remote Desktop to access the computer on which an agent is running with auto-logon, simply closing the Remote Desktop causes the computer to be locked and any UI tests that run on this agent may fail. To avoid this, use the tscon command to disconnect from Remote Desktop. For example:
%windir%\System32\tscon.exe 1 /dest:console
Agent account
Whether you run an agent as a service or interactively, you can choose which computer account you use to run the agent. (Note that this is different from the credentials that you use when you register the agent with Azure Pipelines or Azure DevOps Server.) The choice of agent account depends solely on the needs of the tasks running in your build and deployment jobs.
For example, to run tasks that use Windows authentication to access an external service, you must run the agent using an account that has access to that service. However, if you are running UI tests such as Selenium or Coded UI tests that require a browser, the browser is launched in the context of the agent account.
On Windows, you should consider using a service account such as Network Service or Local Service. These accounts have restricted permissions and their passwords don't expire, meaning the agent requires less management over time.
Agent version and upgrades
We update the agent software with every update in Azure DevOps Server and TFS.
We indicate the agent version in the format {major}.{minor}.
For instance, if the agent version is 2.1, then the major version is 2 and the minor version is 1.
When your Azure DevOps Server or TFS server has a newer version of the agent, and that newer agent is only different in minor version, it can usually be automatically upgraded. An upgrade is requested when a platform feature or one of the tasks used in the pipeline requires a newer version of the agent. Starting with Azure DevOps Server 2019, you don't have to wait for a new server release. You can upload a new version of the agent to your application tier, and that version will be offered as an upgrade.
If you run the agent interactively, or if there is a newer major version of the agent available, then you may have to manually upgrade the agents. You can do this easily from the Agent pools tab under your project collection. Your pipelines won't run until they can target a compatible agent.
You can view the version of an agent by navigating to Agent pools and selecting the Capabilities tab for the desired agent, as described in Configure agent capabilities.
Note
For servers with no internet access, manually copy the agent zip file to C:\ProgramData\Microsoft\Azure DevOps\Agents\ to use as a local file.
FAQ
How do I make sure I have the latest v2 agent version?
Navigate to the Agent pools tab:
Navigate to your project and choose Settings (gear icon) > Agent Queues.
Choose Manage pools.
Click the pool that contains the agent.
Make sure the agent is enabled.
Navigate to the capabilities tab:
Select the desired agent, and choose the Capabilities tab.
Look for the
Agent.Versioncapability. You can check this value against the latest published agent version. See Azure Pipelines Agent and check the page for the highest version number listed.Each agent automatically updates itself when it runs a task that requires a newer version of the agent. If you want to manually update some agents, right-click the pool, and select Update all agents.
Can I update my v2 agents that are part of an Azure DevOps Server pool?
Yes. Beginning with Azure DevOps Server 2019, you can configure your server to look for the agent package files on a local disk. This configuration will override the default version that came with the server at the time of its release. This scenario also applies when the server doesn't have access to the internet.
From a computer with Internet access, download the latest version of the agent package files (in .zip or .tar.gz form) from the Azure Pipelines Agent GitHub Releases page.
Transfer the downloaded package files to each Azure DevOps Server Application Tier by using a method of your choice (such as USB drive, Network transfer, and so on). Place the agent files under the
%ProgramData%\Microsoft\Azure DevOps\Agentsfolder.You're all set! Your Azure DevOps Server will now use the local files whenever the agents are updated. Each agent automatically updates itself when it runs a task that requires a newer version of the agent. But if you want to manually update some agents, right-click the pool, and then choose Update all agents.
Do self-hosted agents have any performance advantages over Microsoft-hosted agents?
In many cases, yes. Specifically:
If you use a self-hosted agent, you can run incremental builds. For example, if you define a pipeline that does not clean the repo and does not perform a clean build, your builds will typically run faster. When you use a Microsoft-hosted agent, you don't get these benefits because the agent is destroyed after the build or release pipeline is completed.
A Microsoft-hosted agent can take longer to start your build. While it often takes just a few seconds for your job to be assigned to a Microsoft-hosted agent, it can sometimes take several minutes for an agent to be allocated depending on the load on our system.
Can I install multiple self-hosted agents on the same machine?
Yes. This approach can work well for agents that run jobs that don't consume many shared resources. For example, you could try it for agents that run releases that mostly orchestrate deployments and don't do much work on the agent itself.
You might find that in other cases you don't gain much efficiency by running multiple agents on the same machine. For example, it might not be worthwhile for agents that run builds that consume much disk and I/O resources.
You might also run into problems if parallel build jobs are using the same singleton tool deployment, such as npm packages. For example, one build might update a dependency while another build is in the middle of using it, which could cause unreliable results and errors.