Xamarin.Forms アプリケーションでナビゲーションを実行する
 サンプルのダウンロード
このクイックスタートでは、次の方法について学習します。
- Xamarin.Forms シェル アプリケーションにさらにページを追加する。
- ページ間のナビゲーションを実行する
- データ バインディングを使用して、ユーザー インターフェイスの要素とそのデータ ソースとの間でデータを同期する
このクイックスタートでは、単一のメモを格納できるクロスプラットフォームの Xamarin.Forms シェル アプリケーションを、複数のメモを格納できるアプリケーションに変更する方法について説明します。 最終的なアプリケーションは、次のとおりです。


前提条件
このクイックスタートを試みるには、前のクイックスタートを正常に完了しておく必要があります。 または、前のクイックスタートのサンプルをダウンロードし、それをこのクイックスタートの出発点として使用します。
Visual Studio でアプリを更新する
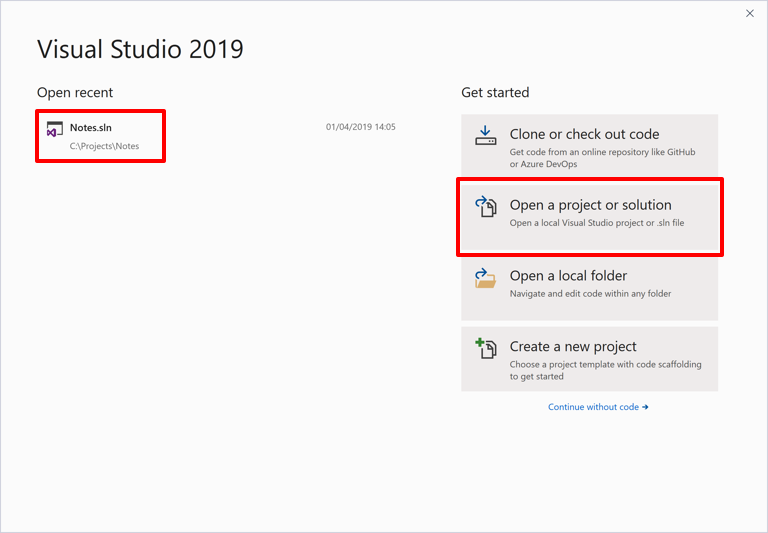
Visual Studio を起動します。 スタート ウィンドウの最近使ったプロジェクトまたはソリューションのリストで Notes ソリューションをクリックするか、 [プロジェクトやソリューションを開く] をクリックします。次に、 [プロジェクト/ソリューションを開く] ダイアログで、Notes プロジェクトのソリューション ファイルを選択します。
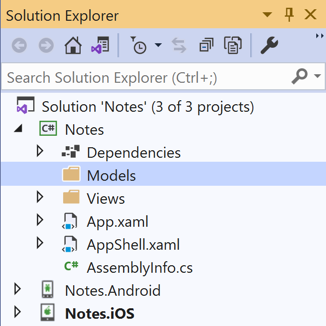
ソリューション エクスプローラーで Notes プロジェクトを右クリックし、[追加] > [新しいフォルダー] を選択します。

ソリューション エクスプローラーで、新しいフォルダーに Models という名前を付けます。
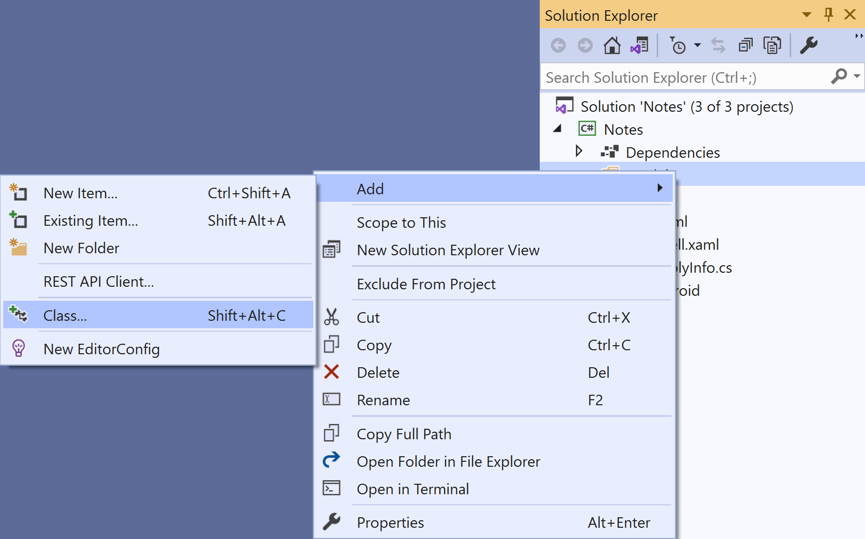
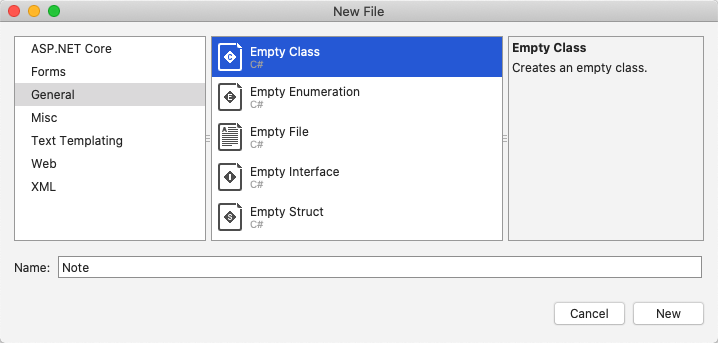
ソリューション エクスプローラーで、[Models] フォルダーを選択して右クリックし、[追加] > [クラス] を選択します。
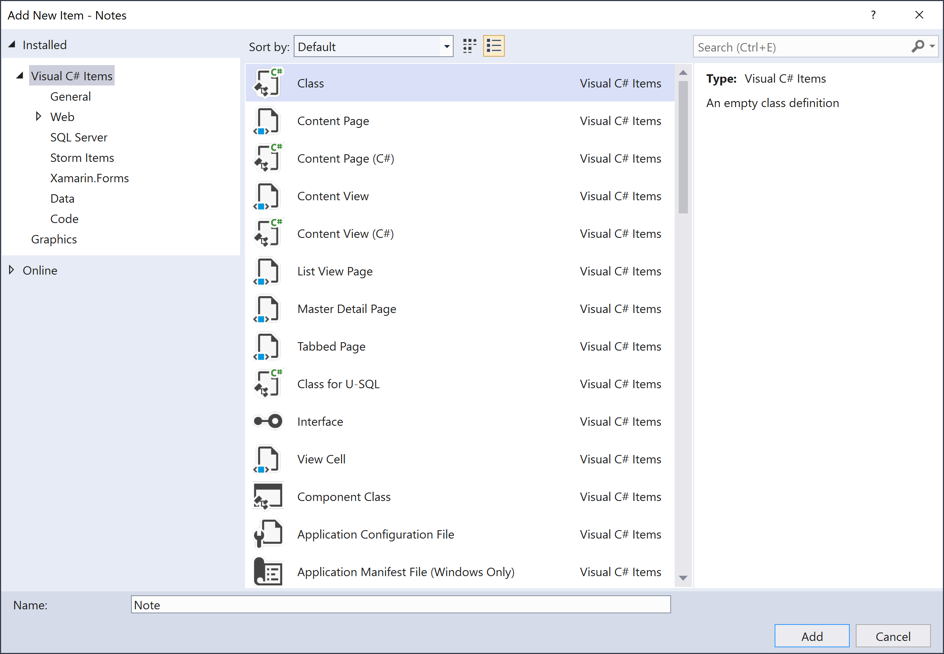
[新しい項目の追加] ダイアログで、[Visual C# アイテム] > [クラス] の順に選択し、新しいファイルに Note という名前を付け、[追加] ボタンをクリックします。
これにより、Note という名前のクラスが Notes プロジェクトの Models フォルダーに追加されます。
Note.cs のテンプレート コードをすべて削除し、次のコードに置き換えます。
using System;

namespace Notes.Models
{
    public class Note
    {
        public string Filename { get; set; }
        public string Text { get; set; }
        public DateTime Date { get; set; }
    }
}
このクラスでは、アプリケーションでの各メモに関するデータを格納する
Noteモデルが定義されています。Ctrl + S キーを押して Note.cs への変更内容を保存します。
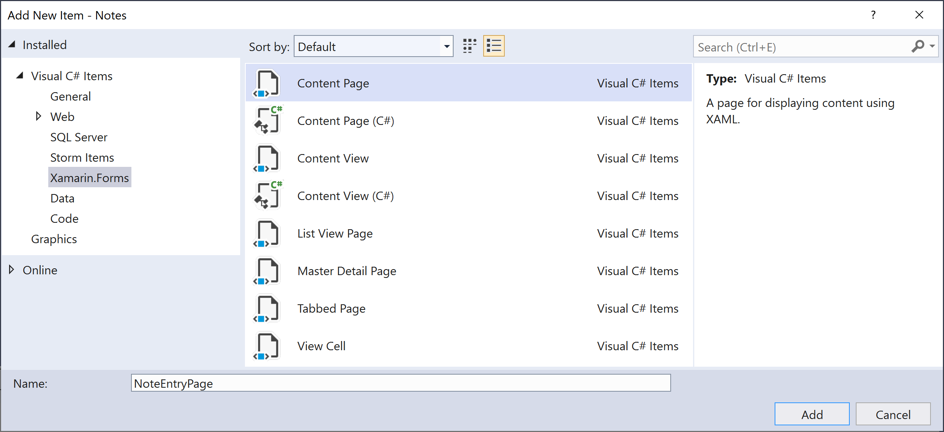
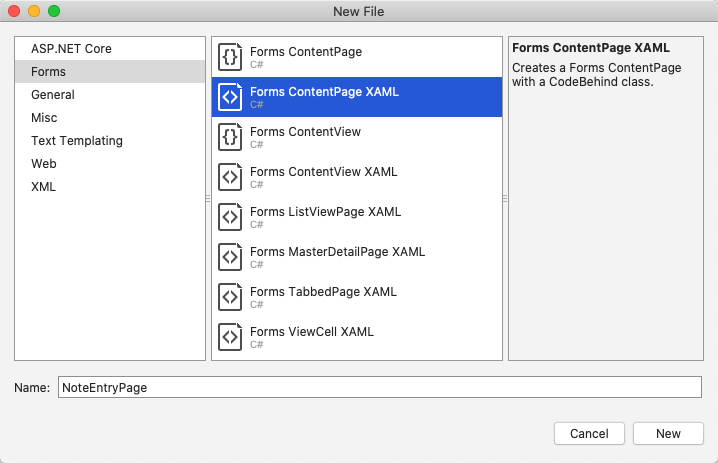
ソリューション エクスプローラーの Notes プロジェクトで、Views フォルダーを選択して右クリックし、[追加]> [新しい項目] を選択します。[新しい項目の追加] ダイアログで、[Visual C# アイテム]>[Xamarin.Forms]>[コンテンツ ページ] を選択し、新しいファイルに NoteEntryPage という名前を付け、[追加] ボタンをクリックします。
これにより、NoteEntryPage という名前の新しいページがプロジェクトの [Views] フォルダーに追加されます。 このページはメモの入力に使用されます。
NoteEntryPage.xaml のテンプレート コードをすべて削除し、次のコードに置き換えます。
<?xml version="1.0" encoding="UTF-8"?>
<ContentPage xmlns="http://xamarin.com/schemas/2014/forms"
             xmlns:x="http://schemas.microsoft.com/winfx/2009/xaml"
             x:Class="Notes.Views.NoteEntryPage"
             Title="Note Entry">
    <!-- Layout children vertically -->
    <StackLayout Margin="20">
        <Editor Placeholder="Enter your note"
                Text="{Binding Text}"
                HeightRequest="100" />
        <!-- Layout children in two columns -->
        <Grid ColumnDefinitions="*,*">
            <Button Text="Save"
                    Clicked="OnSaveButtonClicked" />
            <Button Grid.Column="1"
                    Text="Delete"
                    Clicked="OnDeleteButtonClicked"/>
        </Grid>
    </StackLayout>
</ContentPage>
このコードにより、ページにユーザー インターフェイスが宣言的に定義されます。これは、テキスト入力用の
Editorと、アプリケーションへのファイルの保存または削除の指示が出される 2 つのButtonオブジェクトで構成されます。 この 2 つのButtonインスタンスは、StackLayoutに垂直に配置されているEditorとGridと共に、Gridに水平に配置されます。 さらに、Editorではデータ バインディングを使用して、NoteモデルのTextプロパティにバインドします。 データ バインディングの詳細については、「Xamarin.Forms クイックスタート Deep Dive」の「データ バインディング」を参照してください。Ctrl + S キーを押して NoteEntryPage.xaml への変更内容を保存します。
NoteEntryPage.xaml.cs のテンプレート コードをすべて削除し、次のコードに置き換えます。
using System;
using System.IO;
using Notes.Models;
using Xamarin.Forms;

namespace Notes.Views
{
    [QueryProperty(nameof(ItemId), nameof(ItemId))]
    public partial class NoteEntryPage : ContentPage
    {
        public string ItemId
        {
            set
            {
                LoadNote(value);
            }
        }

        public NoteEntryPage()
        {
            InitializeComponent();

            // Set the BindingContext of the page to a new Note.
            BindingContext = new Note();
        }

        void LoadNote(string filename)
        {
            try
            {
                // Retrieve the note and set it as the BindingContext of the page.
                Note note = new Note
                {
                    Filename = filename,
                    Text = File.ReadAllText(filename),
                    Date = File.GetCreationTime(filename)
                };
                BindingContext = note;
            }
            catch (Exception)
            {
                Console.WriteLine("Failed to load note.");
            }
        }

        async void OnSaveButtonClicked(object sender, EventArgs e)
        {
            var note = (Note)BindingContext;

            if (string.IsNullOrWhiteSpace(note.Filename))
            {
                // Save the file.
                var filename = Path.Combine(App.FolderPath, $"{Path.GetRandomFileName()}.notes.txt");
                File.WriteAllText(filename, note.Text);
            }
            else
            {
                // Update the file.
                File.WriteAllText(note.Filename, note.Text);
            }

            // Navigate backwards
            await Shell.Current.GoToAsync("..");
        }

        async void OnDeleteButtonClicked(object sender, EventArgs e)
        {
            var note = (Note)BindingContext;

            // Delete the file.
            if (File.Exists(note.Filename))
            {
                File.Delete(note.Filename);
            }

            // Navigate backwards
            await Shell.Current.GoToAsync("..");
        }
    }
}
このコードにより、単一のメモを表す
NoteインスタンスがページのBindingContextに格納されます。 クラスは、ナビゲーション中にクエリ パラメーターを使用してページにデータを渡すことができるように、QueryPropertyAttributeで修飾されています。QueryPropertyAttributeの最初の引数には、データを受信するプロパティの名前を指定し、2 番目の引数にはクエリ パラメータ― ID を指定します。そのため、上のコードのQueryParameterAttributeにおいて、GoToAsyncメソッドの呼び出しで指定されている URI からItemIdクエリ パラメーターで渡されたデータをItemIdプロパティが受け取るように指定されています。 その後、ItemIdプロパティによってLoadNoteメソッドが呼び出され、デバイス上のファイルからNoteオブジェクトが作成されて、ページのBindingContextがNoteオブジェクトに設定されます。[保存]
Buttonを押すとOnSaveButtonClickedイベント ハンドラーが実行されます。これにより、Editorの内容がランダムに生成されたファイル名の新しいファイルに保存されるか、またはメモが更新されている場合は既存のファイルに保存されます。 どちらの場合も、ファイルはアプリケーションのローカル アプリケーションのデータ フォルダーに格納されます。 その後、メソッドによって前のページに戻ります。 [削除]Buttonが押されると、OnDeleteButtonClickedイベント ハンドラーが実行されます。これにより、ファイルが存在する場合は削除され、前のページに戻ります。 ナビゲーションの詳細については、Xamarin.Forms シェル クイック スタート Deep Dive に関するページの「ナビゲーション」を参照してください。Ctrl + S キーを押して NoteEntryPage.xaml.cs への変更を保存します。
警告
以降の手順で修正されるエラーのため、アプリケーションは現在はビルドされません。
ソリューション エクスプローラーの Notes プロジェクトで、 [Views] フォルダーにある NotesPage.xaml を開きます。
NotesPage.xaml のテンプレート コードをすべて削除し、次のコードに置き換えます。
<?xml version="1.0" encoding="UTF-8"?>
<ContentPage xmlns="http://xamarin.com/schemas/2014/forms"
             xmlns:x="http://schemas.microsoft.com/winfx/2009/xaml"
             x:Class="Notes.Views.NotesPage"
             Title="Notes">
    <!-- Add an item to the toolbar -->
    <ContentPage.ToolbarItems>
        <ToolbarItem Text="Add"
                     Clicked="OnAddClicked" />
    </ContentPage.ToolbarItems>

    <!-- Display notes in a list -->
    <CollectionView x:Name="collectionView"
                    Margin="20"
                    SelectionMode="Single"
                    SelectionChanged="OnSelectionChanged">
        <CollectionView.ItemsLayout>
            <LinearItemsLayout Orientation="Vertical"
                               ItemSpacing="10" />
        </CollectionView.ItemsLayout>
        <!-- Define the appearance of each item in the list -->
        <CollectionView.ItemTemplate>
            <DataTemplate>
                <StackLayout>
                    <Label Text="{Binding Text}"
                           FontSize="Medium"/>
                    <Label Text="{Binding Date}"
                           TextColor="Silver"
                           FontSize="Small" />
                </StackLayout>
            </DataTemplate>
        </CollectionView.ItemTemplate>
    </CollectionView>
</ContentPage>
このコードにより、
CollectionViewとToolbarItemから構成されるページのユーザー インターフェイスが宣言によって定義されます。CollectionViewにより、データ バインディングを使用して、アプリケーションによって取得されたすべてのメモが表示されます。 メモを選択すると、ノートを変更できるNoteEntryPageに移動します。 または、ToolbarItemを押して、新しいメモを作成することもできます。 データ バインディングの詳細については、「Xamarin.Forms クイックスタート Deep Dive」の「データ バインディング」を参照してください。Ctrl + S キーを押して NotesPage.xaml への変更を保存します。
ソリューション エクスプローラーの Notes プロジェクトで、 [Views] フォルダーの NotesPage.xaml を展開し、NotesPage.xaml.cs を開きます。
NotesPage.xaml.cs のテンプレート コードをすべて削除し、次のコードに置き換えます。
using System;
using System.Collections.Generic;
using System.IO;
using System.Linq;
using Notes.Models;
using Xamarin.Forms;

namespace Notes.Views
{
    public partial class NotesPage : ContentPage
    {
        public NotesPage()
        {
            InitializeComponent();
        }

        protected override void OnAppearing()
        {
            base.OnAppearing();

            var notes = new List<Note>();

            // Create a Note object from each file.
            var files = Directory.EnumerateFiles(App.FolderPath, "*.notes.txt");
            foreach (var filename in files)
            {
                notes.Add(new Note
                {
                    Filename = filename,
                    Text = File.ReadAllText(filename),
                    Date = File.GetCreationTime(filename)
                });
            }

            // Set the data source for the CollectionView to a
            // sorted collection of notes.
            collectionView.ItemsSource = notes
                .OrderBy(d => d.Date)
                .ToList();
        }

        async void OnAddClicked(object sender, EventArgs e)
        {
            // Navigate to the NoteEntryPage, without passing any data.
            await Shell.Current.GoToAsync(nameof(NoteEntryPage));
        }

        async void OnSelectionChanged(object sender, SelectionChangedEventArgs e)
        {
            if (e.CurrentSelection != null)
            {
                // Navigate to the NoteEntryPage, passing the filename as a query parameter.
                Note note = (Note)e.CurrentSelection.FirstOrDefault();
                await Shell.Current.GoToAsync($"{nameof(NoteEntryPage)}?{nameof(NoteEntryPage.ItemId)}={note.Filename}");
            }
        }
    }
}
このコードにより、
NotesPageの機能が定義されます。 このページが表示されると、OnAppearingメソッドが実行されます。これにより、CollectionViewに、ローカル アプリケーションのデータ フォルダーから取得されたすべてのメモが挿入されます。ToolbarItemを押すと、OnAddClickedイベント ハンドラーが実行されます。 このメソッドにより、NoteEntryPageに移動します。CollectionView内の項目が選択されると、OnSelectionChangedイベント ハンドラーが実行されます。CollectionViewで項目が選択されている場合、このメソッドによりNoteEntryPageに移動し、選択されているNoteのFilenameプロパティがクエリ パラメーターとしてページに渡されます。 ナビゲーションの詳細については、「Xamarin.Forms クイックスタート Deep Dive」の「ナビゲーション」を参照してください。Ctrl + S キーを押して NotesPage.xaml.cs への変更を保存します。
警告
以降の手順で修正されるエラーのため、アプリケーションは現在はビルドされません。
ソリューション エクスプローラーで、Notes プロジェクトの AppShell.xaml を展開し、AppShell.xaml.cs を開きます。 次に、既存のコードを次のコードに置き換えます。
using Notes.Views;
using Xamarin.Forms;

namespace Notes
{
    public partial class AppShell : Shell
    {
        public AppShell()
        {
            InitializeComponent();
            Routing.RegisterRoute(nameof(NoteEntryPage), typeof(NoteEntryPage));
        }
    }
}
このコードにより、
NoteEntryPageへのルートが登録されます。これは、シェルのビジュアル階層 (AppShell.xaml) では表されません。 その後、このページには、GoToAsyncメソッドを使用する URI ベースのナビゲーションを使用して移動できます。Ctrl + S キーを押して AppShell.xaml.cs への変更を保存します。
ソリューション エクスプローラーで、Notes プロジェクトの App.xaml を展開し、App.xaml.cs を開きます。 次に、既存のコードを次のコードに置き換えます。
using System;
using System.IO;
using Xamarin.Forms;

namespace Notes
{
    public partial class App : Application
    {
        public static string FolderPath { get; private set; }

        public App()
        {
            InitializeComponent();
            FolderPath = Path.Combine(Environment.GetFolderPath(Environment.SpecialFolder.LocalApplicationData));
            MainPage = new AppShell();
        }

        protected override void OnStart()
        {
        }

        protected override void OnSleep()
        {
        }

        protected override void OnResume()
        {
        }
    }
}
このコードにより、
System.IO名前空間の名前空間宣言が追加され、string型の静的なFolderPathプロパティの宣言が追加されます。FolderPathプロパティは、メモ データが格納されるデバイス上のパスを格納するために使用されます。 さらに、このコードによりAppコンストラクターのFolderPathプロパティが初期化され、MainPageプロパティがサブクラス化されたShellオブジェクトに初期化されます。Ctrl + S キーを押して App.xaml.cs への変更を保存します。
各プラットフォームでプロジェクトをビルドして実行します。 詳細については、「クイックスタートのビルド」を参照してください。
NotesPage で [追加] ボタンを押して NoteEntryPage に移動し、メモを入力します。 メモを保存すると、アプリケーションは NotesPage に戻ります。
さまざまな長さの複数のメモを入力して、アプリケーションの動作を観察します。 アプリケーションを閉じて再起動し、入力したメモがデバイスに保存されていることを確認します。
Visual Studio for Mac でアプリを更新する
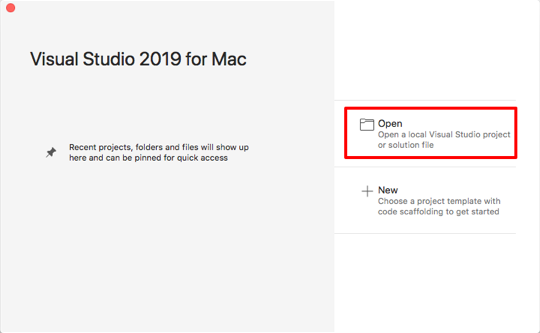
Visual Studio for Mac を起動します。 スタート ウィンドウで [開く] をクリックし、ダイアログで Notes プロジェクトのソリューション ファイルを選択します。
Solution Pad で Notes プロジェクトを右クリックし、[追加] > [新しいフォルダー] を選択します。

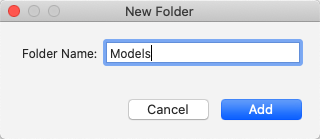
[新しいフォルダー] ダイアログで、新しいフォルダーに「Models」という名前を設定します。
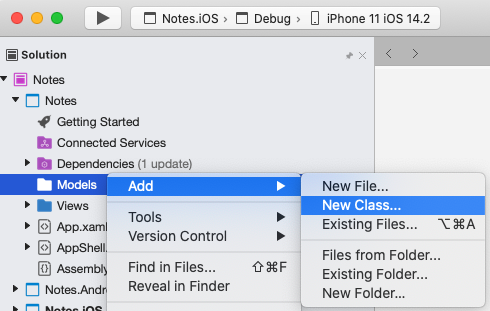
Solution Pad で [Models] フォルダーを選択して右クリックし、[追加] > [新しいクラス] を選択します。
[新しいファイル] ダイアログで [全般] > [空のクラス] の順に選択して、新しいファイルに Note という名前を付け [新規] ボタンをクリックします。
これにより、Note という名前のクラスが Notes プロジェクトの Models フォルダーに追加されます。
Note.cs のテンプレート コードをすべて削除し、次のコードに置き換えます。
using System;

namespace Notes.Models
{
    public class Note
    {
        public string Filename { get; set; }
        public string Text { get; set; }
        public DateTime Date { get; set; }
    }
}
このクラスでは、アプリケーションでの各メモに関するデータを格納する
Noteモデルが定義されています。[ファイル] > [保存] を選択して (または ⌘ + S キーを押して)、Note.cs への変更を保存します。
Solution Pad の [Notes] プロジェクトで、右クリックして [追加] > [新しいファイル] の順に選択します。[新しいファイル] ダイアログで、[フォーム] > [フォーム ContentPage XAML] の順に選択して、新しいファイルに NoteEntryPage という名前を付け、[新規] ボタンをクリックします。
これにより、NoteEntryPage という名前の新しいページがプロジェクトの [Views] フォルダーに追加されます。 このページはメモの入力に使用されます。
NoteEntryPage.xaml のテンプレート コードをすべて削除し、次のコードに置き換えます。
<?xml version="1.0" encoding="UTF-8"?>
<ContentPage xmlns="http://xamarin.com/schemas/2014/forms"
             xmlns:x="http://schemas.microsoft.com/winfx/2009/xaml"
             x:Class="Notes.Views.NoteEntryPage"
             Title="Note Entry">
    <!-- Layout children vertically -->
    <StackLayout Margin="20">
        <Editor Placeholder="Enter your note"
                Text="{Binding Text}"
                HeightRequest="100" />
        <!-- Layout children in two columns -->
        <Grid ColumnDefinitions="*,*">
            <Button Text="Save"
                    Clicked="OnSaveButtonClicked" />
            <Button Grid.Column="1"
                    Text="Delete"
                    Clicked="OnDeleteButtonClicked"/>
        </Grid>
    </StackLayout>
</ContentPage>
このコードにより、ページにユーザー インターフェイスが宣言的に定義されます。これは、テキスト入力用の
Editorと、アプリケーションへのファイルの保存または削除の指示が出される 2 つのButtonオブジェクトで構成されます。 この 2 つのButtonインスタンスは、StackLayoutに垂直に配置されているEditorとGridと共に、Gridに水平に配置されます。 さらに、Editorではデータ バインディングを使用して、NoteモデルのTextプロパティにバインドします。 データ バインディングの詳細については、「Xamarin.Forms クイックスタート Deep Dive」の「データ バインディング」を参照してください。[ファイル] > [保存] を選択して (または ⌘ + S キーを押して)、NoteEntryPage.xaml への変更を保存します。
NoteEntryPage.xaml.cs のテンプレート コードをすべて削除し、次のコードに置き換えます。
using System;
using System.IO;
using Notes.Models;
using Xamarin.Forms;

namespace Notes.Views
{
    [QueryProperty(nameof(ItemId), nameof(ItemId))]
    public partial class NoteEntryPage : ContentPage
    {
        public string ItemId
        {
            set
            {
                LoadNote(value);
            }
        }

        public NoteEntryPage()
        {
            InitializeComponent();

            // Set the BindingContext of the page to a new Note.
            BindingContext = new Note();
        }

        void LoadNote(string filename)
        {
            try
            {
                // Retrieve the note and set it as the BindingContext of the page.
                Note note = new Note
                {
                    Filename = filename,
                    Text = File.ReadAllText(filename),
                    Date = File.GetCreationTime(filename)
                };
                BindingContext = note;
            }
            catch (Exception)
            {
                Console.WriteLine("Failed to load note.");
            }
        }

        async void OnSaveButtonClicked(object sender, EventArgs e)
        {
            var note = (Note)BindingContext;

            if (string.IsNullOrWhiteSpace(note.Filename))
            {
                // Save the file.
                var filename = Path.Combine(App.FolderPath, $"{Path.GetRandomFileName()}.notes.txt");
                File.WriteAllText(filename, note.Text);
            }
            else
            {
                // Update the file.
                File.WriteAllText(note.Filename, note.Text);
            }

            // Navigate backwards
            await Shell.Current.GoToAsync("..");
        }

        async void OnDeleteButtonClicked(object sender, EventArgs e)
        {
            var note = (Note)BindingContext;

            // Delete the file.
            if (File.Exists(note.Filename))
            {
                File.Delete(note.Filename);
            }

            // Navigate backwards
            await Shell.Current.GoToAsync("..");
        }
    }
}
このコードにより、単一のメモを表す
NoteインスタンスがページのBindingContextに格納されます。 クラスは、ナビゲーション中にクエリ パラメーターを使用してページにデータを渡すことができるように、QueryPropertyAttributeで修飾されています。QueryPropertyAttributeの最初の引数には、データを受信するプロパティの名前を指定し、2 番目の引数にはクエリ パラメータ― ID を指定します。そのため、上のコードのQueryParameterAttributeにおいて、GoToAsyncメソッドの呼び出しで指定されている URI からItemIdクエリ パラメーターで渡されたデータをItemIdプロパティが受け取るように指定されています。 その後、ItemIdプロパティによってLoadNoteメソッドが呼び出され、デバイス上のファイルからNoteオブジェクトが作成されて、ページのBindingContextがNoteオブジェクトに設定されます。[保存]
Buttonを押すとOnSaveButtonClickedイベント ハンドラーが実行されます。これにより、Editorの内容がランダムに生成されたファイル名の新しいファイルに保存されるか、またはメモが更新されている場合は既存のファイルに保存されます。 どちらの場合も、ファイルはアプリケーションのローカル アプリケーションのデータ フォルダーに格納されます。 その後、メソッドによって前のページに戻ります。 [削除]Buttonが押されると、OnDeleteButtonClickedイベント ハンドラーが実行されます。これにより、ファイルが存在する場合は削除され、前のページに戻ります。 ナビゲーションの詳細については、Xamarin.Forms シェル クイックスタート Deep Dive に関するページの「ナビゲーション」を参照してください。[ファイル] > [保存] の順に選択して (または ⌘ + S キーを押して)、NoteEntryPage.xaml.cs への変更を保存します。
警告
以降の手順で修正されるエラーのため、アプリケーションは現在はビルドされません。
Solution Pad の Notes プロジェクトで、 [Views] フォルダーにある NotesPage.xaml を開きます。
NotesPage.xaml のテンプレート コードをすべて削除し、次のコードに置き換えます。
<?xml version="1.0" encoding="UTF-8"?>
<ContentPage xmlns="http://xamarin.com/schemas/2014/forms"
             xmlns:x="http://schemas.microsoft.com/winfx/2009/xaml"
             x:Class="Notes.Views.NotesPage"
             Title="Notes">
    <!-- Add an item to the toolbar -->
    <ContentPage.ToolbarItems>
        <ToolbarItem Text="Add"
                     Clicked="OnAddClicked" />
    </ContentPage.ToolbarItems>

    <!-- Display notes in a list -->
    <CollectionView x:Name="collectionView"
                    Margin="20"
                    SelectionMode="Single"
                    SelectionChanged="OnSelectionChanged">
        <CollectionView.ItemsLayout>
            <LinearItemsLayout Orientation="Vertical"
                               ItemSpacing="10" />
        </CollectionView.ItemsLayout>
        <!-- Define the appearance of each item in the list -->
        <CollectionView.ItemTemplate>
            <DataTemplate>
                <StackLayout>
                    <Label Text="{Binding Text}"
                           FontSize="Medium"/>
                    <Label Text="{Binding Date}"
                           TextColor="Silver"
                           FontSize="Small" />
                </StackLayout>
            </DataTemplate>
        </CollectionView.ItemTemplate>
    </CollectionView>
</ContentPage>
このコードにより、
CollectionViewとToolbarItemから構成されるページのユーザー インターフェイスが宣言によって定義されます。CollectionViewにより、データ バインディングを使用して、アプリケーションによって取得されたすべてのメモが表示されます。 メモを選択すると、ノートを変更できるNoteEntryPageに移動します。 または、ToolbarItemを押して、新しいメモを作成することもできます。 データ バインディングの詳細については、「Xamarin.Forms クイックスタート Deep Dive」の「データ バインディング」を参照してください。[ファイル] > [保存] を選択して (または ⌘ + S キーを押して)、NotesPage.xaml への変更を保存します。
Solution Pad の Notes プロジェクトで、 [Views] フォルダーの NotesPage.xaml を展開し、NotesPage.xaml.cs を開きます。
NotesPage.xaml.cs のテンプレート コードをすべて削除し、次のコードに置き換えます。
using System;
using System.Collections.Generic;
using System.IO;
using System.Linq;
using Notes.Models;
using Xamarin.Forms;

namespace Notes.Views
{
    public partial class NotesPage : ContentPage
    {
        public NotesPage()
        {
            InitializeComponent();
        }

        protected override void OnAppearing()
        {
            base.OnAppearing();

            var notes = new List<Note>();

            // Create a Note object from each file.
            var files = Directory.EnumerateFiles(App.FolderPath, "*.notes.txt");
            foreach (var filename in files)
            {
                notes.Add(new Note
                {
                    Filename = filename,
                    Text = File.ReadAllText(filename),
                    Date = File.GetCreationTime(filename)
                });
            }

            // Set the data source for the CollectionView to a
            // sorted collection of notes.
            collectionView.ItemsSource = notes
                .OrderBy(d => d.Date)
                .ToList();
        }

        async void OnAddClicked(object sender, EventArgs e)
        {
            // Navigate to the NoteEntryPage, without passing any data.
            await Shell.Current.GoToAsync(nameof(NoteEntryPage));
        }

        async void OnSelectionChanged(object sender, SelectionChangedEventArgs e)
        {
            if (e.CurrentSelection != null)
            {
                // Navigate to the NoteEntryPage, passing the filename as a query parameter.
                Note note = (Note)e.CurrentSelection.FirstOrDefault();
                await Shell.Current.GoToAsync($"{nameof(NoteEntryPage)}?{nameof(NoteEntryPage.ItemId)}={note.Filename}");
            }
        }
    }
}
このコードにより、
NotesPageの機能が定義されます。 このページが表示されると、OnAppearingメソッドが実行されます。これにより、CollectionViewに、ローカル アプリケーションのデータ フォルダーから取得されたすべてのメモが挿入されます。ToolbarItemを押すと、OnAddClickedイベント ハンドラーが実行されます。 このメソッドにより、NoteEntryPageに移動します。CollectionView内の項目が選択されると、OnSelectionChangedイベント ハンドラーが実行されます。CollectionViewで項目が選択されている場合、このメソッドによりNoteEntryPageに移動し、選択されているNoteのFilenameプロパティがクエリ パラメーターとしてページに渡されます。 ナビゲーションの詳細については、「Xamarin.Forms クイックスタート Deep Dive」の「ナビゲーション」を参照してください。[ファイル] > [保存] を選択して (または ⌘ + S キーを押して)、NotesPage.xaml.cs への変更を保存します。
警告
以降の手順で修正されるエラーのため、アプリケーションは現在はビルドされません。
Solution Pad で、Notes プロジェクトの AppShell.xaml を展開し、AppShell.xaml.cs を開きます。 次に、既存のコードを次のコードに置き換えます。
using Notes.Views;
using Xamarin.Forms;

namespace Notes
{
    public partial class AppShell : Shell
    {
        public AppShell()
        {
            InitializeComponent();
            Routing.RegisterRoute(nameof(NoteEntryPage), typeof(NoteEntryPage));
        }
    }
}
このコードにより、
NoteEntryPageへのルートが登録されます。これは、シェルのビジュアル階層では表されません。 その後、このページには、GoToAsyncメソッドを使用する URI ベースのナビゲーションを使用して移動できます。[ファイル] > [保存] を選択して (または ⌘ + S キーを押して)、AppShell.xaml.cs への変更を保存します。
Solution Pad で、Notes プロジェクトの App.xaml を展開し、App.xaml.cs を開きます。 次に、既存のコードを次のコードに置き換えます。
using System;
using System.IO;
using Xamarin.Forms;

namespace Notes
{
    public partial class App : Application
    {
        public static string FolderPath { get; private set; }

        public App()
        {
            InitializeComponent();
            FolderPath = Path.Combine(Environment.GetFolderPath(Environment.SpecialFolder.LocalApplicationData));
            MainPage = new AppShell();
        }

        protected override void OnStart()
        {
        }

        protected override void OnSleep()
        {
        }

        protected override void OnResume()
        {
        }
    }
}
このコードにより、
System.IO名前空間の名前空間宣言が追加され、string型の静的なFolderPathプロパティの宣言が追加されます。FolderPathプロパティは、メモ データが格納されるデバイス上のパスを格納するために使用されます。 さらに、このコードによりAppコンストラクターのFolderPathプロパティが初期化され、MainPageプロパティがサブクラス化されたShellオブジェクトに初期化されます。[ファイル] > [保存] を選択して (または ⌘ + S キーを押して)、App.xaml.cs への変更を保存します。
各プラットフォームでプロジェクトをビルドして実行します。 詳細については、「クイックスタートのビルド」を参照してください。
NotesPage で [追加] ボタンを押して NoteEntryPage に移動し、メモを入力します。 メモを保存すると、アプリケーションは NotesPage に戻ります。
さまざまな長さの複数のメモを入力して、アプリケーションの動作を観察します。 アプリケーションを閉じて再起動し、入力したメモがデバイスに保存されていることを確認します。
次のステップ
このクイックスタートでは、次の方法について学習しました。
- Xamarin.Forms シェル アプリケーションにさらにページを追加する。
- ページ間のナビゲーションを実行する
- データ バインディングを使用して、ユーザー インターフェイスの要素とそのデータ ソースとの間でデータを同期する
次のクイックスタートに進み、ローカル環境の SQLite.NET データベースにデータを格納するようにアプリケーションを変更します。