Xamarin.Forms의 로컬 알림
 샘플 다운로드
로컬 알림은 모바일 디바이스에 설치된 애플리케이션이 보내는 경고입니다. 로컬 알림은 흔히 다음과 같은 기능에 사용됩니다.
- 일정 이벤트
- 미리 알림
- 위치 기반 트리거
플랫폼마다 로컬 알림의 생성, 표시, 사용량을 다르게 처리합니다. 이 문서에서는 Xamarin.Forms를 사용하여 로컬 알림을 보내고 예약하고 수신하는 플랫폼 간 추상화를 만드는 방법을 설명합니다.

플랫폼 간 인터페이스 만들기
Xamarin.Forms 애플리케이션은 기본 플랫폼 구현에 대한 걱정 없이 알림을 만들고 사용해야 합니다. 다음 INotificationManager 인터페이스는 공유 코드 라이브러리에서 구현되며, 애플리케이션이 알림과 상호 작용하는 데 사용할 수 있는 플랫폼 간 API를 정의합니다.
public interface INotificationManager
{
    event EventHandler NotificationReceived;
    void Initialize();
    void SendNotification(string title, string message, DateTime? notifyTime = null);
    void ReceiveNotification(string title, string message);
}
이 인터페이스는 각 플랫폼 프로젝트에서 구현됩니다. NotificationReceived 이벤트를 사용하면 애플리케이션이 들어오는 알림을 처리할 수 있습니다. Initialize 메서드는 알림 시스템을 준비하는 데 필요한 모든 네이티브 플랫폼 논리를 수행합니다. SendNotification 메서드는 선택적 DateTime으로 알림을 보냅니다. 메시지가 수신되면 기본 플랫폼에서 ReceiveNotification 메서드를 호출합니다.
Xamarin.Forms에서 인터페이스 사용
인터페이스를 만든 후에는 플랫폼 구현이 아직 만들어지지 않은 경우에도 공유 Xamarin.Forms 프로젝트에서 인터페이스를 사용할 수 있습니다. 샘플 애플리케이션에는 다음 내용이 있는 MainPage.xaml이라는 ContentPage가 포함되어 있습니다.
<StackLayout Margin="0,35,0,0"
             x:Name="stackLayout">
    <Label Text="Click the button below to create a local notification."
           TextColor="Red"
           HorizontalOptions="Center"
           VerticalOptions="Start" />
    <Button Text="Create Notification"
            HorizontalOptions="Center"
            VerticalOptions="Start"
            Clicked="OnSendClick" />
    <Label Text="Click the button below to schedule a local notification for in 10 seconds time."
           TextColor="Red"
           HorizontalOptions="Center"
           VerticalOptions="Start" />
    <Button Text="Create Notification"
            HorizontalOptions="Center"
            VerticalOptions="Start"
            Clicked="OnScheduleClick" />
</StackLayout>
레이아웃은 명령을 설명하는 Label 요소와 탭하면 알림을 보내거나 예약하는 Button 요소를 포함합니다.
MainPage 클래스 코드 숨김이 알림 보내기 및 받기를 처리합니다.
public partial class MainPage : ContentPage
{
    INotificationManager notificationManager;
    int notificationNumber = 0;

    public MainPage()
    {
        InitializeComponent();

        notificationManager = DependencyService.Get<INotificationManager>();
        notificationManager.NotificationReceived += (sender, eventArgs) =>
        {
            var evtData = (NotificationEventArgs)eventArgs;
            ShowNotification(evtData.Title, evtData.Message);
        };
    }

    void OnSendClick(object sender, EventArgs e)
    {
        notificationNumber++;
        string title = $"Local Notification #{notificationNumber}";
        string message = $"You have now received {notificationNumber} notifications!";
        notificationManager.SendNotification(title, message);
    }

    void OnScheduleClick(object sender, EventArgs e)
    {
        notificationNumber++;
        string title = $"Local Notification #{notificationNumber}";
        string message = $"You have now received {notificationNumber} notifications!";
        notificationManager.SendNotification(title, message, DateTime.Now.AddSeconds(10));
    }

    void ShowNotification(string title, string message)
    {
        Device.BeginInvokeOnMainThread(() =>
        {
            var msg = new Label()
            {
                Text = $"Notification Received:\nTitle: {title}\nMessage: {message}"
            };
            stackLayout.Children.Add(msg);
        });
    }
}
MainPage 클래스 생성자는 이 클래스를 Xamarin.FormsDependencyService 사용하여 플랫폼별 인스턴스를 검색합니다INotificationManager. OnSendClick 및 OnScheduleClicked 메서드는 INotificationManager 인스턴스를 사용하여 새 알림을 보내고 예약합니다. ShowNotification 메서드는 NotificationReceived 이벤트에 연결된 이벤트 처리기에서 호출되고, 이벤트가 호출될 때 페이지에 새 Label을 삽입합니다.
NotificationReceived 이벤트 처리기는 이벤트 인수를 NotificationEventArgs로 캐스팅합니다. 이 형식은 공유 Xamarin.Forms 프로젝트에 정의되어 있습니다.
public class NotificationEventArgs : EventArgs
{
    public string Title { get; set; }
    public string Message { get; set; }
}
자세한 내용은 Xamarin.FormsDependencyService를 참조 Xamarin.Forms 하세요.DependencyService
Android 인터페이스 구현 만들기
Xamarin.Forms 애플리케이션이 Android에서 알림을 주고받으려면 애플리케이션이 INotificationManager 인터페이스의 구현을 제공해야 합니다.
AndroidNotificationManager 클래스 만들기
AndroidNotificationManager 클래스가 INotificationManager 인터페이스를 구현합니다.
using System;
using Android.App;
using Android.Content;
using Android.Graphics;
using Android.OS;
using AndroidX.Core.App;
using Xamarin.Forms;
using AndroidApp = Android.App.Application;

[assembly: Dependency(typeof(LocalNotifications.Droid.AndroidNotificationManager))]
namespace LocalNotifications.Droid
{
    public class AndroidNotificationManager : INotificationManager
    {
        const string channelId = "default";
        const string channelName = "Default";
        const string channelDescription = "The default channel for notifications.";

        public const string TitleKey = "title";
        public const string MessageKey = "message";

        bool channelInitialized = false;
        int messageId = 0;
        int pendingIntentId = 0;

        NotificationManager manager;

        public event EventHandler NotificationReceived;

        public static AndroidNotificationManager Instance { get; private set; }

        public AndroidNotificationManager() => Initialize();

        public void Initialize()
        {
            if (Instance == null)
            {
                CreateNotificationChannel();
                Instance = this;
            }
        }

        public void SendNotification(string title, string message, DateTime? notifyTime = null)
        {
            if (!channelInitialized)
            {
                CreateNotificationChannel();
            }

            if (notifyTime != null)
            {
                Intent intent = new Intent(AndroidApp.Context, typeof(AlarmHandler));
                intent.PutExtra(TitleKey, title);
                intent.PutExtra(MessageKey, message);

                PendingIntent pendingIntent = PendingIntent.GetBroadcast(AndroidApp.Context, pendingIntentId++, intent, PendingIntentFlags.CancelCurrent);
                long triggerTime = GetNotifyTime(notifyTime.Value);
                AlarmManager alarmManager = AndroidApp.Context.GetSystemService(Context.AlarmService) as AlarmManager;
                alarmManager.Set(AlarmType.RtcWakeup, triggerTime, pendingIntent);
            }
            else
            {
                Show(title, message);
            }
        }

        public void ReceiveNotification(string title, string message)
        {
            var args = new NotificationEventArgs()
            {
                Title = title,
                Message = message,
            };
            NotificationReceived?.Invoke(null, args);
        }

        public void Show(string title, string message)
        {
            Intent intent = new Intent(AndroidApp.Context, typeof(MainActivity));
            intent.PutExtra(TitleKey, title);
            intent.PutExtra(MessageKey, message);

            PendingIntent pendingIntent = PendingIntent.GetActivity(AndroidApp.Context, pendingIntentId++, intent, PendingIntentFlags.UpdateCurrent);

            NotificationCompat.Builder builder = new NotificationCompat.Builder(AndroidApp.Context, channelId)
                .SetContentIntent(pendingIntent)
                .SetContentTitle(title)
                .SetContentText(message)
                .SetLargeIcon(BitmapFactory.DecodeResource(AndroidApp.Context.Resources, Resource.Drawable.xamagonBlue))
                .SetSmallIcon(Resource.Drawable.xamagonBlue)
                .SetDefaults((int)NotificationDefaults.Sound | (int)NotificationDefaults.Vibrate);

            Notification notification = builder.Build();
            manager.Notify(messageId++, notification);
        }

        void CreateNotificationChannel()
        {
            manager = (NotificationManager)AndroidApp.Context.GetSystemService(AndroidApp.NotificationService);

            if (Build.VERSION.SdkInt >= BuildVersionCodes.O)
            {
                var channelNameJava = new Java.Lang.String(channelName);
                var channel = new NotificationChannel(channelId, channelNameJava, NotificationImportance.Default)
                {
                    Description = channelDescription
                };
                manager.CreateNotificationChannel(channel);
            }

            channelInitialized = true;
        }

        long GetNotifyTime(DateTime notifyTime)
        {
            DateTime utcTime = TimeZoneInfo.ConvertTimeToUtc(notifyTime);
            double epochDiff = (new DateTime(1970, 1, 1) - DateTime.MinValue).TotalSeconds;
            long utcAlarmTime = utcTime.AddSeconds(-epochDiff).Ticks / 10000;
            return utcAlarmTime; // milliseconds
        }
    }
}
네임스페이스 위의 assembly 특성은 INotificationManager 인터페이스 구현을 DependencyService에 등록합니다.
Android에서 애플리케이션은 알림을 위한 여러 개의 채널을 정의할 수 있습니다. Initialize 메서드는 샘플 애플리케이션이 알림을 보내는 데 사용하는 기본 채널을 만듭니다. SendNotification 메서드는 알림을 만들고 보내는 데 필요한 플랫폼별 논리를 정의합니다. ReceiveNotification 메서드는 메시지가 수신될 때 Android OS에 의해 호출되며, 이벤트 처리기를 호출합니다.
SendNotification 메서드는 즉시 또는 정확한 DateTime에 로컬 알림을 만듭니다. AlarmManager 클래스를 사용하여 정확한 DateTime에 알림을 예약할 수 있으며, BroadcastReceiver 클래스에서 파생되는 개체가 알림을 수신합니다.
[BroadcastReceiver(Enabled = true, Label = "Local Notifications Broadcast Receiver")]
public class AlarmHandler : BroadcastReceiver
{
    public override void OnReceive(Context context, Intent intent)
    {
        if (intent?.Extras != null)
        {
            string title = intent.GetStringExtra(AndroidNotificationManager.TitleKey);
            string message = intent.GetStringExtra(AndroidNotificationManager.MessageKey);

            AndroidNotificationManager manager = AndroidNotificationManager.Instance ?? new AndroidNotificationManager();
            manager.Show(title, message);
        }
    }
}
Important
기본적으로 AlarmManager 클래스를 사용하여 예약된 알림은 디바이스를 다시 시작하면 작동하지 않습니다. 그러나 디바이스를 다시 시작하는 경우 알림을 자동으로 다시 예약하도록 애플리케이션을 설계할 수 있습니다. 자세한 내용은 developer.android.com에서 반복 알람 예약의 디바이스가 다시 시작되면 알람 시작과 샘플을 참조하세요. Android에서 후순위 처리에 대한 자세한 내용은 developer.android.com의 후순위 처리 가이드를 참조하세요.
브로드캐스트 수신기에 대한 자세한 내용은 Xamarin.Android의 브로드캐스트 수신기를 참조하세요.
Android에서 들어오는 알림 처리
MainActivity 클래스는 들어오는 알림을 검색하여 AndroidNotificationManager 인스턴스에 알려야 합니다. MainActivity 클래스의 Activity 특성은 LaunchMode.SingleTop의 LaunchMode 값을 지정해야 합니다.
[Activity(
        //...
        LaunchMode = LaunchMode.SingleTop]
    public class MainActivity : global::Xamarin.Forms.Platform.Android.FormsAppCompatActivity
    {
        // ...
    }
SingleTop 모드는 애플리케이션이 포그라운드에 있는 동안 Activity의 여러 인스턴스가 시작되지 않도록 합니다. 이 LaunchMode는 보다 복잡한 알림 시나리오에서 여러 활동을 시작하는 애플리케이션에는 적합하지 않을 수 있습니다. LaunchMode 열거형 값에 대한 자세한 내용은 Android 활동 LaunchMode를 참조하세요.
MainActivity에서 클래스는 들어오는 알림을 받도록 수정됩니다.
protected override void OnCreate(Bundle savedInstanceState)
{
    // ...

    global::Xamarin.Forms.Forms.Init(this, savedInstanceState);
    LoadApplication(new App());
    CreateNotificationFromIntent(Intent);
}

protected override void OnNewIntent(Intent intent)
{
    CreateNotificationFromIntent(intent);
}

void CreateNotificationFromIntent(Intent intent)
{
    if (intent?.Extras != null)
    {
        string title = intent.GetStringExtra(AndroidNotificationManager.TitleKey);
        string message = intent.GetStringExtra(AndroidNotificationManager.MessageKey);
        DependencyService.Get<INotificationManager>().ReceiveNotification(title, message);
    }
}
CreateNotificationFromIntent 메서드는 intent 인수에서 알림 데이터를 추출하고 ReceiveNotification 메서드를 사용하여 AndroidNotificationManager에 제공합니다. CreateNotificationFromIntent 메서드는 OnCreate 메서드와 OnNewIntent 메서드에서 호출됩니다.
- 알림 데이터에 의해 애플리케이션이 시작되면
Intent데이터가OnCreate메서드에 전달됩니다. - 애플리케이션이 이미 전경에 있는 경우
Intent데이터가OnNewIntent메서드에 전달됩니다.
Android는 여러 고급 알림 옵션을 제공합니다. 자세한 내용은 Xamarin.Android의 알림을 참조하세요.
iOS 인터페이스 구현 만들기
Xamarin.Forms 애플리케이션이 iOS에서 알림을 주고받으려면 애플리케이션이 INotificationManager의 구현을 제공해야 합니다.
iOSNotificationManager 클래스 만들기
iOSNotificationManager 클래스가 INotificationManager 인터페이스를 구현합니다.
using System;
using Foundation;
using UserNotifications;
using Xamarin.Forms;

[assembly: Dependency(typeof(LocalNotifications.iOS.iOSNotificationManager))]
namespace LocalNotifications.iOS
{
    public class iOSNotificationManager : INotificationManager
    {
        int messageId = 0;
        bool hasNotificationsPermission;
        public event EventHandler NotificationReceived;

        public void Initialize()
        {
            // request the permission to use local notifications
            UNUserNotificationCenter.Current.RequestAuthorization(UNAuthorizationOptions.Alert, (approved, err) =>
            {
                hasNotificationsPermission = approved;
            });
        }

        public void SendNotification(string title, string message, DateTime? notifyTime = null)
        {
            // EARLY OUT: app doesn't have permissions
            if (!hasNotificationsPermission)
            {
                return;
            }

            messageId++;

            var content = new UNMutableNotificationContent()
            {
                Title = title,
                Subtitle = "",
                Body = message,
                Badge = 1
            };

            UNNotificationTrigger trigger;
            if (notifyTime != null)
            {
                // Create a calendar-based trigger.
                trigger = UNCalendarNotificationTrigger.CreateTrigger(GetNSDateComponents(notifyTime.Value), false);
            }
            else
            {
                // Create a time-based trigger, interval is in seconds and must be greater than 0.
                trigger = UNTimeIntervalNotificationTrigger.CreateTrigger(0.25, false);
            }

            var request = UNNotificationRequest.FromIdentifier(messageId.ToString(), content, trigger);
            UNUserNotificationCenter.Current.AddNotificationRequest(request, (err) =>
            {
                if (err != null)
                {
                    throw new Exception($"Failed to schedule notification: {err}");
                }
            });
        }

        public void ReceiveNotification(string title, string message)
        {
            var args = new NotificationEventArgs()
            {
                Title = title,
                Message = message
            };
            NotificationReceived?.Invoke(null, args);
        }

        NSDateComponents GetNSDateComponents(DateTime dateTime)
        {
            return new NSDateComponents
            {
                Month = dateTime.Month,
                Day = dateTime.Day,
                Year = dateTime.Year,
                Hour = dateTime.Hour,
                Minute = dateTime.Minute,
                Second = dateTime.Second
            };
        }
    }
}
네임스페이스 위의 assembly 특성은 INotificationManager 인터페이스 구현을 DependencyService에 등록합니다.
iOS에서는 알림 예약을 시도하기 전에 알림을 사용할 권한을 요청해야 합니다. Initialize 메서드는 로컬 알림을 사용할 수 있는 권한을 요청합니다. SendNotification 메서드는 알림을 만들고 보내는 데 필요한 논리를 정의합니다. ReceiveNotification 메서드는 메시지가 수신될 때 iOS에 의해 호출되며, 이벤트 처리기를 호출합니다.
참고 항목
SendNotification 메서드는 UNTimeIntervalNotificationTrigger 개체를 사용하여 즉시 또는 UNCalendarNotificationTrigger 개체를 사용하여 정확한 DateTime에 로컬 알림을 만듭니다.
iOS에서 들어오는 알림 처리
iOS에서 들어오는 메시지를 처리하려면 UNUserNotificationCenterDelegate를 서브클래스화하는 대리자를 만들어야 합니다. 샘플 애플리케이션은 iOSNotificationReceiver 클래스를 정의합니다.
public class iOSNotificationReceiver : UNUserNotificationCenterDelegate
{
    public override void WillPresentNotification(UNUserNotificationCenter center, UNNotification notification, Action<UNNotificationPresentationOptions> completionHandler)
    {
        ProcessNotification(notification);
        completionHandler(UNNotificationPresentationOptions.Alert);
    }

    void ProcessNotification(UNNotification notification)
    {
        string title = notification.Request.Content.Title;
        string message = notification.Request.Content.Body;

        DependencyService.Get<INotificationManager>().ReceiveNotification(title, message);
    }
}
이 클래스는 DependencyService를 사용하여 iOSNotificationManager 클래스의 인스턴스를 가져오고, 들어오는 알림 데이터를 ReceiveNotification 메서드에 제공합니다.
AppDelegate 클래스는 애플리케이션 시작 중에 iOSNotificationReceiver 개체를 UNUserNotificationCenter 대리자로 지정해야 합니다. 이는 FinishedLaunching 메서드에서 발생합니다.
public override bool FinishedLaunching(UIApplication app, NSDictionary options)
{
    global::Xamarin.Forms.Forms.Init();

    UNUserNotificationCenter.Current.Delegate = new iOSNotificationReceiver();

    LoadApplication(new App());
    return base.FinishedLaunching(app, options);
}
iOS는 여러 고급 알림 옵션을 제공합니다. 자세한 내용은 Xamarin.iOS의 알림을 참조하세요.
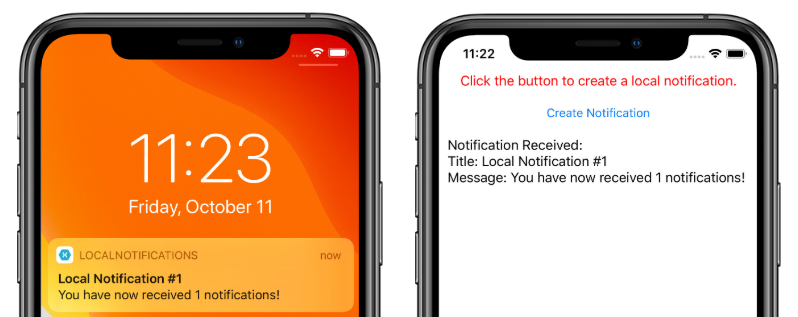
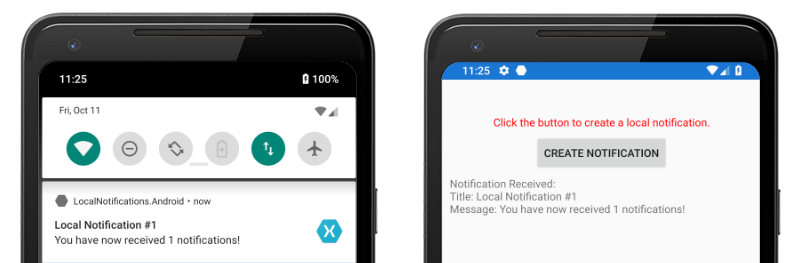
애플리케이션 테스트
플랫폼 프로젝트에 INotificationManager 인터페이스의 등록된 구현이 포함되면 두 플랫폼 모두에서 애플리케이션을 테스트할 수 있습니다. 애플리케이션을 실행하고 알림 만들기 단추 중 하나를 클릭하여 알림을 만듭니다.
Android에서는 알림 영역에 알림이 표시됩니다. 알림을 탭하면 애플리케이션이 알림을 수신하고 메시지를 표시합니다.
iOS에서는 들어오는 알림이 사용자 입력 필요없이 애플리케이션에 의해 자동으로 수신됩니다. 애플리케이션이 알림을 수신하고 메시지를 표시합니다.