Azure IoT Hub를 사용하여 디바이스에서 클라우드로 파일 업로드(Java)
이 문서에서는 IoT Hub의 파일 업로드 기능을 사용하여 Java를 사용해서 Azure Blob Storage에 파일을 업로드하는 방법에 대해 설명합니다.
디바이스에서 IoT 허브로 원격 분석 데이터 보내기 빠른 시작 및 IoT Hub를 사용하여 클라우드-디바이스 메시지 보내기 문서는 IoT Hub의 기본적인 디바이스-클라우드 및 클라우드-디바이스 메시징 기능을 보여 줍니다. IoT Hub로 메시지 라우팅 구성 자습서에서는 디바이스-클라우드 메시지를 Azure Blob 스토리지에 안정적으로 저장하는 방법을 보여 줍니다. 그러나 일부 시나리오에서는 디바이스에서 전송하는 데이터를 IoT Hub에서 허용하는 비교적 작은 디바이스-클라우드 메시지에 쉽게 매핑할 수 없습니다. 예시:
- 비디오
- 이미지가 포함된 대형 파일
- 자주 샘플링되는 진동 데이터
- 특정 형태의 전처리된 데이터
이러한 파일은 일반적으로 Azure Data Factory 또는 Hadoop 스택과 같은 도구를 사용하여 클라우드에서 일괄 처리됩니다. 디바이스에서 파일을 업로드해야 할 때 IoT Hub의 보안 및 안정성을 여전히 사용할 수 있습니다. 이 문서에서 그 방법을 보여줍니다. GitHub에서 azure-iot-sdk-java의 2개 샘플을 확인합니다.
참고 항목
IoT Hub는 Azure IoT 디바이스 SDK를 통해 많은 디바이스 플랫폼 및 언어(C, .NET 및 JavaScript 포함)를 지원합니다. 디바이스를 Azure IoT Hub에 연결하는 방법에 자세한 내용은 Azure IoT 개발자 센터를 참조하세요.
Important
X.509 CA(인증 기관) 인증을 사용하는 디바이스의 파일 업로드 기능은 공개 미리 보기로 제공되고 있으며 미리 보기 모드를 사용하도록 설정해야 합니다. Azure Device Provisioning Service와 함께 X.509 지문 인증 또는 X.509 인증서 증명을 사용하는 디바이스에서 일반적으로 사용할 수 있습니다. IoT Hub를 사용하는 X.509 인증에 대해 자세히 알아보려면 지원되는 X.509 인증서를 참조하세요.
필수 조건
IoT 허브. CLI 또는 Azure Portal을 사용하여 만듭니다.
등록된 디바이스. Azure Portal에 하나를 등록합니다.
Java SE Development Kit 8. JDK 8용 다운로드를 가져오려면 장기 지원에서 Java 8을 선택해야 합니다.
8883 포트는 방화벽에서 열려 있어야 합니다. 이 문서의 디바이스 샘플은 포트 8883을 통해 통신하는 MQTT 프로토콜을 사용합니다. 이 포트는 일부 회사 및 교육용 네트워크 환경에서 차단될 수 있습니다. 이 문제를 해결하는 자세한 내용과 방법은 IoT Hub에 연결(MQTT)을 참조하세요.
Azure Storage 계정을 IoT Hub에 연결
디바이스에서 파일을 업로드하려면 IoT 허브와 연결된 Azure Storage 계정 및 Azure Blob Storage 컨테이너가 있어야 합니다. 스토리지 계정 및 컨테이너를 IoT 허브와 연결하면 IoT 허브가 디바이스에서 요청될 때 SAS URI의 요소를 제공할 수 있습니다. 그런 다음, 디바이스는 이러한 요소를 사용하여 Azure Storage를 인증하고 Blob 컨테이너에 파일을 업로드하는 데 사용하는 SAS URI를 생성할 수 있습니다.
Azure Storage 계정을 IoT 허브와 연결하려면 다음을 수행합니다.
허브 설정 아래에서 사용자 IoT 허브의 왼쪽에 있는 파일 업로드를 선택합니다.
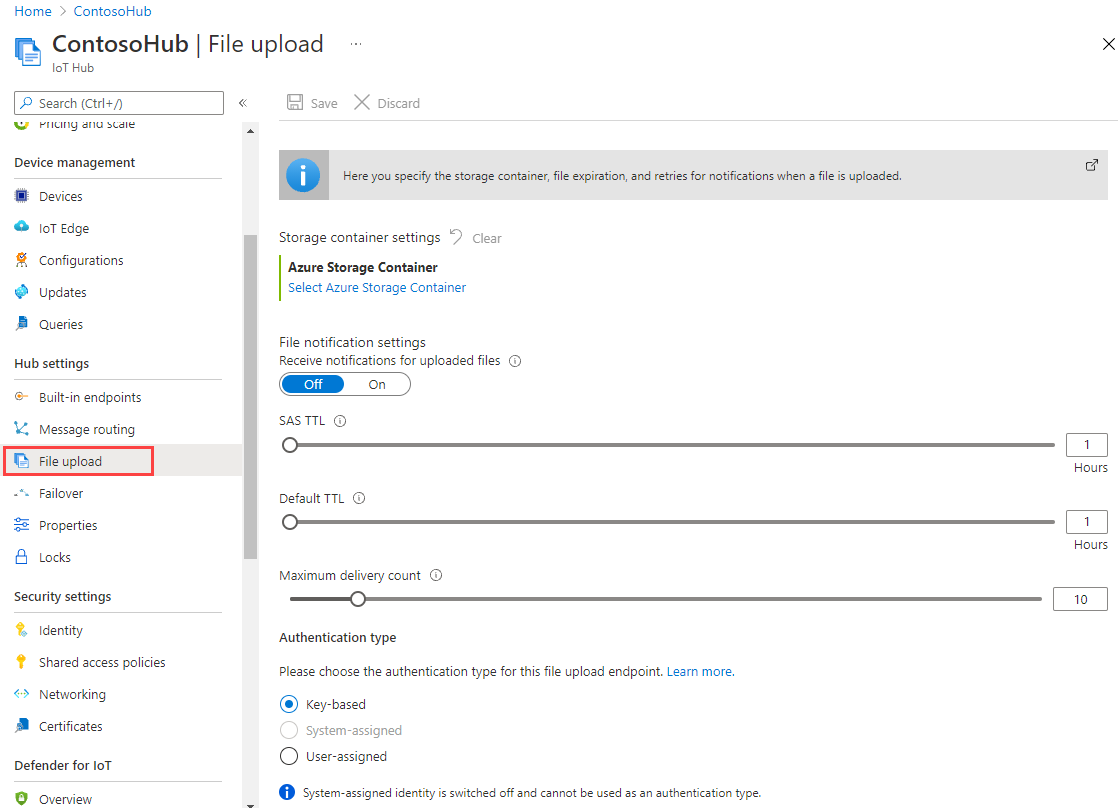
파일 업로드 창에서 Azure Storage 컨테이너를 선택합니다. 이 문서에서는 스토리지 계정과 IoT Hub를 동일한 지역에 배치하는 것이 좋습니다.
사용하려는 스토리지 계정이 이미 있는 경우 목록에서 선택합니다.
새 스토리지 계정을 만들려면 +스토리지 계정을 선택합니다. 스토리지 계정에 대한 이름을 제공하고 위치가 IoT 허브와 동일한 지역으로 설정되었는지 확인한 다음, 확인을 선택합니다. 새 계정은 IoT 허브와 동일한 리소스 그룹에 만들어집니다. 배포가 완료되면 목록에서 스토리지 계정을 선택합니다.
스토리지 계정을 선택하면 컨테이너 창이 열립니다.
컨테이너 창에서 Blob 컨테이너를 선택합니다.
사용하려는 Blob 컨테이너가 이미 있는 경우 목록에서 선택하고 선택을 클릭합니다.
새 Blob 컨테이너를 만들려면 + 컨테이너를 선택합니다. 새 컨테이너에 대한 이름을 제공합니다. 이 문서의 목적을 위해 다른 모든 필드를 기본값으로 그대로 둘 수 있습니다. 만들기를 실행합니다. 배포가 완료되면 목록에서 컨테이너를 선택하고 선택을 클릭합니다.
파일 업로드 창으로 다시 돌아가서 파일 알림이 켜짐으로 설정되었는지 확인합니다. 다른 모든 설정은 기본값으로 그대로 둘 수 있습니다. 저장을 선택하고 다음 섹션으로 이동하기 전에 설정이 완료될 때까지 기다립니다.


Azure Storage 계정을 만드는 방법에 대한 자세한 지침은 스토리지 계정 만들기를 참조하세요. 스토리지 계정 및 Blob 컨테이너를 IoT 허브와 연결하는 방법에 대한 자세한 지침은 Azure Portal을 사용하여 파일 업로드 구성을 참조하세요.
Maven을 사용하여 프로젝트 만들기
프로젝트의 디렉터리를 만들고 해당 디렉터리에서 셸을 시작합니다. 명령줄에서 다음을 실행합니다.
mvn archetype:generate -DgroupId=com.mycompany.app -DartifactId=my-app -DarchetypeArtifactId=maven-archetype-quickstart -DarchetypeVersion=1.4 -DinteractiveMode=false
그러면 artifactId 이름이 같은 디렉터리와 표준 프로젝트 구조가 생성됩니다.
  my-app
  |-- pom.xml
   -- src
      -- main
         -- java
            -- com
               -- mycompany
                  -- app
                     --App.Java
텍스트 편집기를 사용하여 pom.xml 파일을 다음으로 바꿉니다.
<?xml version="1.0" encoding="UTF-8"?>

<project xmlns="http://maven.apache.org/POM/4.0.0" xmlns:xsi="http://www.w3.org/2001/XMLSchema-instance"
  xsi:schemaLocation="http://maven.apache.org/POM/4.0.0 http://maven.apache.org/xsd/maven-4.0.0.xsd">
  <modelVersion>4.0.0</modelVersion>

  <groupId>com.mycompany.app</groupId>
  <artifactId>my-app</artifactId>
  <version>1.0-SNAPSHOT</version>

  <name>my-app</name>
  <!-- FIXME change it to the project's website -->
  <url>http://www.example.com</url>

  <properties>
    <project.build.sourceEncoding>UTF-8</project.build.sourceEncoding>
    <maven.compiler.source>1.7</maven.compiler.source>
    <maven.compiler.target>1.7</maven.compiler.target>
  </properties>

  <dependencies>
      <dependency>
      <groupId>com.microsoft.azure.sdk.iot</groupId>
      <artifactId>iot-device-client</artifactId>
      <version>1.30.1</version>
    </dependency>
    <dependency>
      <groupId>org.slf4j</groupId>
      <artifactId>slf4j-log4j12</artifactId>
      <version>1.7.29</version>
    </dependency>
    <dependency>
      <groupId>junit</groupId>
      <artifactId>junit</artifactId>
      <version>4.11</version>
      <scope>test</scope>
    </dependency>
  </dependencies>

  <build>
    <pluginManagement><!-- lock down plugins versions to avoid using Maven defaults (may be moved to parent pom) -->
      <plugins>
        <plugin>
          <groupId>org.apache.maven.plugins</groupId>
            <artifactId>maven-compiler-plugin</artifactId>
            <version>3.3</version>
            <configuration>
              <source>1.7</source>
              <target>1.7</target>
            </configuration>
        </plugin>
        <plugin>
          <artifactId>maven-shade-plugin</artifactId>
          <version>2.4</version>
          <executions>
              <execution>
                  <phase>package</phase>
                  <goals>
                    <goal>shade</goal>
                  </goals>
                  <configuration>
                      <filters>
                          <filter>
                              <artifact>*:*</artifact>
                              <excludes>
                                  <exclude>META-INF/*.SF</exclude>
                                  <exclude>META-INF/*.RSA</exclude>
                              </excludes>
                          </filter>
                      </filters>
                      <shadedArtifactAttached>true</shadedArtifactAttached>
                      <shadedClassifierName>with-deps</shadedClassifierName>
                  </configuration>
              </execution>
          </executions>
        </plugin>
      </plugins>
    </pluginManagement>
  </build>
</project>
디바이스 앱에서 파일 업로드
프로젝트 트리의 my-app 폴더에 업로드할 파일을 복사합니다. 텍스트 편집기를 사용하여 App.java를 다음 코드로 바꿉니다. 명시된 디바이스 연결 문자열 및 파일 이름을 입력합니다. 디바이스를 등록할 때 디바이스 연결 문자열을 복사했습니다.
package com.mycompany.app;

import com.azure.storage.blob.BlobClient;
import com.azure.storage.blob.BlobClientBuilder;
import com.microsoft.azure.sdk.iot.deps.serializer.FileUploadCompletionNotification;
import com.microsoft.azure.sdk.iot.deps.serializer.FileUploadSasUriRequest;
import com.microsoft.azure.sdk.iot.deps.serializer.FileUploadSasUriResponse;
import com.microsoft.azure.sdk.iot.device.DeviceClient;
import com.microsoft.azure.sdk.iot.device.IotHubClientProtocol;

import java.io.BufferedInputStream;
import java.io.File;
import java.io.FileInputStream;
import java.io.IOException;
import java.net.URISyntaxException;
import java.util.Scanner;

public class App
{
    /**
     * Upload a single file to blobs using IoT Hub.
     *
     */
    public static void main(String[] args)throws IOException, URISyntaxException
    {
        String connString = "Your device connection string here";
        String fullFileName = "Path of the file to upload";

        System.out.println("Starting...");
        System.out.println("Beginning setup.");

        // File upload will always use HTTPS, DeviceClient will use this protocol only
        //   for the other services like Telemetry, Device Method and Device Twin.
        IotHubClientProtocol protocol = IotHubClientProtocol.MQTT;

        System.out.println("Successfully read input parameters.");

        DeviceClient client = new DeviceClient(connString, protocol);

        System.out.println("Successfully created an IoT Hub client.");

        try
        {
            File file = new File(fullFileName);
            if (file.isDirectory())
            {
                throw new IllegalArgumentException(fullFileName + " is a directory, please provide a single file name, or use the FileUploadSample to upload directories.");
            }

            System.out.println("Retrieving SAS URI from IoT Hub...");
            FileUploadSasUriResponse sasUriResponse = client.getFileUploadSasUri(new FileUploadSasUriRequest(file.getName()));

            System.out.println("Successfully got SAS URI from IoT Hub");
            System.out.println("Correlation Id: " + sasUriResponse.getCorrelationId());
            System.out.println("Container name: " + sasUriResponse.getContainerName());
            System.out.println("Blob name: " + sasUriResponse.getBlobName());
            System.out.println("Blob Uri: " + sasUriResponse.getBlobUri());

            System.out.println("Using the Azure Storage SDK to upload file to Azure Storage...");

            try
            {
                BlobClient blobClient =
                    new BlobClientBuilder()
                        .endpoint(sasUriResponse.getBlobUri().toString())
                        .buildClient();

                blobClient.uploadFromFile(fullFileName);
            }
            catch (Exception e)
            {
                System.out.println("Exception encountered while uploading file to blob: " + e.getMessage());

                System.out.println("Failed to upload file to Azure Storage.");

                System.out.println("Notifying IoT Hub that the SAS URI can be freed and that the file upload failed.");

                // Note that this is done even when the file upload fails. IoT Hub has a fixed number of SAS URIs allowed active
                // at any given time. Once you are done with the file upload, you should free your SAS URI so that other
                // SAS URIs can be generated. If a SAS URI is not freed through this API, then it will free itself eventually
                // based on how long SAS URIs are configured to live on your IoT Hub.
                FileUploadCompletionNotification completionNotification = new FileUploadCompletionNotification(sasUriResponse.getCorrelationId(), false);
                client.completeFileUpload(completionNotification);

                System.out.println("Notified IoT Hub that the SAS URI can be freed and that the file upload was a failure.");

                client.closeNow();
                return;
            }

            System.out.println("Successfully uploaded file to Azure Storage.");

            System.out.println("Notifying IoT Hub that the SAS URI can be freed and that the file upload was a success.");
            FileUploadCompletionNotification completionNotification = new FileUploadCompletionNotification(sasUriResponse.getCorrelationId(), true);
            client.completeFileUpload(completionNotification);
            System.out.println("Successfully notified IoT Hub that the SAS URI can be freed, and that the file upload was a success");
        }
        catch (Exception e)
        {
            System.out.println("On exception, shutting down \n" + " Cause: " + e.getCause() + " \nERROR: " +  e.getMessage());
            System.out.println("Shutting down...");
            client.closeNow();
        }

        System.out.println("Press any key to exit...");

        Scanner scanner = new Scanner(System.in);
        scanner.nextLine();
        System.out.println("Shutting down...");
        client.closeNow();
    }
}
애플리케이션 빌드 및 실행
my-app 폴더의 명령 프롬프트에서 다음 명령을 실행합니다.
mvn clean package -DskipTests
빌드가 완료된 후 다음 명령을 사용하여 애플리케이션을 실행합니다.
mvn exec:java -Dexec.mainClass="com.mycompany.app.App"
포털을 사용하면 구성한 스토리지 컨테이너에 업로드된 파일을 볼 수 있습니다.

파일 업로드 알림 수신
이 섹션에서는 IoT Hub에서 파일 업로드 알림 메시지를 수신하는 Java 콘솔 앱을 만듭니다.
프로젝트의 디렉터리를 만들고 해당 디렉터리에서 셸을 시작합니다. 명령줄에서 다음을 실행합니다.
mvn archetype:generate -DgroupId=com.mycompany.app -DartifactId=my-app -DarchetypeArtifactId=maven-archetype-quickstart -DarchetypeVersion=1.4 -DinteractiveMode=false명령 프롬프트에서 새
my-app폴더로 이동합니다.텍스트 편집기를 사용하여
my-app폴더의pom.xml파일을 다음으로 바꿉니다. 서비스 클라이언트 종속성을 추가하면 IoT Hub 서비스와 통신하기 위해 애플리케이션에서 iothub-java-service-client 패키지를 사용할 수 있습니다.<?xml version="1.0" encoding="UTF-8"?> <project xmlns="http://maven.apache.org/POM/4.0.0" xmlns:xsi="http://www.w3.org/2001/XMLSchema-instance" xsi:schemaLocation="http://maven.apache.org/POM/4.0.0 http://maven.apache.org/xsd/maven-4.0.0.xsd"> <modelVersion>4.0.0</modelVersion> <groupId>com.mycompany.app</groupId> <artifactId>my-app</artifactId> <version>1.0-SNAPSHOT</version> <name>my-app</name> <!-- FIXME change it to the project's website --> <url>http://www.example.com</url> <properties> <project.build.sourceEncoding>UTF-8</project.build.sourceEncoding> <maven.compiler.source>1.7</maven.compiler.source> <maven.compiler.target>1.7</maven.compiler.target> </properties> <dependencies> <dependency> <groupId>com.microsoft.azure.sdk.iot</groupId> <artifactId>iot-device-client</artifactId> <version>1.30.1</version> </dependency> <dependency> <groupId>com.microsoft.azure.sdk.iot</groupId> <artifactId>iot-service-client</artifactId> <version>1.7.23</version> </dependency> <dependency> <groupId>org.slf4j</groupId> <artifactId>slf4j-log4j12</artifactId> <version>1.7.29</version> </dependency> <dependency> <groupId>junit</groupId> <artifactId>junit</artifactId> <version>4.11</version> <scope>test</scope> </dependency> </dependencies> <build> <pluginManagement><!-- lock down plugins versions to avoid using Maven defaults (may be moved to parent pom) --> <plugins> <plugin> <groupId>org.apache.maven.plugins</groupId> <artifactId>maven-compiler-plugin</artifactId> <version>3.3</version> <configuration> <source>1.7</source> <target>1.7</target> </configuration> </plugin> <plugin> <artifactId>maven-shade-plugin</artifactId> <version>2.4</version> <executions> <execution> <phase>package</phase> <goals> <goal>shade</goal> </goals> <configuration> <filters> <filter> <artifact>*:*</artifact> <excludes> <exclude>META-INF/*.SF</exclude> <exclude>META-INF/*.RSA</exclude> </excludes> </filter> </filters> <shadedArtifactAttached>true</shadedArtifactAttached> <shadedClassifierName>with-deps</shadedClassifierName> </configuration> </execution> </executions> </plugin> </plugins> </pluginManagement> </build> </project>참고 항목
Maven 검색을 사용하여 iot-service-client의 최신 버전을 확인할 수 있습니다.
pom.xml파일을 저장한 후 닫습니다.IoT Hub 서비스 연결 문자열을 가져옵니다.
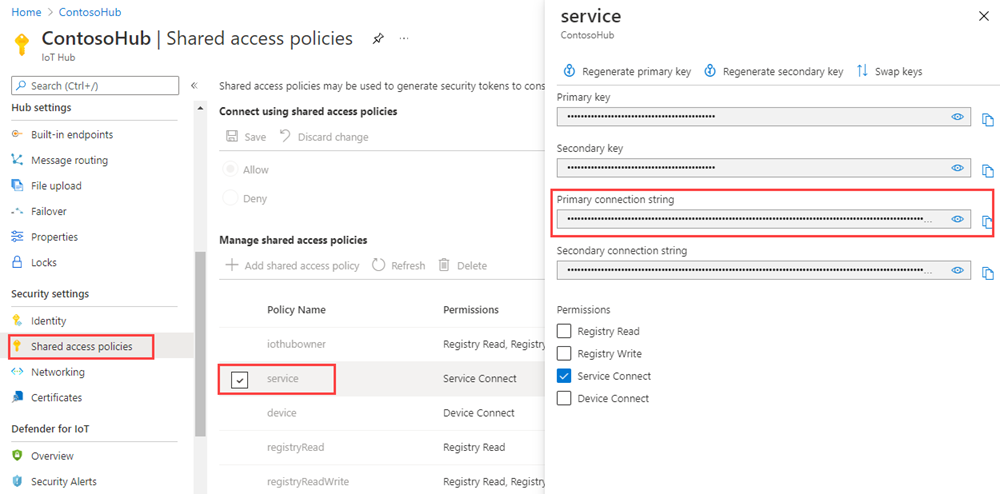
service 정책에 대한 IoT Hub 연결 문자열을 가져오려면 다음 단계를 수행합니다.
Azure Portal에서 리소스 그룹을 선택합니다. 허브가 있는 리소스 그룹을 선택한 다음, 리소스 목록에서 허브를 선택합니다.
IoT Hub의 왼쪽 창에서 공유 액세스 정책을 선택합니다.
정책 목록에서 ervice 정책을 선택합니다.
기본 연결 문자열을 복사하고 값을 저장합니다.
IoT Hub 공유 액세스 정책 및 사용 권한에 대한 자세한 내용은 액세스 제어 및 권한을 참조하세요.
텍스트 편집기를 사용하여
my-app\src\main\java\com\mycompany\app\App.java파일을 열고 코드를 다음으로 바꿉니다.package com.mycompany.app; import com.microsoft.azure.sdk.iot.service.*; import java.io.IOException; import java.net.URISyntaxException; import java.util.concurrent.ExecutorService; import java.util.concurrent.Executors; public class App { private static final String connectionString = "{Your service connection string here}"; private static final IotHubServiceClientProtocol protocol = IotHubServiceClientProtocol.AMQPS; public static void main(String[] args) throws Exception { ServiceClient sc = ServiceClient.createFromConnectionString(connectionString, protocol); FileUploadNotificationReceiver receiver = sc.getFileUploadNotificationReceiver(); receiver.open(); FileUploadNotification fileUploadNotification = receiver.receive(2000); if (fileUploadNotification != null) { System.out.println("File Upload notification received"); System.out.println("Device Id : " + fileUploadNotification.getDeviceId()); System.out.println("Blob Uri: " + fileUploadNotification.getBlobUri()); System.out.println("Blob Name: " + fileUploadNotification.getBlobName()); System.out.println("Last Updated : " + fileUploadNotification.getLastUpdatedTimeDate()); System.out.println("Blob Size (Bytes): " + fileUploadNotification.getBlobSizeInBytes()); System.out.println("Enqueued Time: " + fileUploadNotification.getEnqueuedTimeUtcDate()); } else { System.out.println("No file upload notification"); } receiver.close(); } }my-app\src\main\java\com\mycompany\app\App.java파일을 저장한 후 닫습니다.다음 명령을 사용하여 앱을 빌드하고 오류가 있는지 확인합니다.
mvn clean package -DskipTests

애플리케이션 실행
이제 애플리케이션을 실행할 준비가 되었습니다.
my-app 폴더의 명령 프롬프트에서 다음 명령을 실행합니다.
mvn exec:java -Dexec.mainClass="com.mycompany.app.App"
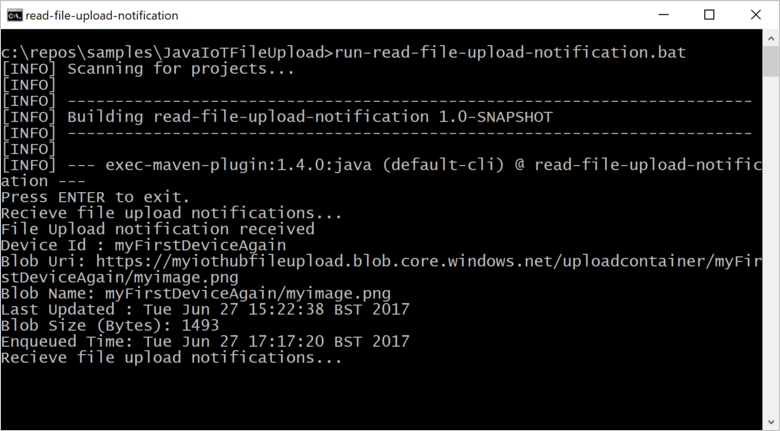
다음 스크린샷은 read-file-upload-notification 앱의 출력을 보여 줍니다.
다음 단계
이 문서에서는 디바이스에서 파일 업로드를 단순화하기 위해 IoT Hub의 파일 업로드 기능을 사용하는 방법을 알아보았습니다. 다음 문서에서 이 기능을 계속 탐색할 수 있습니다.
IoT Hub의 기능을 추가로 탐색하려면 다음을 참조하세요.