패킷 캡처를 사용하여 경고 및 Azure Functions를 사용하여 네트워크를 사전에 모니터링
Azure Network Watcher의 패킷 캡처 기능은 VM(가상 머신) 내/외부 트래픽을 추적하는 캡처 세션을 만듭니다. 캡처 파일에는 모니터링하려는 트래픽만 추적하도록 정의하는 필터가 있을 수 있습니다. 이 데이터는 스토리지 BLOB이나 게스트 컴퓨터에 로컬로 저장됩니다.
Azure Functions와 같은 다른 자동화 시나리오에서 원격으로 이 기능을 시작할 수 있습니다. 정의된 네트워크 변칙에 따라 자동 관리 캡처를 실행할 수 있습니다. 다른 용도로는 네트워크 통계 수집, 네트워크 침입에 대한 정보 가져오기, 클라이언트/서버 통신 디버깅 등이 있습니다.
Azure에 배포된 리소스는 지속적으로 실행됩니다. 모든 리소스의 상태 항상 적극적으로 모니터링하는 것은 어렵습니다. 예를 들어 오전 2시에 문제가 발생하면 어떻게 되나요?
Azure 에코시스템 내에서 Network Watcher 경고 및 기능을 사용하면 데이터 및 도구로 사전에 대응하여 네트워크의 문제를 해결할 수 있습니다.
필수 조건
- 최신 버전의 Azure PowerShell
- Network Watcher의 기존 인스턴스. Network Watcher 인스턴스가 아직 없는 경우에는 새로 만듭니다.
- Windows 확장 또는 Linux 가상 머신 확장이 있고 Network Watcher와 동일한 지역에 기존 가상 머신이 있음
시나리오
이 예제에서는 가상 머신에 평소보다 더 많은 나가는 트래픽이 있으며 경고를 받고자 합니다. 비슷한 프로세스를 사용하여 모든 조건에 대한 경고를 만들 수 있습니다.
인시던트가 경고를 트리거하면 패킷 수준 데이터를 통해 나가는 트래픽이 증가한 이유를 분석할 수 있습니다. 가상 머신을 원래 상태로 되돌리는 단계를 수행할 수 있습니다.
이 시나리오에서는 Network Watcher의 기존 인스턴스와 유효한 가상 머신이 있는 리소스 그룹이 있다고 가정합니다.
패킷 캡처 워크플로는 다음과 같습니다.
- 인시던트가 VM에서 경고를 트리거합니다.
- 경고가 Azure 함수를 호출합니다.
- Azure Function은 경고를 처리하고 Network Watcher 패킷 캡처 세션을 시작합니다.
- 패킷 캡처가 VM에서 실행되고 트래픽을 수집합니다.
- 이 패킷 캡처 파일은 검토 및 진단을 위해 스토리지 계정에 업로드됩니다.
이 프로세스를 자동화하려면 인시던트가 발생할 때 트리거될 VM에 대한 경고를 만들고 연결합니다. Network Watcher를 호출하는 함수도 만듭니다.
이 시나리오의 경우
- 패킷 캡처를 시작하는 Azure 함수를 만듭니다.
- 가상 머신에 대한 경고 규칙을 만들고 Azure Function을 호출할 경고 규칙을 구성합니다.
Azure Function 만들기
경고를 처리하고 패킷 캡처를 만드는 Azure 함수를 만들려면 먼저 함수 앱을 만들어야 합니다.
Azure Portal에 로그인합니다.
포털 맨 위에 있는 검색 상자에 함수 앱을 입력 합니다. 검색 결과에서 함수 앱을 선택합니다.
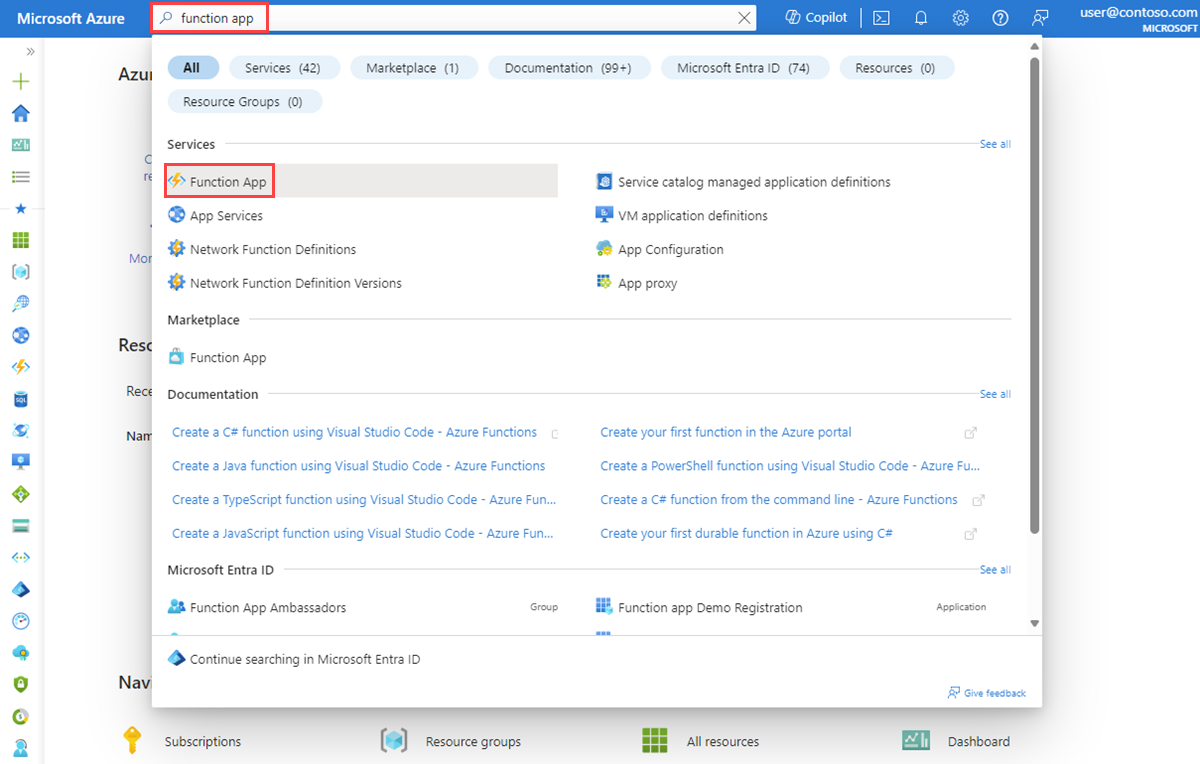
+ 만들기를 선택합니다.
함수 앱 만들기의 기본 사항 탭에서 다음 설정에 대한 값을 입력하거나 선택합니다.
- 프로젝트 세부 정보에서 함수 앱을 만들려는 구독과 앱을 포함할 리소스 그룹을 선택합니다.
- 인스턴스 세부 정보에서:
- 함수 앱 이름의 경우 함수 앱의 이름을 입력합니다. 이 이름은 .azurewebsites.net 추가됩니다.
- 코드 또는 컨테이너 이미지를 배포하시겠습니까? 코드 또는 컨테이너 이미지 게시 모드를 선택합니다.
- 런타임 스택의 경우 런타임 스택을 선택합니다.
- 버전에 대해 런타임 스택의 버전을 선택합니다.
- 지역의 경우 함수 앱을 만들 지역을 선택합니다.
- 운영 체제에서 현재 사용하는 운영 체제 유형을 선택합니다. Azure는 런타임 스택 선택에 따라 운영 체제 유형을 권장합니다.
- 호스팅에서 함수 앱에 사용할 계획 유형을 선택합니다. 다음 옵션 중에서 선택합니다.
- 소비(서버리스): 가장 낮은 비용을 위한 이벤트 기반 크기 조정의 경우.
- Functions Premium: 이벤트 기반 크기 조정 및 네트워크 격리를 사용하는 엔터프라이즈 수준 서버리스 애플리케이션의 경우
- App Service 계획: 기존 Azure 앱 Service 계획에서 컴퓨팅을 다시 사용합니다.
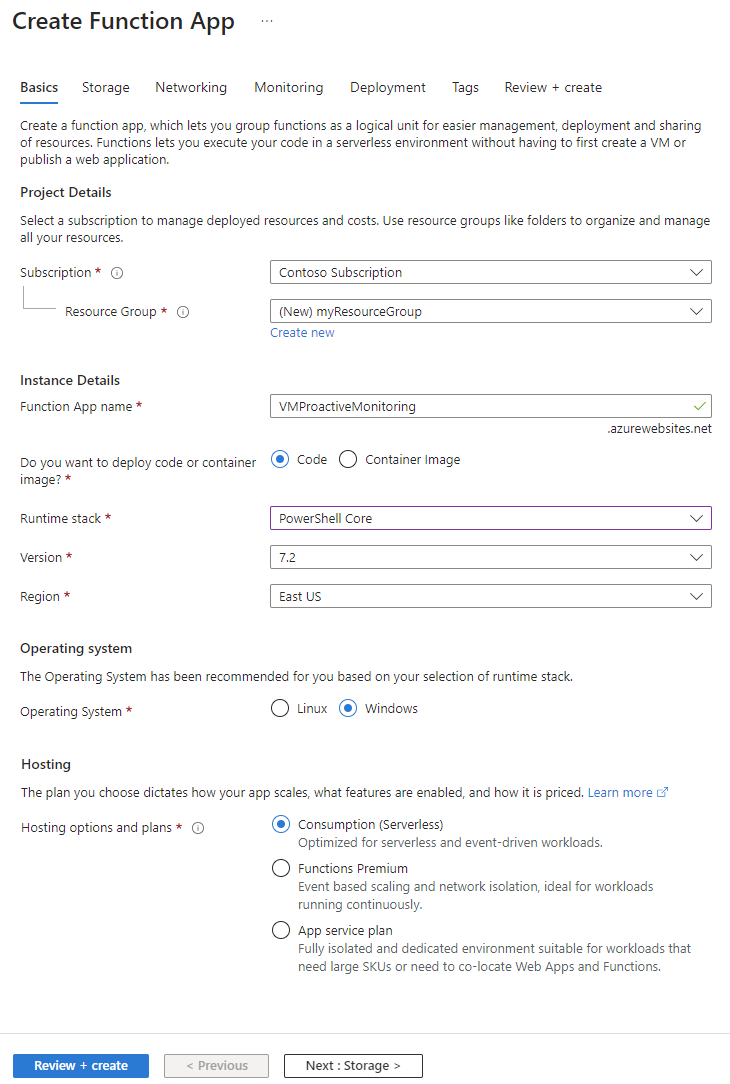
검토 + 만들기를 선택하여 앱을 만듭니다.


이제 함수를 만들 수 있습니다.
만든 함수 앱에서 함수를 선택한 다음 만들기를 선택하여 함수 만들기 창을 엽니다.
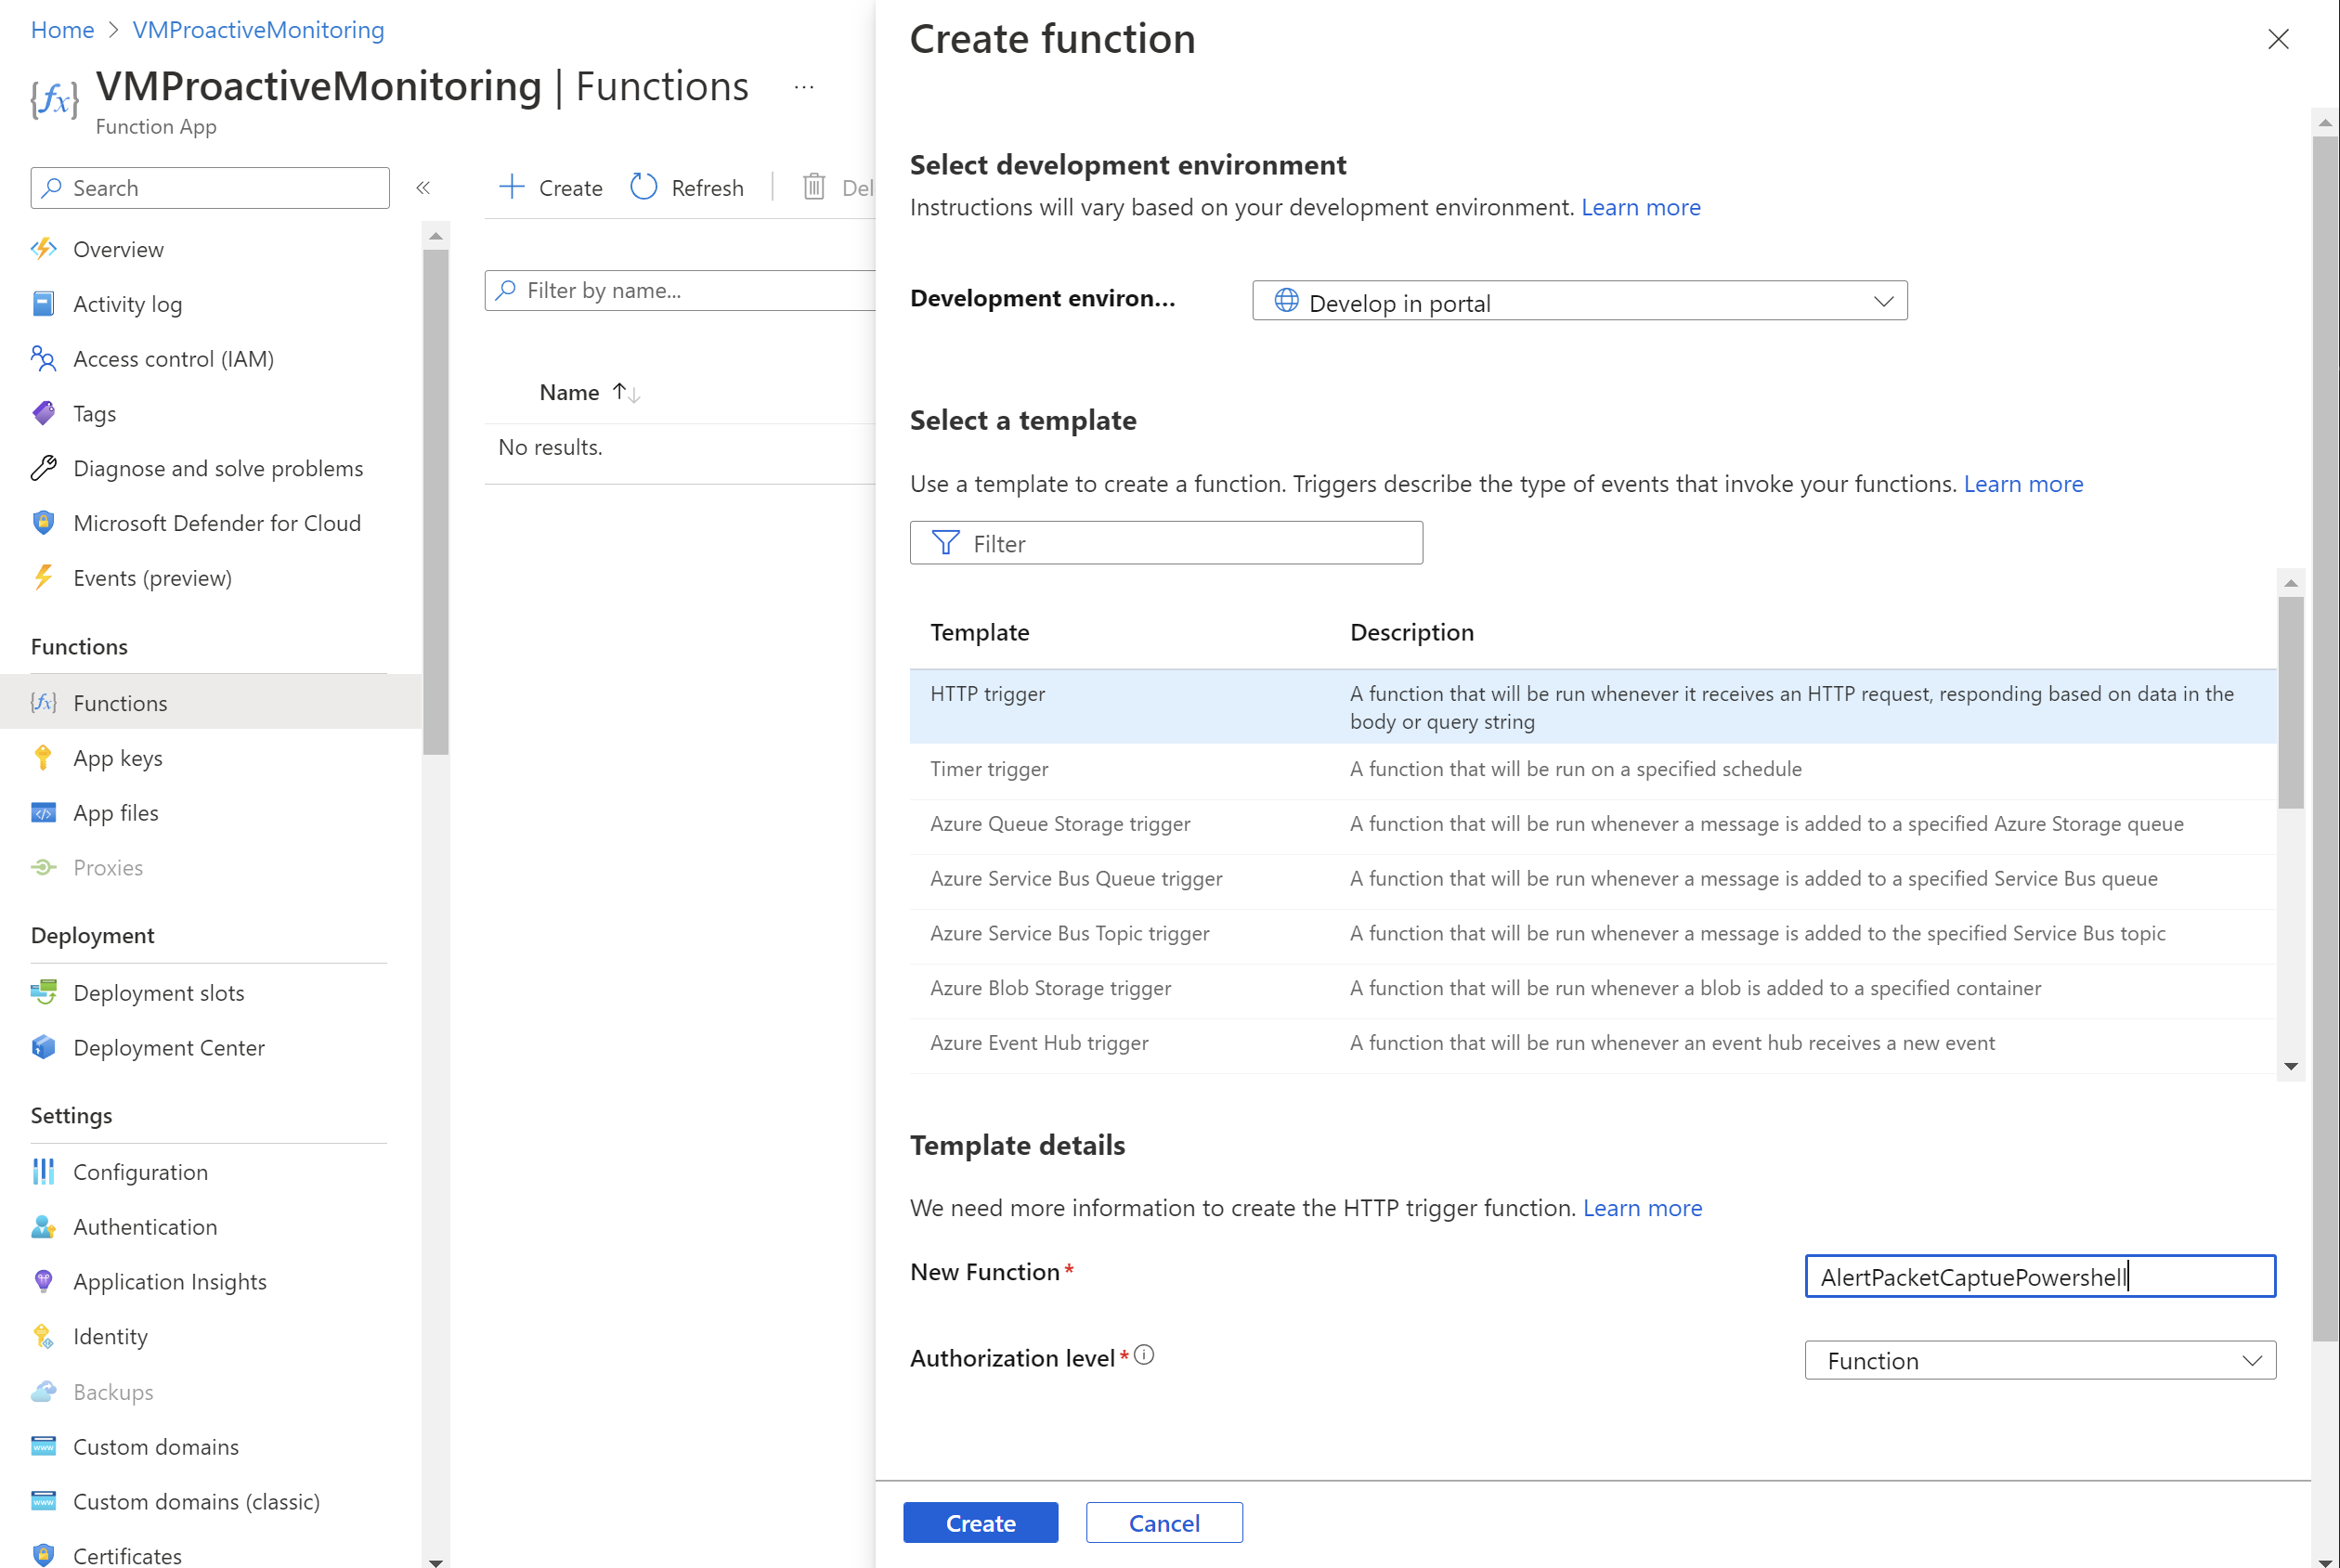
개발 환경으로 포털에서 개발을 선택합니다.
템플릿 선택에서 HTTP 트리거를 선택합니다.
템플릿 세부 정보 섹션에서 다음을 수행합니다.
- 새 함수의 경우 함수의 이름을 입력합니다.
- 권한 부여 수준으로 함수를 선택합니다.
만들기를 실행합니다.
만든 함수로 이동하여 Code + Test를 선택합니다.
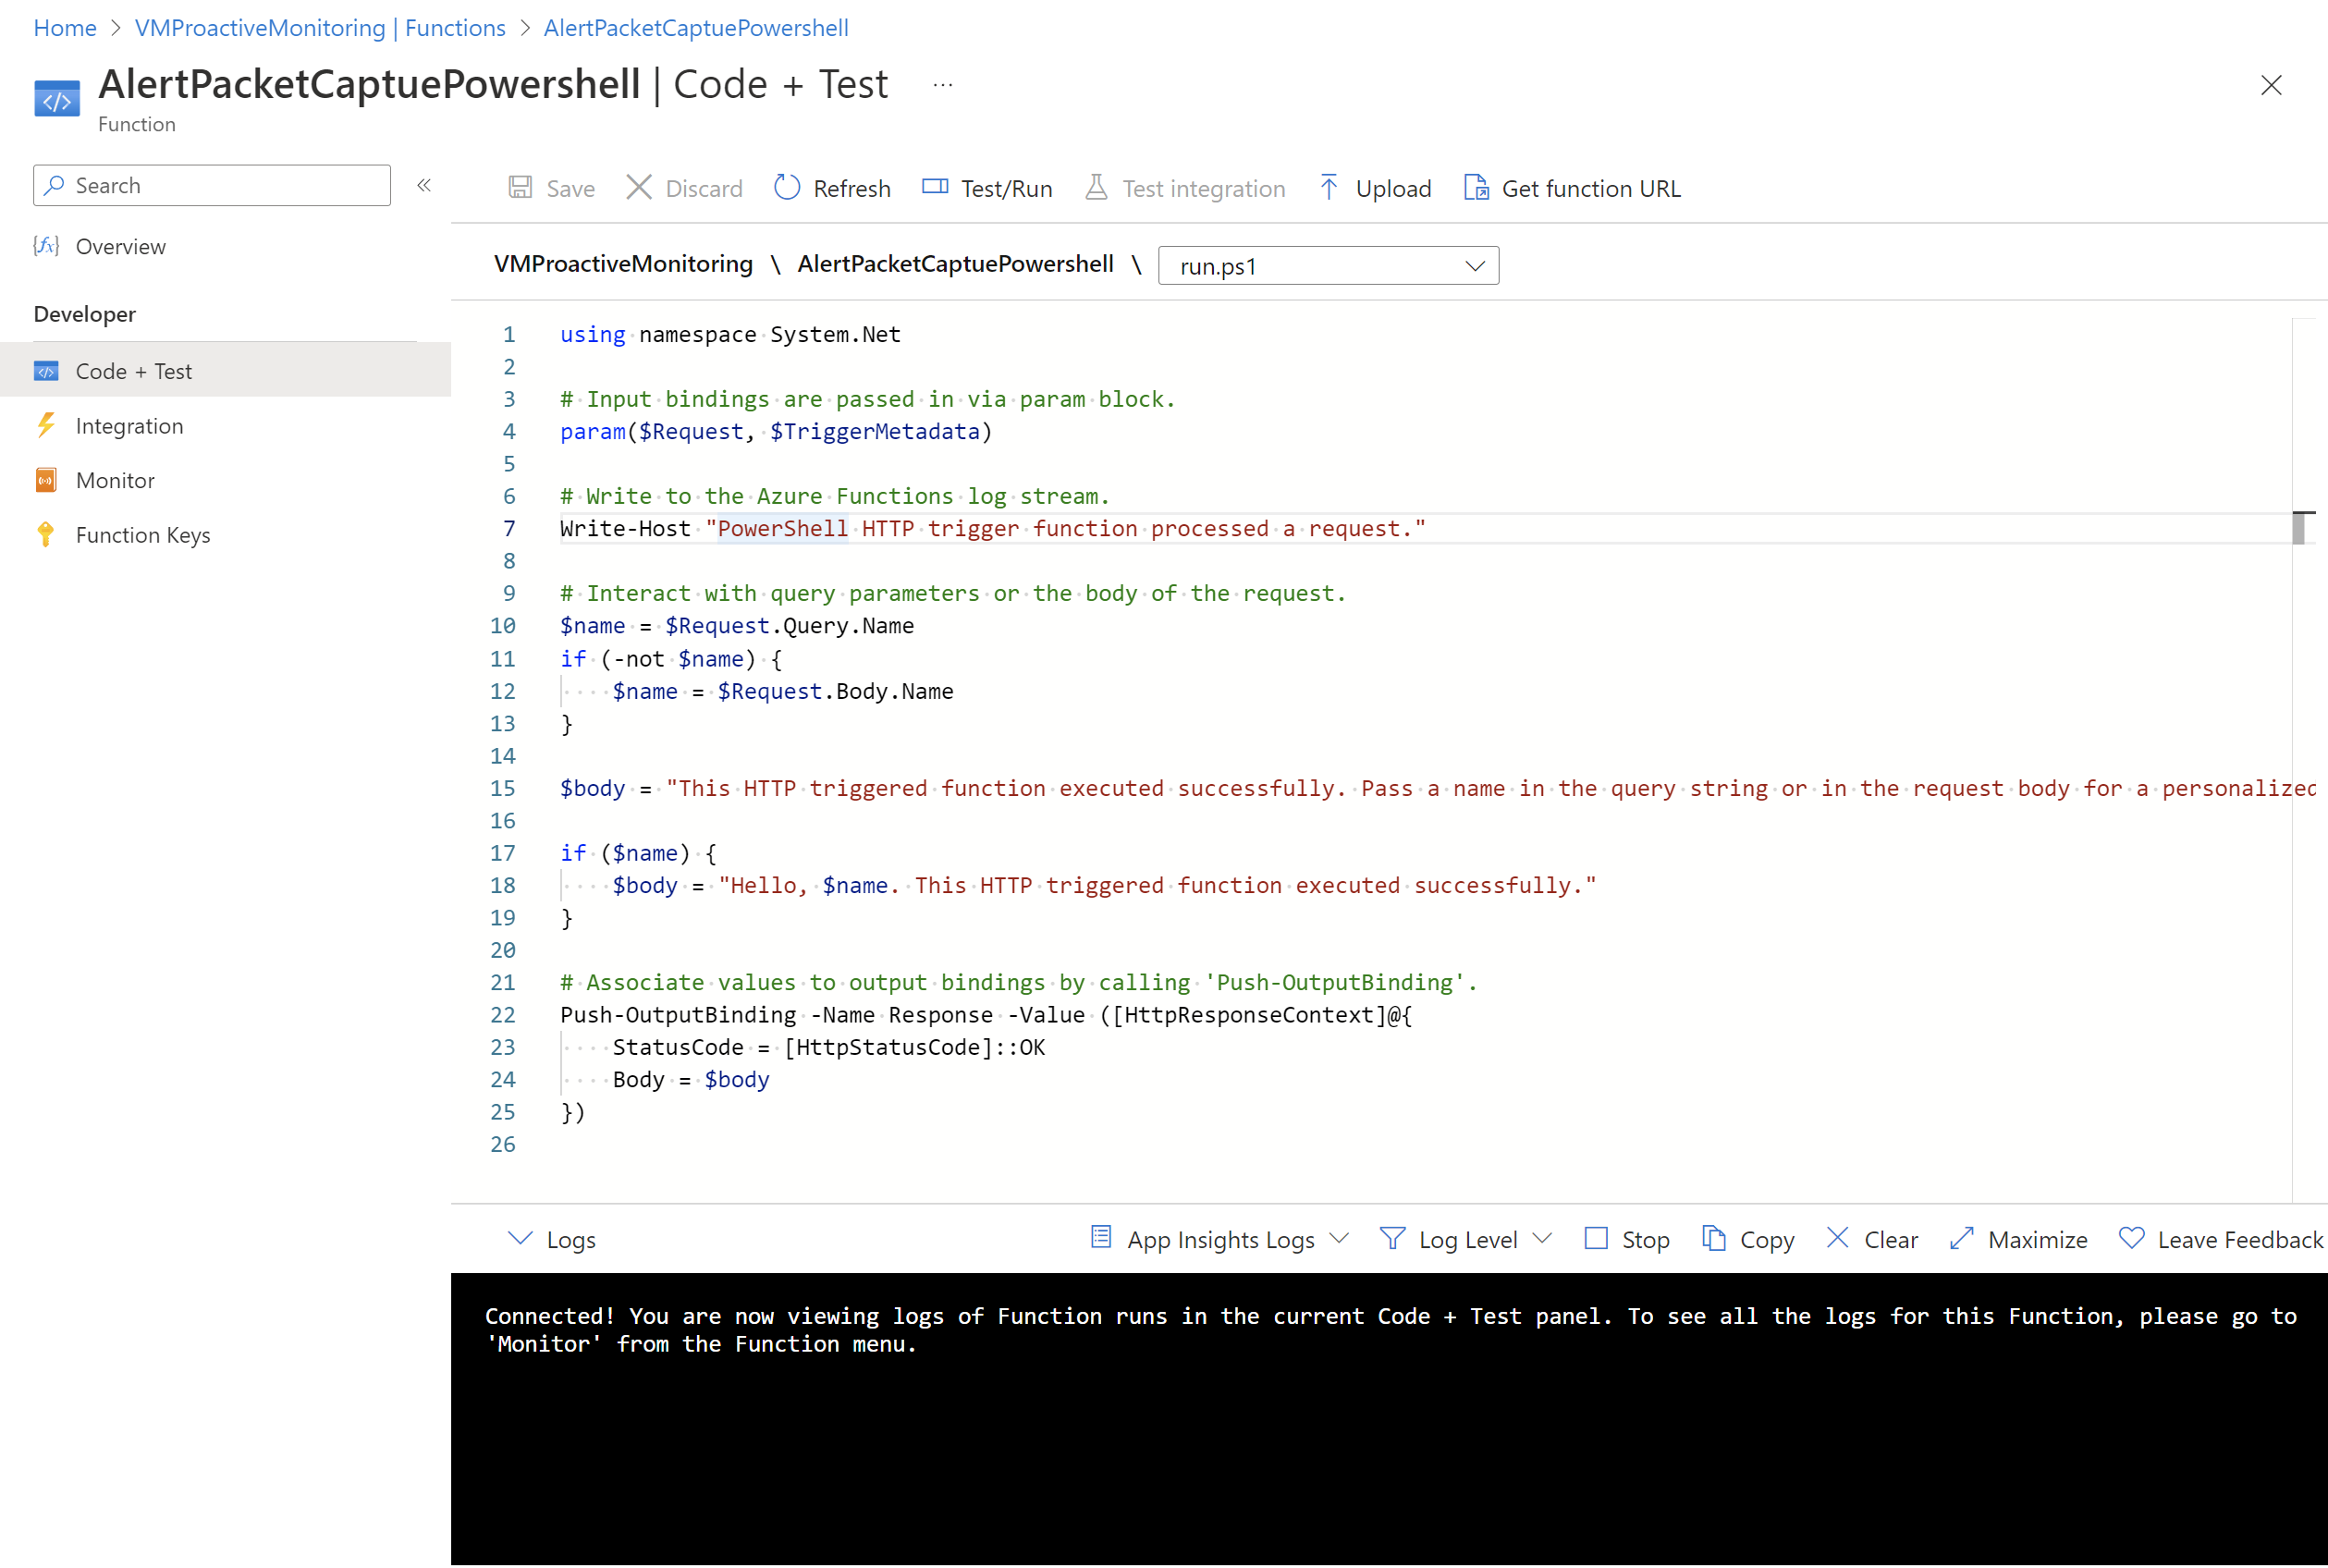
스크립트를 업데이트하고 저장을 선택합니다.
인증 구성
PowerShell cmdlet을 사용하려면 함수 앱에서 인증을 구성해야 합니다. 인증을 구성하려면 환경 변수를 구성하고 암호화된 키 파일을 함수 앱에 업로드합니다.
참고 항목
이 시나리오에서는 Azure Functions를 사용하여 인증을 구현하는 방법에 대한 하나의 예제만 제공합니다. 동일한 작업을 수행하는 다른 방법이 있습니다.
다음 PowerShell 스크립트는 PassEncryptKey.key라는 키 파일을 만듭니다. 또한 제공된 암호의 암호화된 버전을 제공합니다. 이 암호는 인증에 사용되는 Microsoft Entra 애플리케이션에 대해 정의된 것과 동일한 암호입니다.
#Variables
$keypath = "C:\temp\PassEncryptKey.key"
$AESKey = New-Object Byte[] 32
$Password = "<insert a password here>"

#Keys
[Security.Cryptography.RNGCryptoServiceProvider]::Create().GetBytes($AESKey)
Set-Content $keypath $AESKey

#Get encrypted password
$secPw = ConvertTo-SecureString -AsPlainText $Password -Force
$AESKey = Get-content $KeyPath
$Encryptedpassword = $secPw | ConvertFrom-SecureString -Key $AESKey
$Encryptedpassword
환경 변수의 값 검색
인증 값에 액세스하는 데 필요한 다음 환경 변수를 설정합니다.
AzureClientIDAzureTenantAzureCredPassword
애플리케이션 ID가 이미 있는 경우 해당 애플리케이션의 AzureClientID값 AzureTenant과 AzureCredPassword 해당 값을 사용합니다. 환경 변수가 없으면 환경 변수 저장 섹션으로 진행합니다 .
AzureClientID
클라이언트 ID는 Microsoft Entra ID에 있는 애플리케이션의 ID입니다. 클라이언트 ID를 가져오려면 다음을 수행합니다.
사용할 애플리케이션이 아직 없는 경우 다음 cmdlet을 실행하여 애플리케이션을 만듭니다.
$app = New-AzADApplication -DisplayName "ExampleAutomationAccount_MF" -HomePage "https://exampleapp.com" -IdentifierUris "https://exampleapp1.com/ExampleFunctionsAccount" -Password "<same password as defined earlier>"
New-AzADServicePrincipal -ApplicationId $app.ApplicationId
Start-Sleep 15]
New-AzRoleAssignment -RoleDefinitionName Contributor -ServicePrincipalName $app.ApplicationId
참고 항목
애플리케이션을 만들 때 사용하는 암호는 키 파일을 저장할 때 이전에 만든 암호와 동일해야 합니다.
Azure Portal에서 구독을 선택합니다. 사용할 구독을 선택한 다음, 액세스 제어(IAM)를 선택합니다.
사용할 계정을 선택한 다음 속성을 선택합니다. 애플리케이션 ID를 복사합니다.
AzureTenant
다음 PowerShell cmdlet을 실행하여 테넌트 ID를 가져옵니다.
(Get-AzSubscription -SubscriptionName "<subscriptionName>").TenantId
AzureCredPassword
환경 변수의 AzureCredPassword 값은 다음 PowerShell 샘플을 실행하여 얻을 수 있는 값입니다. 이 샘플은 이전 인증 구성 섹션에서 보여 준 것과 동일합니다. 필요한 값은 변수의 출력입니다 $Encryptedpassword . 이 출력은 PowerShell 스크립트를 사용하여 암호화한 서비스 주체 암호입니다.
#Variables
$keypath = "C:\temp\PassEncryptKey.key"
$AESKey = New-Object Byte[] 32
$Password = "<insert a password here>"

#Keys
[Security.Cryptography.RNGCryptoServiceProvider]::Create().GetBytes($AESKey)
Set-Content $keypath $AESKey

#Get encrypted password
$secPw = ConvertTo-SecureString -AsPlainText $Password -Force
$AESKey = Get-content $KeyPath
$Encryptedpassword = $secPw | ConvertFrom-SecureString -Key $AESKey
$Encryptedpassword
환경 변수 저장
환경 변수를 저장하려면 다음을 수행합니다.
함수 앱으로 돌아갑니다. 구성>애플리케이션 설정을 선택합니다.
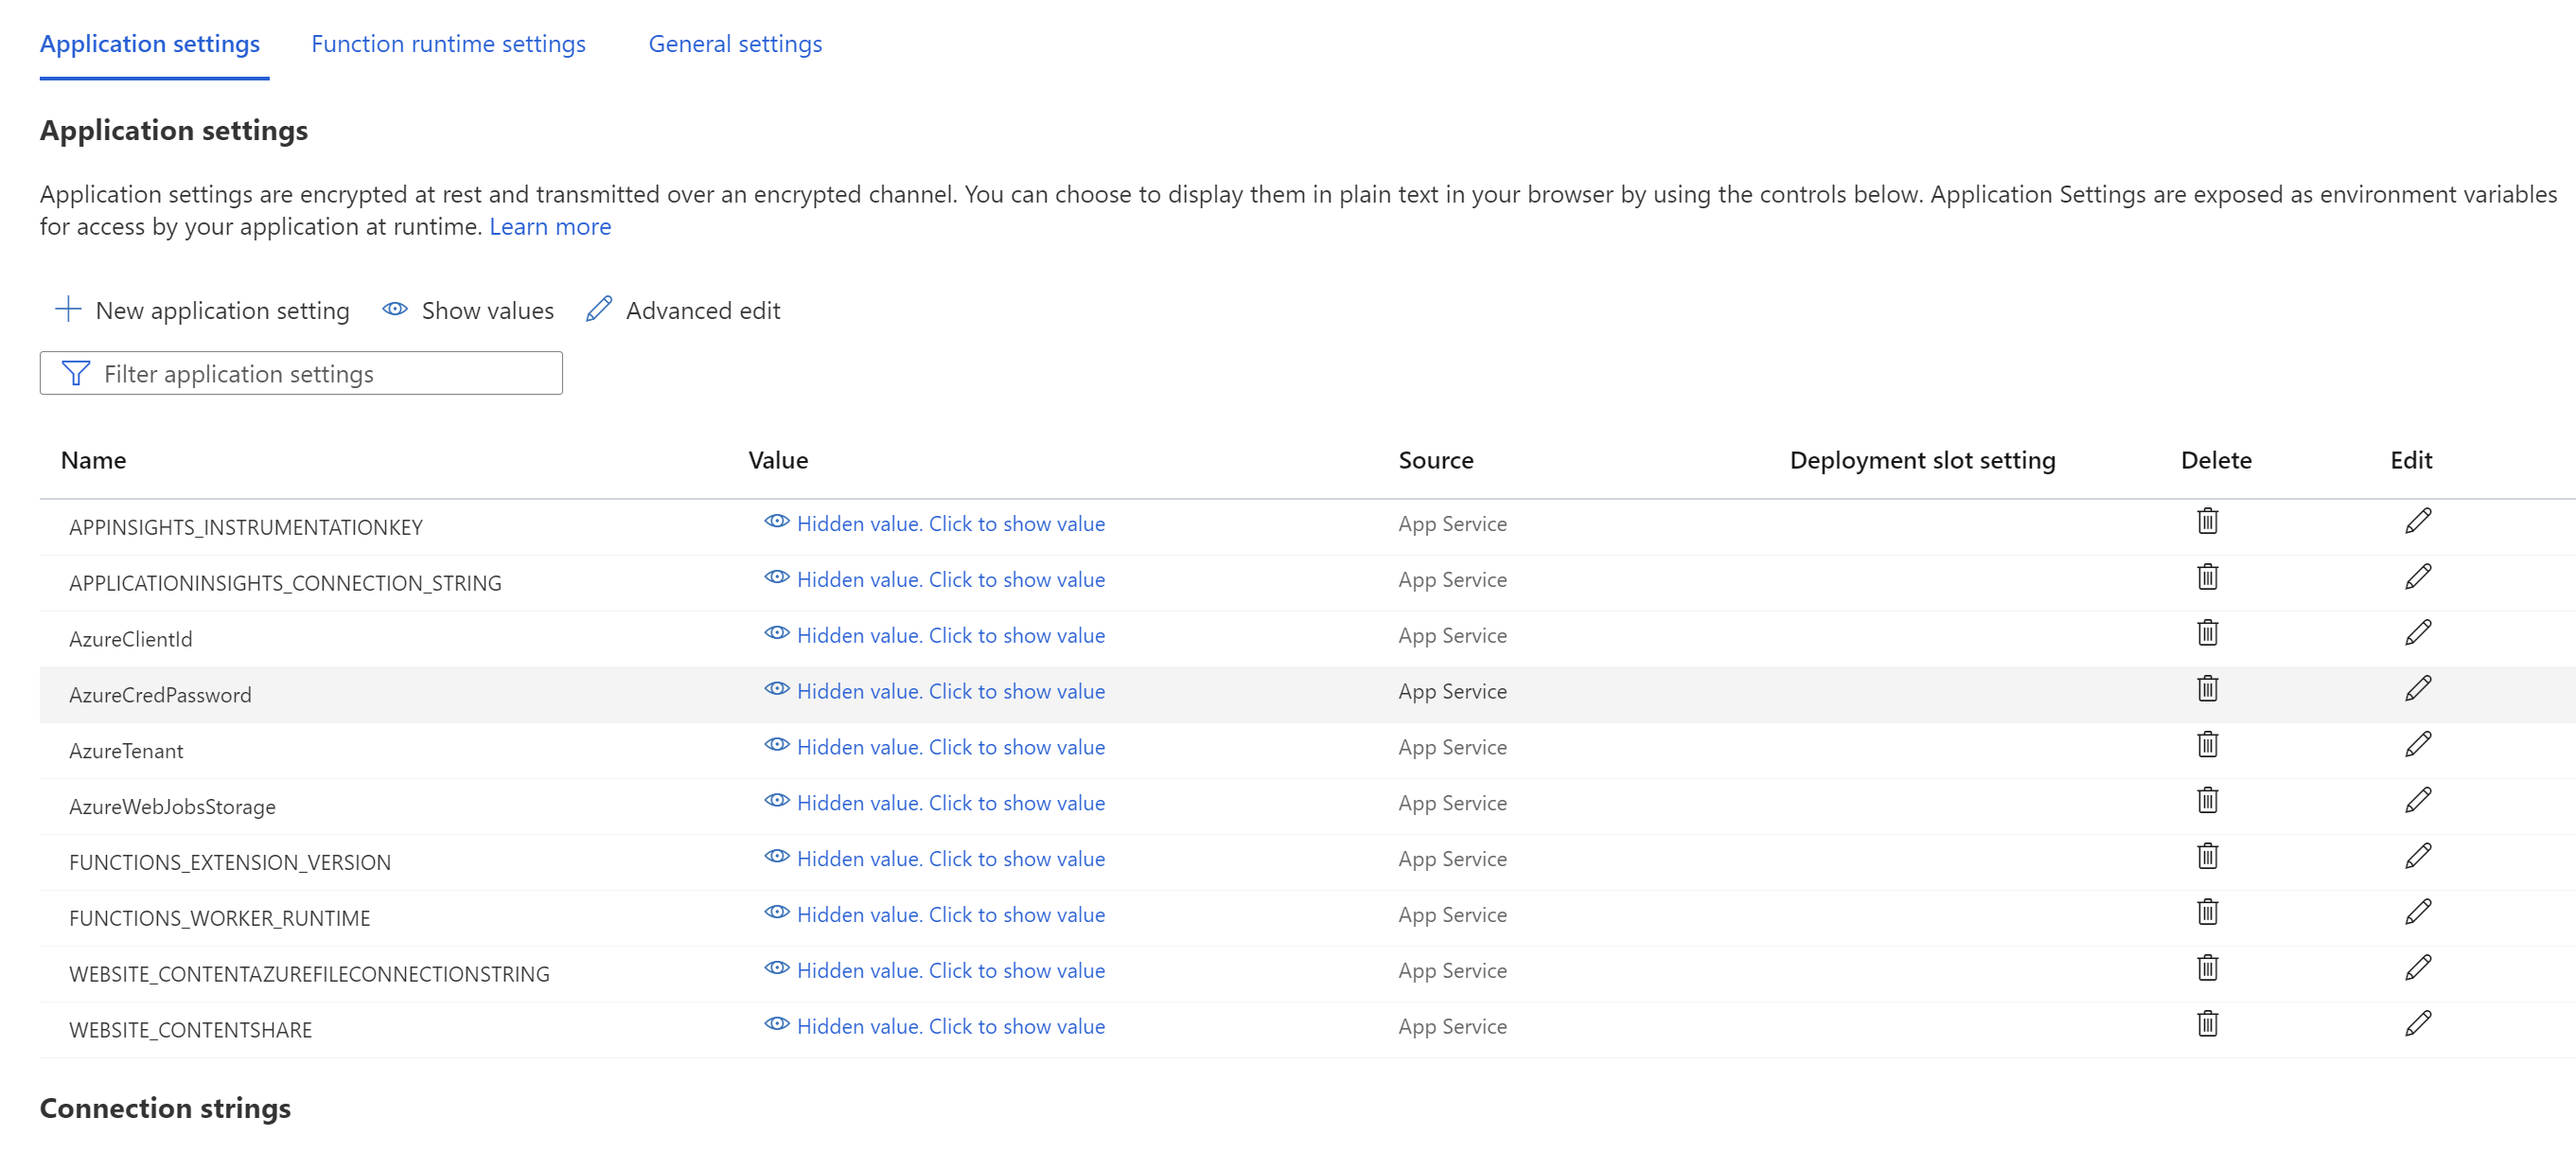
환경 변수와 해당 값을 앱 설정에 추가하고 저장을 선택합니다.
함수에 PowerShell 추가
이제 Azure Function 내에서 Network Watcher를 호출합니다. 요구 사항에 따라 이 함수의 구현이 달라질 수 있습니다. 하지만 코드의 일반적인 흐름은 다음과 같습니다.
- 입력 매개 변수를 처리합니다.
- 기존 패킷 캡처를 쿼리하여 한도를 확인하고 이름 충돌을 해결합니다.
- 적절한 매개 변수를 사용하여 패킷 캡처를 만듭니다.
- 패킷 캡처가 완료될 때까지 주기적으로 폴링합니다.
- 사용자에게 패킷 캡처 세션이 완료되었음을 알립니다.
다음 예제는 함수에서 사용할 수 있는 PowerShell 코드입니다. 및 resourceGroupNamestorageAccountName에 대한 subscriptionId값을 바꿔야 합니다.
# Input bindings are passed in via parameter block
param($Request, $TriggerMetadata)

$essentials = $Request.body.data.essentials
$alertContext = $Request.body.data.alertContext


# Storage account ID to save captures in
$storageaccountid = "/subscriptions/{subscriptionId}/resourceGroups/{resourceGroupName}/providers/Microsoft.Storage/storageAccounts/{storageAccountName}"

# Packet capture variables
$packetCaptureName = "PSAzureFunction"
$packetCaptureLimit = 100
$packetCaptureDuration = 30

# Credentials
# Set the credentials in the configurations
$tenant = $env:AzureTenant
$pw = $env:AzureCredPassword
$clientid = $env:AzureClientId
$password = ConvertTo-SecureString $pw -AsPlainText -Force
$credential = New-Object System.Management.Automation.PSCredential ($clientid, $password)

Connect-AzAccount -ServicePrincipal -Tenant $tenant -Credential $credential #-WarningAction SilentlyContinue | out-null

if ($alertContext.condition.allOf.metricNamespace -eq "Microsoft.Compute/virtualMachines") {

    # Get the VM firing this alert
    $vm = Get-AzVM -ResourceId $essentials.alertTargetIDs[0]

    # Get the Network Watcher instance in the VM's region
    $networkWatcher = Get-AzNetworkWatcher -Location $vm.Location

    # Get existing packet captures
    $packetCaptures = Get-AzNetworkWatcherPacketCapture -NetworkWatcher $networkWatcher

    # Remove an existing packet capture created by the function (if it exists)
    $packetCaptures | ForEach-Object { if ($_.Name -eq $packetCaptureName)
        {
            Remove-AzNetworkWatcherPacketCapture -NetworkWatcher $networkWatcher -PacketCaptureName $packetCaptureName
        }
    }

    # Initiate packet capture on the VM that fired the alert
    if ($packetCaptures.Count -lt $packetCaptureLimit) {
        Write-Output "Initiating Packet Capture"
        New-AzNetworkWatcherPacketCapture -NetworkWatcher $networkWatcher -TargetVirtualMachineId $vm.Id -PacketCaptureName $packetCaptureName -StorageAccountId $storageaccountid -TimeLimitInSeconds $packetCaptureDuration
    }
}
이전 스키마를 사용하는 경우 다음 PowerShell 코드를 사용합니다.
# Input bindings are passed in via parameter block
param($Request, $TriggerMetadata)
$details = $Request.RawBody | ConvertFrom-Json


# Process alert request body
$requestBody = $Request.Body.data

# Storage account ID to save captures in
$storageaccountid = "/subscriptions/{subscriptionId}/resourceGroups/{resourceGroupName}/providers/Microsoft.Storage/storageAccounts/{storageAccountName}"

# Packet capture variables
$packetCaptureName = "PSAzureFunction"
$packetCaptureLimit = 100
$packetCaptureDuration = 30

# Credentials
# Set the credentials in the configurations
$tenant = $env:AzureTenant
$pw = $env:AzureCredPassword
$clientid = $env:AzureClientId

$password = ConvertTo-SecureString $pw -AsPlainText -Force
$credential = New-Object System.Management.Automation.PSCredential ($clientid, $password)

Connect-AzAccount -ServicePrincipal -Tenant $tenant -Credential $credential #-WarningAction SilentlyContinue | out-null

if ($requestBody.context.resourceType -eq "Microsoft.Compute/virtualMachines") {

    # Get the VM firing this alert
    $vm = Get-AzVM -ResourceGroupName $requestBody.context.resourceGroupName -Name $requestBody.context.resourceName

    # Get the Network Watcher instance in the VM's region
    $networkWatcher = Get-AzNetworkWatcher -Location $vm.Location

    # Get existing packet captures
    packetCaptures = Get-AzNetworkWatcherPacketCapture -NetworkWatcher $networkWatcher

    # Remove an existing packet capture created by the function (if it exists)
    $packetCaptures | ForEach-Object { if ($_.Name -eq $packetCaptureName)
        {
            Remove-AzNetworkWatcherPacketCapture -NetworkWatcher $networkWatcher -PacketCaptureName $packetCaptureName
        }
    }

    # Initiate packet capture on the VM that fired the alert
    if ($packetCaptures.Count -lt $packetCaptureLimit) {
        Write-Output "Initiating Packet Capture"
        New-AzNetworkWatcherPacketCapture -NetworkWatcher $networkWatcher -TargetVirtualMachineId $requestBody.context.resourceId -PacketCaptureName $packetCaptureName -StorageAccountId $storageaccountid -TimeLimitInSeconds $packetCaptureDuration
    }
}
VM에서 경고 구성
특정 메트릭이 할당한 임계값을 초과할 때 개인에게 알리도록 경고를 구성할 수 있습니다. 이 예제에서 경고는 전송된 Network Out 총 메트릭에 있지만 다른 많은 메트릭에 대해 경고를 트리거할 수 있습니다.
경고 규칙 만들기
기존 가상 머신으로 이동하고 경고 규칙을 추가합니다. 경고 규칙 만들기 페이지에서 다음 단계를 수행합니다.
신호 선택 창에서 신호의 이름을 검색하고 선택합니다. 이 예제 에서 Network Out 합계 는 선택한 신호입니다. 가상 머신의 모든 네트워크 인터페이스에서 바이트 수를 나타냅니다.
조건 탭에서 다음 값을 설정한 다음, 다음: 작업을 선택합니다.
설정 값 Threshold 정적 집계 유형 평균 Operator 보다 큼 임계값 3 확인 간격 1분 되돌아보기 기간 5분 작업 탭에서 작업 그룹 만들기를 선택합니다.
작업 그룹 만들기 페이지에서 구독, 리소스 그룹 및 지역 값을 선택합니다. 또한 작업 그룹 이름 및 표시 이름을 입력한 다음 다음: 알림을 선택합니다.
알림 탭에서 작업 유형에 대해 Azure Function을 선택합니다.
Azure 함수 창에서 구독, 리소스 그룹, 함수 앱 및 Azure Function 값을 선택합니다.
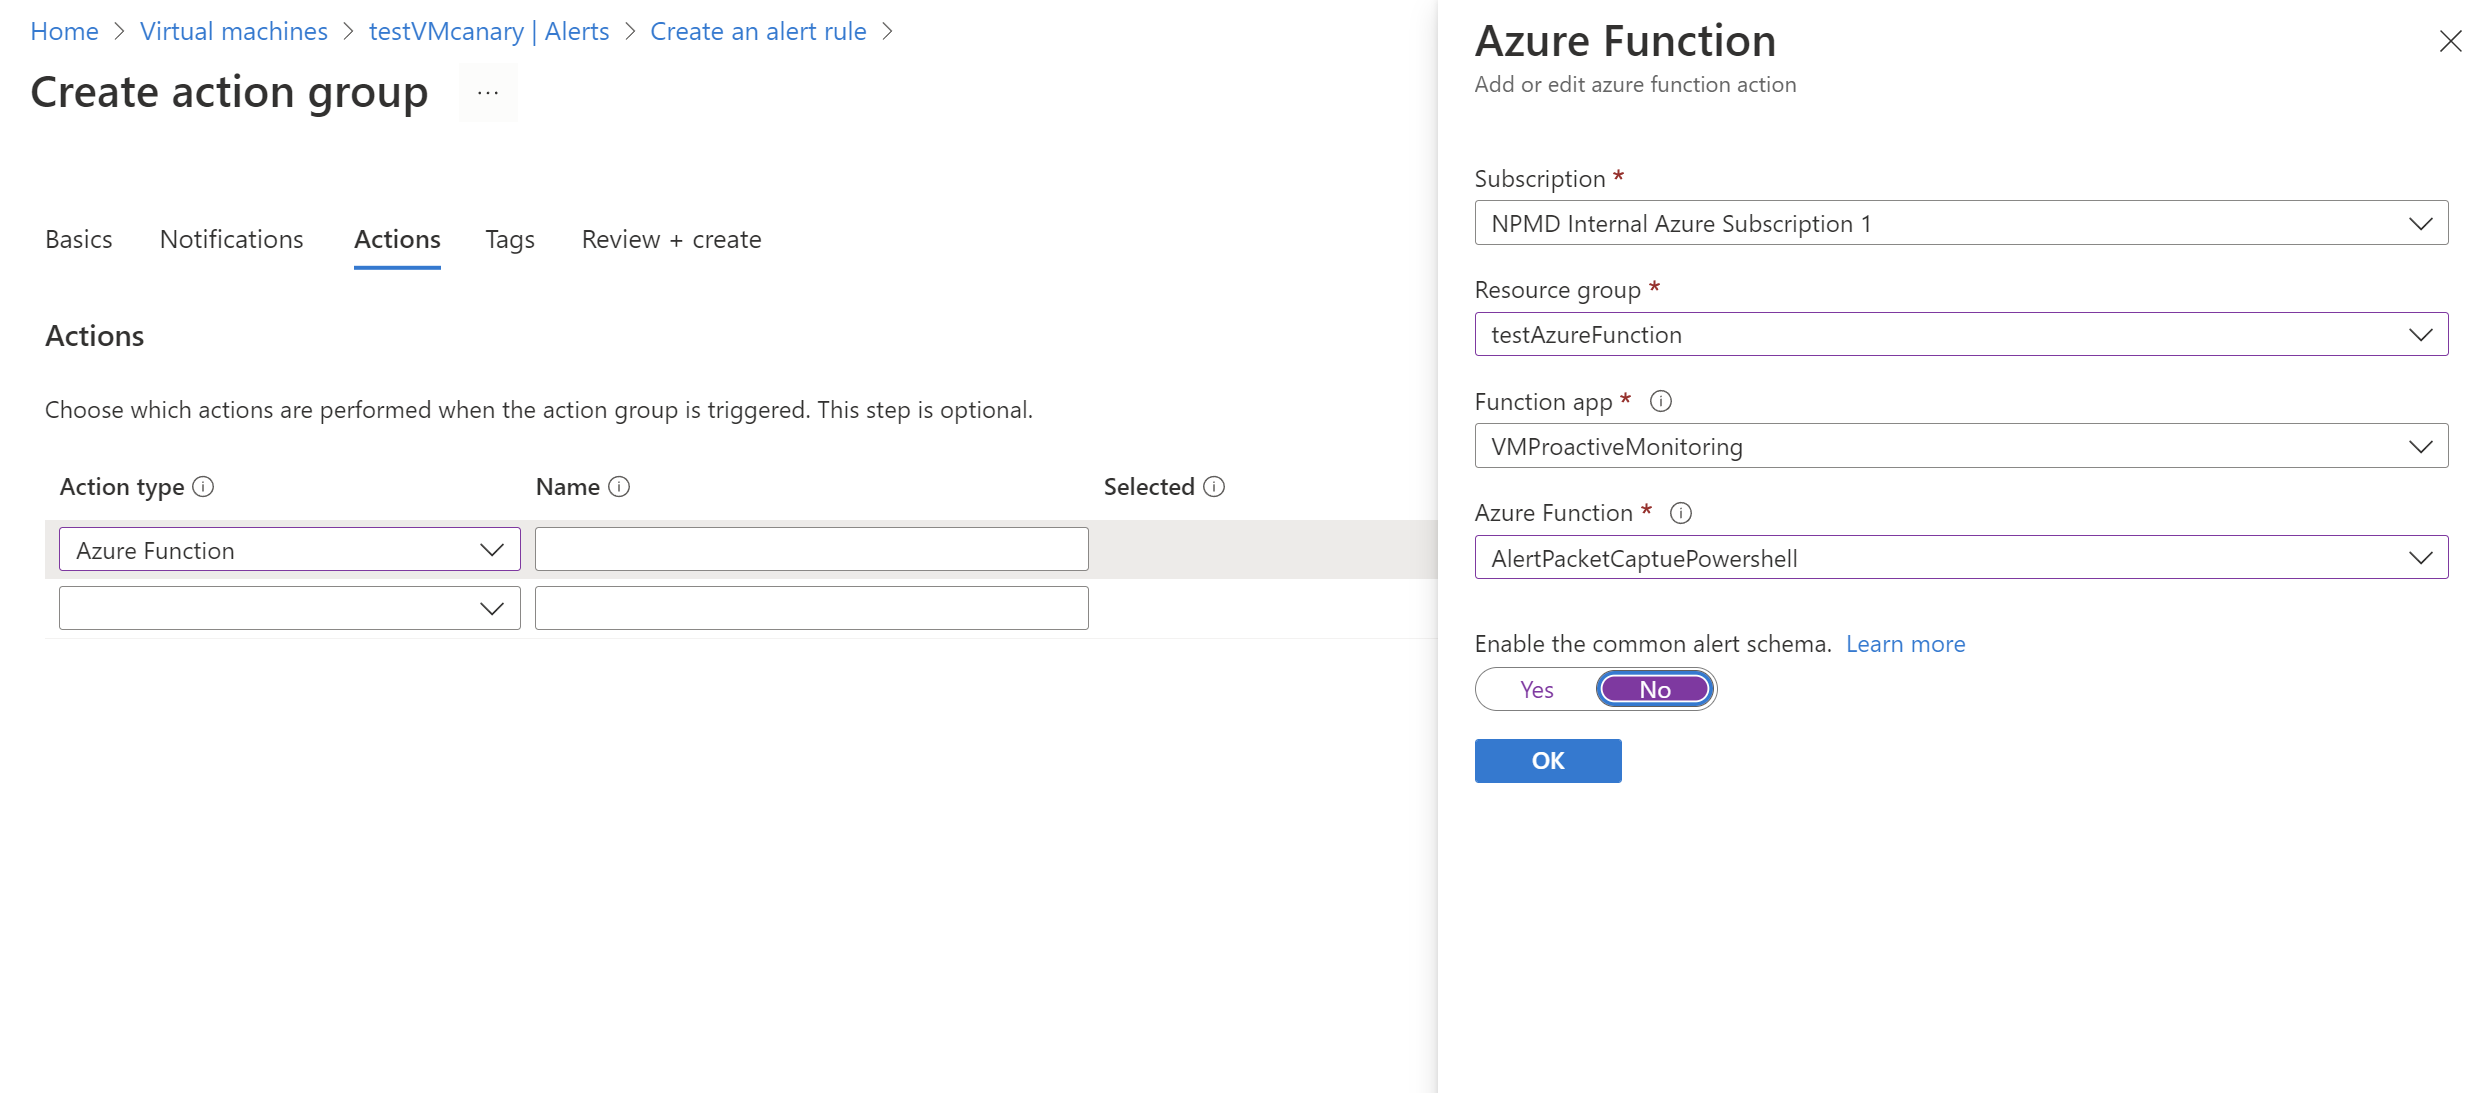
일반 경고 스키마 슬라이더 사용에서 아니요를 선택합니다. 그런 다음 확인을 선택합니다.
결과 검토
조건이 경고를 트리거한 후 Network Watcher는 패킷 캡처를 만듭니다. Network Watcher로 이동한 다음, 패킷 캡처를 선택합니다. 이 페이지에서 파일 링크를 선택하여 패킷 캡처를 다운로드할 수 있습니다.
캡처 파일이 로컬로 저장된 경우 가상 머신에 로그인하여 가져올 수 있습니다.
Azure Storage 계정에서 파일을 다운로드하는 방법에 대한 지침은 .NET용 Azure Blob Storage 클라이언트 라이브러리에 대한 빠른 시작을 참조하세요. Azure Storage Explorer 도구를 사용할 수도 있습니다.
캡처를 다운로드한 후 .cap 파일을 읽을 수 있는 Wireshark와 같은 도구를 사용하여 볼 수 있습니다.
다음 단계
Network Watcher 패킷 캡처 파일 검사를 읽고 분석하여 패킷 캡처를 보는 방법을 알아봅니다.