Azure Notification Hubs 보안 푸시
개요
Microsoft Azure의 푸시 알림 지원을 통해 사용하기 쉬운 다중 플랫폼 및 규모 확장 푸시 인프라에 액세스할 수 있어, 모바일 플랫폼용 소비자 애플리케이션 및 엔터프라이즈 애플리케이션 모두에 대한 푸시 알림을 매우 간단하게 구현할 수 있습니다.
규제나 보안 제약 조건 때문에 애플리케이션의 알림에 표준 푸시 알림 인프라를 통해 전송할 수 없는 어떤 항목을 포함해야 할 수 있습니다. 이 자습서에서는 클라이언트 디바이스와 앱 백 엔드 간에 인증된 보안 연결을 통해 중요한 정보를 전송하여 동일한 경험을 얻는 방법에 대해 설명합니다.
개략적으로 흐름은 다음과 같습니다.
- 앱 백 엔드:
- 백 엔드 데이터베이스에 보안 페이로드를 저장합니다.
- 이 알림의 ID를 디바이스에 보냅니다(보안 정보는 전송되지 않음).
- 알림 수신 시 디바이스의 앱:
- 디바이스가 보안 페이로드를 요청하는 백 엔드에 접속합니다.
- 앱이 디바이스에서 페이로드를 알림으로 표시할 수 있습니다.
앞의 흐름과 이 자습서에서는 사용자가 로그인한 후 디바이스가 인증 토큰을 로컬 스토리지에 저장한다고 가정합니다. 이렇게 하면 디바이스가 이 토큰을 사용하여 알림의 보안 페이로드를 검색할 수 있으므로 원활한 환경이 보장됩니다. 애플리케이션이 인증 토큰을 디바이스에 저장하지 않거나 이 토큰이 만료될 수 없으면 알림 수신 시 디바이스 앱은 사용자에게 앱을 시작할지 묻는 메시지가 포함된 일반 알림을 표시해야 합니다. 그리고 나서 앱은 사용자를 인증하고 알림 페이로드를 표시합니다.
이 보안 푸시 자습서에서는 푸시 알림을 안전하게 보내는 방법을 보여 줍니다. 이 자습서는 사용자에게 알림 자습서를 기반으로 빌드되므로 해당 자습서의 단계를 먼저 완료해야 합니다.
참고 항목
이 자습서에서는 Azure Notification Hubs를 사용하여 iOS 앱에 푸시 알림 보내기에 설명된 대로 알림 허브를 생성하고 구성했다고 가정합니다.
WebAPI 프로젝트
Visual Studio에서 사용자에게 알림 자습서에서 만든 AppBackend 프로젝트를 엽니다.
Notifications.cs에서 전체 Notifications 클래스를 다음 코드로 바꿉니다. 자리 표시자를 알림 허브에 대한 연결 문자열(모든 권한 사용) 및 허브 이름으로 바꿉니다. Azure Portal에서 이러한 값을 가져올 수 있습니다. 이 모듈은 이제 전송할 다른 보안 알림을 나타냅니다. 완전한 구현에서 알림은 데이터베이스에 저장됩니다. 여기서는 단순화를 위해 메모리에 알림을 저장합니다.
 public class Notification
 {
     public int Id { get; set; }
     public string Payload { get; set; }
     public bool Read { get; set; }
 }

 public class Notifications
 {
     public static Notifications Instance = new Notifications();

     private List<Notification> notifications = new List<Notification>();

     public NotificationHubClient Hub { get; set; }

     private Notifications() {
         Hub = NotificationHubClient.CreateClientFromConnectionString("{conn string with full access}",     "{hub name}");
     }

     public Notification CreateNotification(string payload)
     {
         var notification = new Notification() {
         Id = notifications.Count,
         Payload = payload,
         Read = false
         };

         notifications.Add(notification);

         return notification;
     }

     public Notification ReadNotification(int id)
     {
         return notifications.ElementAt(id);
     }
 }
NotificationsController.cs에서, NotificationsController 클래스 정의 내의 코드를 다음 코드로 바꿉니다. 이 구성 요소는 디바이스에서 알림을 안전하게 검색할 수 있는 방법을 구현하며, 이 자습서에서는 사용자가 자신의 디바이스로 보안 푸시를 트리거할 수 있는 방법을 제공합니다. 알림 허브로 알림을 보낼 때에는 알림의 ID만 포함된 원시 알림(실제 메시지 없음)을 보냅니다.
 public NotificationsController()
 {
     Notifications.Instance.CreateNotification("This is a secure notification!");
 }

 // GET api/notifications/id
 public Notification Get(int id)
 {
     return Notifications.Instance.ReadNotification(id);
 }

 public async Task<HttpResponseMessage> Post()
 {
     var secureNotificationInTheBackend = Notifications.Instance.CreateNotification("Secure confirmation.");
     var usernameTag = "username:" + HttpContext.Current.User.Identity.Name;

     // windows
     var rawNotificationToBeSent = new Microsoft.Azure.NotificationHubs.WindowsNotification(secureNotificationInTheBackend.Id.ToString(),
                     new Dictionary<string, string> {
                         {"X-WNS-Type", "wns/raw"}
                     });
     await Notifications.Instance.Hub.SendNotificationAsync(rawNotificationToBeSent, usernameTag);

     // apns
     await Notifications.Instance.Hub.SendAppleNativeNotificationAsync("{\"aps\": {\"content-available\": 1}, \"secureId\": \"" + secureNotificationInTheBackend.Id.ToString() + "\"}", usernameTag);

     // gcm
     await Notifications.Instance.Hub.SendGcmNativeNotificationAsync("{\"data\": {\"secureId\": \"" + secureNotificationInTheBackend.Id.ToString() + "\"}}", usernameTag);

     return Request.CreateResponse(HttpStatusCode.OK);
 }
이제 Post 메서드는 알림 메시지를 보내지 않습니다. 중요 콘텐츠가 아닌 알림 ID만 포함하는 원시 알림을 보냅니다. 또한 알림 허브에서 자격 증명을 구성하지 않은 플랫폼에 대한 보내기 작업은 오류를 발생시키므로 이 작업을 주석으로 처리합니다.
- 이제 모든 디바이스에서 액세스할 수 있도록 이 앱을 Azure 웹 사이트에 다시 배포합니다. AppBackend 프로젝트를 마우스 오른쪽 단추로 클릭하고 게시를 선택합니다.
- Azure 웹 사이트를 게시 대상으로 선택합니다. Azure 계정으로 로그인하고 기존 웹 사이트 또는 새로운 웹 사이트를 선택한 다음, 연결 탭의 대상 URL 속성을 적어 둡니다. 이 자습서의 뒷부분에서 이 URL을 백 엔드 엔드포인트 라고 합니다. 게시를 클릭합니다.
iOS 프로젝트 수정
알림의 ID 만 보내도록 앱 백 엔드를 수정했으므로 해당 알림을 처리하고 백 엔드를 콜백하여 표시할 보안 메시지를 검색하도록 iOS 앱을 변경해야 합니다.
이 목표를 달성하려면 앱 백 엔드에서 보안 콘텐츠를 검색하는 논리를 작성해야 합니다.
AppDelegate.m에서 앱이 자동 알림을 등록하여 백 엔드에서 전송된 알림 ID를 처리하는지 확인합니다. 다음과 같이 didFinishLaunchingWithOptions에서UIRemoteNotificationTypeNewsstandContentAvailability옵션을 추가합니다.[[UIApplication sharedApplication] registerForRemoteNotificationTypes: UIRemoteNotificationTypeAlert | UIRemoteNotificationTypeBadge | UIRemoteNotificationTypeSound | UIRemoteNotificationTypeNewsstandContentAvailability];AppDelegate.m에서 맨 위에 다음 선언과 함께 구현 섹션을 추가합니다.@interface AppDelegate () - (void) retrieveSecurePayloadWithId:(int)payloadId completion: (void(^)(NSString*, NSError*)) completion; @end그리고 나서 구현 섹션에 다음 코드를 추가하여 자리 표시자
{back-end endpoint}를 이전에 얻은 백 엔드의 엔드포인트로 대체합니다.NSString *const GetNotificationEndpoint = @"{back-end endpoint}/api/notifications"; - (void) retrieveSecurePayloadWithId:(int)payloadId completion: (void(^)(NSString*, NSError*)) completion; { // check if authenticated ANHViewController* rvc = (ANHViewController*) self.window.rootViewController; NSString* authenticationHeader = rvc.registerClient.authenticationHeader; if (!authenticationHeader) return; NSURLSession* session = [NSURLSession sessionWithConfiguration:[NSURLSessionConfiguration defaultSessionConfiguration] delegate:nil delegateQueue:nil]; NSURL* requestURL = [NSURL URLWithString:[NSString stringWithFormat:@"%@/%d", GetNotificationEndpoint, payloadId]]; NSMutableURLRequest* request = [NSMutableURLRequest requestWithURL:requestURL]; [request setHTTPMethod:@"GET"]; NSString* authorizationHeaderValue = [NSString stringWithFormat:@"Basic %@", authenticationHeader]; [request setValue:authorizationHeaderValue forHTTPHeaderField:@"Authorization"]; NSURLSessionDataTask* dataTask = [session dataTaskWithRequest:request completionHandler:^(NSData *data, NSURLResponse *response, NSError *error) { NSHTTPURLResponse* httpResponse = (NSHTTPURLResponse*) response; if (!error && httpResponse.statusCode == 200) { NSLog(@"Received secure payload: %@", [[NSString alloc] initWithData:data encoding:NSUTF8StringEncoding]); NSMutableDictionary *json = [NSJSONSerialization JSONObjectWithData:data options: NSJSONReadingMutableContainers error: &error]; completion([json objectForKey:@"Payload"], nil); } else { NSLog(@"Error status: %ld, request: %@", (long)httpResponse.statusCode, error); if (error) completion(nil, error); else { completion(nil, [NSError errorWithDomain:@"APICall" code:httpResponse.statusCode userInfo:nil]); } } }]; [dataTask resume]; }이 메서드는 앱 백 엔드를 호출하여 공유 기본 설정에 저장된 자격 증명을 통해 알림 콘텐츠를 검색합니다.
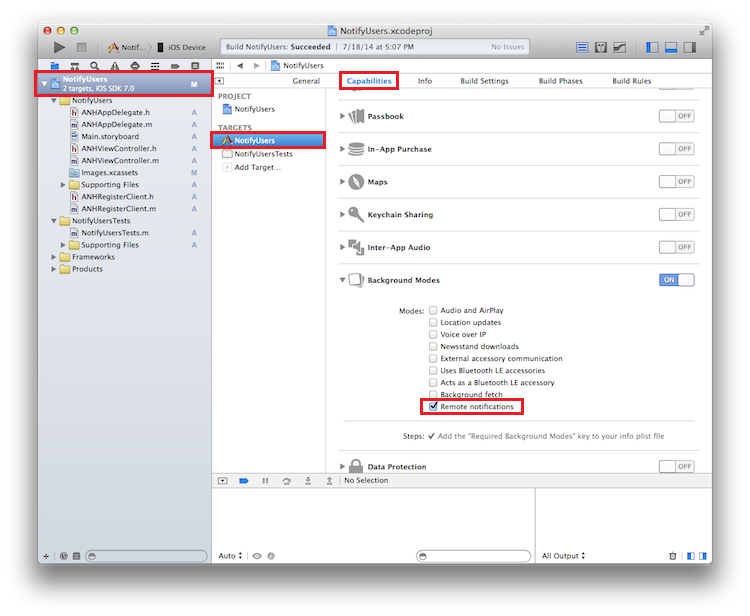
이제 들어오는 알림을 처리하고 위의 메서드를 사용하여 표시할 콘텐츠를 검색합니다. 먼저 푸시 알림을 받을 때 iOS 앱이 백그라운드에서 실행될 수 있도록 설정합니다. XCode의 왼쪽 패널에서 앱 프로젝트를 선택하고 가운데 창의 대상 섹션에서 기본 앱 대상을 클릭합니다.
그리고 가운데 창의 맨 위에서 기능 탭을 클릭하고 원격 알림 상자를 선택합니다.
AppDelegate.m에서 다음 메서드를 추가하여 푸시 알림을 처리합니다.-(void)application:(UIApplication *)application didReceiveRemoteNotification:(NSDictionary *)userInfo fetchCompletionHandler:(void (^)(UIBackgroundFetchResult))completionHandler { NSLog(@"%@", userInfo); [self retrieveSecurePayloadWithId:[[userInfo objectForKey:@"secureId"] intValue] completion:^(NSString * payload, NSError *error) { if (!error) { // show local notification UILocalNotification* localNotification = [[UILocalNotification alloc] init]; localNotification.fireDate = [NSDate dateWithTimeIntervalSinceNow:0]; localNotification.alertBody = payload; localNotification.timeZone = [NSTimeZone defaultTimeZone]; [[UIApplication sharedApplication] scheduleLocalNotification:localNotification]; completionHandler(UIBackgroundFetchResultNewData); } else { completionHandler(UIBackgroundFetchResultFailed); } }]; }백 엔드에 의해 거부되거나 인증 헤더 속성이 누락되는 경우를 처리하는 것이 좋습니다. 이러한 경우의 특수 처리는 대부분 대상 사용자 환경에 따라 다릅니다. 한 가지 옵션은 실제 알림을 검색하기 위해 사용자가 인증을 받도록 하는 일반 프롬프트가 포함된 알림을 표시하는 것입니다.
애플리케이션 실행
애플리케이션을 실행하려면 다음을 수행합니다.
- XCode에서는 실제 iOS 디바이스에서 앱을 실행합니다(푸시 알림은 시뮬레이터에서 작동하지 않음).
- iOS 앱 UI에서 사용자 이름과 암호를 입력합니다. 이는 임의 문자열일 수 있지만 같은 값이어야 합니다.
- iOS 앱 UI에서 로그인을 클릭합니다. 그리고 나서 푸시 보내기를 클릭합니다. 알림 센터에 보안 알림이 표시되는지 확인해야 합니다.