패키지 지원 프레임워크 파일 시스템 쓰기 권한 오류를 해결하는 방법
이 문서에서는 PSF(패키지 지원 프레임워크)를 사용하여 파일 시스템 쓰기 권한 오류를 해결하는 방법을 설명합니다.
Windows 앱은 특정 애플리케이션 관련 디렉터리를 폴더로 C:\Program Files\WindowsApps 리디렉션합니다. 애플리케이션이 Windows 앱 컨테이너에 쓰려고 하면 오류가 트리거되고 쓰기가 실패합니다. Windows 앱 패키지를 개선하여 이 문제를 해결할 수 있습니다.
조사
먼저 실패 및 앱이 요청하는 디렉터리 경로를 식별합니다.
Windows 앱 오류 캡처
결과 필터링은 선택 사항이지만 애플리케이션 관련 오류를 더 쉽게 볼 수 있습니다. 결과를 필터링하려면 두 개의 필터 규칙을 만듭니다. 첫 번째 필터에는 애플리케이션 프로세스 이름이 포함되고 두 번째 필터에는 성공하지 못한 결과가 포함됩니다.
SysInternals 프로세스 모니터를 다운로드하여 C:\PSF\ProcessMonitor 디렉터리로 추출합니다.
Windows 탐색기를 열고 추출된 SysInternals ProcessMonitor 폴더로 이동합니다.
SysInternals Process Monitor procmon.exe 파일을 선택하여 앱을 시작합니다.
UAC에서 메시지가 표시되면 예를 선택합니다.
프로세스 모니터 필터 창의 첫 번째 필드 드롭다운 메뉴에서 프로세스 이름을 선택합니다.
다음 필드에 표시되는지 확인합니다.
다음 필드에 앱의 프로세스 이름(예 : PSFSample.exe)을 입력합니다.

추가를 선택합니다.
프로세스 모니터 필터 창의 첫 번째 필드 드롭다운 메뉴에서 결과를 선택합니다.
다음 필드에서 드롭다운 메뉴에서 선택 하지 않습니다 .
텍스트 필드에 SUCCESS를 입력합니다.
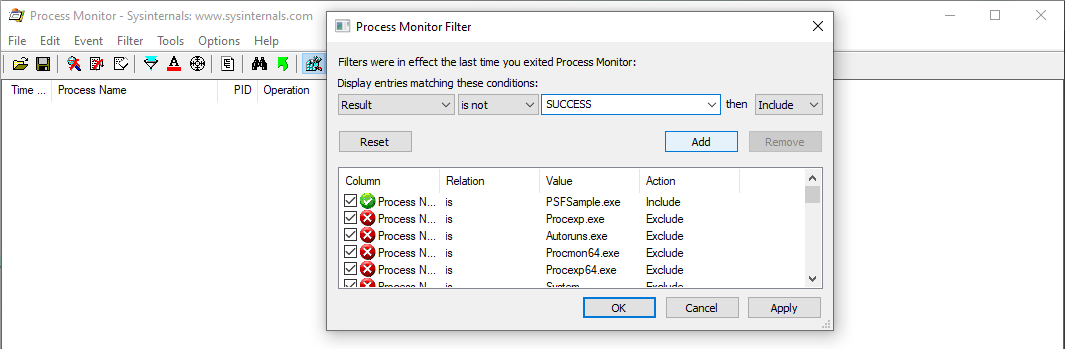
추가를 선택한 다음 확인을 선택합니다.
Windows 앱을 시작하고 오류를 트리거한 다음 Windows 앱을 닫습니다.
Windows 앱 오류 로그 검토
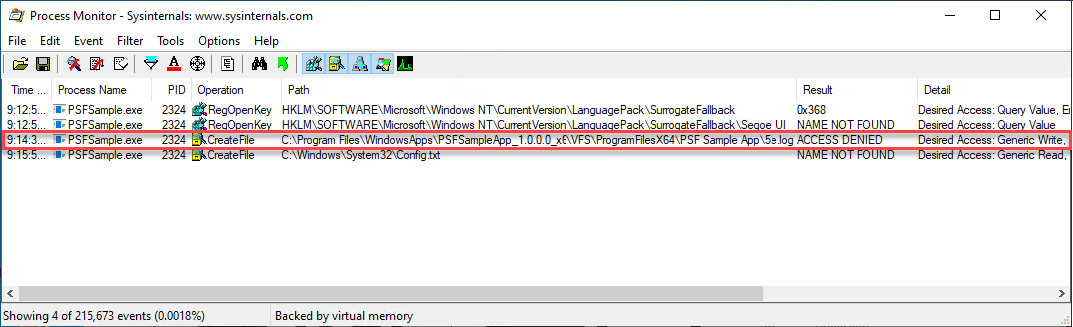
Windows 앱 프로세스를 캡처한 후 결과를 조사하여 실패가 작업 디렉터리와 관련이 있는지 확인합니다.
SysInternals 프로세스 모니터 실패 결과를 검토합니다. C:\Program Files\WindowsApps\...\를 대상으로 하는 앱에 대해 원하는 액세스: 일반 쓰기 세부 정보가 포함된 액세스 거부 결과가 포함된 경우 작업 디렉터리와 관련된 쓰기 권한 실패를 확인했습니다.
이 오류를 식별하는 경우 앱에 다음 PSF 수정 사항을 적용합니다.
해결
Windows 앱 컨테이너에 쓰지 못하는 Windows 앱 문제를 해결하려면 다음 단계를 수행합니다.
- 로컬 스테이징 디렉터리에 Windows 앱 의 콘텐츠를 추출합니다.
- config.json을 만들고 PSF 수정 파일을 준비된 Windows 앱 디렉터리에 삽입합니다.
- PSF 시작 관리자를 가리키도록 애플리케이션 시작 관리자를 구성하고 PSF config.json 파일을 구성하여 PSF 시작 관리자를 리디렉션하고 작업 디렉터리를 지정합니다.
- Windows 앱 AppxManifest 파일을 업데이트합니다.
- Windows 앱을 다시 패키지하고 서명합니다.
필수 도구 다운로드 및 설치
이 프로세스에는 다음 도구가 필요합니다.
- NuGet 클라이언트 도구
- PSF(패키지 지원 프레임워크)
- Windows 10 소프트웨어 개발 도구 키트(Win 10 SDK), 최신 버전
- SysInternals 프로세스 모니터
NuGet 및 PSF를 다운로드하고 설치하려면 다음을 수행합니다.
최신 비 미리 보기 버전의 NuGet 클라이언트 도구를 다운로드하고 c:\PSF\nuget에 nuget.exe를 저장합니다.
관리 PowerShell 창에서 다음 명령을 실행하여 NuGet에서 패키지 지원 프레임워크를 다운로드하고 설치합니다.
Set-Location "C:\PSF"
.\nuget\nuget.exe install Microsoft.PackageSupportFramework
Windows 10 SDK를 다운로드하고 설치하려면 다음을 수행합니다.
- Win 10 SDK를 다운로드합니다.
- winsdksetup.exe를 실행 합니다 .
- 다음을 선택합니다.
- 다음 세 가지 기능만 선택합니다.
- 데스크톱 앱용 Windows SDK 서명 도구
- UWP C++ 앱용 Windows SDK
- UWP 앱 지역화용 Windwos SDK
- 설치를 선택한 다음 확인을 선택합니다.
Windows 앱 스테이징
Windows 앱을 준비하면 앱의 콘텐츠가 압축을 풀고 로컬 디렉터리에 압축을 풉니다. Windows 앱이 스테이징 위치로 압축을 풀면 PSF 수정 파일을 삽입하여 원치 않는 환경을 수정할 수 있습니다.
관리 PowerShell 창에서 특정 앱 파일 및 Windows 10 SDK 버전을 대상으로 하려면 다음 변수를 설정합니다.
$AppPath          = "C:\PSF\SourceApp\PSFSampleApp.msix"         ## Path to the MSIX App Installer
$StagingFolder    = "C:\PSF\Staging\PSFSampleApp"                ## Path to where the MSIX App will be staged
$OSArchitecture   = "x$((gwmi Win32_Processor).AddressWidth)"    ## Operating System Architecture
$Win10SDKVersion  = "10.0.19041.0"                               ## Latest version of the Win10 SDK
다음 PowerShell cmdlet을 실행하여 Windows 앱을 스테이징 폴더로 압축을 풀 수 있습니다.
## Sets the directory to the Windows 10 SDK
Set-Location "${env:ProgramFiles(x86)}\Windows Kits\10\Bin\$Win10SDKVersion\$OSArchitecture"

## Unpackages the Windows app to the staging folder
.\makeappx.exe unpack /p "$AppPath" /d "$StagingFolder"
필요한 PSF 파일 만들기 및 삽입
Windows 앱을 수정하려면 실패하는 Windows 앱 시작 관리자에 대한 정보가 포함된 config.json 파일을 만듭니다. 여러 Windows 앱 시작 관리자에 문제가 발생하는 경우 여러 항목으로 config.json 파일을 구성할 수 있습니다.
config.json 파일을 만든 후 config.json 및 지원 PSF 수정 파일을 Windows 앱 패키지의 루트로 이동합니다.
Visual Studio Code 또는 다른 텍스트 편집기를 엽니다.
Windows 앱 준비 디렉터리 C:\PSF\Staging\PSFSampleApp에서 config.json이라는 새 파일을 만듭니다.
다음 코드를 새로 만든 config.json 파일에 복사합니다.
{
    "applications": [
        {
            "id": "",
            "executable": ""
        }
    ],
    "processes": [
        {
            "executable": "",
            "fixups": [
            {
                "dll": "",
                "config": {
                    "redirectedPaths": {
                        "packageRelative": [
                            {
                                "base": "",
                                "patterns": [
                                    ""
                                ]
                            }
                        ]
                    }
                }
            }
        ]
        }
    ]
}
Windows 앱 준비 폴더에서 AppxManifest.xml 파일을 엽니다. 다음 예제에서는 AppxManifest.xml 파일을 보여줍니다.
<Applications>
    <Application Id="PSFSAMPLE" Executable="VFS\ProgramFilesX64\PS Sample App\PSFSample.exe" EntryPoint="Windows.FullTrustApplication">
    <uap:VisualElements BackgroundColor="transparent" DisplayName="PSFSample" Square150x150Logo="Assets\StoreLogo.png" Square44x44Logo="Assets\StoreLogo.png" Description="PSFSample">
        <uap:DefaultTile Wide310x150Logo="Assets\StoreLogo.png" Square310x310Logo="Assets\StoreLogo.png" Square71x71Logo="Assets\StoreLogo.png" />
    </uap:VisualElements>
    </Application>
</Applications>
config.json 파일에서 다음을 변경합니다.
applications.idAppxManifest.xml 파일의 필드와 동일한 값으로Applications.Application.ID값을 설정합니다.
applications.executableAppxManifest.xml 파일의 필드에 있는Applications.Application.Executable애플리케이션의 상대 경로를 대상으로 하려면 값을 설정합니다.
applications.workingdirectoryAppxManifest.xml 파일의 필드에 있는Applications.Application.Executable상대 폴더 경로를 대상으로 하려면 값을 설정합니다.
process.executableAppxManifest.xml 파일의 필드에서 경로 및 확장Applications.Application.Executable명 없이 파일 이름을 대상으로 지정할 값을 설정합니다.
processes.fixups.dll아키텍처별FileRedirectionFixup.dll대상 값을 설정합니다. x64 아키텍처에 대한 수정이 있는 경우 값을 으로FileRedirectionFixup64.dll설정합니다. 아키텍처가 x86이거나 알 수 없는 경우 값을FileRedirectionFixup86.dll설정합니다.processes.fixups.config.redirectedPaths.packageRelative.baseAppxManifest.xml 파일의 필드에 있는Applications.Application.Executable패키지 상대 폴더 경로로 값을 설정합니다.
애플리케이션에서
processes.fixups.config.redirectedPaths.packageRelative.patterns만드는 파일 형식과 일치하도록 값을 설정합니다. 사용하는.*\\.log경우 PSF는 디렉터리 및 자식 디렉터리에 있는 모든 로그 파일 쓰기를processes.fixups.config.redirectedPaths.packageRelative.base리디렉션합니다.
업데이트 된 config.json 파일을 저장합니다. 다음 예제에서는 업데이트 된 config.json 파일을 보여줍니다.
{
    "applications": [
        {
        "id": "PSFSample",
        "executable": "VFS/ProgramFilesX64/PS Sample App/PSFSample.exe"
        }
    ],
    "processes": [
        {
            "executable": "PSFSample",
            "fixups": [
                {
                    "dll": "FileRedirectionFixup64.dll",
                    "config": {
                        "redirectedPaths": {
                            "packageRelative": [
                                {
                                    "base": "VFS/ProgramFilesX64/PS Sample App/",
                                    "patterns": [
                                        ".*\\.log"
                                    ]
                                }
                            ]
                        }
                    }
                }
            ]
        }
    ]
}
애플리케이션 실행 아키텍처의 패키지 지원 프레임워크에서 스테이징된 Windows 앱의 루트로 다음 파일을 복사합니다. .\Microsoft.PackageSupportFramework.\Version\bin에서 파일을 찾을 수 있습니다.<>
애플리케이션(x64) 애플리케이션(x86) PSF시작 관리자64.exe PSF시작 관리자32.exe PSFRuntime64.dll PSFRuntime32.dll PSFRunDll64.exe PSFRunDll32.exe FileRedirectionFixup64.dll FileRedirectionFixup64.dll
AppxManifest 업데이트
config.json 파일을 만들고 업데이트한 후 config.json에 포함된 각 Windows 앱 시작 관리자에 대해 Windows 앱의 AppxManifest.xml 파일을 업데이트합니다. AppxManifest.xmlApplications은 이제 애플리케이션 아키텍처와 연결된 PSF시작 관리자.exe를 대상으로 지정해야 합니다.
- 준비된 MSIX 앱 폴더 C:\PSF\Staging\PSFSampleApp에서 AppxManifest.xml을 엽니다.
- AppxManifest.xml을 다음 코드로 업데이트합니다.
<Package ...>
...
<Applications>
    <Application Id="PSFSample"
                Executable="PSFLauncher32.exe"
                EntryPoint="Windows.FullTrustApplication">
    ...
    </Application>
</Applications>
</Package>
애플리케이션 재패키지
모든 수정 사항을 적용한 후 Windows 앱을 MSIX에 다시 패키지하고 코드 서명 인증서로 서명합니다.
관리이상 PowerShell 창을 엽니다.
다음 변수를 설정합니다.
$AppPath          = "C:\PSF\SourceApp\PSFSampleApp_Updated.msix" ## Path to the MSIX App Installer
$CodeSigningCert  = "C:\PSF\Cert\CodeSigningCertificate.pfx"     ## Path to your code signing certificate
$CodeSigningPass  = "<Password>"                                 ## Password used by the code signing certificate
$StagingFolder    = "C:\PSF\Staging\PSFSampleApp"                ## Path to where the MSIX App will be staged
$OSArchitecture   = "x$((gwmi Win32_Processor).AddressWidth)"    ## Operating System Architecture
$Win10SDKVersion  = "10.0.19041.0"                               ## Latest version of the Win10 SDK
다음 PowerShell cmdlet을 실행하여 스테이징 폴더에서 Windows 앱을 다시 패키지합니다.
Set-Location "${env:ProgramFiles(x86)}\Windows Kits\10\Bin\$Win10SDKVersion\$OSArchitecture"
.\makeappx.exe pack /p "$AppPath" /d "$StagingFolder"
다음 PowerShell cmdlet을 실행하여 Windows 앱에 서명합니다.
Set-Location "${env:ProgramFiles(x86)}\Windows Kits\10\Bin\$Win10SDKVersion\$OSArchitecture"
.\signtool.exe sign /v /fd sha256 /f $CodeSigningCert /p $CodeSigningPass $AppPath
피드백
출시 예정: 2024년 내내 콘텐츠에 대한 피드백 메커니즘으로 GitHub 문제를 단계적으로 폐지하고 이를 새로운 피드백 시스템으로 바꿀 예정입니다. 자세한 내용은 다음을 참조하세요. https://aka.ms/ContentUserFeedback
다음에 대한 사용자 의견 제출 및 보기