For information about what sensitivity labels are and how they can help you protect your organization's data, see Learn about sensitivity labels.
When you're ready to start protecting your organization's data by using sensitivity labels:
Create the labels. Create and name your sensitivity labels according to your organization's classification taxonomy for different sensitivity levels of content. Use common names or terms that make sense to your users. If you don't already have an established taxonomy, consider starting with label names such as Personal, Public, General, Confidential, and Highly Confidential. You can then use sublabels to group similar labels by category.
For each label, specify a tooltip to help users select the appropriate label and consider including specific examples. However, don't make the tooltip so long that users won't read it, and be aware that some apps might truncate long tooltips.
Always test and tailor your sensitivity label names and tooltips with the people who need to apply them.
Define what each label can do. Configure the protection settings you want associated with each label. For example, you might want lower sensitivity content (such as a "General" label) to have just a header or footer applied, while higher sensitivity content (such as a "Confidential" label) should have a watermark and encryption.
Publish the labels. After your sensitivity labels are configured, publish them by using a label policy. Decide which users and groups should have the labels and what policy settings to use. A single label is reusable—you define it once, and then you can include it in several label policies assigned to different users. So for example, you could pilot your sensitivity labels by assigning a label policy to just a few users. Then when you're ready to roll out the labels across your organization, you can create a new label policy for your labels and this time, specify all users.
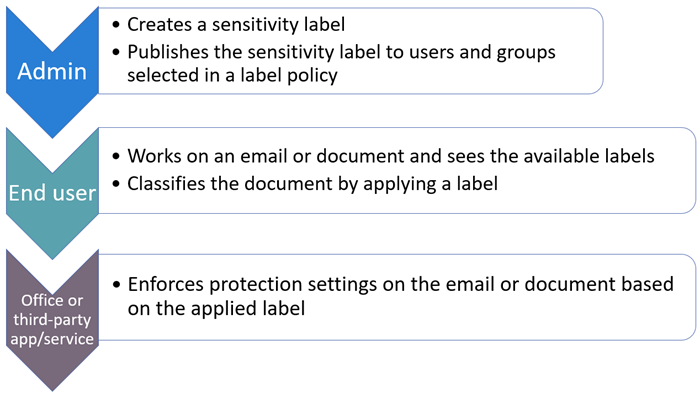
The basic flow for deploying and applying sensitivity labels is summarized in the following diagram. It identifies the roles and actions of admins, end users, and then Office or third-party apps or services that respectively create labels, apply them, and enforce the label settings.
Tipp
If you're not an E5 customer, use the 90-day Microsoft Purview solutions trial to explore how additional Purview capabilities can help your organization manage data security and compliance needs. Start now at the Microsoft Purview trials hub. Learn details about signing up and trial terms.
Subscription and licensing requirements for sensitivity labels
A number of different subscriptions support sensitivity labels and the licensing requirements for users depend on the features you use. Admins also need a license to manage sensitivity labels.
Permissions required to create and manage sensitivity labels
Wichteg
Microsoft recommends that you use roles with the fewest permissions. Minimizing the number of users with the Global Administrator role helps improve security for your organization. Learn more about Microsoft Purview roles and permissions.
Alternatively to using the default role groups, you can create a new role group and add the Sensitivity Label Administrator role to this group. For a read-only role, use Sensitivity Label Reader.
Another option is to add users to the Compliance Data Administrator, Compliance Administrator, or Security Administrator role group.
For configuration instructions, see the following guidance, depending on the portal you're using:
These permissions are required only to create and configure sensitivity labels and their label policies. They are not required to apply the labels in apps or services. If additional permissions are needed for specific configurations that relate to sensitivity labels, those permissions will be listed in their respective documentation instructions.
You can assign administrative units to members of role groups that are used with Microsoft Purview Information Protection. Edit these role groups and select individual members, and then the Assign admin units option to select administrative units from Microsoft Entra ID. These administrators are now restricted to managing just the users in those administrative units.
You can define the initial scope of sensitivity label policies and auto-labeling policies when you create or edit these policies. When you select administrative units, only the users in those administrative units will be eligible for the policy.
Don't select administrative units for an auto-labeling policy that you want to apply to documents in SharePoint. Because administrative units support only users and groups, if you configure an auto-labeling policy to use administrative units, you won't be able to select the SharePoint location.
The configuration of administrative units and the accuracy of their membership is a Microsoft Entra ID dependency. Although the main purpose of administrative units is to ensure the security best practice of least privileges, using administrative units for your labeling policies can simplify their configuration and maintenance.
For example, your organization has configured administrative units for specific countries, and you need to publish a new sensitivity label just to users in France and assign specific policy settings to these users:
You sign in to the Microsoft Purview compliance portal. Your account is a member of the Information Protection Admins role group, and your account in that role group has been assigned administrative units for France, Germany, and Spain.
When you create the sensitivity label policy, you see just three administrative units and select the one for France, keeping the default of all users and groups.
This configuration automatically scopes the policy to all users in France. You don't need to worry about which groups to select or manually select users. You also don't need to worry about changing the policy when there are new users in France, because this change is handled by the administrative unit in Microsoft Entra.
For more information about how Microsoft Purview supports administrative units, see Administrative units.
Deployment strategy for sensitivity labels
A successful strategy to deploy sensitivity labels for an organization is to create a working virtual team that identifies and manages the business and technical requirements, proof of concept testing, internal checkpoints and approvals, and final deployment for the production environment.
Using the table in the next section, we recommend identifying your top one or two scenarios that map to your most impactful business requirements. After these scenarios are deployed, return to the list to identify the next one or two priorities for deployment.
Tipp
To help accelerate your deployment, use the Overview page from Information Protection in the Microsoft Purview portal to see labeling recommendations and reports specific to your organization, and more.
Enable sensitivity labels for Office for the web, with support for coauthoring, eDiscovery, data loss prevention, search—even when documents are encrypted
Apply a sensitivity label to a document understanding model, so that identified documents in a SharePoint library are automatically classified and protected
Label SQL database columns by using the same sensitivity labels as those used for files and emails so that the organization has a unified labeling solution that can continue to protect this structured data when it's exported
Extend sensitivity labels across content in my Microsoft Purview Data Map assets, such as Azure Blob Storage, Azure Files, Azure Data Lake Storage, and multi-cloud data sources
The most effective end-user documentation will be customized guidance and instructions you provide for the label names and configurations you choose. You can use the label policy setting Provide users with a link to a custom help page to specify an internal link for this documentation.
In Office apps, users can then easily access your customized help from the Sensitivity button, Learn More menu option. If you don't specify a link in the policy setting, users don't see this menu option in their apps.
From the Microsoft Purview Information Protection file labler in Windows File Explorer, users can access the same customized help from Help and Feedback > Tell Me More in the file labeler dialog box.
To help you provide your customized documentation, see the following page and downloads that you can use to help train your users: End User Training for Sensitivity Labels.
You can also use the following resources for basic instructions:
This module examines how sensitivity labels from the Microsoft Information Protection solution let you classify and protect your organization's data, while making sure that user productivity and collaboration isn't hindered.
A requirement for all Microsoft Purview Information Protection solutions: Create, configure, and publish sensitivity labels to classify and protect your organization's data.
When you create a sensitivity label, you can automatically assign a label to data stored in Microsoft 365, or you can prompt users to select the label that you recommend.
Step-by-step guide on authoring and publishing protection policies for sensitivity labels in Microsoft Purview so only certain users can access sensitive information.