Create a role-assignable group in Microsoft Entra ID
With Microsoft Entra ID P1 or P2, you can create role-assignable groups and assign Microsoft Entra roles to these groups. You create a new role-assignable group by setting Microsoft Entra roles can be assigned to the group to Yes or by setting the isAssignableToRole property set to true. A role-assignable group can't be of dynamic membership type and you can create a maximum of 500 groups in a single tenant.
This article describes how to create a role-assignable group using the Microsoft Entra admin center, PowerShell, or Microsoft Graph API.
Prerequisites
- Microsoft Entra ID P1 or P2 license
- Privileged Role Administrator
- Microsoft.Graph module when using Microsoft Graph PowerShell
- Azure AD PowerShell module when using Azure AD PowerShell
- Admin consent when using Graph explorer for Microsoft Graph API
For more information, see Prerequisites to use PowerShell or Graph Explorer.
Microsoft Entra admin center
Tip
Steps in this article might vary slightly based on the portal you start from.
Sign in to the Microsoft Entra admin center as at least a Privileged Role Administrator.
Browse to Identity > Groups > All groups.
Select New group.
On the New Group page, provide group type, name and description.
Set Microsoft Entra roles can be assigned to the group to Yes.
This option is visible to only Privileged Role Administrators and Global Administrators because these are only two roles that can set this option.
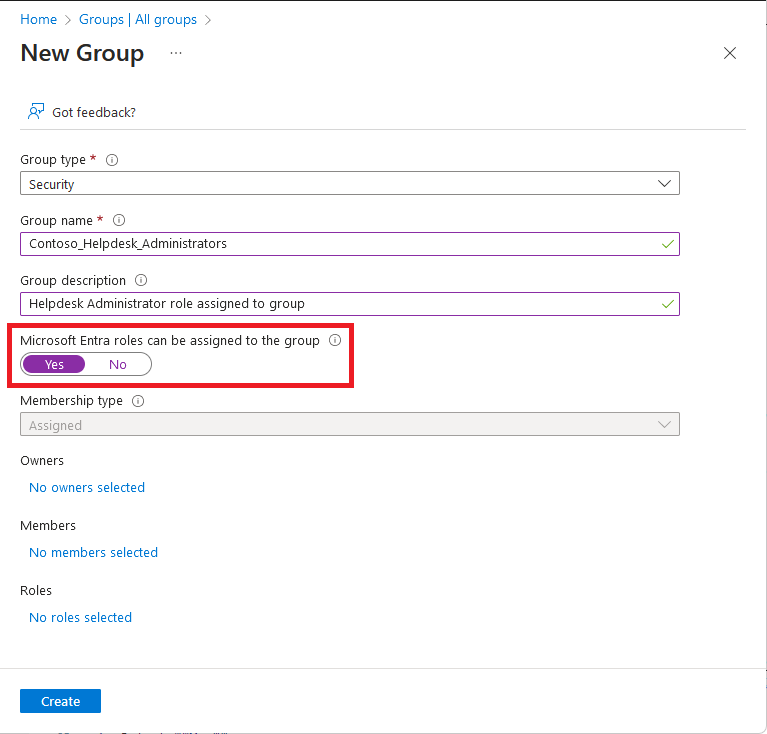
Select the members and owners for the group. You also have the option to assign roles to the group, but assigning a role isn't required here.
Select Create.
You see the following message:
Creating a group to which Microsoft Entra roles can be assigned is a setting that cannot be changed later. Are you sure you want to add this capability?
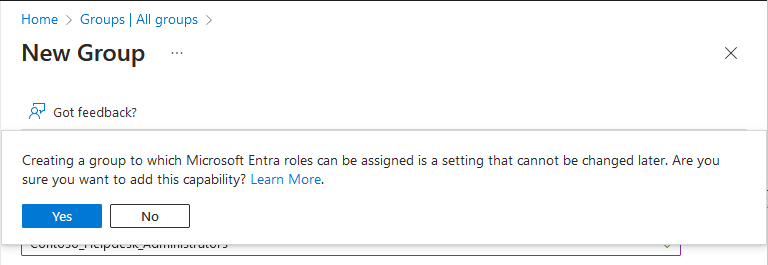
Select Yes.
The group is created with any roles you might have assigned to it.


PowerShell
Use the New-MgGroup command to create a role-assignable group.
This example shows how to create a Security role-assignable group.
Connect-MgGraph -Scopes "Group.ReadWrite.All"
$group = New-MgGroup -DisplayName "Contoso_Helpdesk_Administrators" -Description "Helpdesk Administrator role assigned to group" -MailEnabled:$false -SecurityEnabled -MailNickName "contosohelpdeskadministrators" -IsAssignableToRole:$true
This example shows how to create a Microsoft 365 role-assignable group.
Connect-MgGraph -Scopes "Group.ReadWrite.All"
$group = New-MgGroup -DisplayName "Contoso_Helpdesk_Administrators" -Description "Helpdesk Administrator role assigned to group" -MailEnabled:$true -SecurityEnabled -MailNickName "contosohelpdeskadministrators" -IsAssignableToRole:$true -GroupTypes "Unified"
Microsoft Graph API
Use the Create group API to create a role-assignable group.
This example shows how to create a Security role-assignable group.
POST https://graph.microsoft.com/v1.0/groups
{
    "description": "Helpdesk Administrator role assigned to group",
    "displayName": "Contoso_Helpdesk_Administrators",
    "isAssignableToRole": true,
    "mailEnabled": false,
    "mailNickname": "contosohelpdeskadministrators",
    "securityEnabled": true
}
This example shows how to create a Microsoft 365 role-assignable group.
POST https://graph.microsoft.com/v1.0/groups
{
  "description": "Helpdesk Administrator role assigned to group",
  "displayName": "Contoso_Helpdesk_Administrators",
  "groupTypes": [
    "Unified"
  ],
  "isAssignableToRole": true,
  "mailEnabled": true,
  "mailNickname": "contosohelpdeskadministrators",
  "securityEnabled": true,
  "visibility" : "Private"
}
For this type of group, isPublic will always be false and isSecurityEnabled will always be true.
Next steps
Atsiliepimai
Jau greitai: 2024 m. palaipsniui atsisakysime „GitHub“ problemų, kaip turiniui taikomo atsiliepimų mechanizmo, ir pakeisime jį nauja atsiliepimų sistema. Daugiau informacijos žr. https://aka.ms/ContentUserFeedback.
Pateikti ir peržiūrėti atsiliepimą, skirtą