How to deploy School Data Sync (Classic) by using OneRoster® 1.1 API
Important
School Data Sync (Classic) experience will be replaced by the new School Data Sync experience by the end of 2024. We advise that you start planning your transition to the new experience for your next year Back to School.
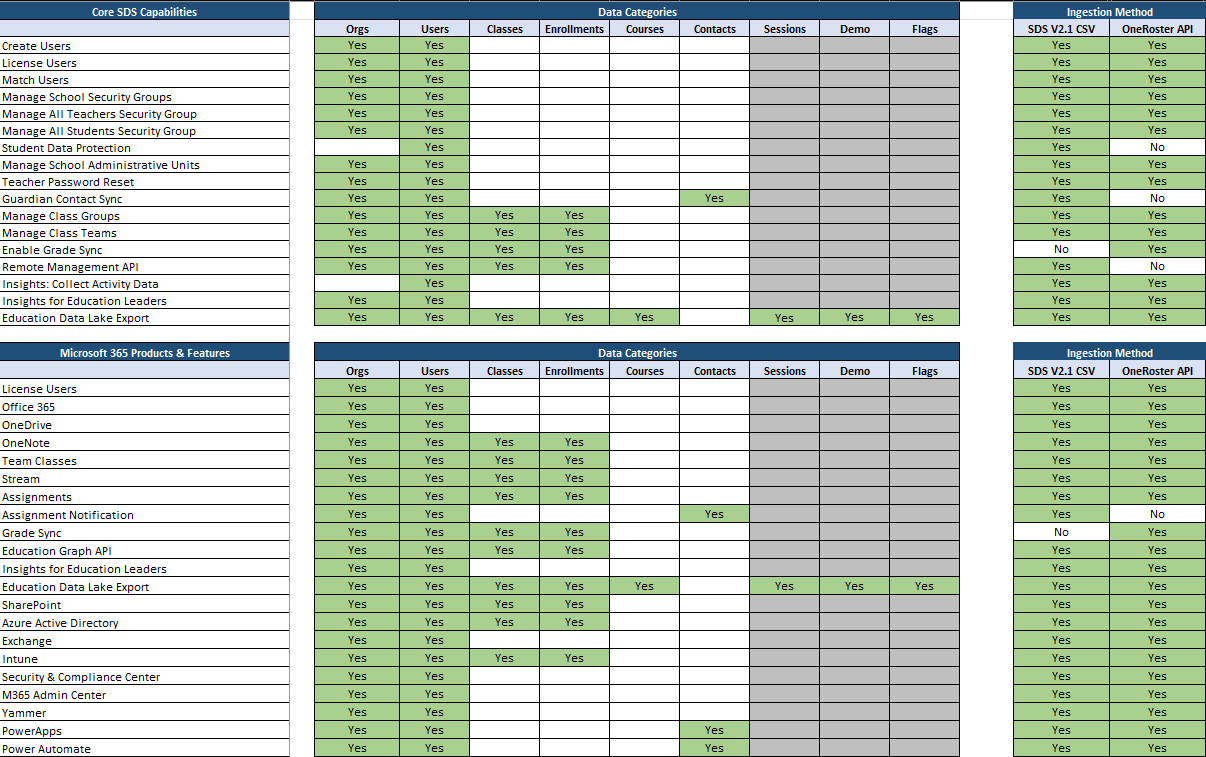
OneRoster® is an Industry Standard format for exchange of Student Information System (SIS) data. The OneRoster® REST APIs are the means by which we can sync objects from SISs that provide OneRoster® APIs to Microsoft 365 through the SDS (Classic) service. Using this sync method, you can connect directly to your SIS using the REST-based OneRoster 1.1 APIs provided by the SIS, and synchronize data directly instead of using CSV files. Using the OneRoster® API to ingest the data categories highlighted, it enables you to light up core SDS (Classic) capabilities for provisioning. It also allows you to enhance experiences for the Microsoft 365 (Microsoft 365) products and features listed.
To set up SDS (Classic) using the OneRoster® Sync method, follow the instructions detailed in this article.
Prerequisites
Before you start synchronizing with SDS (Classic) using the OneRoster® Sync method, read the Overview of SDS (Classic) and make sure you meet the following prerequisites:
- An Office 365 for Education tenant
- Global Admin Permissions
Note
The data that you provide through SDS (Classic) may be accessible to third party application providers through their apps, so you should sync only the data that you want to make available to these third parties.
Watch Deployment Video
Also refer to the following video for user identity matching.
Data Accessed by School Data Sync (Classic)
Important
By connecting and making institution data available with School Data Sync (Classic), you acknowledge that you are authorized to share this data with Microsoft and commit to adhere to your organization’s data governance standards.
| Action | URL | Required Filter Properties | Examples |
|---|---|---|---|
| getAllAcademicSessions | /academicSessions | schoolYear, status | /academicSessions?filter=schoolYear='2019' AND status='active' |
| getAcademicSession | /academicSessions/{academicSession_id} |
About Microsoft Entra Connect deployment warnings
If you're configuring SDS (Classic) for a tenant, which is synchronized from on-premises active directory through Microsoft Entra Connect, you may notice an increase in the number of disconnectors shown in your misclient. This is a result of Microsoft 365 Group being unable to sync back to the Microsoft Entra Connect Metaverse and on-premises active directory. These warnings don't have any negative impact on your current Microsoft Entra Connect deployment, and only provide an informational note on the resultant sync failure. You should expect these warnings in Microsoft Entra Connect after enabling sync in SDS (Classic). One Microsoft 365 Group is created for each class synchronized through SDS (Classic).
Synchronize your SIS data using the OneRoster API sync method
After you've set up SIS / SMS access, create a sync profile in SDS (Classic) to synchronize your information.
SDS Access and First Time sign-in
To access the SDS Admin Portal launch a private web browser, navigate to sds.microsoft.com, and then sign in using your Microsoft 365 Global Admin account.
Create a Sync Profile and Sync your SIS Data
After logging in, select +Add Profile in the left hand navigation to create a sync profile.

On the Choose Connection Type page, choice OneRoster API and then choose your SIS integration provider from the “Choose your provider” drop-down menu. Once complete, select Start.
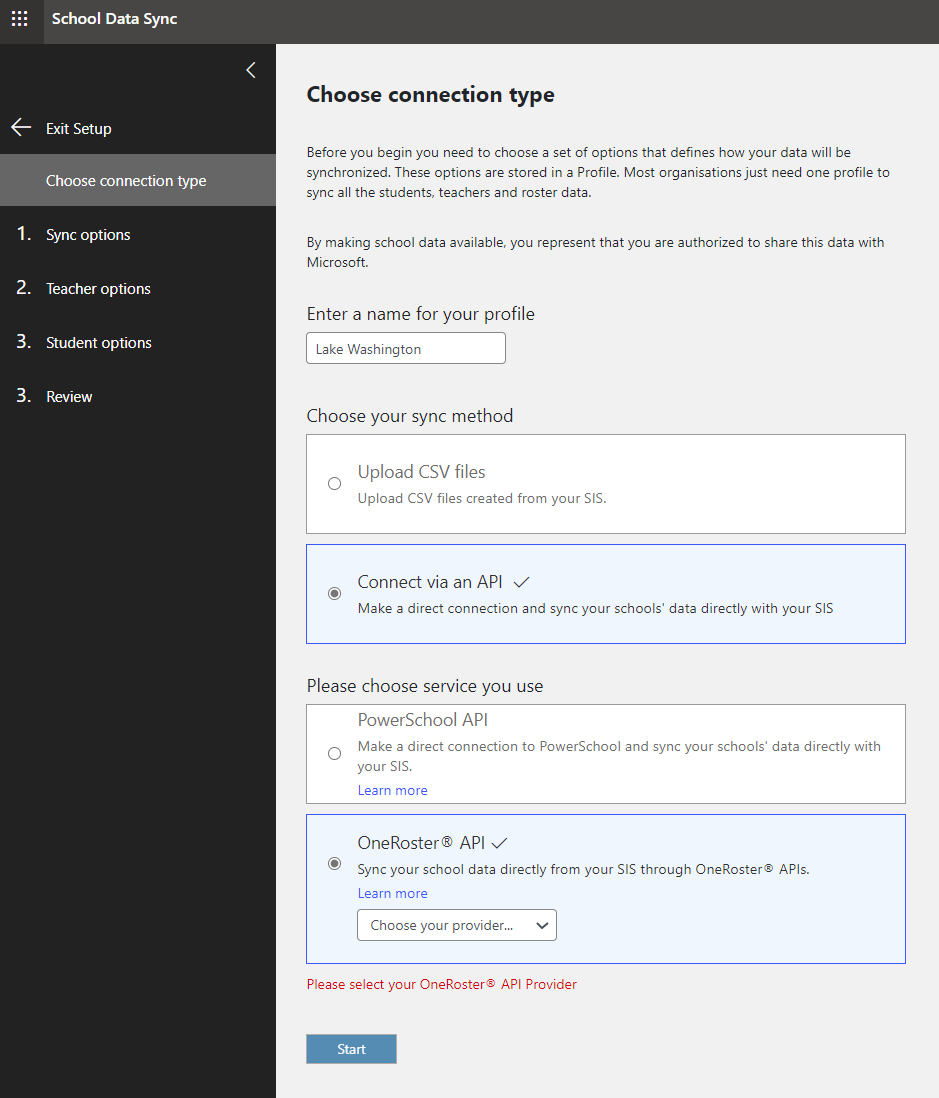
- Name this profile - Enter a name for your sync profile. This name is used to identify the sync profile in the SDS (Classic) Dashboard, and can't be changed once the profile setup is complete.
- Choose your sync method - Choose between the available sync methods shown. If you're syncing using OneRoster, select Connect via an API sync method, and then select OneRoster 1.1 API for the service selection.
On the Sync Options page, select the appropriate option to create new users or sync existing users. Then complete your selections on the page as appropriate.
Note
If running with option for creating new users and wish to adopt V2.1 CSV, we have released a tool that will help you prepare to support V2.1 CSV format as part of your transition for back to school. See update anchor IDs before creating users.
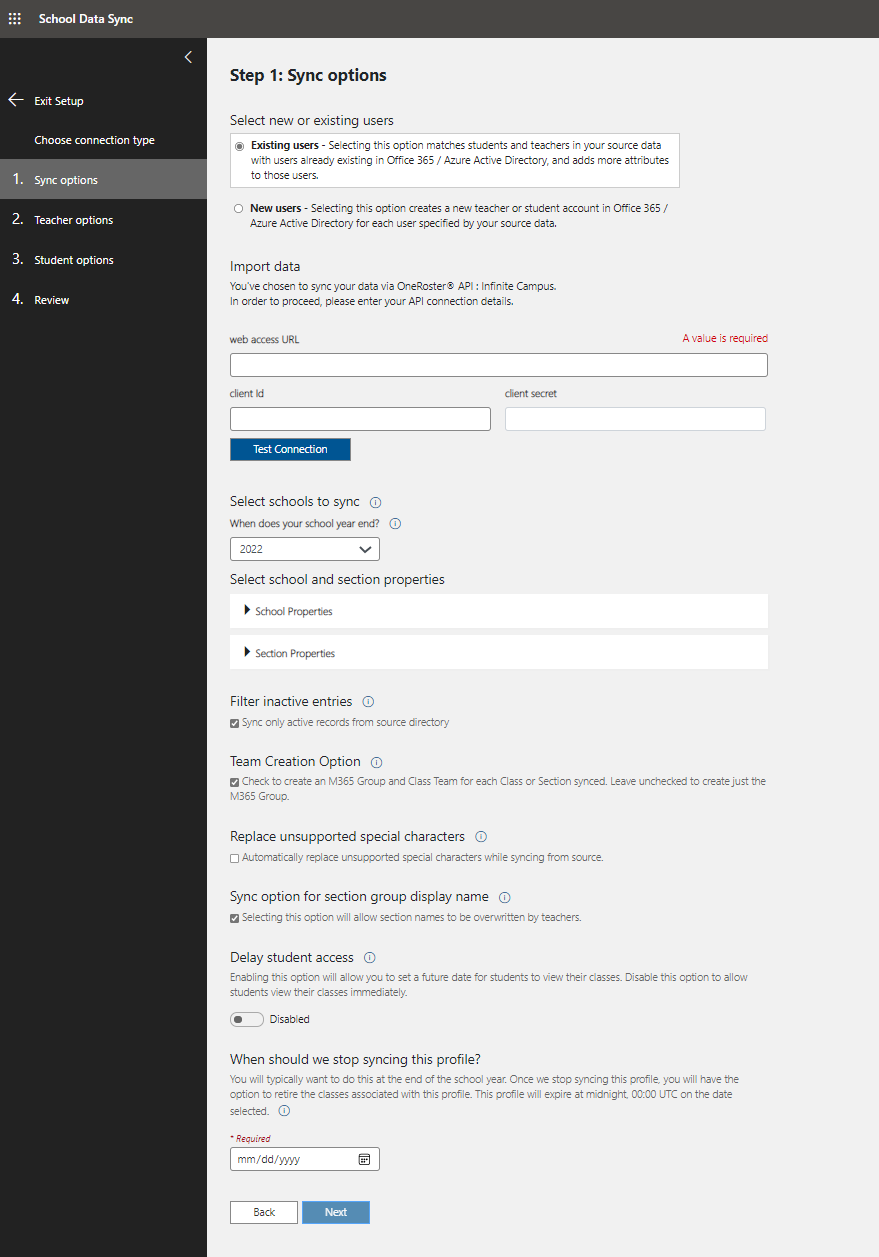
- Existing Users - Select this option if you already have user accounts created within your Microsoft 365 tenant for each of the students and teachers contained within OneRoster.
- New Users - Select this option if you want SDS (Classic) to create user accounts for each of your students and teachers contained within OneRoster.
- Web Access URL - This is the base OneRoster API URL for your SIS/SMS, which is internet accessible.
- Client ID - Used to connect to your SIS / SMS OneRoster API
- Client Secret - Used to connect to your SIS / SMS OneRoster API.
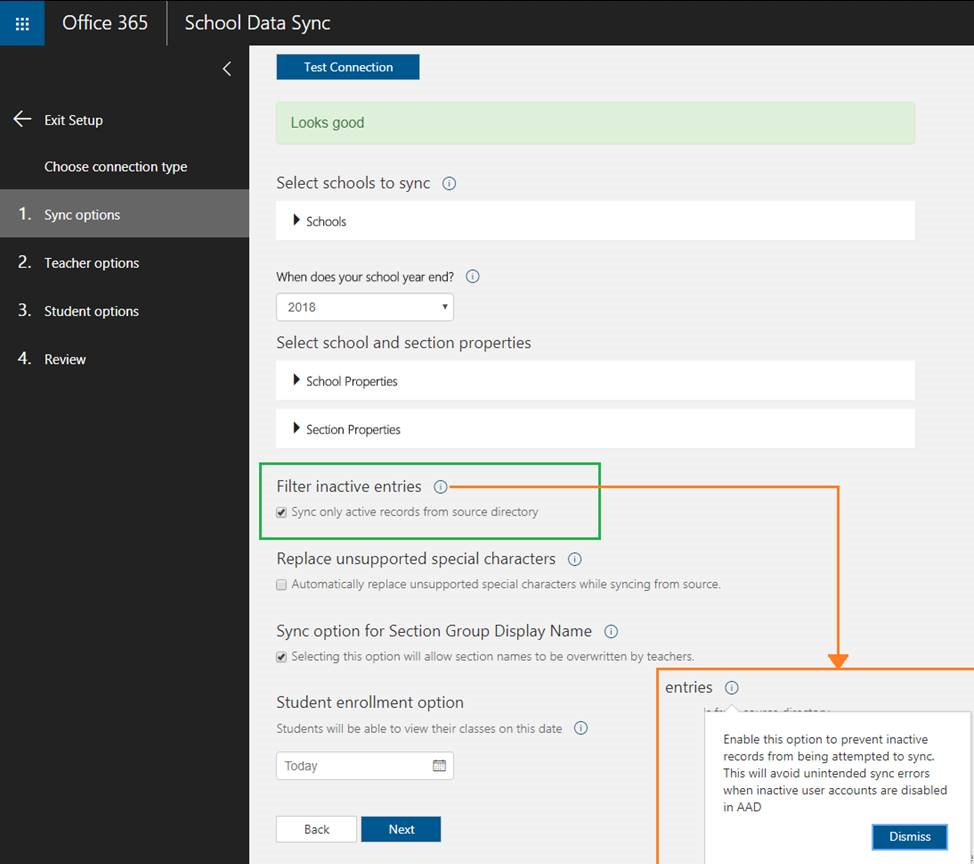
- Select schools to sync - This option allows you to select the school you want to sync from OneRoster.
- School properties - Select the School attributes you would like to be included.
- Section Properties - Select the Section attributes you would like to be included.
- Filter inactive properties - Checking this box syncs active records only.
- Team Creation Option – Checking this box ensures SDS (Classic) creates the Microsoft 365 Group and Class Team for each class synced. If you leave the box unchecked, SDS (Classic) will only create the Microsoft 365 Groups.
- Replace unsupported characters - Checking this box will automatically replace unsupported characters with supported ones.
- Sync option for Section Group Display Name - Checking this box will allow teachers to control the section display name after the first sync, and prevent SDS from overwriting Section DisplayName changes made by teachers.
- Delay Student Access - Enabling this option will allow you to set a future date for students to view their classes. Disable this option to allow students to view their classes immediately.
- When should we stop syncing this profile? - You'll typically want to do this at the end of the school year. Once we stop syncing this profile, you'll have the option to retire the classes associated with this profile.
Note
At this time, single tenant with mixed formats (i.e. having V1 and V2 sync profiles actively running and both set to 'Sync to Insights') will not work.
Note
Sync to Insights is pending support for SIMS and Infinite Campus providers.
On the Teacher options page, select the appropriate identity matching options, confirm the teacher properties are selected, then select Next.
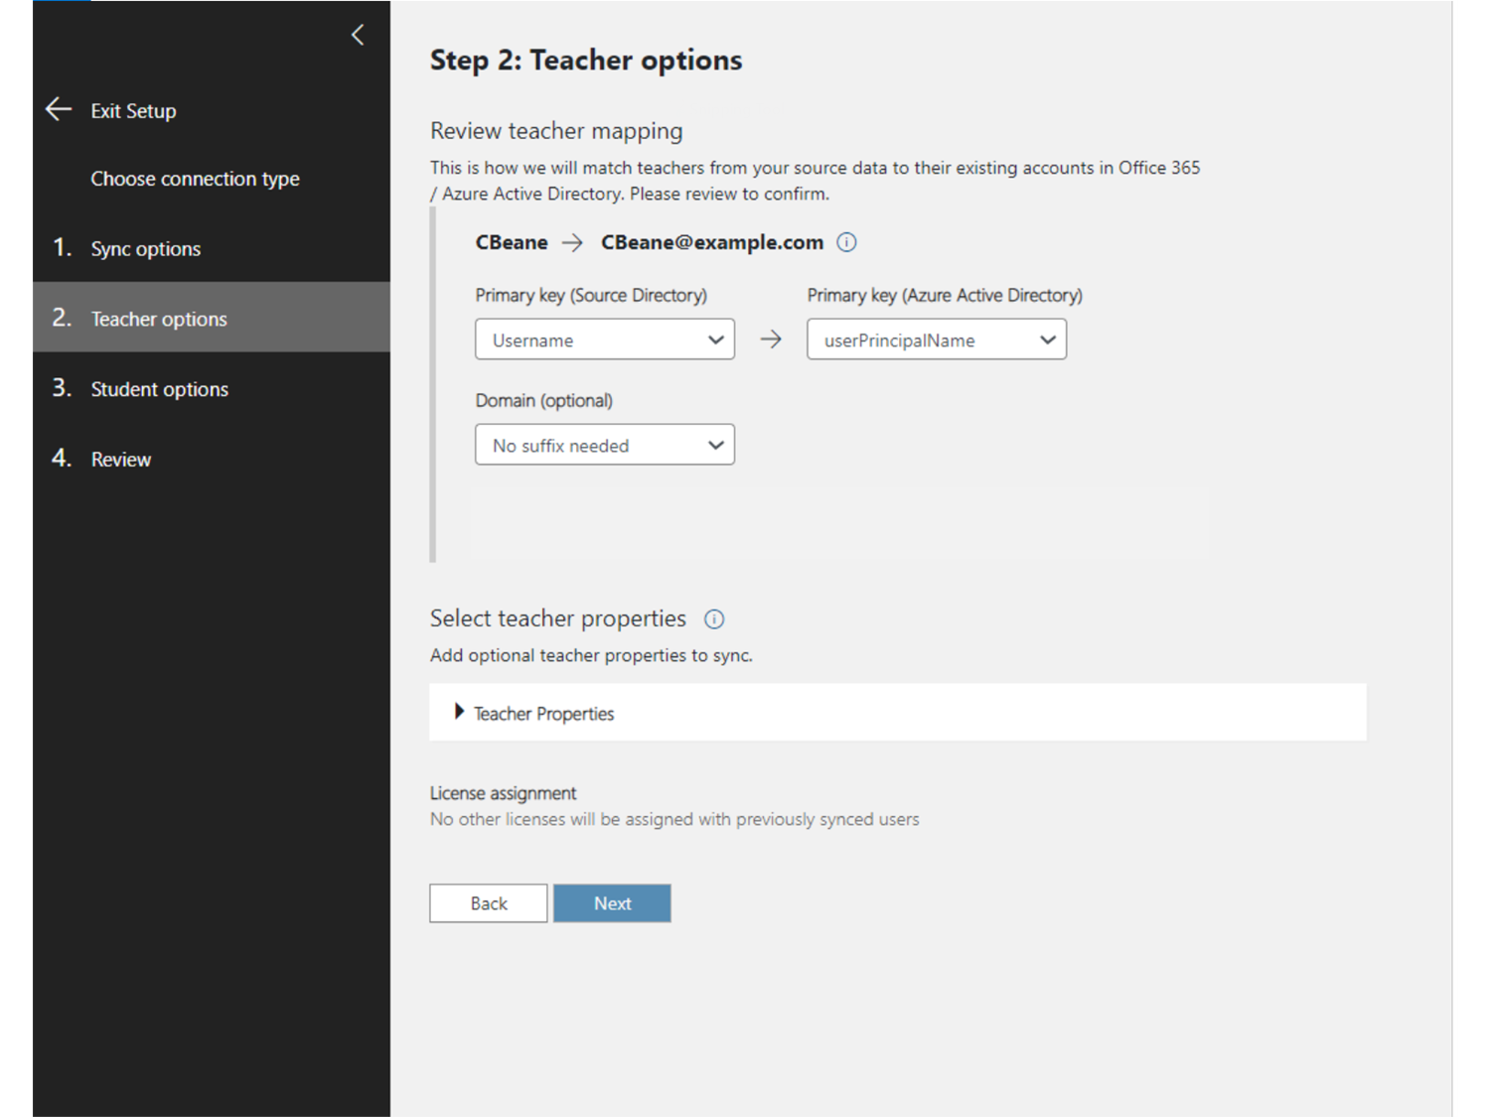
- Primary Key (Target Directory) - This is the user attribute in Microsoft Entra ID used for SDS identity matching. Watch the identity matching video for additional information on how to select the appropriate target directory attribute, and properly configure the identity matching settings for the teacher.
- Domain (optional) - This is an optional domain value that you can add to the selected source directory attribute to complete your teacher identity matching. If you need to match to a UserPrincipalName or Mail attribute, you must have a domain included in the string. Your source attribute must either include the domain already or you can append the appropriate domain to the source attribute using this dropdown menu.
- Primary Key (Source Directory) - This is the teacher attribute in OneRoster used for SDS identity matching. Watch the identity matching video for additional information on how to select the appropriate source directory attribute, and properly configure the identity matching settings for teacher.
On the Student options page, select the appropriate identity matching options, confirm the student properties are selected, and then select Next.
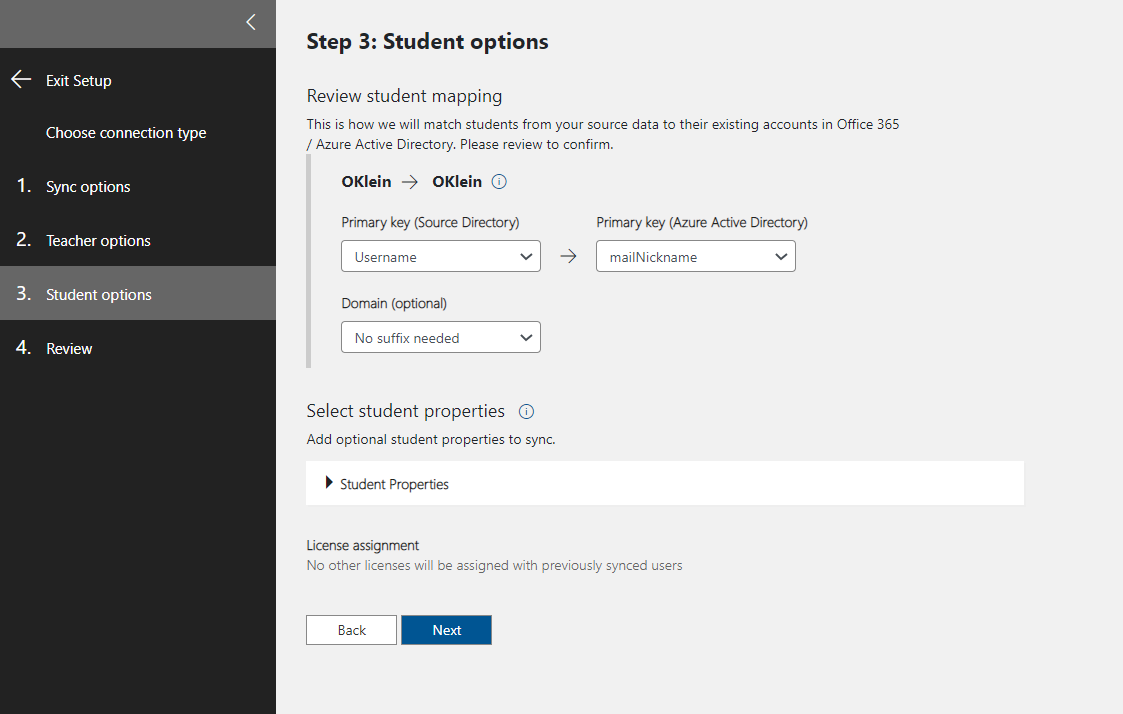
- Primary Key (Source Directory) - This is the student attribute in OneRoster used for SDS identity matching. Watch the identity matching video for additional information on how to select the appropriate source directory attribute, and properly configure the identity matching settings for teacher.
- Primary Key (Target Directory) - This is the user attribute in Microsoft Entra ID used for SDS Identity Matching. Watch the Identity Matching video for additional information on how to select the appropriate target directory attribute, and properly configure the identity matching settings for the student.
- Domain (optional) - This is an optional domain value that you can add to the selected source directory attribute to complete your student identity matching. If you need to match to a UserPrincipalName or Mail attribute, you must have a domain included in the string. Your source attribute must either include the domain already or you can append the appropriate domain to the source attribute, using the dropdown menu.
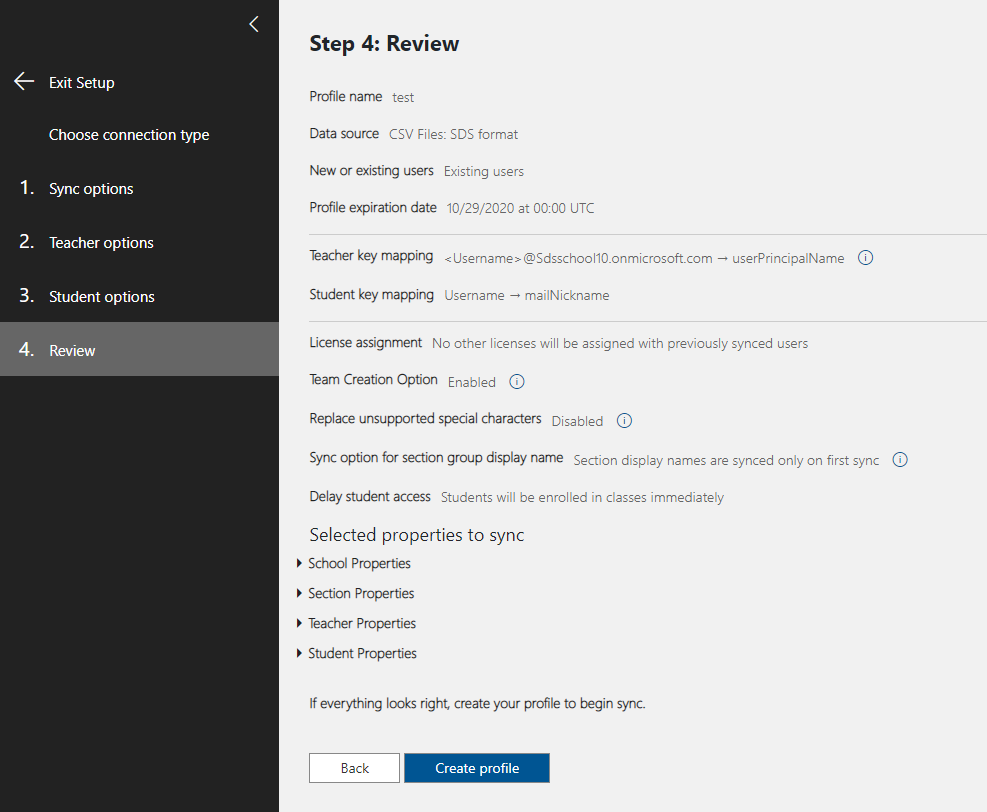
On the Review page, ensure you have made the appropriate selections. If satisfied, select Create Profile.
Filtered State of OneRoster API
Students and enrollments – SDS syncs some students based on school association and status.
- Synced
- Active
- Not synced
- To be deleted
- Synced
Teachers – SDS syncs some students based on school association and status.
- Synced
- Active
- Not synced
- To be deleted
- Synced
Classes - SDS syncs some classes based on school association, and staff type.
- Synced
- Active
- Not synced
- To be deleted
- Synced
Schools– SDS syncs some schools based on school association, and staff type.
- Synced
- Active
- Not synced
- To be deleted
- Synced
Video: OneRoster API deployment
Video: How to match source and target attributes for sync
For various examples of matching logic success and failure for sync, watch the identity matching video: