Notikumi
Veidojiet inteliģentas lietotnes
17. marts 21 - 21. marts 10
Pievienojieties meetup sērijai, lai kopā ar citiem izstrādātājiem un ekspertiem izveidotu mērogojamus AI risinājumus, kuru pamatā ir reālas lietošanas gadījumi.
Reģistrēties tūlītŠī pārlūkprogramma vairs netiek atbalstīta.
Jauniniet uz Microsoft Edge, lai izmantotu jaunāko līdzekļu, drošības atjauninājumu un tehniskā atbalsta sniegtās priekšrocības.
Azure DevOps Services | Azure DevOps Server 2022 - Azure DevOps Server 2019
This article provides guidance for using the 3.x agent software with Azure DevOps Services and current versions of Azure DevOps Server. For a list of Azure DevOps Server versions that support the 3.x agent, see Does Azure DevOps Server support the 3.x agent.
To run your jobs, you need at least one agent. A Linux agent can build and deploy different kinds of apps, including Java and Android apps. See Check prerequisites for a list of supported Linux distributions.
Piezīme
This article describes how to configure a self-hosted agent. If you're using Azure DevOps Services and a Microsoft-hosted agent meets your needs, you can skip setting up a self-hosted Linux agent.
If you already know what an agent is and how it works, feel free to jump right in to the following sections. But if you'd like some more background about what they do and how they work, see Azure Pipelines agents.
The agent is based on .NET 6. You can run this agent on several Linux distributions. We support the following subset of .NET 6 supported distributions:
Piezīme
The agent installer knows how to check for other dependencies.
You can install those dependencies on supported Linux platforms by running ./bin/installdependencies.sh in the agent directory.
Be aware that some of these dependencies required by .NET are fetched from third party sites, like packages.efficios.com. Review the installdependencies.sh script and ensure any referenced third party sites are accessible from your Linux machine before running the script.
Please also make sure that all required repositories are connected to the relevant package manager used in installdependencies.sh (like apt or zypper).
For issues with dependencies installation (like 'dependency was not found in repository' or 'problem retrieving the repository index file') - you can reach out to distribution owner for further support.
You should run agent setup manually the first time. After you get a feel for how agents work, or if you want to automate setting up many agents, consider using unattended config.
The user configuring the agent needs pool admin permissions, but the user running the agent does not.
The folders controlled by the agent should be restricted to as few users as possible because they contain secrets that could be decrypted or exfiltrated.
The Azure Pipelines agent is a software product designed to execute code it downloads from external sources. It inherently could be a target for Remote Code Execution (RCE) attacks.
Therefore, it is important to consider the threat model surrounding each individual usage of Pipelines Agents to perform work, and decide what are the minimum permissions that could be granted to the user running the agent, to the machine where the agent runs, to the users who have write access to the Pipeline definition, the git repos where the yaml is stored, or the group of users who control access to the pool for new pipelines.
It is a best practice to have the identity running the agent be different from the identity with permissions to connect the agent to the pool. The user generating the credentials (and other agent-related files) is different than the user that needs to read them. Therefore, it is safer to carefully consider access granted to the agent machine itself, and the agent folders which contain sensitive files, such as logs and artifacts.
It makes sense to grant access to the agent folder only for DevOps administrators and the user identity running the agent process. Administrators may need to investigate the file system to understand build failures or get log files to be able to report Azure DevOps failures.
As a one-time step, you must register the agent. Someone with permission to administer the agent queue must complete these steps. The agent will not use this person's credentials in everyday operation, but they're required to complete registration. Learn more about how agents communicate.
Make sure the user account that you're going to use has permission to register the agent.
Is the user an Azure DevOps organization owner or TFS or Azure DevOps Server administrator? Stop here, you have permission.
Otherwise:
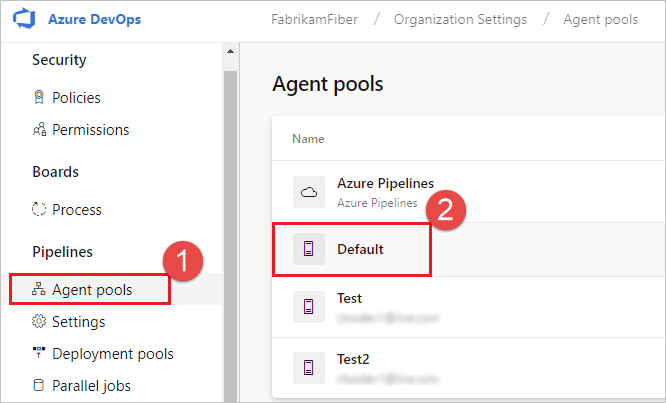
Open a browser and navigate to the Agent pools tab for your Azure Pipelines organization or Azure DevOps Server or TFS server:
Sign in to your organization (https://dev.azure.com/{yourorganization}).
Choose Azure DevOps, Organization settings.
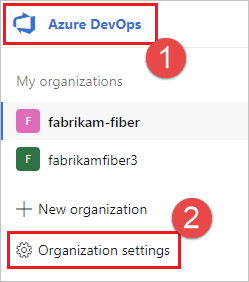
Choose Agent pools.

Sign in to your project collection (http://your-server/DefaultCollection).
Choose Azure DevOps, Collection settings.
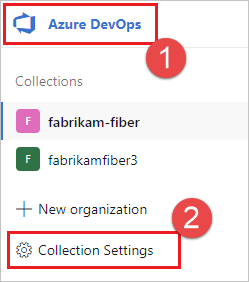
Choose Agent pools.
Choose Azure DevOps, Collection settings.

Choose Agent pools.

Select the pool on the right side of the page and then click Security.
If the user account you're going to use is not shown, then get an administrator to add it. The administrator can be an agent pool administrator, an Azure DevOps organization owner, or a TFS or Azure DevOps Server administrator.
If it's a deployment group agent, the administrator can be a deployment group administrator, an Azure DevOps organization owner, or a TFS or Azure DevOps Server administrator.
You can add a user to the deployment group administrator role in the Security tab on the Deployment Groups page in Azure Pipelines.
Piezīme
If you see a message like this: Sorry, we couldn't add the identity. Please try a different identity., you probably followed the above steps for an organization owner or TFS or Azure DevOps Server administrator. You don't need to do anything; you already have permission to administer the agent pool.
Log on to the machine using the account for which you've prepared permissions as explained in the previous section.
In your web browser, sign in to Azure Pipelines, and navigate to the Agent pools tab:
Sign in to your organization (https://dev.azure.com/{yourorganization}).
Choose Azure DevOps, Organization settings.
Choose Agent pools.
Sign in to your project collection (http://your-server/DefaultCollection).
Choose Azure DevOps, Collection settings.
Choose Agent pools.
Choose Azure DevOps, Collection settings.
Choose Agent pools.
Select the Default pool, select the Agents tab, and choose New agent.
On the Get the agent dialog box, click Linux.
On the left pane, select the specific flavor. We offer x64 or ARM for many Linux distributions.
On the right pane, click the Download button.
Follow the instructions on the page.
Unpack the agent into the directory of your choice. cd to that directory and run ./config.sh.
Azure Pipelines: https://dev.azure.com/{your-organization}
When you register an agent, choose from the following authentication types, and agent setup prompts you for the specific additional information required for each authentication type. For more information, see Self-hosted agent authentication options.
For guidance on whether to run the agent in interactive mode or as a service, see Agents: Interactive vs. service.
To run the agent interactively:
If you have been running the agent as a service, uninstall the service.
Run the agent.
./run.sh
To restart the agent, press Ctrl+C and then run run.sh to restart it.
To use your agent, run a job using the agent's pool. If you didn't choose a different pool, your agent is placed in the Default pool.
For agents configured to run interactively, you can choose to have the agent accept only one job. To run in this configuration:
./run.sh --once
Agents in this mode accept only one job and then spin down gracefully (useful for running in Docker on a service like Azure Container Instances).
If your agent is running on these operating systems you can run the agent as a systemd service:
We provide an example ./svc.sh script for you to run and manage your agent as a systemd service.
This script will be generated after you configure the agent.
We encourage you to review, and if needed, update the script before running it.
Some important caveats:
root user.svc.sh script.
Refer to this agent issue as a starting point.
SELinux is not an officially supported configuration.Piezīme
If you have a different distribution, or if you prefer other approaches, you can use whatever kind of service mechanism you prefer. See Service files.
For example, if you installed in the myagent subfolder of your home directory:
cd ~/myagent$
Command:
sudo ./svc.sh install [username]
This command creates a service file that points to ./runsvc.sh. This script sets up the environment (more details below) and starts the agents host. If username parameter is not specified, the username is taken from the $SUDO_USER environment variable set by sudo command. This variable is always equal to the name of the user who invoked the sudo command.
sudo ./svc.sh start
sudo ./svc.sh status
sudo ./svc.sh stop
You should stop before you uninstall.
sudo ./svc.sh uninstall
When you configure the service, it takes a snapshot of some useful environment variables for your current logon user such as PATH, LANG, JAVA_HOME, ANT_HOME, and MYSQL_PATH. If you need to update the variables (for example, after installing some new software):
./env.sh
sudo ./svc.sh stop
sudo ./svc.sh start
The snapshot of the environment variables is stored in .env file (PATH is stored in .path) under agent root directory, you can also change these files directly to apply environment variable changes.
You can also run your own instructions and commands to run when the service starts. For example, you could set up the environment or call scripts.
Edit runsvc.sh.
Replace the following line with your instructions:
# insert anything to setup env when running as a service
When you install the service, some service files are put in place.
A systemd service file is created:
/etc/systemd/system/vsts.agent.{tfs-name}.{agent-name}.service
For example, you have configured an agent (see above) with the name our-linux-agent. The service file will be either:
Azure Pipelines: the name of your organization. For example if you connect to https://dev.azure.com/fabrikam, then the service name would be /etc/systemd/system/vsts.agent.fabrikam.our-linux-agent.service
TFS or Azure DevOps Server: the name of your on-premises server. For example if you connect to http://our-server:8080/tfs, then the service name would be /etc/systemd/system/vsts.agent.our-server.our-linux-agent.service
sudo ./svc.sh install generates this file from this template: ./bin/vsts.agent.service.template
sudo ./svc.sh start finds the service by reading the .service file, which contains the name of systemd service file described above.
We provide the ./svc.sh script as a convenient way for you to run and manage your agent as a systemd service. But you can use whatever kind of service mechanism you prefer (for example: initd or upstart).
You can use the template described above as to facilitate generating other kinds of service files.
It's important to avoid situations in which the agent fails or become unusable because otherwise the agent can't stream pipeline logs or report pipeline status back to the server. You can mitigate the risk of this kind of problem being caused by high memory pressure by using cgroups and a lower oom_score_adj. After you've done this, Linux reclaims system memory from pipeline job processes before reclaiming memory from the agent process. Learn how to configure cgroups and OOM score.
To replace an agent, follow the Download and configure the agent steps again.
When you configure an agent using the same name as an agent that already exists,
you're asked if you want to replace the existing agent. If you answer Y,
then make sure you remove the agent (see below) that you're replacing. Otherwise,
after a few minutes of conflicts, one of the agents will shut down.
To remove the agent:
Stop and uninstall the service as explained in the previous section.
Remove the agent.
./config.sh remove
Enter your credentials.
After you've removed the agent, you can configure it again.
The agent can be set up from a script with no human intervention.
You must pass --unattended and the answers to all questions.
To configure an agent, it must know the URL to your organization or collection and credentials of someone authorized to set up agents.
All other responses are optional.
Any command-line parameter can be specified using an environment variable instead:
put its name in upper case and prepend VSTS_AGENT_INPUT_.
For example, VSTS_AGENT_INPUT_PASSWORD instead of specifying --password.
--unattended - agent setup will not prompt for information, and all settings must be provided on the command line--url <url> - URL of the server. For example: https://dev.azure.com/myorganization or http://my-azure-devops-server:8080/tfs--auth <type> - authentication type. Valid values are:
pat (Personal access token) - PAT is the only scheme that works with Azure DevOps Services.alt (Basic authentication)--auth pat:
--token <token> - specifies your personal access token--auth negotiate or --auth alt:
--userName <userName> - specifies a username--password <password> - specifies a password--pool <pool> - pool name for the agent to join--agent <agent> - agent name--replace - replace the agent in a pool. If another agent is listening by the same name, it will start failing with a conflict--work <workDirectory> - work directory where job data is stored. Defaults to _work under the
root of the agent directory. The work directory is owned by a given
agent and should not be shared between multiple agents.--acceptTeeEula - accept the Team Explorer Everywhere End User License Agreement (macOS and Linux only)--disableloguploads - don't stream or send console log output to the server. Instead, you may retrieve them from the agent host's filesystem after the job completes.--deploymentGroup - configure the agent as a deployment group agent--deploymentGroupName <name> - used with --deploymentGroup to specify the deployment group for the agent to join--projectName <name> - used with --deploymentGroup to set the project name--addDeploymentGroupTags - used with --deploymentGroup to indicate that deployment group tags should be added--deploymentGroupTags <tags> - used with --addDeploymentGroupTags to specify the comma separated list of tags for
the deployment group agent - for example "web, db"--addvirtualmachineresourcetags - used to indicate that environment resource tags should be added--virtualmachineresourcetags <tags> - used with --addvirtualmachineresourcetags to specify the comma separated list of tags for
the environment resource agent - for example "web, db"./config.sh --help always lists the latest required and optional responses.
If you're having trouble with your self-hosted agent, you can try running diagnostics. After configuring the agent:
./run.sh --diagnostics
This will run through a diagnostic suite that may help you troubleshoot the problem. The diagnostics feature is available starting with agent version 2.165.0.
Set the value of Agent.Diagnostic to true to collect additional logs that can be used for troubleshooting network issues for self-hosted agents. For more information, see Network diagnostics for self-hosted agents.
To learn about other options:
./config.sh --help
The help provides information on authentication alternatives and unattended configuration.
Your agent's capabilities are cataloged and advertised in the pool so that only the builds and releases it can handle are assigned to it. See Build and release agent capabilities.
In many cases, after you deploy an agent, you'll need to install software or utilities. Generally you should install on your agents whatever software and tools you use on your development machine.
For example, if your build includes the npm task, then the build won't run unless there's a build agent in the pool that has npm installed.
Svarīgi
Capabilities include all environment variables and the values that are set when the agent runs. If any of these values change while the agent is running, the agent must be restarted to pick up the new values. After you install new software on an agent, you must restart the agent for the new capability to show up in the pool, so that the build can run.
If you want to exclude environment variables as capabilities, you can designate them by setting an environment variable VSO_AGENT_IGNORE with a comma-delimited list of variables to ignore.
For information and FAQs about the v3 agent software, see Agent software version 3.
Navigate to the Agent pools tab:
Sign in to your organization (https://dev.azure.com/{yourorganization}).
Choose Azure DevOps, Organization settings.
Choose Agent pools.
Sign in to your project collection (http://your-server/DefaultCollection).
Choose Azure DevOps, Collection settings.
Choose Agent pools.
Choose Azure DevOps, Collection settings.
Choose Agent pools.
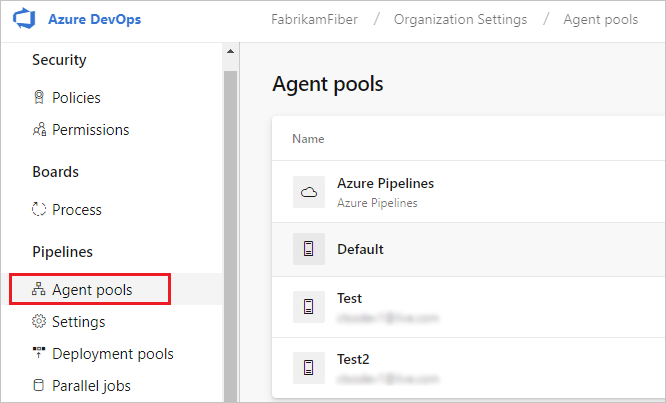
Click the pool that contains the agent.
Make sure the agent is enabled.
Navigate to the capabilities tab:
From the Agent pools tab, select the desired agent pool.

Select Agents and choose the desired agent.
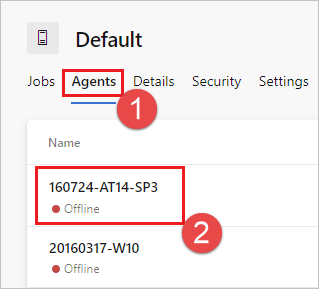
Choose the Capabilities tab.

Piezīme
Microsoft-hosted agents don't display system capabilities. For a list of software installed on Microsoft-hosted agents, see Use a Microsoft-hosted agent.
From the Agent pools tab, select the desired pool.

Select Agents and choose the desired agent.

Choose the Capabilities tab.

From the Agent pools tab, select the desired pool.
Select Agents and choose the desired agent.

Choose the Capabilities tab.
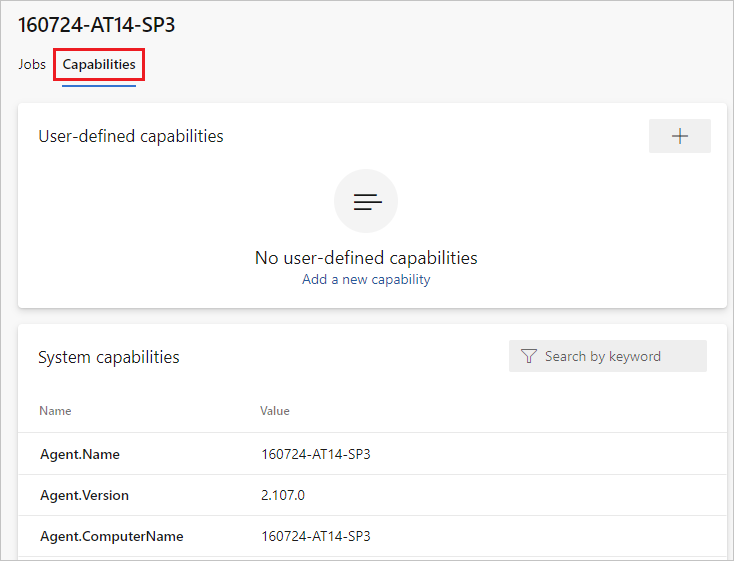
Look for the Agent.Version capability. You can check this value against the latest published agent version. See Azure Pipelines Agent and check the page for the highest version number listed.
Each agent automatically updates itself when it runs a task that requires a newer version of the agent. If you want to manually update some agents, right-click the pool, and select Update all agents.
Yes. Beginning with Azure DevOps Server 2019, you can configure your server to look for the agent package files on a local disk. This configuration will override the default version that came with the server at the time of its release. This scenario also applies when the server doesn't have access to the internet.
From a computer with Internet access, download the latest version of the agent package files (in .zip or .tar.gz form) from the Azure Pipelines Agent GitHub Releases page.
Transfer the downloaded package files to each Azure DevOps Server Application Tier by using a method of your choice (such as USB drive, Network transfer, and so on). Place the agent files under the following folder:
%ProgramData%\Microsoft\Azure DevOps\Agentsusr/share/Microsoft/Azure DevOps/Agentsusr/share/Microsoft/Azure DevOps/AgentsCreate the Agents folder if it is not present.
./svc.sh uses systemctl, which requires sudo.
Source code: systemd.svc.sh.template on GitHub
If you're running an agent in a secure network behind a firewall, make sure the agent can initiate communication with the following URLs and IP addresses.
| Domain URL | Description |
|---|---|
https://{organization_name}.pkgs.visualstudio.com |
Azure DevOps Packaging API for organizations using the {organization_name}.visualstudio.com domain |
https://{organization_name}.visualstudio.com |
For organizations using the {organization_name}.visualstudio.com domain |
https://{organization_name}.vsblob.visualstudio.com |
Azure DevOps Telemetry for organizations using the {organization_name}.visualstudio.com domain |
https://{organization_name}.vsrm.visualstudio.com |
Release Management Services for organizations using the {organization_name}.visualstudio.com domain |
https://{organization_name}.vssps.visualstudio.com |
Azure DevOps Platform Services for organizations using the {organization_name}.visualstudio.com domain |
https://{organization_name}.vstmr.visualstudio.com |
Azure DevOps Test Management Services for organizations using the {organization_name}.visualstudio.com domain |
https://*.blob.core.windows.net |
Azure Artifacts |
https://*.dev.azure.com |
For organizations using the dev.azure.com domain |
https://*.vsassets.io |
Azure Artifacts via CDN |
https://*.vsblob.visualstudio.com |
Azure DevOps Telemetry for organizations using the dev.azure.com domain |
https://*.vssps.visualstudio.com |
Azure DevOps Platform Services for organizations using the dev.azure.com domain |
https://*.vstmr.visualstudio.com |
Azure DevOps Test Management Services for organizations using the dev.azure.com domain |
https://app.vssps.visualstudio.com |
For organizations using the {organization_name}.visualstudio.com domain |
https://dev.azure.com |
For organizations using the dev.azure.com domain |
https://login.microsoftonline.com |
Microsoft Entra sign-in |
https://management.core.windows.net |
Azure Management APIs |
https://vstsagentpackage.azureedge.net |
Agent package |
To ensure your organization works with any existing firewall or IP restrictions, ensure that dev.azure.com and *dev.azure.com are open and update your allow-listed IPs to include the following IP addresses, based on your IP version. If you're currently allow-listing the 13.107.6.183 and 13.107.9.183 IP addresses, leave them in place, as you don't need to remove them.
IPv4 ranges
13.107.6.0/2413.107.9.0/2413.107.42.0/2413.107.43.0/24IPv6 ranges
2620:1ec:4::/482620:1ec:a92::/482620:1ec:21::/482620:1ec:22::/48Piezīme
For more information about allowed addresses, see Allowed address lists and network connections.
Run the agent with self-signed certificate
Run the agent behind a web proxy
If you are running the agent interactively, see the restart instructions in Run interactively. If you are running the agent as a systemd service, follow the steps to Stop and then Start the agent.
If you want the agent to bypass your proxy and connect to Azure Pipelines directly, then you should configure your web proxy to enable the agent to access the following URLs.
https://login.microsoftonline.com
https://app.vssps.visualstudio.com
https://{organization_name}.visualstudio.com
https://{organization_name}.vsrm.visualstudio.com
https://{organization_name}.vstmr.visualstudio.com
https://{organization_name}.pkgs.visualstudio.com
https://{organization_name}.vssps.visualstudio.com
https://dev.azure.com
https://*.dev.azure.com
https://login.microsoftonline.com
https://management.core.windows.net
https://vstsagentpackage.azureedge.net
https://vssps.dev.azure.com
To ensure your organization works with any existing firewall or IP restrictions, ensure that dev.azure.com and *dev.azure.com are open and update your allow-listed IPs to include the following IP addresses, based on your IP version. If you're currently allow-listing the 13.107.6.183 and 13.107.9.183 IP addresses, leave them in place, as you don't need to remove them.
IPv4 ranges
13.107.6.0/2413.107.9.0/2413.107.42.0/2413.107.43.0/24IPv6 ranges
2620:1ec:4::/482620:1ec:a92::/482620:1ec:21::/482620:1ec:22::/48Piezīme
This procedure enables the agent to bypass a web proxy. Your build pipeline and scripts must still handle bypassing your web proxy for each task and tool you run in your build.
For example, if you are using a NuGet task, you must configure your web proxy to support bypassing the URL for the server that hosts the NuGet feed you're using.
Some of these features are available only on Azure Pipelines and not yet available on-premises. Some features are available on-premises if you have upgraded to the latest version of TFS.
If you'll be using TFVC, you'll also need the Oracle Java JDK 1.6 or higher. (The Oracle JRE and OpenJDK aren't sufficient for this purpose.)
TEE plugin is used for TFVC functionality. It has an EULA, which you need to accept during configuration if you plan to work with TFVC.
Since the TEE plugin is no longer maintained and contains some out-of-date Java dependencies, starting from Agent 2.198.0 it's no longer included in the agent distribution. However, the TEE plugin will be downloaded during checkout task execution if you're checking out a TFVC repo. The TEE plugin will be removed after the job execution.
Piezīme
Note: You may notice your checkout task taking a long time to start working because of this download mechanism.
If the agent is running behind a proxy or a firewall, you need to ensure access to the following site: https://vstsagenttools.blob.core.windows.net/. The TEE plugin will be downloaded from this address.
If you're using a self-hosted agent and facing issues with TEE downloading, you may install TEE manually:
DISABLE_TEE_PLUGIN_REMOVAL environment or pipeline variable to true. This variable prevents the agent from removing the TEE plugin after TFVC repository checkout.TEE-CLC-14.135.0 folder to <agent_directory>/externals/tee.Notikumi
Veidojiet inteliģentas lietotnes
17. marts 21 - 21. marts 10
Pievienojieties meetup sērijai, lai kopā ar citiem izstrādātājiem un ekspertiem izveidotu mērogojamus AI risinājumus, kuru pamatā ir reālas lietošanas gadījumi.
Reģistrēties tūlītApmācība
Modulis
Host your own build agent in Azure Pipelines - Training
Work with guidance from the Space Game web team to set up your build agent running on-premises or on an Azure virtual machine running in the cloud.
Dokumentācija
Run a self-hosted agent in Docker - Azure Pipelines
Instructions for running your Azure Pipelines agent in Docker
Azure Pipelines Agents - Azure Pipelines
Learn about building your code or deploying your software using agents in Azure Pipelines.
Register an agent using a personal access token (PAT) - Azure Pipelines
Learn how to register a self-hosted agent using a personal access token (PAT)