Berhijrah ke Sidang Kemuncak Inovasi:
Ketahui cara berhijrah dan memodenkan ke Azure boleh meningkatkan prestasi, daya tahan dan keselamatan perniagaan anda, membolehkan anda menerima AI sepenuhnya.Daftar sekarang
Pelayar ini tidak lagi disokong.
Naik taraf kepada Microsoft Edge untuk memanfaatkan ciri, kemas kini keselamatan dan sokongan teknikal yang terkini.
Tutorial: Deploy an Azure VMware Solution private cloud
Artikel
The Azure VMware Solution private gives you the ability to deploy a vSphere cluster in Azure. For each private cloud created, there's one vSAN cluster by default. You can add, delete, and scale clusters. The minimum number of hosts per cluster is three. More hosts can be added one at a time, up to a maximum of 16 hosts per cluster. The maximum number of clusters per private cloud is 12. The initial deployment of Azure VMware Solution has three hosts.
You use vCenter Server and NSX-T Manager to manage most other aspects of cluster configuration or operation. All local storage of each host in a cluster is under the control of vSAN.
Petua
You can always extend the cluster and add more clusters later if you need to go beyond the initial deployment number.
Because Azure VMware Solution doesn't allow you to manage your private cloud with your cloud vCenter Server at launch, you need to do more steps for the configuration. This tutorial covers these steps and related prerequisites.
In this tutorial, learn how to:
Create an Azure VMware Solution private cloud
Verify the private cloud deployed
Prerequisites
Appropriate administrative rights and permission to create a private cloud. You must be at minimum contributor level in the subscription.
Follow the information you gathered in the planning tutorial to deploy Azure VMware Solution.
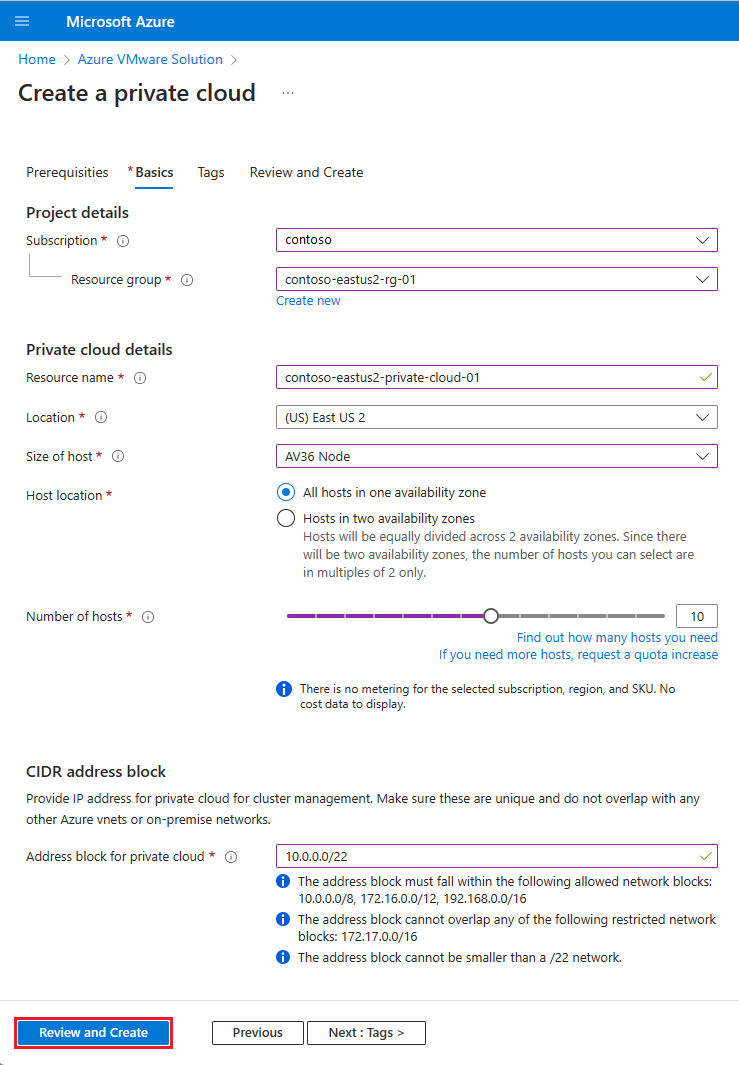
On the Basics tab, enter values for the fields and then select Review + Create.
Petua
You gathered this information during the planning phase of this quick start.
Field
Value
Subscription
Select the subscription you plan to use for the deployment. All resources in an Azure subscription are billed together.
Resource group
Select the resource group for your private cloud. An Azure resource group is a logical container into which Azure resources are deployed and managed. Alternatively, you can create a new resource group for your private cloud.
Resource name
Provide the name of your Azure VMware Solution private cloud.
Location
Select a location, such as (US) East US 2. It's the region you defined during the planning phase.
Size of host
Select the AV36, AV36P or AV52 SKU.
Host Location
Select All hosts in one availability zone for a standard private cloud or Hosts in two availability zones for stretched clusters.
Number of hosts
Number of hosts allocated for the private cloud cluster. The default value is 3, which you can increase or decrease after deployment. If these nodes aren't listed as available, contact support to request a quota increase. You can also select the link labeled If you need more hosts, request a quota increase in the Azure portal.
Address block for private cloud
Provide an IP address block for the private cloud. The CIDR represents the private cloud management network and is used for the cluster management services, such as vCenter Server and NSX-T Manager. Use /22 address space, for example, 10.175.0.0/22. The address should be unique and not overlap with other Azure Virtual Networks and with on-premises networks.
Verify the information entered, and if correct, select Create.
Nota
This step takes an estimated 4+ hours. Adding a single host in an existing cluster takes an estimated 1 hour. If you are adding a new cluster with maximum nodes (16), it can take an estimated 4+ hours.
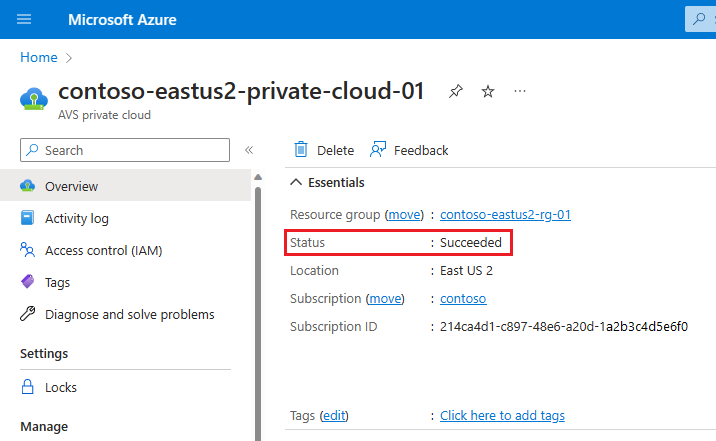
Verify that the deployment was successful. Navigate to the resource group you created and select your private cloud. You see the status of Succeeded when the deployment is finished.
Instead of the Azure portal to create an Azure VMware Solution private cloud, you can use the Azure CLI using the Azure Cloud Shell. For a list of commands you can use with Azure VMware Solution, see Azure VMware commands.
If you prefer to run CLI reference commands locally, install the Azure CLI. If you're running on Windows or macOS, consider running Azure CLI in a Docker container. For more information, see How to run the Azure CLI in a Docker container.
If you're using a local installation, sign in to the Azure CLI by using the az login command. To finish the authentication process, follow the steps displayed in your terminal. For other sign-in options, see Sign in with the Azure CLI.
When you're prompted, install the Azure CLI extension on first use. For more information about extensions, see Use extensions with the Azure CLI.
Run az version to find the version and dependent libraries that are installed. To upgrade to the latest version, run az upgrade.
Create a resource group with the 'az group create' command. An Azure resource group is a logical container into which Azure resources are deployed and managed. The following example creates a resource group named myResourceGroup in the eastus location:
Azure CLI
az group create --name myResourceGroup --location eastus
Provide a name for the resource group and the private cloud, a location, and the size of the cluster.
Property
Description
-g (Resource Group name)
The name of the resource group for your private cloud resources.
-n (Private Cloud name)
The name of your Azure VMware Solution private cloud.
--location
The region used for your private cloud.
--cluster-size
The size of the cluster. The minimum value is 3.
--network-block
The CIDR IP address network block to use for your private cloud. The address block shouldn't overlap with address blocks used in other virtual networks that are in your subscription and on-premises networks.
Continue to the next tutorial to learn how to create a jump box. You use the jump box to connect to your environment to manage your private cloud locally.
Prepare to migrate VMware resources to Azure by deploying an Azure VMware Solution resource. Then, connect your VMware environment to Azure VMware Solution.