RabbitMQ trigger for Azure Functions overview
Note
The RabbitMQ bindings are only fully supported on Premium and Dedicated plans. Consumption is not supported.
Use the RabbitMQ trigger to respond to messages from a RabbitMQ queue.
For information on setup and configuration details, see the overview.
Example
A C# function can be created by using one of the following C# modes:
- Isolated worker model: Compiled C# function that runs in a worker process that's isolated from the runtime. Isolated worker process is required to support C# functions running on LTS and non-LTS versions .NET and the .NET Framework.
- In-process model: Compiled C# function that runs in the same process as the Functions runtime.
- C# script: Used primarily when you create C# functions in the Azure portal.
Important
Support will end for the in-process model on November 10, 2026. We highly recommend that you migrate your apps to the isolated worker model for full support.
[Function(nameof(RabbitMQFunction))]
[RabbitMQOutput(QueueName = "destinationQueue", ConnectionStringSetting = "RabbitMQConnection")]
public static string Run([RabbitMQTrigger("queue", ConnectionStringSetting = "RabbitMQConnection")] string item,
    FunctionContext context)
{
    var logger = context.GetLogger(nameof(RabbitMQFunction));

    logger.LogInformation(item);

    var message = $"Output message created at {DateTime.Now}";
    return message;
}
The following Java function uses the @RabbitMQTrigger annotation from the Java RabbitMQ types to describe the configuration for a RabbitMQ queue trigger. The function grabs the message placed on the queue and adds it to the logs.
@FunctionName("RabbitMQTriggerExample")
public void run(
    @RabbitMQTrigger(connectionStringSetting = "rabbitMQConnectionAppSetting", queueName = "queue") String input,
    final ExecutionContext context)
{
    context.getLogger().info("Java HTTP trigger processed a request." + input);
}
The following example shows a RabbitMQ trigger binding in a function.json file and a JavaScript function that uses the binding. The function reads and logs a RabbitMQ message.
Here's the binding data in the function.json file:
{
"bindings": [
{
"name": "myQueueItem",
"type": "rabbitMQTrigger",
"direction": "in",
"queueName": "queue",
"connectionStringSetting": "rabbitMQConnectionAppSetting"
}
]
}
Here's the JavaScript script code:
module.exports = async function (context, myQueueItem) {
context.log('JavaScript RabbitMQ trigger function processed work item', myQueueItem);
};
The following example demonstrates how to read a RabbitMQ queue message via a trigger.
A RabbitMQ binding is defined in function.json where type is set to RabbitMQTrigger.
{
"scriptFile": "__init__.py",
"bindings": [
{
"name": "myQueueItem",
"type": "rabbitMQTrigger",
"direction": "in",
"queueName": "queue",
"connectionStringSetting": "rabbitMQConnectionAppSetting"
}
]
}
import logging
import azure.functions as func

def main(myQueueItem) -> None:
    logging.info('Python RabbitMQ trigger function processed a queue item: %s', myQueueItem)
Attributes
Both in-process and isolated worker process C# libraries use the attribute to define the function. C# script instead uses a function.json configuration file.
The attribute's constructor takes the following parameters:
| Parameter | Description |
|---|---|
| QueueName | Name of the queue from which to receive messages. |
| HostName | Hostname of the queue, such as 10.26.45.210. Ignored when using ConnectStringSetting. |
| UserNameSetting | Name of the app setting that contains the username to access the queue, such as UserNameSetting: "%< UserNameFromSettings >%". Ignored when using ConnectStringSetting. |
| PasswordSetting | Name of the app setting that contains the password to access the queue, such as PasswordSetting: "%< PasswordFromSettings >%". Ignored when using ConnectStringSetting. |
| ConnectionStringSetting | The name of the app setting that contains the RabbitMQ message queue connection string. The trigger won't work when you specify the connection string directly instead through an app setting. For example, when you have set ConnectionStringSetting: "rabbitMQConnection", then in both the local.settings.json and in your function app you need a setting like "RabbitMQConnection" : "< ActualConnectionstring >". |
| Port | Gets or sets the port used. Defaults to 0, which points to the RabbitMQ client's default port setting of 5672. |
In C# class libraries, use the RabbitMQTrigger attribute.
Here's a RabbitMQTrigger attribute in a method signature for an isolated worker process library:
[Function(nameof(RabbitMQFunction))]
[RabbitMQOutput(QueueName = "destinationQueue", ConnectionStringSetting = "RabbitMQConnection")]
public static string Run([RabbitMQTrigger("queue", ConnectionStringSetting = "RabbitMQConnection")] string item,
    FunctionContext context)
{
Annotations
The RabbitMQTrigger annotation allows you to create a function that runs when a RabbitMQ message is created.
The annotation supports the following configuration options:
| Parameter | Description |
|---|---|
| queueName | Name of the queue from which to receive messages. |
| hostName | Hostname of the queue, such as 10.26.45.210. Ignored when using ConnectStringSetting. |
| userNameSetting | Name of the app setting that contains the username to access the queue, such as UserNameSetting: "%< UserNameFromSettings >%". Ignored when using ConnectStringSetting. |
| passwordSetting | Name of the app setting that contains the password to access the queue, such as PasswordSetting: "%< PasswordFromSettings >%". Ignored when using ConnectStringSetting. |
| connectionStringSetting | The name of the app setting that contains the RabbitMQ message queue connection string. The trigger won't work when you specify the connection string directly instead through an app setting. For example, when you have set ConnectionStringSetting: "rabbitMQConnection", then in both the local.settings.json and in your function app you need a setting like "RabbitMQConnection" : "< ActualConnectionstring >". |
| port | Gets or sets the port used. Defaults to 0, which points to the RabbitMQ client's default port setting of 5672. |
Configuration
The following table explains the binding configuration properties that you set in the function.json file.
| function.json property | Description |
|---|---|
| type | Must be set to RabbitMQTrigger. |
| direction | Must be set to in. |
| name | The name of the variable that represents the queue in function code. |
| queueName | Name of the queue from which to receive messages. |
| hostName | Hostname of the queue, such as 10.26.45.210. Ignored when using connectStringSetting. |
| userNameSetting | Name of the app setting that contains the username to access the queue, such as UserNameSetting: "%< UserNameFromSettings >%". Ignored when using connectStringSetting. |
| passwordSetting | Name of the app setting that contains the password to access the queue, such as PasswordSetting: "%< PasswordFromSettings >%". Ignored when using connectStringSetting. |
| connectionStringSetting | The name of the app setting that contains the RabbitMQ message queue connection string. The trigger won't work when you specify the connection string directly instead through an app setting. For example, when you have set connectionStringSetting: "rabbitMQConnection", then in both the local.settings.json and in your function app you need a setting like "rabbitMQConnection" : "< ActualConnectionstring >". |
| port | Gets or sets the port used. Defaults to 0, which points to the RabbitMQ client's default port setting of 5672. |
When you're developing locally, add your application settings in the local.settings.json file in the Values collection.
See the Example section for complete examples.
Usage
The parameter type supported by the RabbitMQ trigger depends on the C# modality used.
The RabbitMQ bindings currently support only string and serializable object types when running in an isolated process.
For a complete example, see C# example.
Refer to Java annotations.
The queue message is available via context.bindings.<NAME> where <NAME> matches the name defined in function.json. If the payload is JSON, the value is deserialized into an object.
Refer to the Python example.
Dead letter queues
Dead letter queues and exchanges can't be controlled or configured from the RabbitMQ trigger. To use dead letter queues, pre-configure the queue used by the trigger in RabbitMQ. Refer to the RabbitMQ documentation.
host.json settings
This section describes the configuration settings available for this binding in versions 2.x and higher. Settings in the host.json file apply to all functions in a function app instance. The example host.json file below contains only the version 2.x+ settings for this binding. For more information about function app configuration settings in versions 2.x and later versions, see host.json reference for Azure Functions.
{
    "version": "2.0",
    "extensions": {
        "rabbitMQ": {
            "prefetchCount": 100,
            "queueName": "queue",
            "connectionString": "amqp://user:password@url:port",
            "port": 10
        }
    }
}
| Property | Default | Description |
|---|---|---|
| prefetchCount | 30 | Gets or sets the number of messages that the message receiver can simultaneously request and is cached. |
| queueName | n/a | Name of the queue to receive messages from. |
| connectionString | n/a | The RabbitMQ message queue connection string. The connection string is directly specified here and not through an app setting. |
| port | 0 | (ignored if using connectionString) Gets or sets the Port used. Defaults to 0, which points to rabbitmq client's default port setting: 5672. |
Local testing
Note
The connectionString takes precedence over "hostName", "userName", and "password". If these are all set, the connectionString will override the other two.
If you're testing locally without a connection string, you should set the "hostName" setting and "userName" and "password" if applicable in the "rabbitMQ" section of host.json:
{
    "version": "2.0",
    "extensions": {
        "rabbitMQ": {
            ...
            "hostName": "localhost",
            "username": "userNameSetting",
            "password": "passwordSetting"
        }
    }
}
| Property | Default | Description |
|---|---|---|
| hostName | n/a | (ignored if using connectionString) Hostname of the queue (Ex: 10.26.45.210) |
| userName | n/a | (ignored if using connectionString) Name to access the queue |
| password | n/a | (ignored if using connectionString) Password to access the queue |
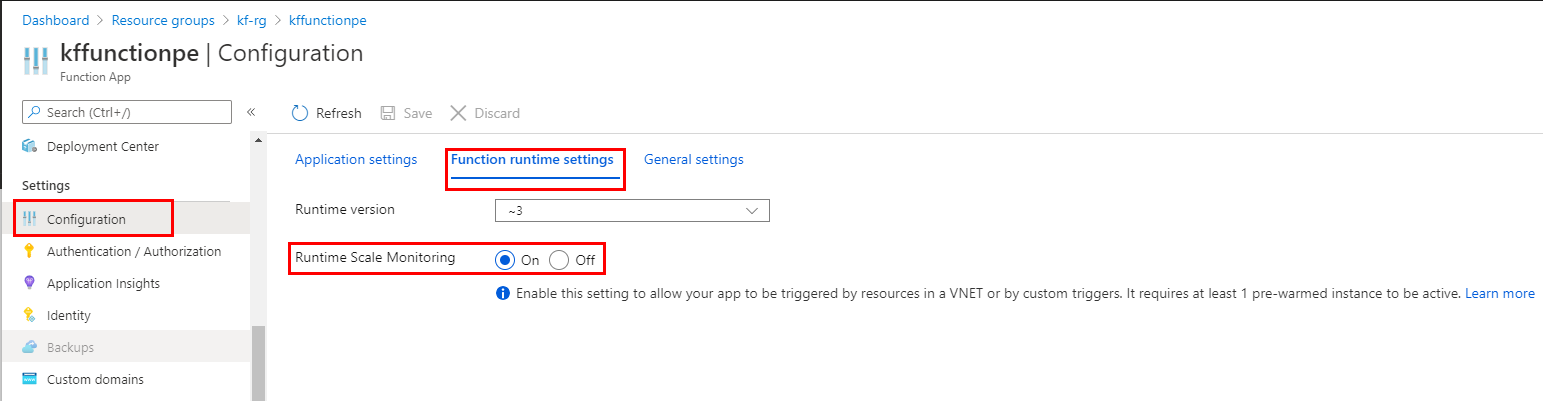
Enable Runtime Scaling
In order for the RabbitMQ trigger to scale out to multiple instances, the Runtime Scale Monitoring setting must be enabled.
In the portal, this setting can be found under Configuration > Function runtime settings for your function app.
In the CLI, you can enable Runtime Scale Monitoring by using the following command:
az resource update -g <resource_group> -n <function_app_name>/config/web --set properties.functionsRuntimeScaleMonitoringEnabled=1 --resource-type Microsoft.Web/sites
Monitoring RabbitMQ endpoint
To monitor your queues and exchanges for a certain RabbitMQ endpoint:
- Enable the RabbitMQ management plugin
- Browse to http://{node-hostname}:15672 and log in with your user name and password.
Next steps
Tilbakemeldinger
Kommer snart: Gjennom 2024 skal vi fase ut GitHub-problemer som tilbakemeldingsmekanisme for innhold og erstatte det med et nytt tilbakemeldingssystem. Hvis du vil ha mer informasjon, kan du se https://aka.ms/ContentUserFeedback.
Send inn og vis tilbakemelding for