Plan and manage costs for Azure Logic Apps
Applies to: Azure Logic Apps (Consumption + Standard)
This article helps you plan and manage costs for Azure Logic Apps. Before you create or add any resources using this service, estimate your costs by using the Azure pricing calculator. After you start using Azure Logic Apps resources, you can set budgets and monitor costs by using Microsoft Cost Management. To identify areas where you might want to act, you can also review forecasted costs and monitor spending trends.
Keep in mind that costs for Azure Logic Apps are only part of the monthly costs in your Azure bill. Although this article explains how to estimate and manage costs for Azure Logic Apps, you're billed for all the Azure services and resources that are used in your Azure subscription, including any third-party services. After you're familiar with managing costs for Azure Logic Apps, you can apply similar methods to manage costs for all the Azure services used in your subscription.
Prerequisites
Microsoft Cost Management supports most Azure account types. To view all the supported account types, see Understand Cost Management data. To view cost data, you need at least read access for your Azure account.
For information about assigning access to Microsoft Cost Management data, see Assign access to data.
Understand the billing model
Azure Logic Apps runs on Azure infrastructure that accrues costs when you deploy new resources. Make sure that you understand the billing model for Azure Logic Apps along with related Azure resources, and manage costs due to these dependencies when you make changes to deployed resources.
Costs that typically accrue with Azure Logic Apps
Azure Logic Apps applies different pricing models, based on the resources that you create and use:
Logic app resources that you create and run in multitenant Azure Logic Apps use a consumption (pay-for-use) pricing model.
Logic app resources that you create and run in single-tenant Azure Logic Apps use a hosting plan pricing model.
Logic app resources that you create and run in an integration service environment (ISE) use the ISE pricing model.
Here are other resources that incur costs when you create them for use with logic apps:
An integration account is a separate resource that you create and link to logic apps for building B2B integrations. Integration accounts use a fixed pricing model where the rate is based on the integration account type or tier that you use.
An ISE is a separate resource that you create as a deployment location for logic apps that need direct access to resources in a virtual network. ISEs use the ISE pricing model where the rate is based on the ISE SKU that you create and other settings. However, data retention and storage consumption don't incur costs.
A custom connector is a separate resource that you create for a REST API that has no prebuilt connector for you to use in your logic apps. Custom connector executions use a consumption pricing model except when you use them in an ISE.
Storage operations and costs
Azure Logic Apps uses Azure Storage for any storage operations. With multitenant Azure Logic Apps, any storage usage and costs are attached to the logic app. Data retention and storage consumption accrue costs using a fixed pricing model. For example, inputs and outputs from run history are kept in behind-the-scenes storage, which differs from storage resources that you independently create, manage, and access from your logic app.
With single-tenant Azure Logic Apps, you can use your own Azure storage account. This capability gives you more control and flexibility with your Azure Logic Apps data. When stateful workflows run their operations, the Azure Logic Apps runtime makes storage transactions. For example, queues are used for scheduling, while tables and blobs are used for storing workflow states. Storage costs change based on your workflow's content. Different triggers, actions, and payloads result in different storage operations and needs. Storage transactions follow the Azure Storage pricing model. Storage costs are separately listed in your Azure billing invoice.
For single-tenant Azure Logic Apps, you can get some idea about the number of storage operations that a workflow might run and their cost by using the Logic Apps Storage calculator. You can either select a sample workflow or use an existing workflow definition. The first calculation estimates the number of storage operations in your workflow. You can then use these numbers to estimate possible costs using the Azure pricing calculator. For more information, review Estimate storage needs and costs for workflows in single-tenant Azure Logic Apps.
Costs might accrue after resource deletion
After you delete a logic app, Azure Logic Apps won't create or run new workflow instances. However, all in-progress and pending runs continue until they finish. Depending on the number of these runs, this process might take some time. For more information, see Manage logic apps.
If you have these resources after deleting a logic app, these resources continue to exist and accrue costs until you delete them:
Azure resources that you create and manage independently from the logic app that connects to those resources, for example, Azure function apps, event hubs, event grids, and so on
Integration accounts
Integration service environments (ISEs)
If you delete an ISE, the associated Azure virtual network, subnets, and other related resources continue to exist. After you delete the ISE, you might have to wait up to a specific number of hours before you can try deleting the virtual network or subnets.
Using Monetary Credit with Azure Logic Apps
You can pay for Azure Logic Apps charges with your EA monetary commitment credit. However, you can't use EA monetary commitment credit to pay for charges for third-party products and services, including those from the Azure Marketplace.
Estimate costs
Before you create resources with Azure Logic Apps, estimate your costs by using the Azure pricing calculator. For more information, review Pricing model for Azure Logic Apps.
On the Azure pricing calculator page, from the left menu, select Integration > Azure Logic Apps.
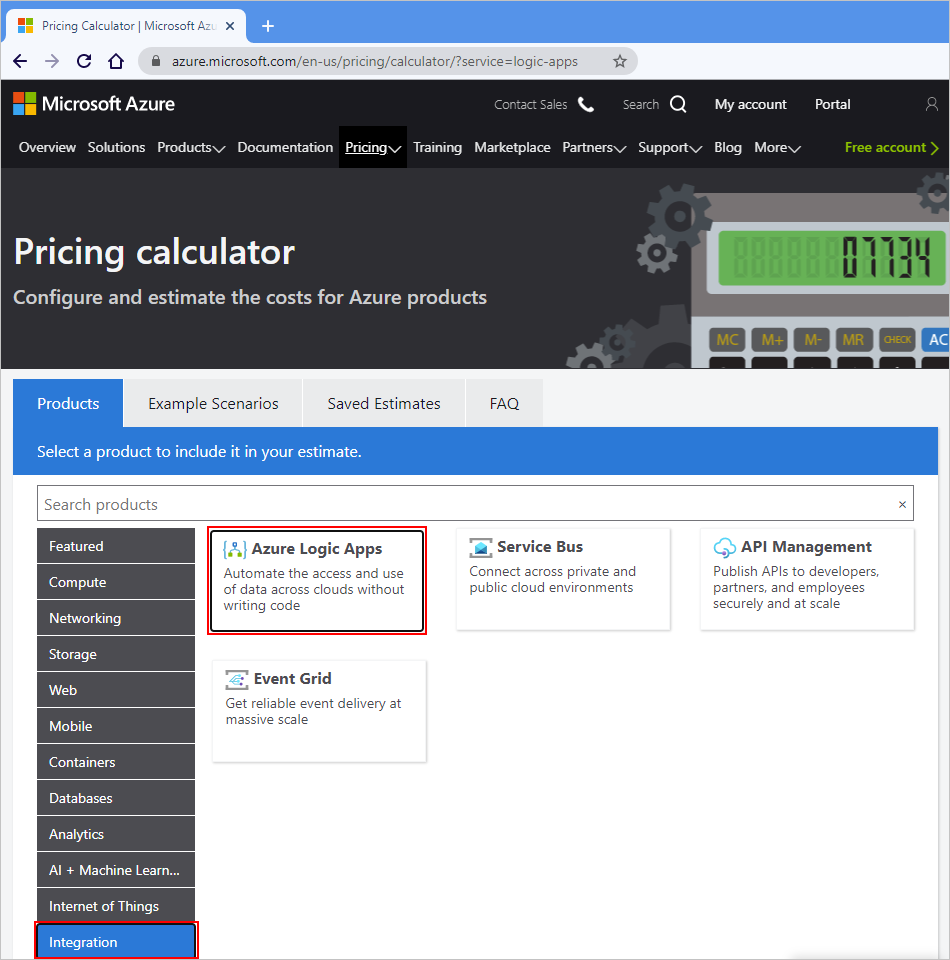
Scroll down the page until you can view the Azure Logic Apps pricing calculator. In the various sections for Azure resources that are directly related to Azure Logic Apps, enter the numbers of resources that you plan to use and the number of intervals over which you might use those resources.
This screenshot shows an example cost estimate by using the calculator:
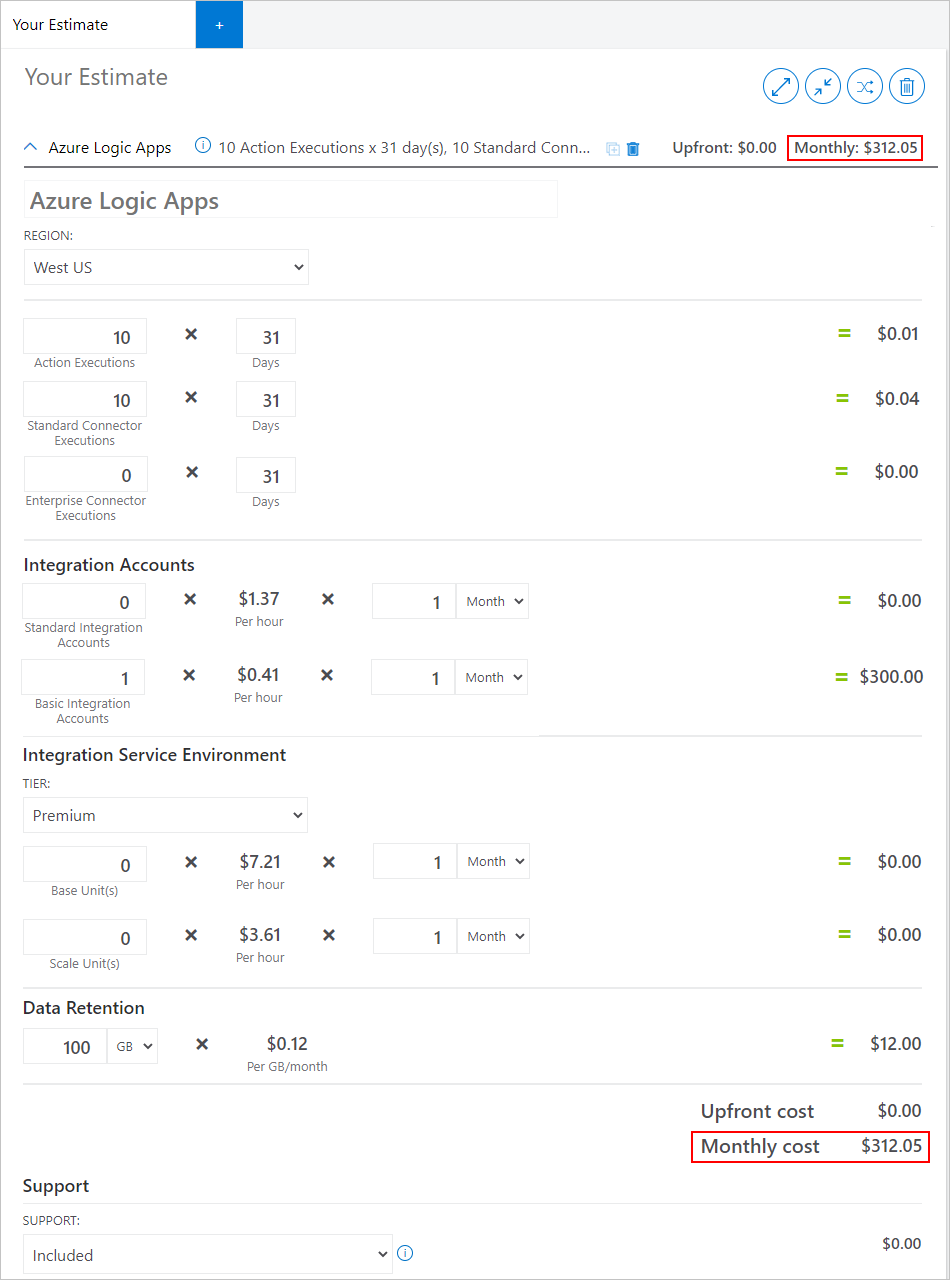
To update your cost estimates as you create and use new related resources, return to this calculator, and update those resources here.
Create budgets and alerts
To help you proactively manage costs for your Azure account or subscription, you can create budgets and alerts by using the Microsoft Cost Management and Billing service and capabilities. Budgets and alerts are created for Azure subscriptions and resource groups, so they're useful as part of an overall cost monitoring strategy.
Based on spending compared to budget and cost thresholds, alerts automatically notify stakeholders about spending anomalies and overspending risks. If you want more granularity in your monitoring, you can also create budgets that use filters for specific resources or services in Azure. Filters help make sure that you don't accidentally create new resources that cost you extra money. For more information about the filter options, see Group and filter options.
Monitor costs
Resource usage unit costs vary by time intervals, such as seconds, minutes, hours, and days, or by unit usage, such as bytes, megabytes, and so on. Some examples are by day, current and prior month, and year. Switching to longer views over time can help you identify spending trends. When you use the cost analysis features, you can view costs as graphs and tables over various time intervals. If you created budgets and cost forecasts, you can also easily find where budgets are exceeded and overspending might have occurred.
After you start incurring costs for resources that create or start using in Azure, you can review and monitor these costs in these ways:
Monitor logic app executions and storage usage by using Azure Monitor
Run cost analysis by using Microsoft Cost Management and Billing
Monitor logic app executions and storage usage
Using Azure Monitor, you can view these metrics for a specific logic app:
- Billable action executions
- Billable trigger executions
- Billing usage for native operation executions
- Billing usage for standard connector executions
- Billing usage for storage consumption
- Total billable executions
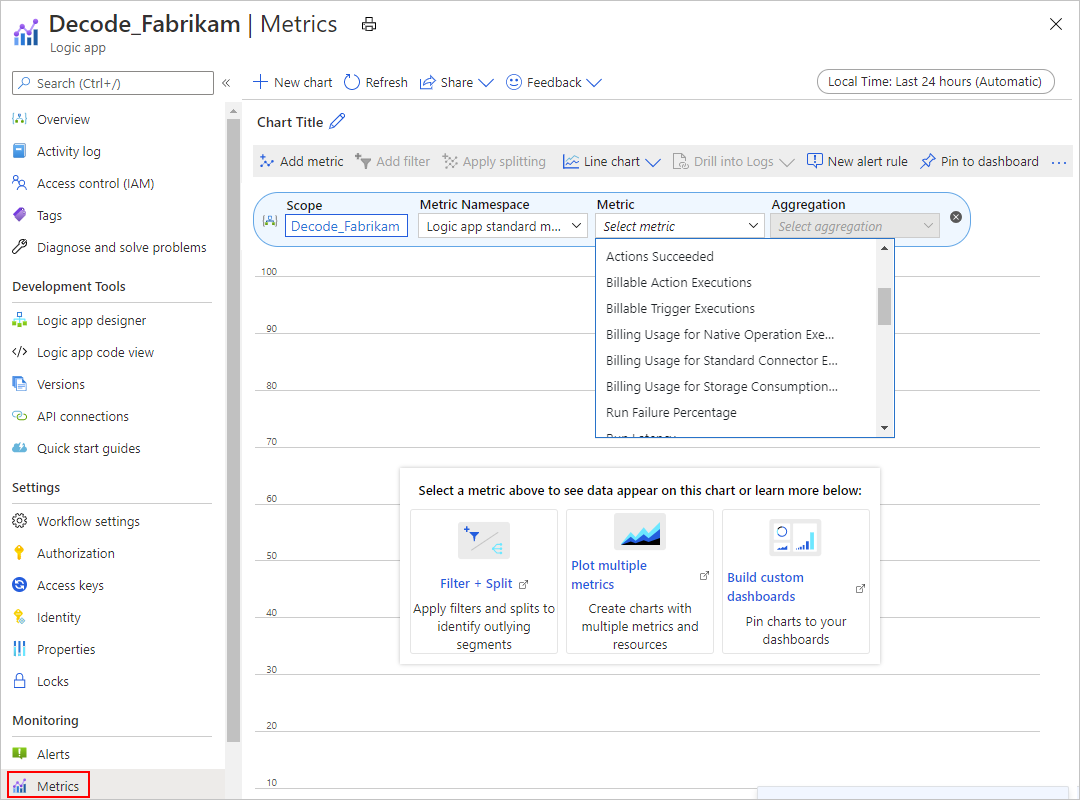
View execution and storage consumption metrics
In the Azure portal, find and open your logic app. On your logic app's menu, under Monitoring, select Metrics.
In the right-side pane, under Chart Title, in the metric bar, open the Metric list, and select the metric that you want.
Note
Storage consumption is measured as the number of storage units (GB) that your logic app uses and is billed. Runs that use less than 500 MB in storage might not appear in monitoring view, but they are still billed.
In the pane's upper-right corner, select the time period that you want.
To view other storage consumption data, specifically action input and output sizes in your logic app's run history, follow these steps.
View action input and output sizes in run history
In the Azure portal, find and open your logic app.
On your logic app's menu, select Overview.
In the right-side pane, under Runs history, select the run that has the inputs and outputs you want to view.
Under Logic app run, select Run Details.
In the Logic app run details pane, in the actions table, which lists each action's status and duration, select the action that you want to view.
In the Logic app action pane, find the sizes for that action's inputs and outputs. Under Inputs link and Outputs link, find the links to those inputs and outputs.
Note
For loops, only the top-level actions show sizes for their inputs and outputs. For actions inside nested loops, inputs and outputs show zero size and no links.
Run cost analysis by using Microsoft Cost Management and Billing
To review costs for Azure Logic Apps based on a specific scope, for example, an Azure subscription, you can use the cost analysis capabilities in Microsoft Cost Management and Billing.
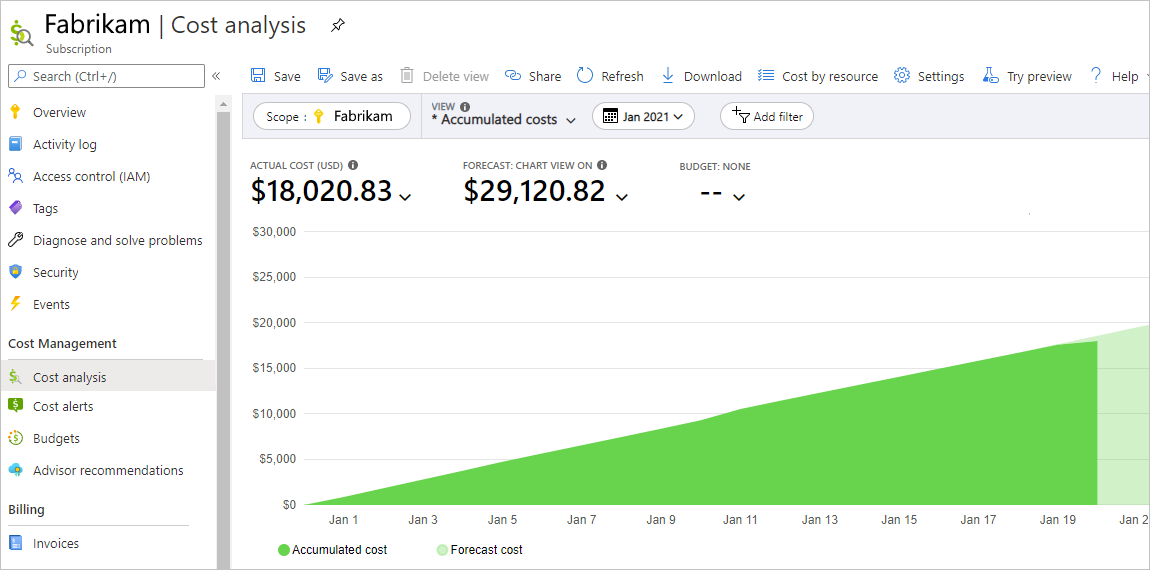
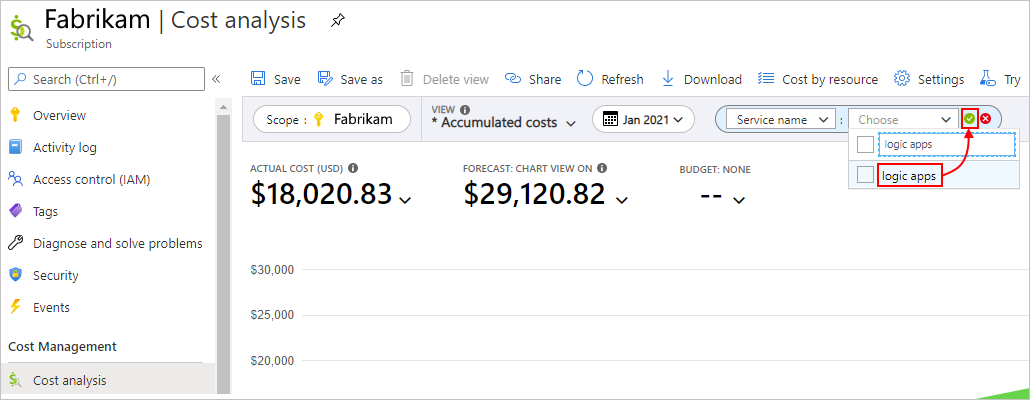
In the Azure portal, open the scope that you want, such as your Azure subscription. From the left menu, under Cost Management, select Cost analysis.
When you first open the cost analysis pane, the top graph shows the actual and forecasted usage costs across all the services in the subscription for the current month.
Tip
To change scopes, in the Cost analysis pane, from the filters bar, select the Scope filter. In the Select scope pane, switch to the scope that you want.
Underneath, the donut charts show the current costs by Azure services, by Azure region (location), and by resource group.
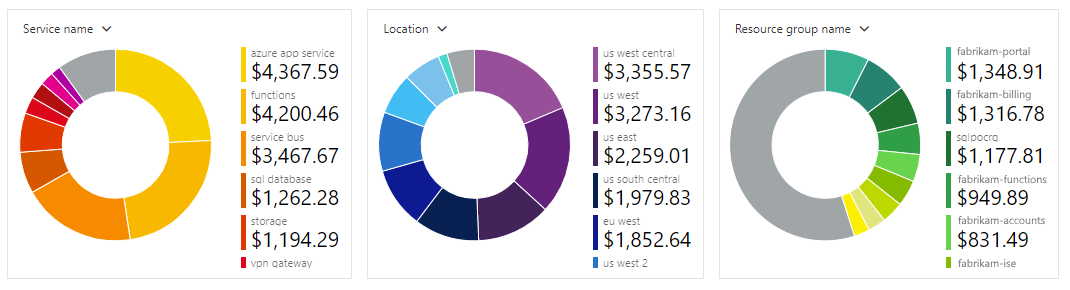
To filter the chart to a specific area, such as a service or resource, in the filters bar, select Add filter.
From the left-side list, select the filter type, for example, Service name. From the right-side list, select the filter, for example, logic apps. When you're done, select the green check mark.
For example, here is the result for Azure Logic Apps:

Export cost data
When you need to do more data analysis on costs, you can export cost data to a storage account. For example, a finance team can analyze this data using Excel or Power BI. You can export your costs on a daily, weekly, or monthly schedule, and set a custom date range. Exporting cost data is the recommended way to retrieve cost datasets.
Other ways to manage and reduce costs
To help you reduce costs on your logic aps and related resources, try these options:
If possible, use built-in triggers and actions, which cost less to run per execution than managed connector triggers and actions.
For example, you might be able to reduce costs when accessing other resources by using the HTTP action or by calling a function that you created by using the Azure Functions service and using the built-in Azure Functions action. However, using Azure Functions also incurs costs, so make sure that you compare your options.
Specify precise trigger conditions for running a workflow.
For example, you can specify that a trigger fires only when the target website returns an internal server error. In the trigger's JSON definition, use the
conditionsproperty to specify a condition that references the trigger's status code.If a trigger has a polling version and a webhook version, try the webhook version, which waits for the specified event to happen before firing, rather than regularly checking for the event.
Call your logic app through another service so that the trigger fires only when the workflow should run.
For example, you can call your logic app from a function that you create and run using the Azure Functions service. For example, see Call or trigger logic apps by using Azure Functions and Azure Service Bus.
Disable logic apps that don't have to constantly run, or delete logic apps that you no longer need at all. If possible, disable any other resources that you don't need constantly active.
Next steps
- Optimize your cloud investment with Microsoft Cost Management
- Manage costs using cost analysis
- Prevent unexpected costs
- Take the Cost Management guided learning course
Tilbakemeldinger
Kommer snart: Gjennom 2024 faser vi ut GitHub Issues som tilbakemeldingsmekanisme for innhold, og erstatter det med et nytt system for tilbakemeldinger. Hvis du vil ha mer informasjon, kan du se: https://aka.ms/ContentUserFeedback.
Send inn og vis tilbakemelding for