Manage the Planner app for your organization in Microsoft Teams
Overview of Planner
The Planner app in Microsoft Teams brings together the simplicity of Microsoft To Do, the collaboration of Microsoft Planner, and the power of Project for the web into a single experience to help your users get work done more efficiently. Users can access Planner as an app on the left side of Teams and as a tab in a channel within individual teams.
Note
Prior to March 2024, this app was named Tasks by Planner and To Do.

What you need to know about Planner
Planner is available as an app and as a tab in a channel. The app shows all a user's individual tasks and shared tasks.
When a user opens the Planner app in Teams, they see:
- My Day: Includes tasks that are due today, along with any tasks the user chooses to add to this view.
- My Tasks: This view includes:
- Private Tasks: A dedicated place for the user to quickly create tasks in a default place.
- Assigned to me: Shows all tasks that are assigned to the user from Teams meeting notes, Microsoft Loop, Planner, and Planner premium.
- Flagged emails: Emails the user flagged in Outlook show up as tasks here.
- My Plans: Shows all the user's To Do lists, basic plans, and premium plans.
- New plan: Create new personal or shared plans directly in the app.
Users can also use the Planner app to get notifications about Planner tasks. To learn more about the end-user experience, see Getting started with Planner in Teams.
Note
There's limited functionality when using the Planner app on Teams mobile. On mobile, users will only see plans that are added to a tab in a channel within a team.
For organizations who want to streamline task management for frontline workers, Planner also includes capabilities to distribute and monitor tasks across frontline locations. See the Frontline workers and managers section of this article.
Set up Planner
Important
Settings and policies that you configure for Planner for web will also apply to Planner in Teams.
Enable or disable Planner in your organization
Planner is enabled by default for all Teams users in your organization. You can turn off or turn on the app at the org level on the Manage apps page in the Teams admin center.
In the left pane of the Teams admin center, go to Teams apps > Manage apps.
In the list of apps, do one of the following actions:
- To turn off Planner for your organization, search for the Planner app, select it, and then select Block.
- To turn on Planner for your organization, search for the Planner app, select it, and then select Allow.
Note
If you can't find the Planner app, search for "Tasks by Planner and To Do". The app could still be in the process of being renamed.
Enable or disable Planner for specific users in your organization
To allow or block specific users in your organization from using Planner, make sure Planner is turned on for your organization on the Manage apps page, and then create a custom policy for app permissions and assign it to those users. To learn more, see Use app permission policies to control user access to apps.
Pin Planner to Teams
Use an app setup policy to pin Planner to Teams
App setup policies let you customize Teams to pin apps that are most important for your users.
To pin the Planner app for your users, you can edit the global (Org-wide default) policy or create and assign a custom policy in app setup policy. To learn more, see Use app setup policies to pin and auto install apps for users.
As described in the Frontline workers and managers section of this article, there's a default app setup policy for users who are assigned an F license.
Frontline workers and managers
Tailored frontline app experience in Teams
The tailored frontline app experience in Teams pins the most relevant apps in Teams for users who have an F license assigned to them. This feature is enabled by default, giving your frontline workers an out-of-the-box experience tailored to reflect workloads used by frontline employees.
As part of this experience, a handful of apps are pinned to the app bar—the bar on the side of the Teams desktop client and at the bottom of Teams mobile clients—where users can quickly and easily access them. Pinned apps include Viva Connections dashboard, Walkie Talkie, Shifts, and Planner. However, Planner might appear in the … menu on mobile because there are fewer app spots available in the app navigation.
To learn more, including how the experience works with app policies that you set, see Tailor Teams apps for your frontline workers.
A user's My Tasks is visible if the user is licensed for Exchange Online
If you don't want a user to see My Tasks, you can hide it. To hide My Tasks, remove the user's Exchange Online license. It's important to know that after you remove an Exchange Online license, the user no longer has access to their mailbox. Mailbox data is held for 30 days, after which the data will be removed and can't be recovered unless the mailbox is placed on In-Place Hold or Litigation Hold.
We don't recommend removing an Exchange Online license for information workers, but there might be some scenarios where you can hide My Tasks in this way, such as for frontline workers who don't depend on email.
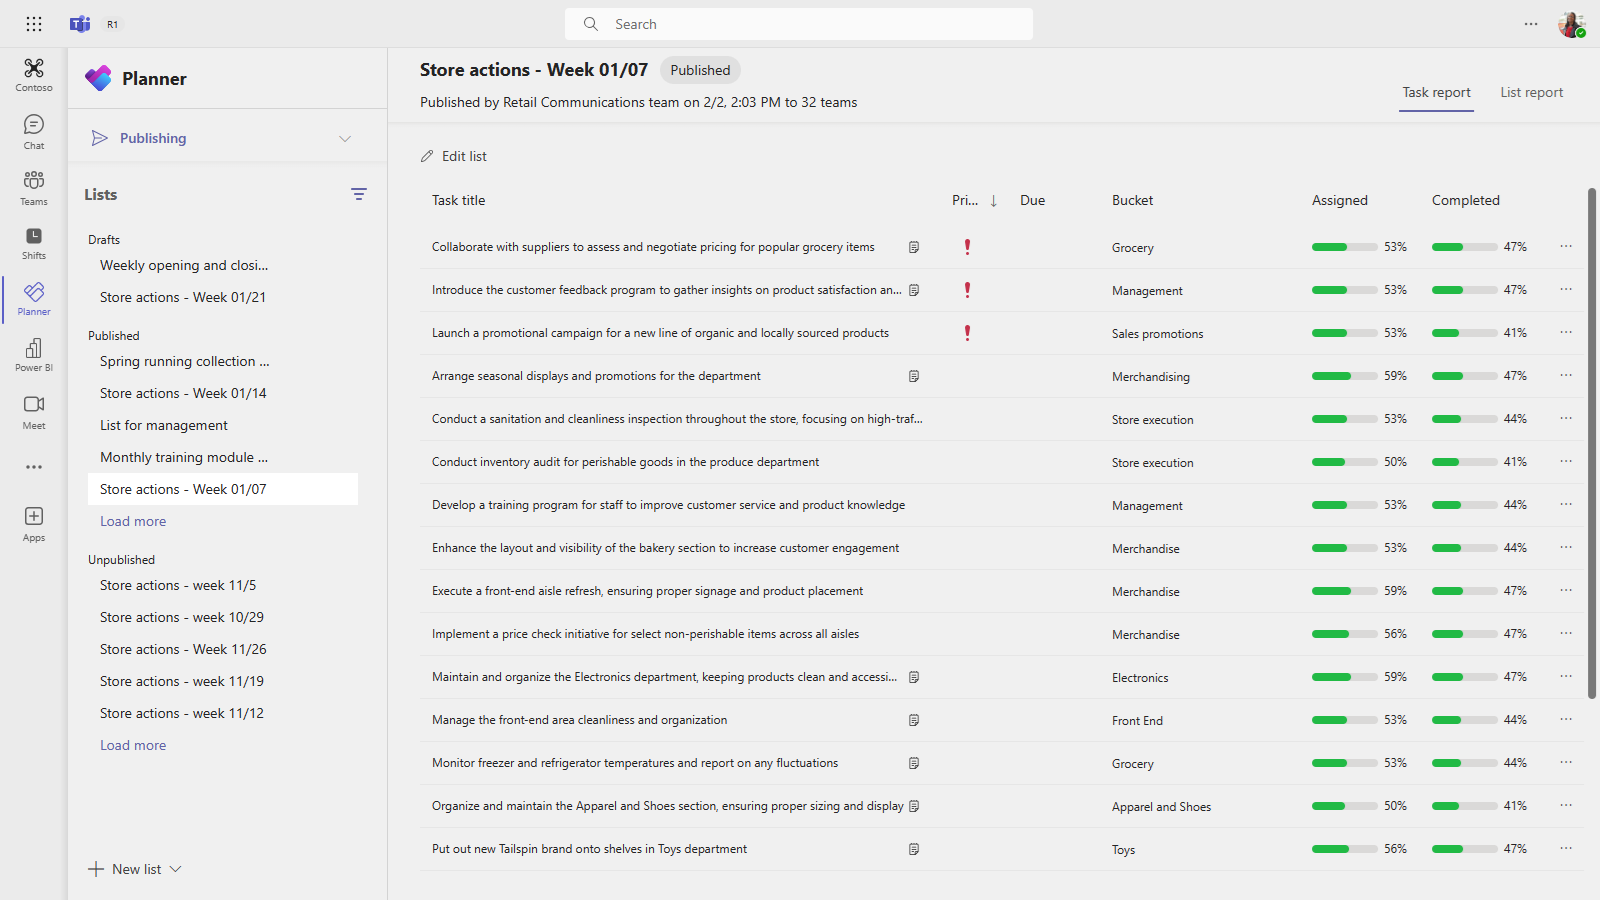
Task publishing
With task publishing, your organization can publish task lists targeted to specific locations (teams) across your organization to define and share a work plan to be completed at those locations.
- People on the publishing team, such as corporate or regional leadership, can create task lists and publish them to specific teams.
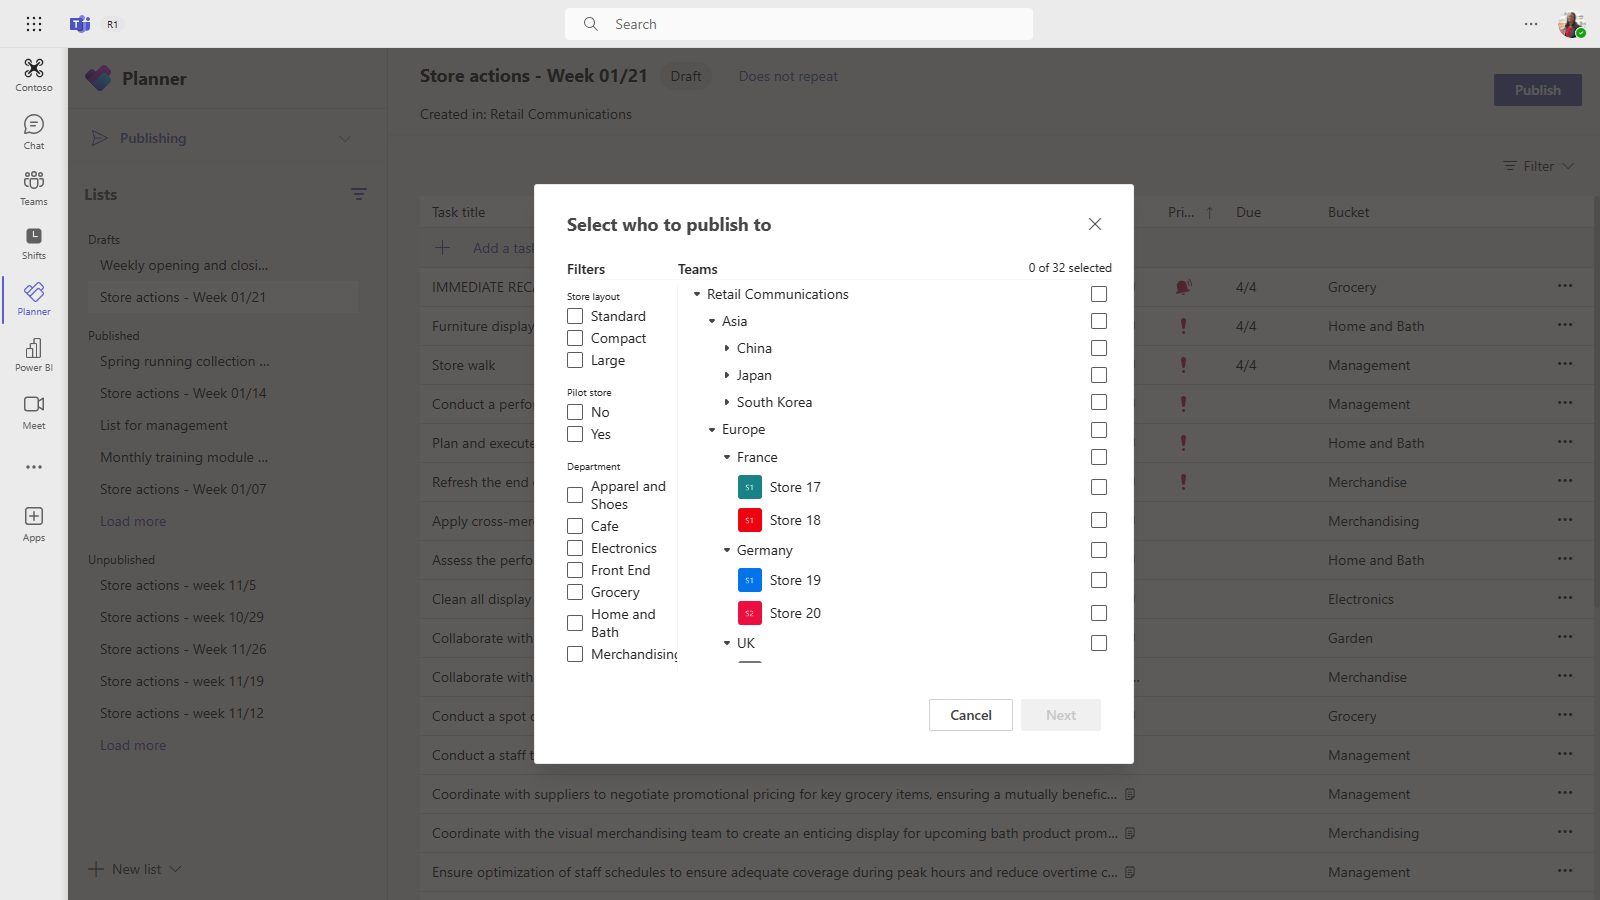
- Managers on the recipient teams can review the published task lists and assign individual tasks to team members.
- Frontline workers have a simple mobile experience to see tasks assigned to them. They can attach photos to show their work when appropriate and mark their tasks as completed.
- Publishers and managers can view reports to see assignment and completion status of tasks at each level, including by location (team), task list, and individual task.


Users create, manage, and publish task lists by selecting the My Tasks & Plans dropdown menu in the Planner app, and then choosing Publishing. This menu only shows for a user if your organization set up a team targeting hierarchy and the user is part of a team that's included in the hierarchy. The hierarchy determines whether the user can publish or receive task lists and view reporting for received lists.

See this short task publishing video with an example scenario.
Set up your team targeting hierarchy
To enable task publishing in your organization, you have to first set up your team targeting schema in a .CSV file. The schema defines how all the teams in your hierarchy are related to each other and also defines the attributes that can be used to filter and select teams. After you create the schema, upload it to Teams to apply it to your organization. Members of the publishing team, such as the Retail Communications Manager in the example scenario, can then filter teams by hierarchy, attributes, or a combination of both to select the relevant teams that should receive the task lists, and then publish the task lists to those teams.
For steps on how to set up your team targeting hierarchy, see Set up your team targeting hierarchy.
About the services
The Planner app in Teams relies on several underlying services. The types of tasks that users are creating and editing affect the available capabilities for extensibility, compliance, and governance.
Private tasks and their attachments
These are stored in Microsoft Exchange.
For eDiscovery support for these types of tasks, see Content stored in Exchange Online mailboxes for eDiscovery and Review data storage and compliance in Microsoft To Do.
For Power Automate support, see Using Microsoft To Do with Power Automate.
Basic plans and the tasks in them
These tasks and plans are stored in Azure and managed by the Planner service. Comments in Planner are stored in Exchange as email threads. See Microsoft Planner for admins to learn more about the Planner service.
For eDiscovery support for these types of tasks, see Content stored in Exchange Online mailboxes for eDiscovery.
Attachments on these types of tasks are stored in the SharePoint location for the group. For eDiscovery support of these attachments, see Overview of Content search.
Planner tasks can be managed using Microsoft Graph and the Power Automate connector. To learn more about these tools, go to:
Premium plans and the tasks in them
Premium plans and tasks are stored in Dataverse and managed via the Project for the web service. When a task is assigned to a user, it's also stored in the same Azure location as basic plans. Attachments are stored in the SharePoint location for the group.
To learn more, see Project for the web get started guide for administrators.
To learn more about managing Power Platform, see the Power Platform admin documentation.
Support for programmability is available via our scheduling API. To learn more, see Use Project schedule APIs to perform operations with Scheduling entities.
Licensing
Users with a Microsoft 365 license are entitled to the Planner app. Users with a Planner premium license such as Planner Plan 1, Project Plan 3, or Project Plan 5, can use the premium capabilities in Planner. Users with a Microsoft 365 license can continue to collaborate on premium plans but won't be able to use the premium features without a premium license.
See the Project for the web service description to learn more about the capabilities available across Microsoft 365 and Planner premium subscriptions.
Give feedback or report an issue
To send us feedback or report an issue, select Help in the upper-right corner, select Feedback, and then enter your feedback or details about the issue you're experiencing.
Tilbakemeldinger
Kommer snart: Gjennom 2024 faser vi ut GitHub Issues som tilbakemeldingsmekanisme for innhold, og erstatter det med et nytt system for tilbakemeldinger. Hvis du vil ha mer informasjon, kan du se: https://aka.ms/ContentUserFeedback.
Send inn og vis tilbakemelding for