Oefening: een opslagaccount en -database seeden
U hebt uw pijplijn bijgewerkt om de toepassing van uw website te bouwen en te implementeren in de Azure-app Service-app die is gedefinieerd in uw Bicep-bestand. Maar de betrouwbaarheidstestfase mislukt omdat de database nog niet werkt. In deze eenheid implementeert u een nieuwe logische Azure SQL-server en -database en configureert u uw pijplijn om het schema van de database te bouwen en te implementeren. U werkt uw pijplijn ook bij om enkele voorbeeldproductgegevens toe te voegen voor uw testomgeving, zodat uw team de website kan uitproberen.
In het proces voert u de volgende taken uit:
- Voeg een blobcontainer toe aan het Azure-opslagaccount.
- Voeg een logische Azure SQL-server en -database toe.
- Werk de buildfase bij om het databaseproject in een DACPAC-bestand te bouwen.
- Voeg nieuwe variabelen toe aan uw variabelegroep voor de logische Azure SQL-server en -database.
- Werk de implementatiefasen bij om de nieuwe variabelen als parameterwaarden te gebruiken.
- Voeg nieuwe pijplijnstappen toe om uw DACPAC-bestand te implementeren.
- Voer de pijplijn uit en bekijk de website.
Een opslagcontainer toevoegen
Uw Bicep-bestand definieert al een opslagaccount, maar er wordt geen blobcontainer gedefinieerd. Hier voegt u een blobcontainer toe aan uw Bicep-bestand. U geeft ook de naam van het opslagaccount en de blobcontainer op voor de toepassing met behulp van de configuratie-instellingen. Op die manier weet de app welk opslagaccount moet worden geopend.
Open in Visual Studio Code het bestand main.bicep in de implementatiemap .
Voeg onder de variabelen die resourcenamen definiëren (in de buurt van regel 27) een nieuwe variabeledefinitie toe voor de naam van de blobopslagcontainer:
var storageAccountImagesBlobContainerName = 'toyimages'Werk de
storageAccountresource bij om de blobcontainer te definiëren:resource storageAccount 'Microsoft.Storage/storageAccounts@2022-09-01' = { name: storageAccountName location: location kind: 'StorageV2' sku: environmentConfigurationMap[environmentType].storageAccount.sku resource blobService 'blobServices' = { name: 'default' resource storageAccountImagesBlobContainer 'containers' = { name: storageAccountImagesBlobContainerName properties: { publicAccess: 'Blob' } } } }Werk de eigenschap van
appSettingsde app bij om drie nieuwe toepassingsinstellingen toe te voegen voor de naam van het opslagaccount, het blob-eindpunt en de naam van de blobcontainer:resource appServiceApp 'Microsoft.Web/sites@2022-03-01' = { name: appServiceAppName location: location properties: { serverFarmId: appServicePlan.id httpsOnly: true siteConfig: { appSettings: [ { name: 'APPINSIGHTS_INSTRUMENTATIONKEY' value: applicationInsights.properties.InstrumentationKey } { name: 'APPLICATIONINSIGHTS_CONNECTION_STRING' value: applicationInsights.properties.ConnectionString } { name: 'ReviewApiUrl' value: reviewApiUrl } { name: 'ReviewApiKey' value: reviewApiKey } { name: 'StorageAccountName' value: storageAccount.name } { name: 'StorageAccountBlobEndpoint' value: storageAccount.properties.primaryEndpoints.blob } { name: 'StorageAccountImagesContainerName' value: storageAccount::blobService::storageAccountImagesBlobContainer.name } ] } } }Voeg aan het einde van het bestand nieuwe uitvoer toe om de namen van het opslagaccount en de blobcontainer beschikbaar te maken:
output storageAccountName string = storageAccount.name
output storageAccountImagesBlobContainerName string = storageAccount::blobService::storageAccountImagesBlobContainer.name
Sla de wijzigingen in het bestand op.
Voer uw wijzigingen door in uw Git-opslagplaats, maar push ze nog niet. Voer in de Visual Studio Code-terminal de volgende opdrachten uit:
git add .
git commit -m "Add storage container"
Een logische Azure SQL-server en -database toevoegen
Uw Bicep-bestand implementeert momenteel geen logische Azure SQL-server of -database. In deze sectie voegt u deze resources toe aan uw Bicep-bestand.
Voeg in het bestand main.bicep twee nieuwe parameters toe onder de
reviewApiKeyparameter:@description('The administrator login username for the SQL server.') param sqlServerAdministratorLogin string @secure() @description('The administrator login password for the SQL server.') param sqlServerAdministratorLoginPassword stringVoeg onder de variabelen die resourcenamen definiëren nieuwe variabelen toe om de namen van uw logische Azure SQL-server en -database te definiëren:
var sqlServerName = 'toy-website-${resourceNameSuffix}'
var sqlDatabaseName = 'Toys'
Definieer onder de variabelen die u zojuist hebt toegevoegd een nieuwe variabele waarmee een verbindingsreeks wordt gemaakt voor de toepassing voor toegang tot de database:
// Define the connection string to access Azure SQL.
var sqlDatabaseConnectionString = 'Server=tcp:${sqlServer.properties.fullyQualifiedDomainName},1433;Initial Catalog=${sqlDatabase.name};Persist Security Info=False;User ID=${sqlServerAdministratorLogin};Password=${sqlServerAdministratorLoginPassword};MultipleActiveResultSets=False;Encrypt=True;TrustServerCertificate=False;Connection Timeout=30;'
Notitie
Ter vereenvoudiging gebruikt de toepassing de aanmelding en het wachtwoord van de beheerder om toegang te krijgen tot de database. Dit is echter geen goede gewoonte voor een productieoplossing. Het is beter om een door App Service beheerde identiteit te gebruiken voor toegang tot de database en de beheerde identiteit de minimale machtigingen te verlenen die nodig zijn voor de toepassing. We koppelen een koppeling naar meer informatie op de pagina Samenvatting.
Voeg aan het einde van het bestand, boven de uitvoer, de logische Azure SQL-server en databasebronnen toe:
resource sqlServer 'Microsoft.Sql/servers@2022-05-01-preview' = {
  name: sqlServerName
  location: location
  properties: {
    administratorLogin: sqlServerAdministratorLogin
    administratorLoginPassword: sqlServerAdministratorLoginPassword
  }
}

resource sqlServerFirewallRule 'Microsoft.Sql/servers/firewallRules@2022-05-01-preview' = {
  parent: sqlServer
  name: 'AllowAllWindowsAzureIps'
  properties: {
    endIpAddress: '0.0.0.0'
    startIpAddress: '0.0.0.0'
  }
}

resource sqlDatabase 'Microsoft.Sql/servers/databases@2022-05-01-preview' = {
  parent: sqlServer
  name: sqlDatabaseName
  location: location
  sku: environmentConfigurationMap[environmentType].sqlDatabase.sku
}
Werk de
environmentConfigurationMapvariabele bij om deskuwaarden te definiëren die moeten worden gebruikt voor uw database voor elke omgeving:var environmentConfigurationMap = { Production: { appServicePlan: { sku: { name: 'S1' capacity: 1 } } storageAccount: { sku: { name: 'Standard_LRS' } } sqlDatabase: { sku: { name: 'Standard' tier: 'Standard' } } } Test: { appServicePlan: { sku: { name: 'F1' } } storageAccount: { sku: { name: 'Standard_GRS' } } sqlDatabase: { sku: { name: 'Standard' tier: 'Standard' } } } }Voeg een andere app-instelling toe aan uw App Service-app voor de database verbindingsreeks:
resource appServiceApp 'Microsoft.Web/sites@2022-03-01' = {
  name: appServiceAppName
  location: location
  properties: {
    serverFarmId: appServicePlan.id
    httpsOnly: true
    siteConfig: {
      appSettings: [
        {
          name: 'APPINSIGHTS_INSTRUMENTATIONKEY'
          value: applicationInsights.properties.InstrumentationKey
        }
        {
          name: 'APPLICATIONINSIGHTS_CONNECTION_STRING'
          value: applicationInsights.properties.ConnectionString
        }
        {
          name: 'ReviewApiUrl'
          value: reviewApiUrl
        }
        {
          name: 'ReviewApiKey'
          value: reviewApiKey
        }
        {
          name: 'StorageAccountName'
          value: storageAccount.name
        }
        {
          name: 'StorageAccountBlobEndpoint'
          value: storageAccount.properties.primaryEndpoints.blob
        }
        {
          name: 'StorageAccountImagesContainerName'
          value: storageAccount::blobService::storageAccountImagesBlobContainer.name
        }
        {
          name: 'SqlDatabaseConnectionString'
          value: sqlDatabaseConnectionString
        }
      ]
    }
  }
}
Voeg onder aan het bestand uitvoer toe om de hostnaam van de logische Azure SQL-server en de naam van de database beschikbaar te maken:
output appServiceAppName string = appServiceApp.name
output appServiceAppHostName string = appServiceApp.properties.defaultHostName
output storageAccountName string = storageAccount.name
output storageAccountImagesBlobContainerName string = storageAccount::blobService::storageAccountImagesBlobContainer.name
output sqlServerFullyQualifiedDomainName string = sqlServer.properties.fullyQualifiedDomainName
output sqlDatabaseName string = sqlDatabase.name
Sla de wijzigingen in het bestand op.
Nieuwe buildstappen voor het databaseproject toevoegen
Uw websiteontwikkelaars hebben een Visual Studio-databaseproject voorbereid dat uw websitedatabasetabel implementeert en configureert. Hier werkt u de buildfase van de pijplijn bij om het databaseproject te bouwen in een DACPAC-bestand en publiceert u het als een pijplijnartefact.
Open het bestand build.yml in de map deploy/pipeline-templates .
Als u het Visual Studio-databaseproject wilt bouwen, kopieert u het gegenereerde DACPAC-bestand naar een faseringsmap en publiceert u het als een pijplijnartefact. Voeg de volgende stappen toe:
jobs:
- job: Build
  displayName: Build application and database
  pool:
    vmImage: windows-latest

  steps:

  # Build, copy, and publish the website.
  - task: DotNetCoreCLI@2
    displayName: Build publishable website
    inputs:
      command: 'publish'
      publishWebProjects: true

  - task: CopyFiles@2
    displayName: Copy publishable website
    inputs:
      sourceFolder: '$(Build.SourcesDirectory)/src/ToyCompany/ToyCompany.Website/bin'
      contents: '**/publish.zip'
      targetFolder: '$(Build.ArtifactStagingDirectory)/website'
      flattenFolders: true

  - task: PublishBuildArtifacts@1
    displayName: Publish website as pipeline artifact
    inputs:
      pathToPublish: '$(Build.ArtifactStagingDirectory)/website'
      artifactName: 'website'

  # Build, copy, and publish the DACPAC file.
  - task: VSBuild@1
    displayName: Build Visual Studio solution
    inputs:
      solution: '$(Build.SourcesDirectory)/src/ToyCompany/ToyCompany.Database/ToyCompany.Database.sqlproj'

  - task: CopyFiles@2
    displayName: Copy DACPAC
    inputs:
      sourceFolder: '$(Build.SourcesDirectory)/src/ToyCompany/ToyCompany.Database/bin'
      contents: '**/*.dacpac'
      targetFolder: '$(Build.ArtifactStagingDirectory)/database'
      flattenFolders: true

  - task: PublishBuildArtifacts@1
    displayName: Publish DACPAC as pipeline artifact
    inputs:
      pathToPublish: '$(Build.ArtifactStagingDirectory)/database'
      artifactName: 'database'
Sla de wijzigingen in het bestand op.
Waarden toevoegen aan de variabelegroepen
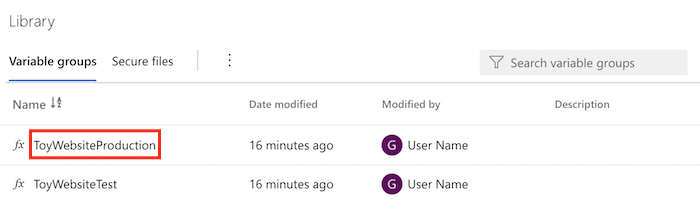
Ga in uw browser naar de pijplijnbibliotheek>.
Selecteer de variabele groep ToyWebsiteProduction .
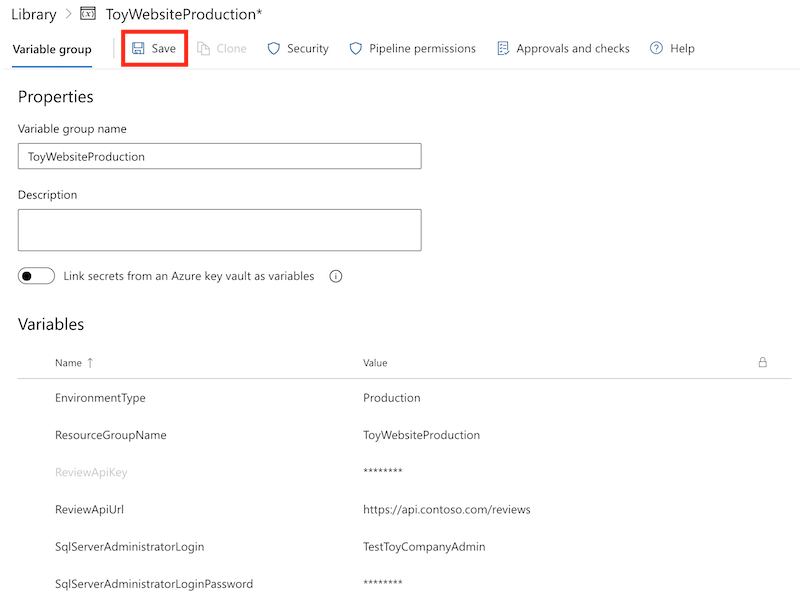
Voeg de volgende variabelen toe aan de variabelengroep:
Naam Weergegeven als SqlServer Beheer istratorLogin Speelgoedbedrijf Beheer SqlServer Beheer istratorLoginPassword SecurePassword!111 Selecteer het hangslotpictogram naast de variabele SqlServer Beheer istratorLoginPassword. Deze functie vertelt Azure Pipelines om de waarde van de variabele veilig te behandelen.

Sla de variabelegroep op.
Herhaal het proces om de volgende variabelen toe te voegen aan de variabelegroep ToyWebsiteTest :
Naam Weergegeven als SqlServer Beheer istratorLogin TestToyCompany Beheer SqlServer Beheer istratorLoginPassword SecurePassword!999 Vergeet niet om het hangslotpictogram naast de variabele SqlServer Beheer istratorLoginPassword te selecteren en de variabelegroep op te slaan.
Parameterwaarden toevoegen aan de fasen Valideren en Preview
Het Bicep-bestand heeft nu twee nieuwe verplichte parameters: sqlServerAdministratorLogin en sqlServerAdministratorLoginPassword. Hier kunt u deze parameterwaarden uit uw variabelegroep doorgeven voor zowel de fasen Valideren als Preview .
Open in Visual Studio Code het deploy.yml-bestand in de map deploy/pipeline-templates .
Werk de stap RunPreflightValidation van de fase Validatebij door de nieuwe parameters toe te voegen.
- task: AzureResourceManagerTemplateDeployment@3
  name: RunPreflightValidation
  displayName: Run preflight validation
  inputs:
    connectedServiceName: ToyWebsite${{parameters.environmentType}}
    location: ${{parameters.deploymentDefaultLocation}}
    deploymentMode: Validation
    resourceGroupName: $(ResourceGroupName)
    csmFile: deploy/main.bicep
    overrideParameters: >
      -environmentType $(EnvironmentType)
      -reviewApiUrl $(ReviewApiUrl)
      -reviewApiKey $(ReviewApiKey)
      -sqlServerAdministratorLogin $(SqlServerAdministratorLogin)
      -sqlServerAdministratorLoginPassword $(SqlServerAdministratorLoginPassword)
Werk de RunWhatIf-stap van de preview-fase bij door de nieuwe parameters toe te voegen.
inlineScript: |
  az deployment group what-if \
    --resource-group $(ResourceGroupName) \
    --template-file deploy/main.bicep \
    --parameters environmentType=$(EnvironmentType) \
                 reviewApiUrl=$(ReviewApiUrl) \
                 reviewApiKey=$(ReviewApiKey) \
                 sqlServerAdministratorLogin=$(SqlServerAdministratorLogin) \
                 sqlServerAdministratorLoginPassword=$(SqlServerAdministratorLoginPassword)
Belangrijk
Zorg ervoor dat u het backslashteken (
\) aan het einde van de regel toevoegt waarmee dereviewApiKeyparameterwaarde wordt ingesteld en op de volgende regel. Het\teken geeft aan dat er verdere regels zijn die deel uitmaken van dezelfde Azure CLI-opdracht.
Parameterwaarden toevoegen aan de implementatiefase
Werk de stap DeployBicepFile van de implementatiefase bij door de nieuwe parameters toe te voegen:
- task: AzureResourceManagerTemplateDeployment@3
  name: DeployBicepFile
  displayName: Deploy Bicep file
  inputs:
    connectedServiceName: ToyWebsite${{parameters.environmentType}}
    deploymentName: $(Build.BuildNumber)
    location: ${{parameters.deploymentDefaultLocation}}
    resourceGroupName: $(ResourceGroupName)
    csmFile: deploy/main.bicep
    overrideParameters: >
      -environmentType $(EnvironmentType)
      -reviewApiUrl $(ReviewApiUrl)
      -reviewApiKey $(ReviewApiKey)
      -sqlServerAdministratorLogin $(SqlServerAdministratorLogin)
      -sqlServerAdministratorLoginPassword $(SqlServerAdministratorLoginPassword)
    deploymentOutputs: deploymentOutputs
Maak pijplijnvariabelen die de waarden bevatten van de Bicep-uitvoer die u onlangs hebt toegevoegd voor het opslagaccount en Azure SQL-resources:
- bash: |
    echo "##vso[task.setvariable variable=appServiceAppName]$(echo $DEPLOYMENT_OUTPUTS | jq -r '.appServiceAppName.value')"
    echo "##vso[task.setvariable variable=appServiceAppHostName;isOutput=true]$(echo $DEPLOYMENT_OUTPUTS | jq -r '.appServiceAppHostName.value')"
    echo "##vso[task.setvariable variable=storageAccountName]$(echo $DEPLOYMENT_OUTPUTS | jq -r '.storageAccountName.value')"
    echo "##vso[task.setvariable variable=storageAccountImagesBlobContainerName]$(echo $DEPLOYMENT_OUTPUTS | jq -r '.storageAccountImagesBlobContainerName.value')"
    echo "##vso[task.setvariable variable=sqlServerFullyQualifiedDomainName]$(echo $DEPLOYMENT_OUTPUTS | jq -r '.sqlServerFullyQualifiedDomainName.value')"
    echo "##vso[task.setvariable variable=sqlDatabaseName]$(echo $DEPLOYMENT_OUTPUTS | jq -r '.sqlDatabaseName.value')"
  name: SaveDeploymentOutputs
  displayName: Save deployment outputs into variables
  env:
    DEPLOYMENT_OUTPUTS: $(deploymentOutputs)
Stappen voor database-implementatie toevoegen
In deze sectie definieert u de stappen die nodig zijn om de databaseonderdelen van uw website te implementeren. Eerst voegt u een stap toe om het DACPAC-bestand te implementeren dat de pijplijn eerder heeft gebouwd. Vervolgens voegt u voorbeeldgegevens toe aan de database en het opslagaccount, maar alleen voor niet-productieomgevingen.
Voeg onder de stap DeployWebsiteApp in de implementatiefase een nieuwe stap toe om het DACPAC-bestand te implementeren:
- task: SqlAzureDacpacDeployment@1
  name: DeploySqlDatabaseDacpac
  displayName: Deploy DACPAC to database
  inputs:
    ConnectedServiceNameARM: ToyWebsite${{parameters.environmentType}}
    authenticationType: 'server'
    serverName: $(sqlServerFullyQualifiedDomainName)
    databaseName: $(sqlDatabaseName)
    sqlUsername: $(SqlServerAdministratorLogin)
    sqlPassword: $(SqlServerAdministratorLoginPassword)
    deployType: 'DacpacTask'
    deploymentAction: 'Publish'
    dacpacFile: '$(Pipeline.Workspace)/database/ToyCompany.Database.dacpac'
Definieer onder de stap die u zojuist hebt toegevoegd een stap voor het seeden van de database met voorbeeldgegevens.
- ${{ if ne(parameters.environmentType, 'Production') }}:
  - task: SqlAzureDacpacDeployment@1
    name: AddTestDataToDatabase
    displayName: Add test data to database
    inputs:
      ConnectedServiceNameARM: ToyWebsite${{parameters.environmentType}}
      authenticationType: 'server'
      serverName: $(sqlServerFullyQualifiedDomainName)
      databaseName: $(sqlDatabaseName)
      sqlUsername: $(SqlServerAdministratorLogin)
      sqlPassword: $(SqlServerAdministratorLoginPassword)
      deployType: 'sqlTask'
      sqlFile: 'deploy/sample-data/Toys.sql'
U ziet dat voor deze stap een voorwaarde is toegepast, zodat deze alleen wordt uitgevoerd voor niet-productieomgevingen.
Voeg onder de stap die u zojuist hebt toegevoegd en nog steeds binnen het bereik van de voorwaarde een stap toe om een aantal voorbeeldafbeeldingen van speelgoed te uploaden naar de blobcontainer met behulp van Azure CLI:
- task: AzureCLI@2
  name: UploadSampleImages
  displayName: Upload sample images
  inputs:
    azureSubscription: ToyWebsite${{parameters.environmentType}}
    scriptType: 'bash'
    scriptLocation: 'inlineScript'
    inlineScript: |
      az storage blob upload-batch \
        --account-name $(storageAccountName) \
        --destination $(storageAccountImagesBlobContainerName) \
        --source 'deploy/sample-data/toyimages'
Bestanden verifiëren en uw wijzigingen doorvoeren
Controleer of uw bestand main.bicep er als volgt uitziet:
@description('The location into which your Azure resources should be deployed.')
param location string = resourceGroup().location

@description('Select the type of environment you want to provision. Allowed values are Production and Test.')
@allowed([
  'Production'
  'Test'
])
param environmentType string

@description('A unique suffix to add to resource names that need to be globally unique.')
@maxLength(13)
param resourceNameSuffix string = uniqueString(resourceGroup().id)

@description('The URL to the product review API.')
param reviewApiUrl string

@secure()
@description('The API key to use when accessing the product review API.')
param reviewApiKey string

@description('The administrator login username for the SQL server.')
param sqlServerAdministratorLogin string

@secure()
@description('The administrator login password for the SQL server.')
param sqlServerAdministratorLoginPassword string

// Define the names for resources.
var appServiceAppName = 'toy-website-${resourceNameSuffix}'
var appServicePlanName = 'toy-website'
var logAnalyticsWorkspaceName = 'workspace-${resourceNameSuffix}'
var applicationInsightsName = 'toywebsite'
var storageAccountName = 'mystorage${resourceNameSuffix}'
var storageAccountImagesBlobContainerName = 'toyimages'
var sqlServerName = 'toy-website-${resourceNameSuffix}'
var sqlDatabaseName = 'Toys'

// Define the connection string to access Azure SQL.
var sqlDatabaseConnectionString = 'Server=tcp:${sqlServer.properties.fullyQualifiedDomainName},1433;Initial Catalog=${sqlDatabase.name};Persist Security Info=False;User ID=${sqlServerAdministratorLogin};Password=${sqlServerAdministratorLoginPassword};MultipleActiveResultSets=False;Encrypt=True;TrustServerCertificate=False;Connection Timeout=30;'

// Define the SKUs for each component based on the environment type.
var environmentConfigurationMap = {
  Production: {
    appServicePlan: {
      sku: {
        name: 'S1'
        capacity: 1
      }
    }
    storageAccount: {
      sku: {
        name: 'Standard_LRS'
      }
    }
    sqlDatabase: {
      sku: {
        name: 'Standard'
        tier: 'Standard'
      }
    }
  }
  Test: {
    appServicePlan: {
      sku: {
        name: 'F1'
      }
    }
    storageAccount: {
      sku: {
        name: 'Standard_GRS'
      }
    }
    sqlDatabase: {
      sku: {
        name: 'Standard'
        tier: 'Standard'
      }
    }
  }
}

resource appServicePlan 'Microsoft.Web/serverfarms@2022-03-01' = {
  name: appServicePlanName
  location: location
  sku: environmentConfigurationMap[environmentType].appServicePlan.sku
}

resource appServiceApp 'Microsoft.Web/sites@2022-03-01' = {
  name: appServiceAppName
  location: location
  properties: {
    serverFarmId: appServicePlan.id
    httpsOnly: true
    siteConfig: {
      appSettings: [
        {
          name: 'APPINSIGHTS_INSTRUMENTATIONKEY'
          value: applicationInsights.properties.InstrumentationKey
        }
        {
          name: 'APPLICATIONINSIGHTS_CONNECTION_STRING'
          value: applicationInsights.properties.ConnectionString
        }
        {
          name: 'ReviewApiUrl'
          value: reviewApiUrl
        }
        {
          name: 'ReviewApiKey'
          value: reviewApiKey
        }
        {
          name: 'StorageAccountName'
          value: storageAccount.name
        }
        {
          name: 'StorageAccountBlobEndpoint'
          value: storageAccount.properties.primaryEndpoints.blob
        }
        {
          name: 'StorageAccountImagesContainerName'
          value: storageAccount::blobService::storageAccountImagesBlobContainer.name
        }
        {
          name: 'SqlDatabaseConnectionString'
          value: sqlDatabaseConnectionString
        }
      ]
    }
  }
}

resource logAnalyticsWorkspace 'Microsoft.OperationalInsights/workspaces@2022-10-01' = {
  name: logAnalyticsWorkspaceName
  location: location
}

resource applicationInsights 'Microsoft.Insights/components@2020-02-02' = {
  name: applicationInsightsName
  location: location
  kind: 'web'
  properties: {
    Application_Type: 'web'
    Request_Source: 'rest'
    Flow_Type: 'Bluefield'
    WorkspaceResourceId: logAnalyticsWorkspace.id
  }
}

resource storageAccount 'Microsoft.Storage/storageAccounts@2022-09-01' = {
  name: storageAccountName
  location: location
  kind: 'StorageV2'
  sku: environmentConfigurationMap[environmentType].storageAccount.sku

  resource blobService 'blobServices' = {
    name: 'default'

    resource storageAccountImagesBlobContainer 'containers' = {
      name: storageAccountImagesBlobContainerName

      properties: {
        publicAccess: 'Blob'
      }
    }
  }
}

resource sqlServer 'Microsoft.Sql/servers@2022-05-01-preview' = {
  name: sqlServerName
  location: location
  properties: {
    administratorLogin: sqlServerAdministratorLogin
    administratorLoginPassword: sqlServerAdministratorLoginPassword
  }
}

resource sqlServerFirewallRule 'Microsoft.Sql/servers/firewallRules@2022-05-01-preview' = {
  parent: sqlServer
  name: 'AllowAllWindowsAzureIps'
  properties: {
    endIpAddress: '0.0.0.0'
    startIpAddress: '0.0.0.0'
  }
}

resource sqlDatabase 'Microsoft.Sql/servers/databases@2022-05-01-preview' = {
  parent: sqlServer
  name: sqlDatabaseName
  location: location
  sku: environmentConfigurationMap[environmentType].sqlDatabase.sku
}

output appServiceAppName string = appServiceApp.name
output appServiceAppHostName string = appServiceApp.properties.defaultHostName
output storageAccountName string = storageAccount.name
output storageAccountImagesBlobContainerName string = storageAccount::blobService::storageAccountImagesBlobContainer.name
output sqlServerFullyQualifiedDomainName string = sqlServer.properties.fullyQualifiedDomainName
output sqlDatabaseName string = sqlDatabase.name
Als dit niet het probleem is, werkt u deze bij zodat deze overeenkomt met de inhoud van het bestand.
Controleer of uw deploy.yml-bestand er als volgt uitziet:
parameters:
- name: environmentType
  type: string
- name: deploymentDefaultLocation
  type: string
  default: westus3

stages:

- ${{ if ne(parameters.environmentType, 'Production') }}:
  - stage: Validate_${{parameters.environmentType}}
    displayName: Validate (${{parameters.environmentType}} Environment)
    jobs:
    - job: ValidateBicepCode
      displayName: Validate Bicep code
      variables:
      - group: ToyWebsite${{parameters.environmentType}}
      steps:
        - task: AzureResourceManagerTemplateDeployment@3
          name: RunPreflightValidation
          displayName: Run preflight validation
          inputs:
            connectedServiceName: ToyWebsite${{parameters.environmentType}}
            location: ${{parameters.deploymentDefaultLocation}}
            deploymentMode: Validation
            resourceGroupName: $(ResourceGroupName)
            csmFile: deploy/main.bicep
            overrideParameters: >
              -environmentType $(EnvironmentType)
              -reviewApiUrl $(ReviewApiUrl)
              -reviewApiKey $(ReviewApiKey)
              -sqlServerAdministratorLogin $(SqlServerAdministratorLogin)
              -sqlServerAdministratorLoginPassword $(SqlServerAdministratorLoginPassword)

- ${{ if eq(parameters.environmentType, 'Production') }}:
  - stage: Preview_${{parameters.environmentType}}
    displayName: Preview (${{parameters.environmentType}} Environment)
    jobs:
    - job: PreviewAzureChanges
      displayName: Preview Azure changes
      variables:
      - group: ToyWebsite${{parameters.environmentType}}
      steps:
        - task: AzureCLI@2
          name: RunWhatIf
          displayName: Run what-if
          inputs:
            azureSubscription: ToyWebsite${{parameters.environmentType}}
            scriptType: 'bash'
            scriptLocation: 'inlineScript'
            inlineScript: |
              az deployment group what-if \
                --resource-group $(ResourceGroupName) \
                --template-file deploy/main.bicep \
                --parameters environmentType=$(EnvironmentType) \
                             reviewApiUrl=$(ReviewApiUrl) \
                             reviewApiKey=$(ReviewApiKey) \
                             sqlServerAdministratorLogin=$(SqlServerAdministratorLogin) \
                             sqlServerAdministratorLoginPassword=$(SqlServerAdministratorLoginPassword)

- stage: Deploy_${{parameters.environmentType}}
  displayName: Deploy (${{parameters.environmentType}} Environment)
  jobs:
  - deployment: DeployWebsite
    displayName: Deploy website
    pool:
      vmImage: windows-latest
    variables:
    - group: ToyWebsite${{parameters.environmentType}}
    environment: ${{parameters.environmentType}}
    strategy:
      runOnce:
        deploy:
          steps:
            - checkout: self

            - task: AzureResourceManagerTemplateDeployment@3
              name: DeployBicepFile
              displayName: Deploy Bicep file
              inputs:
                connectedServiceName: ToyWebsite${{parameters.environmentType}}
                deploymentName: $(Build.BuildNumber)
                location: ${{parameters.deploymentDefaultLocation}}
                resourceGroupName: $(ResourceGroupName)
                csmFile: deploy/main.bicep
                overrideParameters: >
                  -environmentType $(EnvironmentType)
                  -reviewApiUrl $(ReviewApiUrl)
                  -reviewApiKey $(ReviewApiKey)
                  -sqlServerAdministratorLogin $(SqlServerAdministratorLogin)
                  -sqlServerAdministratorLoginPassword $(SqlServerAdministratorLoginPassword)
                deploymentOutputs: deploymentOutputs

            - bash: |
                echo "##vso[task.setvariable variable=appServiceAppName]$(echo $DEPLOYMENT_OUTPUTS | jq -r '.appServiceAppName.value')"
                echo "##vso[task.setvariable variable=appServiceAppHostName;isOutput=true]$(echo $DEPLOYMENT_OUTPUTS | jq -r '.appServiceAppHostName.value')"
                echo "##vso[task.setvariable variable=storageAccountName]$(echo $DEPLOYMENT_OUTPUTS | jq -r '.storageAccountName.value')"
                echo "##vso[task.setvariable variable=storageAccountImagesBlobContainerName]$(echo $DEPLOYMENT_OUTPUTS | jq -r '.storageAccountImagesBlobContainerName.value')"
                echo "##vso[task.setvariable variable=sqlServerFullyQualifiedDomainName]$(echo $DEPLOYMENT_OUTPUTS | jq -r '.sqlServerFullyQualifiedDomainName.value')"
                echo "##vso[task.setvariable variable=sqlDatabaseName]$(echo $DEPLOYMENT_OUTPUTS | jq -r '.sqlDatabaseName.value')"
              name: SaveDeploymentOutputs
              displayName: Save deployment outputs into variables
              env:
                DEPLOYMENT_OUTPUTS: $(deploymentOutputs)

            - task: AzureRmWebAppDeployment@4
              name: DeployWebsiteApp
              displayName: Deploy website
              inputs:
                appType: webApp
                ConnectionType: AzureRM
                azureSubscription: ToyWebsite${{parameters.environmentType}}
                ResourceGroupName: $(ResourceGroupName)
                WebAppName: $(appServiceAppName)
                Package: '$(Pipeline.Workspace)/website/publish.zip'

            - task: SqlAzureDacpacDeployment@1
              name: DeploySqlDatabaseDacpac
              displayName: Deploy DACPAC to database
              inputs:
                ConnectedServiceNameARM: ToyWebsite${{parameters.environmentType}}
                authenticationType: 'server'
                serverName: $(sqlServerFullyQualifiedDomainName)
                databaseName: $(sqlDatabaseName)
                sqlUsername: $(SqlServerAdministratorLogin)
                sqlPassword: $(SqlServerAdministratorLoginPassword)
                deployType: 'DacpacTask'
                deploymentAction: 'Publish'
                dacpacFile: '$(Pipeline.Workspace)/database/ToyCompany.Database.dacpac'

            - ${{ if ne(parameters.environmentType, 'Production') }}:
              - task: SqlAzureDacpacDeployment@1
                name: AddTestDataToDatabase
                displayName: Add test data to database
                inputs:
                  ConnectedServiceNameARM: ToyWebsite${{parameters.environmentType}}
                  authenticationType: 'server'
                  serverName: $(sqlServerFullyQualifiedDomainName)
                  databaseName: $(sqlDatabaseName)
                  sqlUsername: $(SqlServerAdministratorLogin)
                  sqlPassword: $(SqlServerAdministratorLoginPassword)
                  deployType: 'sqlTask'
                  sqlFile: 'deploy/sample-data/Toys.sql'

              - task: AzureCLI@2
                name: UploadSampleImages
                displayName: Upload sample images
                inputs:
                  azureSubscription: ToyWebsite${{parameters.environmentType}}
                  scriptType: 'bash'
                  scriptLocation: 'inlineScript'
                  inlineScript: |
                    az storage blob upload-batch \
                      --account-name $(storageAccountName) \
                      --destination $(storageAccountImagesBlobContainerName) \
                      --source 'deploy/sample-data/toyimages'

- stage: SmokeTest_${{parameters.environmentType}}
  displayName: Smoke Test (${{parameters.environmentType}} Environment)
  jobs:
  - job: SmokeTest
    displayName: Smoke test
    variables:
      appServiceAppHostName: $[ stageDependencies.Deploy_${{parameters.environmentType}}.DeployWebsite.outputs['DeployWebsite.SaveDeploymentOutputs.appServiceAppHostName'] ]
    steps:
      - task: PowerShell@2
        name: RunSmokeTests
        displayName: Run smoke tests
        inputs:
          targetType: inline
          script: |
            $container = New-PesterContainer `
              -Path 'deploy/Website.Tests.ps1' `
              -Data @{ HostName = '$(appServiceAppHostName)' }
            Invoke-Pester `
              -Container $container `
              -CI

      - task: PublishTestResults@2
        name: PublishTestResults
        displayName: Publish test results
        condition: always()
        inputs:
          testResultsFormat: NUnit
          testResultsFiles: 'testResults.xml'
Als dit niet het probleem is, werkt u deze bij zodat deze overeenkomt met de inhoud van het bestand.
Sla de wijzigingen in het bestand op.
Voer uw wijzigingen door en push deze naar uw Git-opslagplaats. Voer in de Visual Studio Code-terminal de volgende opdrachten uit:
git add .
git commit -m "Add SQL database"
git push
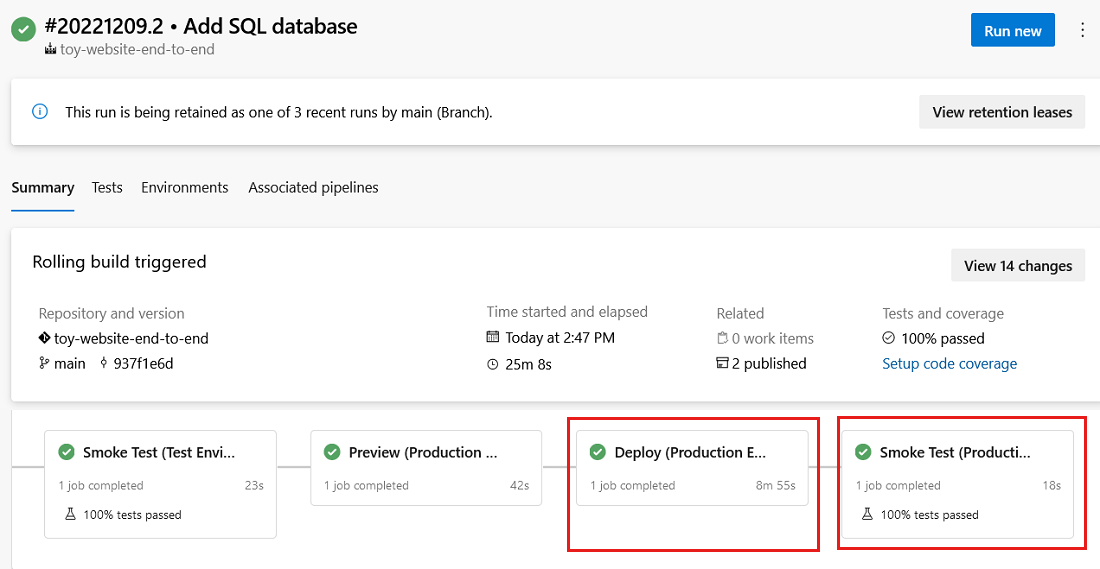
De pijplijn uitvoeren
Ga in uw browser naar Pijplijnen.
Selecteer de meest recente uitvoering van uw pijplijn.
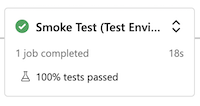
Wacht totdat alle fasen voor de testomgeving zijn voltooid. U ziet dat de betrouwbaarheidstest nu ook slaagt.
Wacht totdat de pijplijn opnieuw wordt onderbroken voordat de fase Preview (Productieomgeving) wordt uitgevoerd, omdat deze keer toestemming nodig heeft voor een andere variabelegroep.
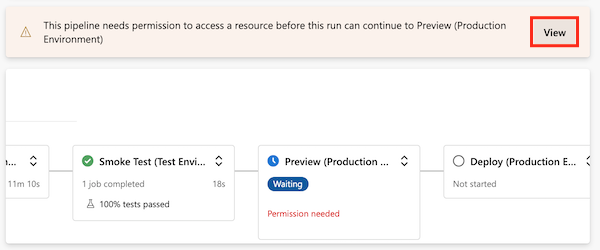
Selecteer Weergeven en selecteer Vervolgens Toestaan>toestaan.
De previewfase (productieomgeving) is voltooid.
Controleer de pijplijn terwijl deze de laatste fasen voltooit.
De fase Deploy (Production Environment) is voltooid en de fase Betrouwbaarheidstest (Productieomgeving) is ook voltooid.
De website weergeven
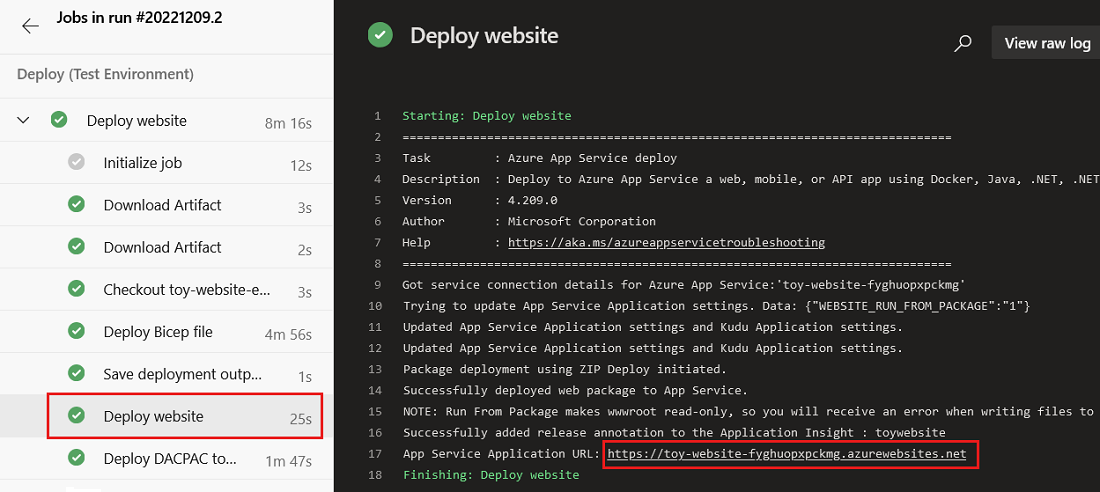
Selecteer de fase Implementeren (testomgeving) om het pijplijnlogboek te openen.
Selecteer de stap Website implementeren.
Houd Ctrl ingedrukt (⌘ in macOS) en selecteer de URL van de App Service-app en open deze in een nieuw browsertabblad.
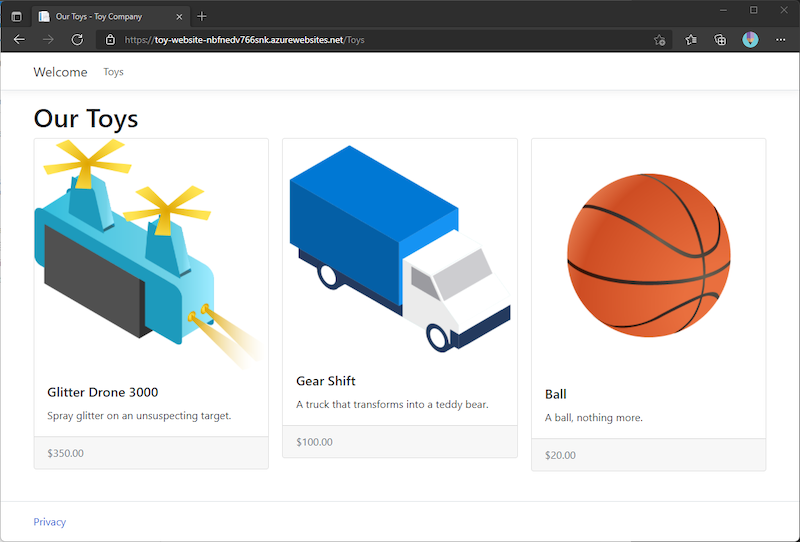
Selecteer Speelgoed.

U ziet dat voorbeeldgegevens worden weergegeven in de testomgeving.
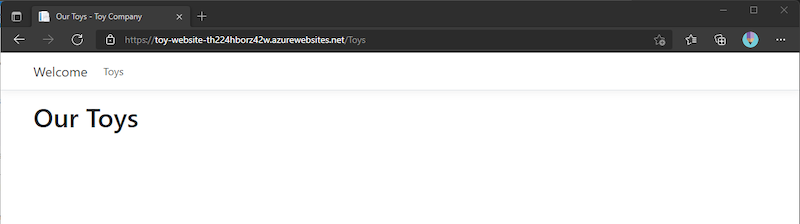
Herhaal het voorgaande proces voor de app Deploy (Production Environment).
U ziet dat er geen voorbeeldgegevens worden weergegeven in de productieomgeving.
Resources opschonen
Nu de oefening is voltooid, moet u de resources verwijderen, zodat u er geen kosten voor in rekening worden gebracht.
Voer in de Visual Studio Code-terminal de volgende opdrachten uit:
az group delete --resource-group ToyWebsiteTest --yes --no-wait
az group delete --resource-group ToyWebsiteProduction --yes --no-wait
De resourcegroep wordt op de achtergrond verwijderd.
Remove-AzResourceGroup -Name ToyWebsiteTest -Force
Remove-AzResourceGroup -Name ToyWebsiteProduction -Force