Email issues for priority accounts report in the new EAC in Exchange Online
Note
The priority accounts report that's described in this topic is available only to organizations that meet both of the following requirements:
- At least 5,000 licenses for one or more of the following products: Office 365 E3, Microsoft 365 E3, Office 365 E5, or Microsoft 365 E5. For example, 3,000 Office 365 E3 licenses and 2,500 Microsoft 365 E5 licenses.
- Your organization needs to have at least 50 monthly active users for one or more core workloads – Teams, One Drive for Business, SharePoint Online, Exchange Online and Office apps
For permissions that are required to use this report, see Permissions required to view mail flow reports.
The Email issues for priority accounts report in the new Exchange admin center (new EAC) allows Exchange Admins and Global admins to view failed events from the last 15 minutes and delayed email messages from last 6 hours that were sent to or sent from priority accounts. If no issues are found, the report will be empty. Users can configure to receive email notifications for failed and delayed messages which will provide information at the time alert is fired.
Priority users are people in your Microsoft 365 organization who have a high business impact, like your CEO, executives, or other users who have access to sensitive or high priority information. For more information about priority accounts, see Manage and monitor priority account. For more reporting for priority accounts, see Exchange Online monitoring for Microsoft 365.
The Unhealthy email status section shows the following information about messages where a priority user is a sender or a recipient:
- Date
- Sender
- Recipient
- Subject
- Status: The value is Failed or Delayed.
To quickly filter the results by recipient, click Search ![]() and start typing the recipient's email address.
and start typing the recipient's email address.
For more advanced filters that you can also save and use later, click Filter ![]() and select New filter. In the Custom filter flyout that appears, enter the following information:
and select New filter. In the Custom filter flyout that appears, enter the following information:
Name your filter: Enter a unique name.
Click Add new clause. A clause contains the following elements that you need to enter:
- Field: Select Date, Sender, Recipient, Subject or Status.
- Operator: Select starts with or is.
- Value: Enter the value you want to search for.
You can click Add new clause as many times as you need. Multiple clauses use AND logic (<Clause1> AND <Clause2>...).
To remove a clause, click Remove

When you're finished, click Save. The new filter is automatically loaded, and the results are changed based on the filter. This is the same result as clicking Filter and selecting the customer filter from the list.
To unload a existing filter (return to the default list), click Filter
 and select Clear all filters.
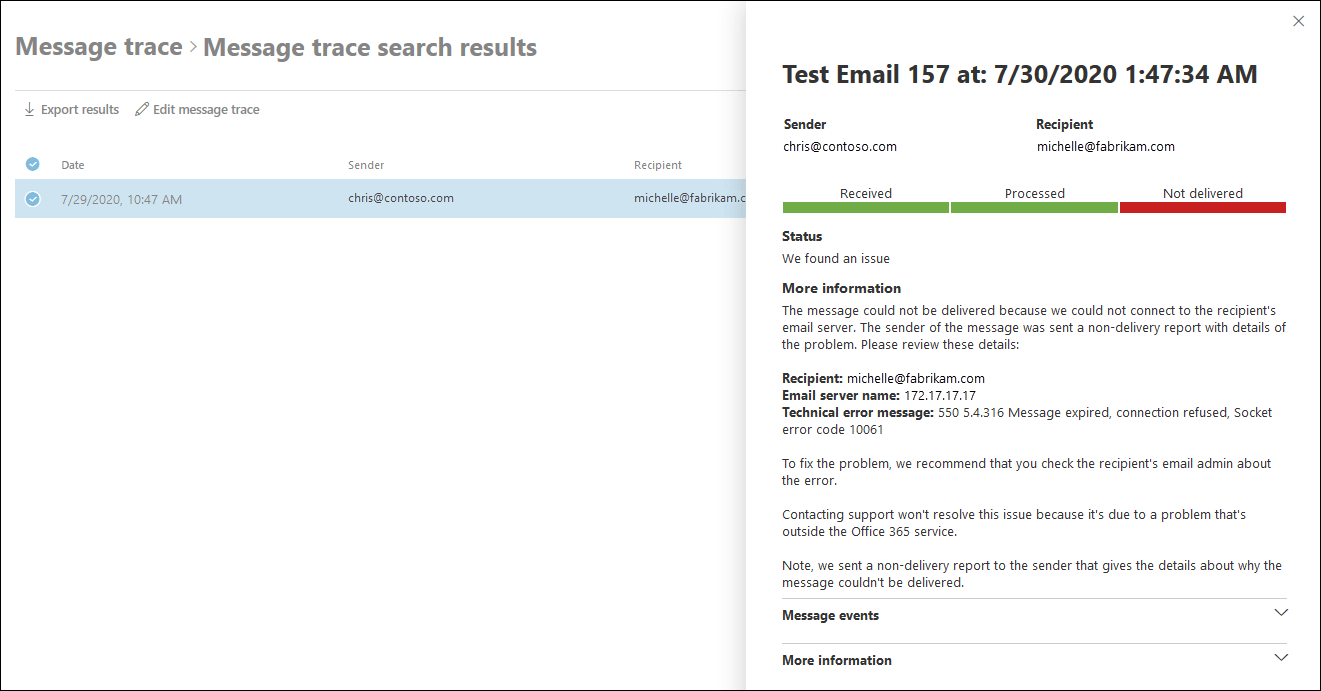
Select an entry in the list to be taken to the message trace search results for the message. Select the message trace entry to view details about the message and what happened to it.
Note
For the following procedures, you need to be a Security Reader to see the alerts, and a Security Administrator to edit the policy.
Click Export to export the displayed results to a .csv file.
Click Manage priority accounts to add or remove users from the priority accounts list.
Click Edit policy to configure email notifications related to priority accounts:
- Send email notification: Select or clear this checkbox.
- Send email notifications to these users or groups: Click in the box to find or enter a user or group to receive email notifications.
- Daily notification limit: Select from the following values: No limit, 1 (default), 5, 10, 25, 50, 150, or 200.
- Threshold: An email notification is sent when the number of failed or delayed email messages for priority accounts exceeds the specified value. The default value is 100.
You can see alerts for delayed and failed messages under View Alerts. Selecting the alert will provide details about the messages that were delayed or failed at the time alert is fired.
When you're finished, click Save.