Copy Dataverse data into Azure SQL
Use the Azure Synapse Link to connect your Microsoft Dataverse data to Azure Synapse Analytics to explore your data and accelerate time to insight. This article shows you how to run Azure Synapse pipelines or Azure Data Factory to copy data from Azure Data Lake Storage Gen2 to an Azure SQL Database with incremental updates feature enabled in Azure Synapse Link.
Note
Azure Synapse Link for Microsoft Dataverse was formerly known as Export to data lake. The service was renamed effective May 2021 and will continue to export data to Azure Data Lake as well as Azure Synapse Analytics. This template is a code sample. We encourage you to use this template as guidance to test out the functionality of retrieving data from Azure Data Lake Storage Gen2 to Azure SQL Database using the pipeline provided.
Prerequisites
- Azure Synapse Link for Dataverse. This guide assumes that you've already met the prerequisites to create an Azure Synapse Link with Azure Data Lake. More information: Prerequisites for an Azure Synapse Link for Dataverse with your Azure Data Lake
- Create an Azure Synapse Workspace or Azure Data Factory under the same Microsoft Entra tenant as your Power Apps tenant.
- Create an Azure Synapse Link for Dataverse with the incremental folder update enabled to set the time interval. More information: Query and analyze the incremental updates
- Microsoft.EventGrid provider needs to be registered for trigger. More information: Azure portal. Note: If you are using this feature in Azure Synapse Analytics, ensure that your subscription is also registered with Data Factory resource provider, otherwise you'll get an error stating that the creation of an "Event Subscription" failed.
- Create an Azure SQL database with the Allow Azure services and resources to access this server property enabled. More information: What should I know when setting up my Azure SQL Database (PaaS)?
- Create and configure an Azure integration runtime. More information: Create Azure integration runtime - Azure Data Factory & Azure Synapse
Important
Using this template might incur additional costs. These costs are related to the usage of Azure Data Factory or Synapse workspace pipeline and are billed on a monthly basis. The cost of using pipelines mainly depends on the time interval for incremental update and the data volumes. To plan and manage the cost of using this feature, go to: Monitor costs at pipeline level with cost analysis
It's important to take these additional costs into consideration when deciding to use this template as they are not optional and must be paid in order to continue using this feature.
Use the solution template
- Go to the Azure portal and open Azure Synapse workspace.
- Select Integrate > Browse gallery.
- Select Copy Dataverse data into Azure SQL using Synapse Link from the integration gallery.
Configure the solution template
Create a linked service to Azure Data Lake Storage Gen2, which is connected to Dataverse using the appropriate authentication type. To do this, select Test connection to validate the connectivity, and then select Create.
Similar to the previous steps, create a linked service to Azure SQL Database where Dataverse data will be synced.
Once Inputs are configured, select Use this template.

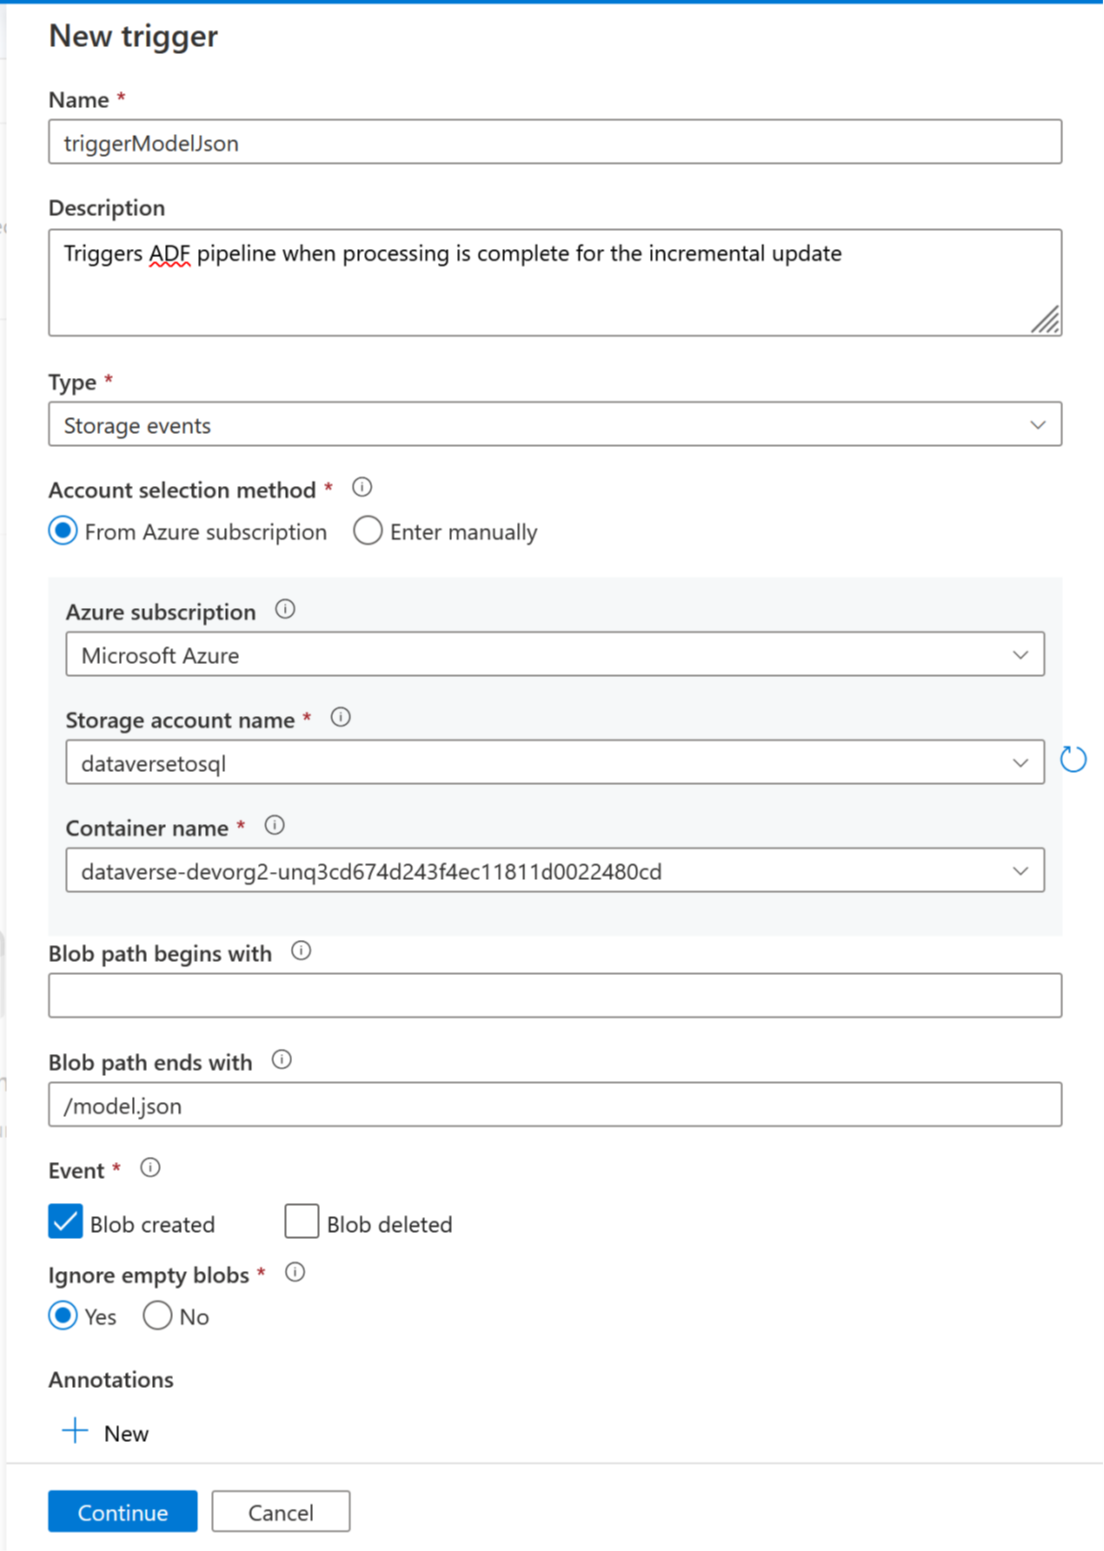
Now a trigger can be added to automate this pipeline, so that the pipeline can always process files when incremental updates are completed periodically. Go to Manage > Trigger, and create a trigger using the following properties:
- Name: Enter a name for the trigger, such as triggerModelJson.
- Type: Storage events.
- Azure subscription: Select the subscription that has Azure Data Lake Storage Gen2.
- Storage account name: Select the storage that has Dataverse data.
- Container name: Select the container created by Azure Synapse Link.
- Blob path ends with: /model.json
- Event: Blob created.
- Ignore empty blobs: Yes.
- Start trigger: Enable Start trigger on creation.
Select Continue to proceed to the next screen.
On the next screen, the trigger validates the matching files. Select OK to create the trigger.
Associate the trigger with a pipeline. Go to the pipeline imported earlier, and then select Add trigger > New/Edit.
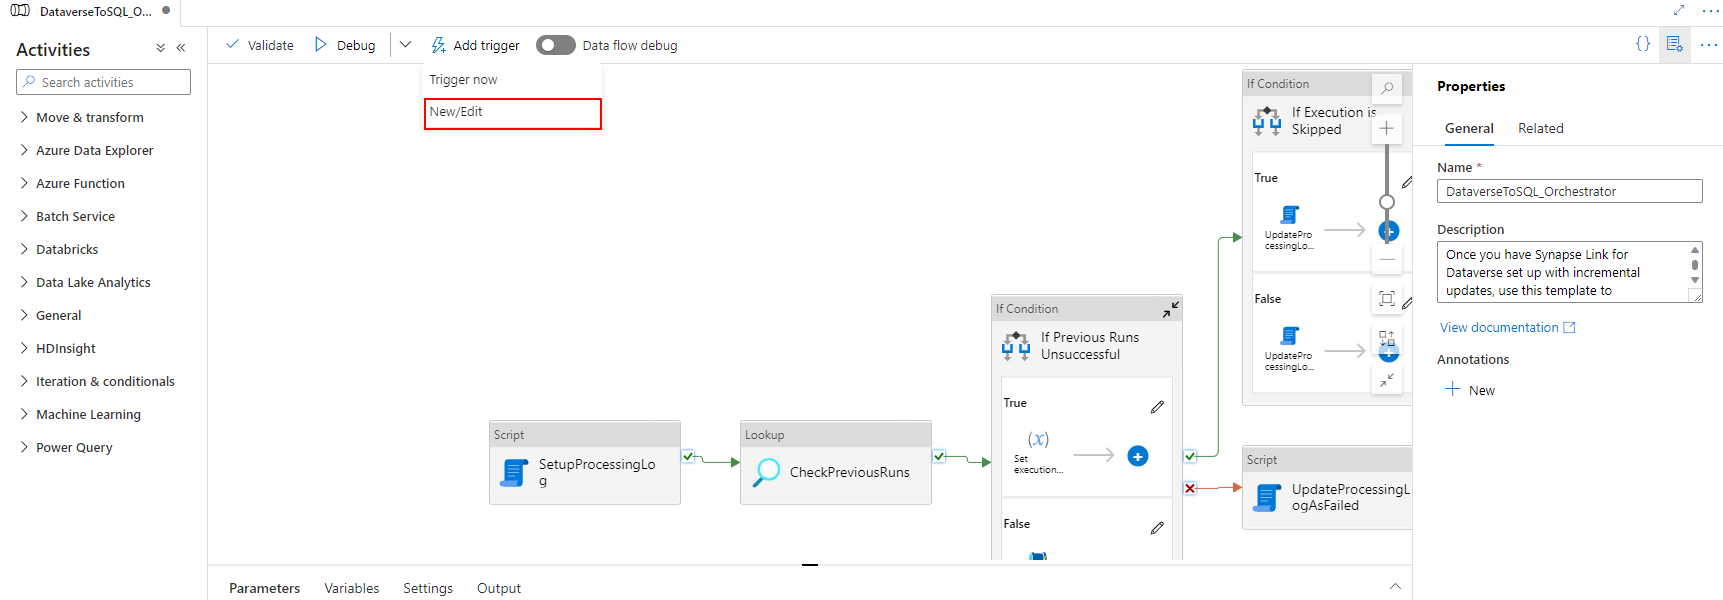
Select the trigger in the earlier step, and then select Continue to proceed to the next screen where the trigger validates the matching files.
Select Continue to proceed to the next screen.
In the Trigger Run Parameter section, enter the below parameters, and then select OK.
- Container:
@split(triggerBody().folderPath,'/')[0] - Folder:
@split(triggerBody().folderPath,'/')[1]
- Container:
After associating the trigger with the pipeline, select Validate all.
Once validation succeeds, select Publish All.
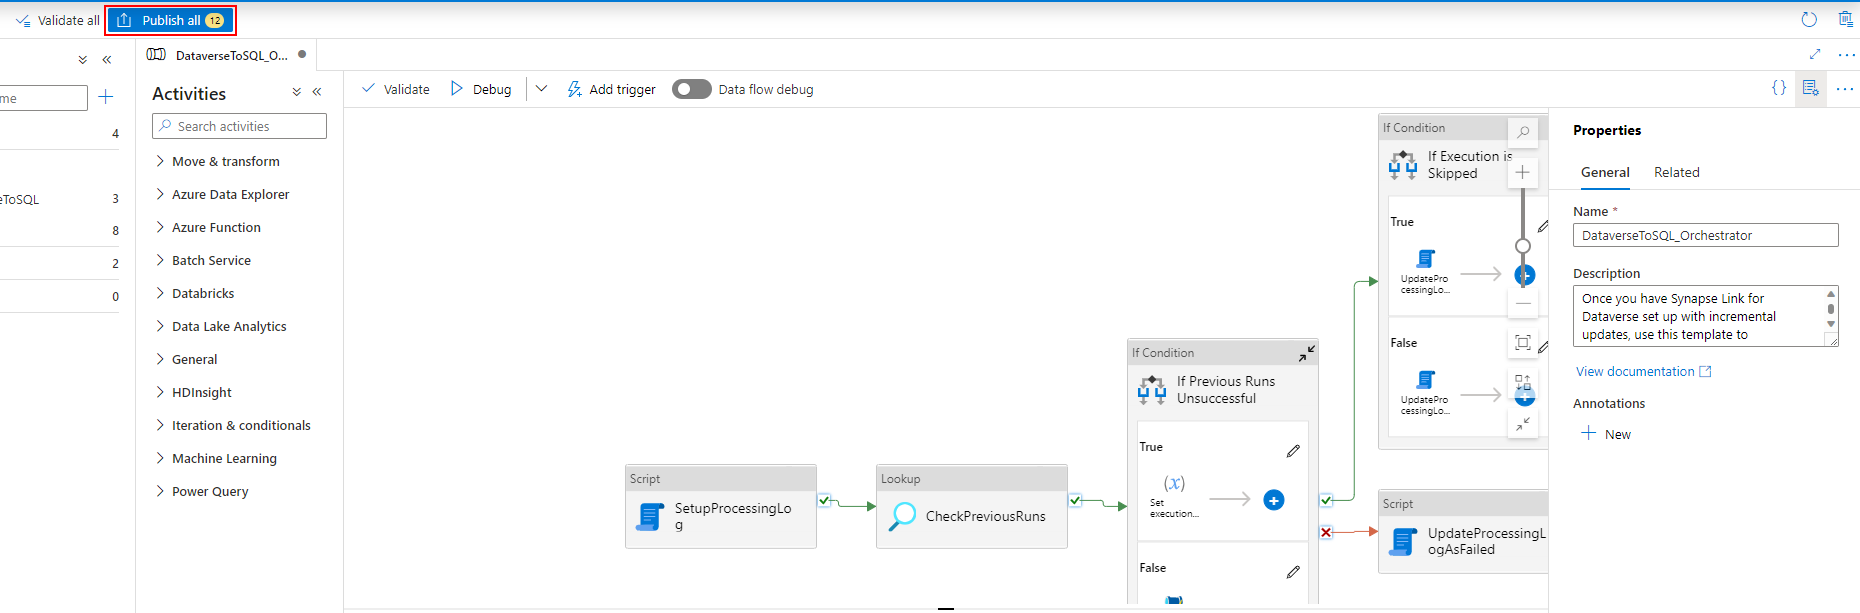
Select Publish to publish all the changes.


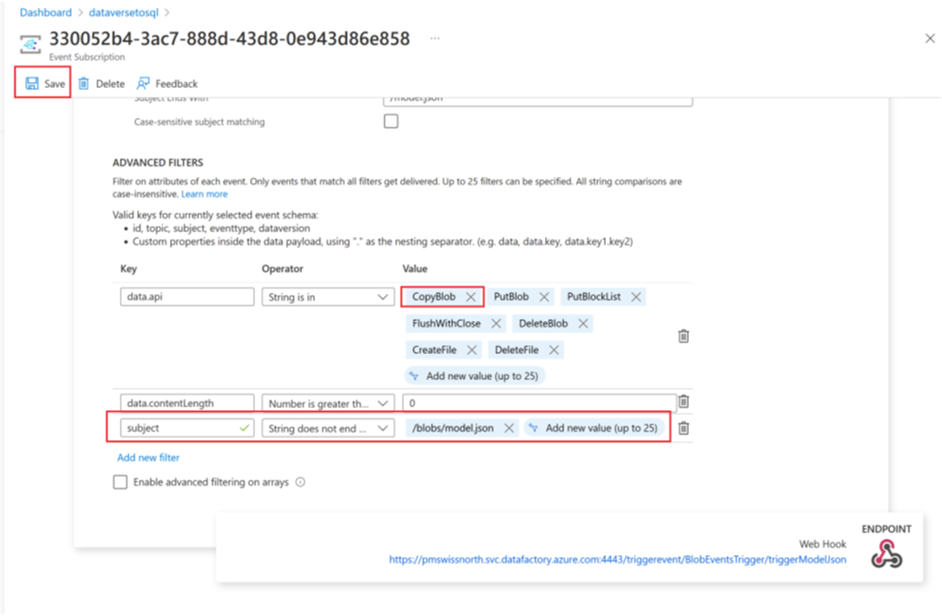
Add an event subscription filter
To ensure that the trigger fires only when model.json creation is complete, advanced filters need to be updated for the trigger’s event subscription. An event is registered against the storage account the first time the trigger runs.
Once a trigger run completes, go to storage account > Events > Event Subscriptions.
Select the event that was registered for the model.json trigger.
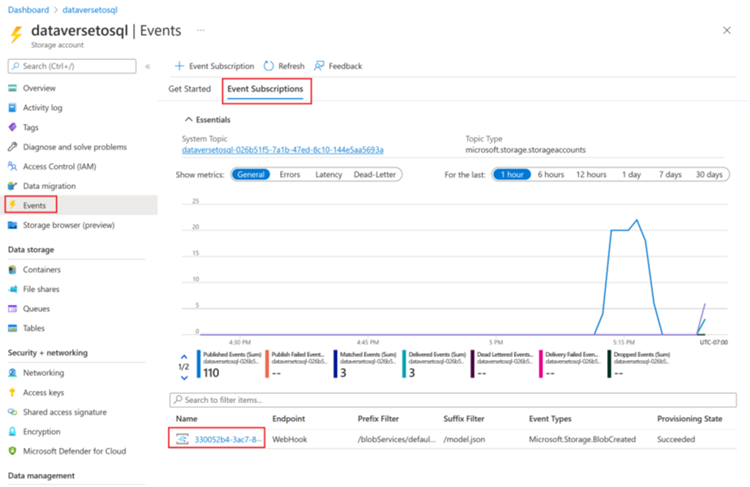
Select the Filters tab, and then select Add new filter.
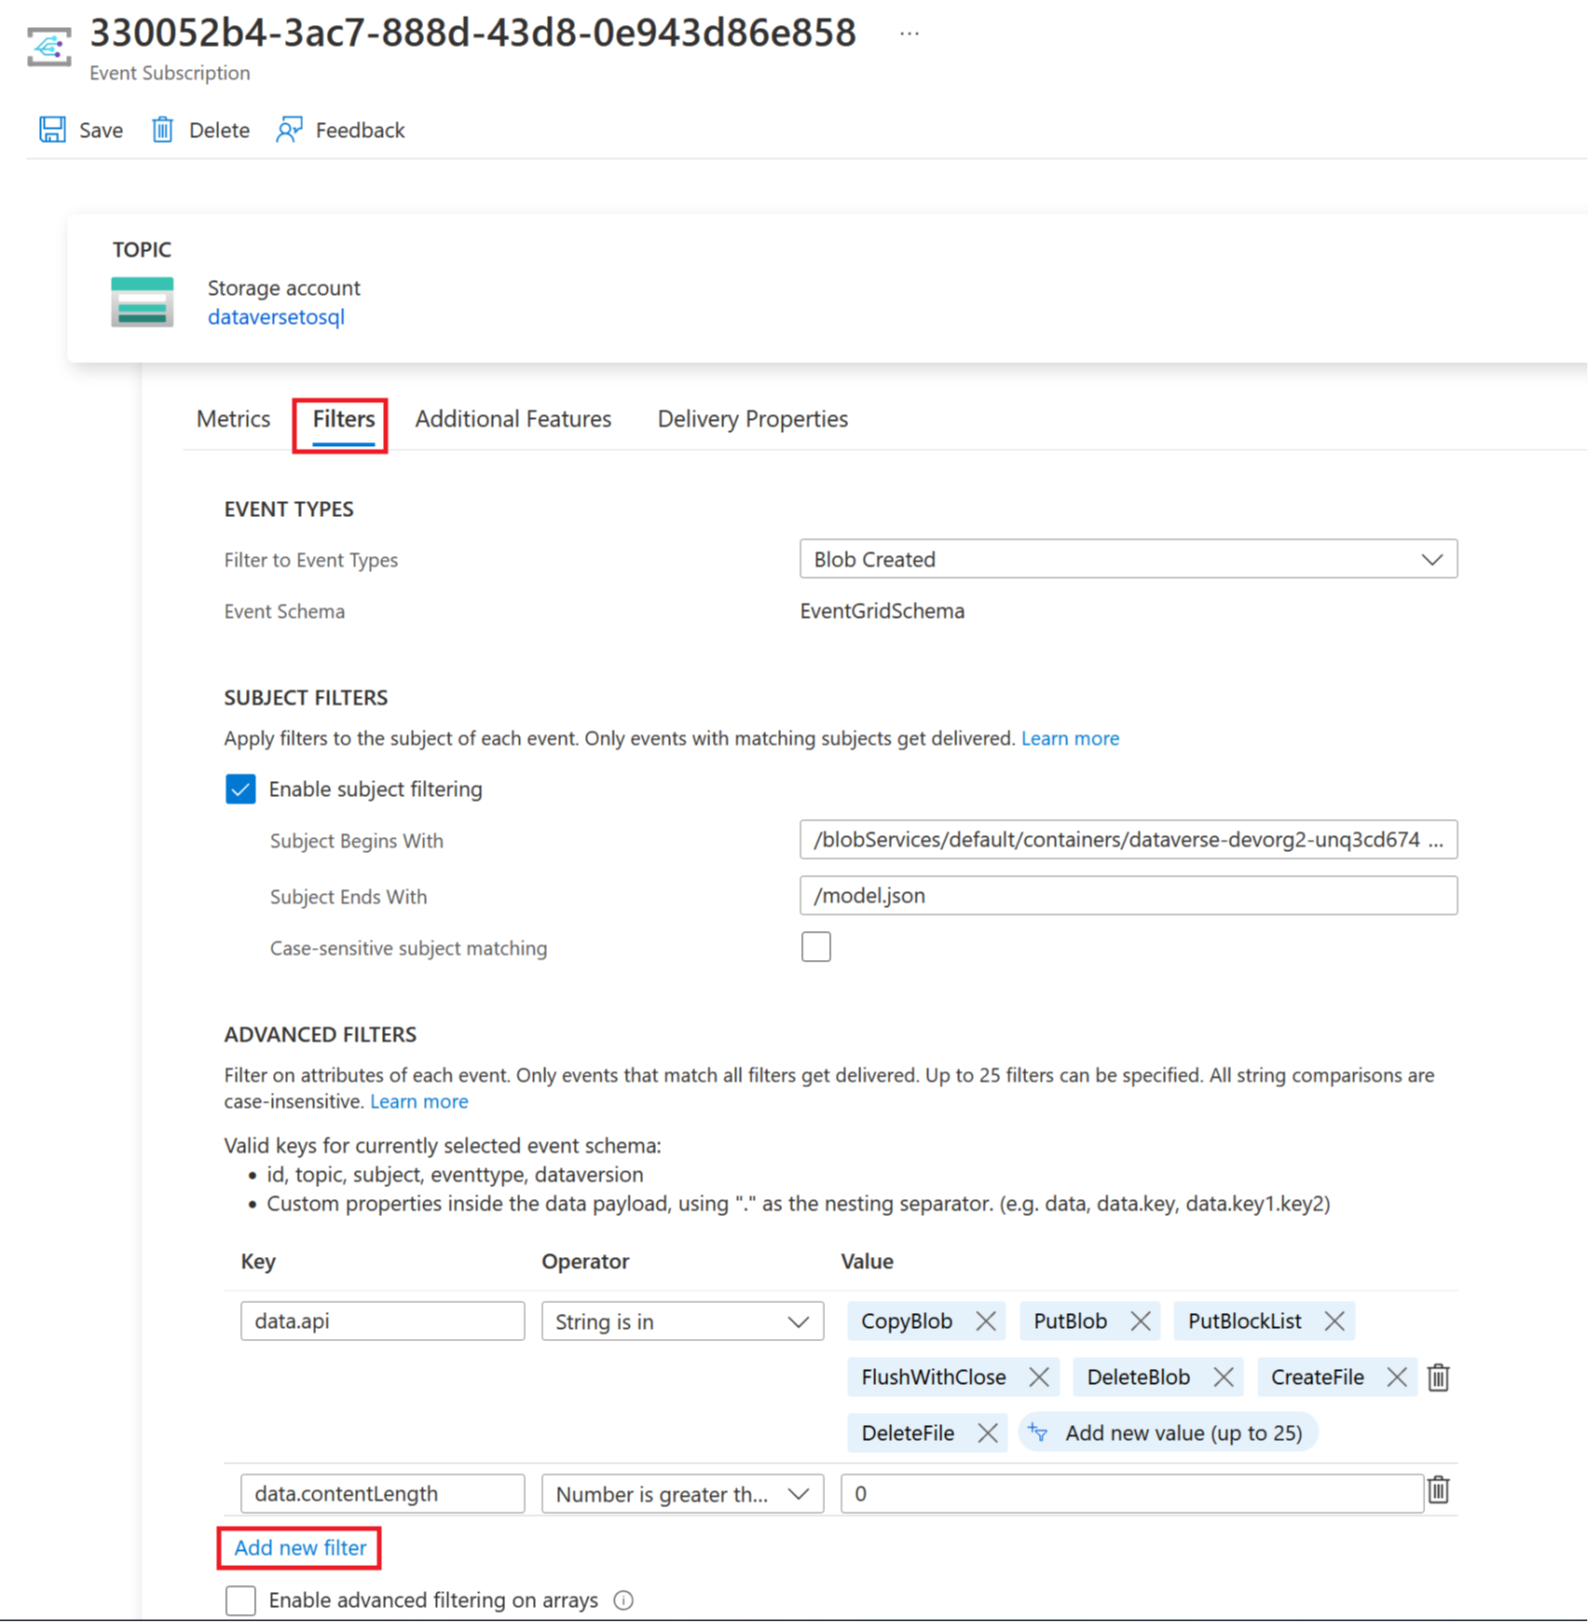
Create the filter:
- Key: subject
- Operator: String does not end with
- Value: /blobs/model.json
Remove the CopyBlob parameter from data.api Value array.
Select Save to deploy the additional filter.
See also
Feedback
Coming soon: Throughout 2024 we will be phasing out GitHub Issues as the feedback mechanism for content and replacing it with a new feedback system. For more information see: https://aka.ms/ContentUserFeedback.
Submit and view feedback for