Subsequent uploads
Administrators can use the following steps for a subsequent upload (import) of organizational data into the advanced insights app. Complete the steps after preparing the data as described in Prepare organizational data.
Important
Only follow these steps if this is not the first time you have uploaded organizational data. If this is the first time, follow the steps in Upload organizational data (first upload).
Import tasks
Importing organizational data requires the following tasks:
After you prepare the source data, you can upload the .csv file and map fields. After you map fields, the advanced insights app validates the data. When the data successfully validates, the overall data-import task is complete. If the data validation is not successful, you can choose from a few options that are described in Validation fails.
File upload
Use the following steps to upload (import) your organizational data as a .csv file.
Open the app. (If that link doesn't work, try this link instead). If prompted, enter your organizational credentials.
Select Data sources > Organizational data.
Select Upload to see your organization's Upload history.
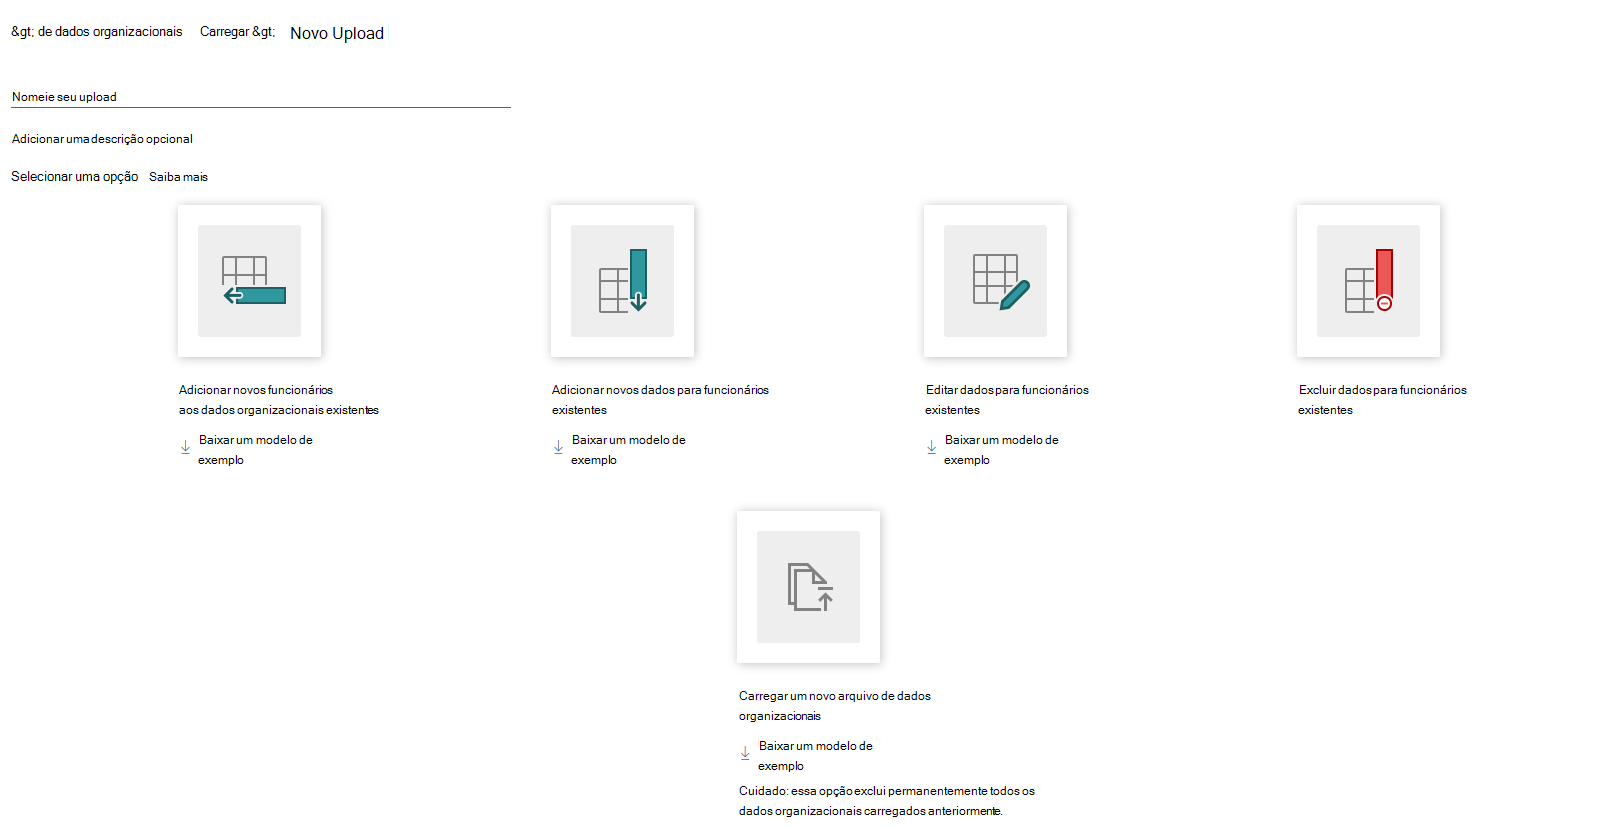
Select New upload.
In Upload, select Name your upload, enter a name, select Add an optional description, and enter a description.
Select one of the following options to add, change, or replace existing organizational data that’s already been uploaded. You can also select the applicable Download a sample template (where attributes can be in any order) to help with file requirements:
- Add new employees to existing organizational data – This option is the same as the legacy Append data option from earlier releases. This adds new employees to your existing organizational data. You can also use this option to add new attribute values and edit existing attribute values in the same upload. However, you must include all required attributes with the upload, including PersonId, ManagerId, Organization, and EffectiveDate. If EffectiveDate is not provided, the process automatically adds the upload date for all EffectiveDate values in the newly uploaded data.
- Add new data for existing employees - Adds new attributes to existing employees' organizational data by uploading the minimum required attributes of PersonId and EffectiveDate (if not provided, the process automatically adds the upload date for all EffectiveDate values). You can also use this option to edit existing attribute values for existing employees in the same upload.
- Edit data for existing employees - Edits the current attribute values for existing employees' organizational data by uploading the minimum required attributes of PersonId and EffectiveDate (if not provided, the process automatically adds the upload date for all EffectiveDate values in the newly uploaded data) along with the edited employee data.
- Delete data for existing employees - Deletes attributes that are not required in the existing organizational data. In Existing attributes, select one or more attributes to remove, and then select the Delete (trashcan) icon. You cannot delete any required attributes. When you see the message confirming the deletion, select Confirm or Cancel (only if you want to select different or additional attributes to delete).
- Upload a new organizational data file - Deletes all previously uploaded data and replaces it with a new upload with all the required attributes.
Important
If you discover that an existing data upload has sensitive, incorrect, or unauthorized data, use Upload a new organizational data file to permanently replace it with new employee data.
Select the .csv file with the new employee data you want to upload, and then select Open after reviewing the following important upload considerations:
- The .csv file that you upload must be UTF-8 encoded.
- The field columns can be in any order in the .csv file.
- Confirm the .csv file is not open in a different program when you begin the upload process.
- If you see a message about updating existing data, select Confirm.
- After the upload process begins, the process is irreversible.
Map the fields as applicable. For details, see Field column details.
- In Source column in file, map the names in the .csv file to the corresponding names for the Advanced insights attributes.
- Enter values for the other columns in the table as applicable, such as for Data type and Report options.
When Adding employees or replacing with new data, you’ll see the following types of fields, which includes the validity thresholds:
When editing employee data, you’ll see the following types of fields, which excludes the validity thresholds:
- Map the optional and custom fields, as applicable. You only need to map the columns in the .csv file that your organization considers important for analysis. For example, if "Region" is important and your data contains this field, map it.
When Adding employees or replacing with new data, you’ll see the following types of fields, which includes the validity thresholds:

When editing employee data, you’ll see the following types of fields, which excludes the validity thresholds:
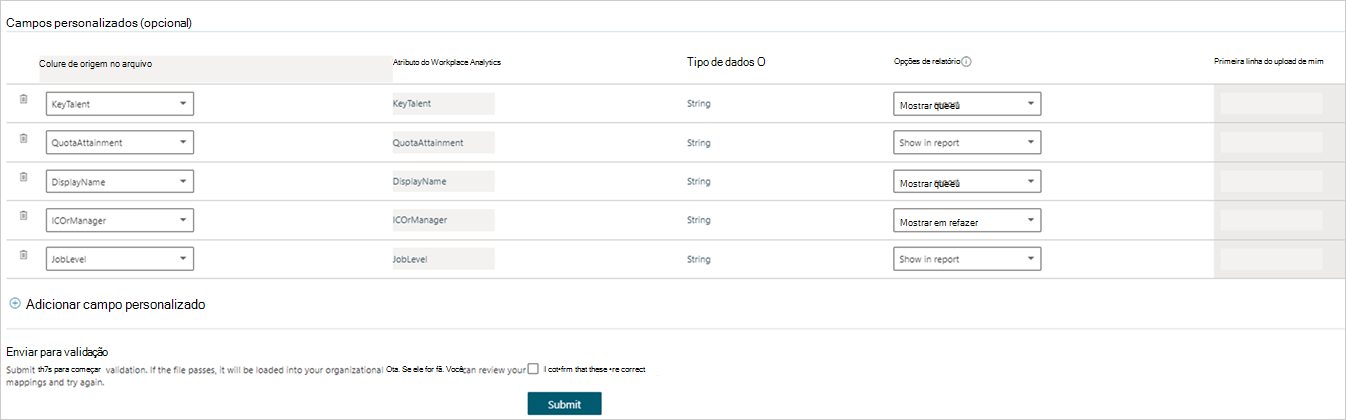
In Submit for validation, select the checkbox for I confirm that these mappings are correct, and then select Submit to start the upload and validation process.
You’ll then see a message while the data is being validated and then a new message when it is successful or not. The following can cause a warning message:
- Omitted columns - If replacing an existing upload and while mapping fields, you chose to omit one or more columns that are present in the existing upload data schema, and at least one auto-refresh query depends on those (omitted) columns.
- Excluded columns - While setting the Report options for attributes on the Mapping page, you chose to exclude one or more columns from query results, and at least one auto-refresh query depends on those (excluded) columns.
If you see a warning message about either of these issues, go to If expected columns are missing or excluded. If you do not, go to Data validation.
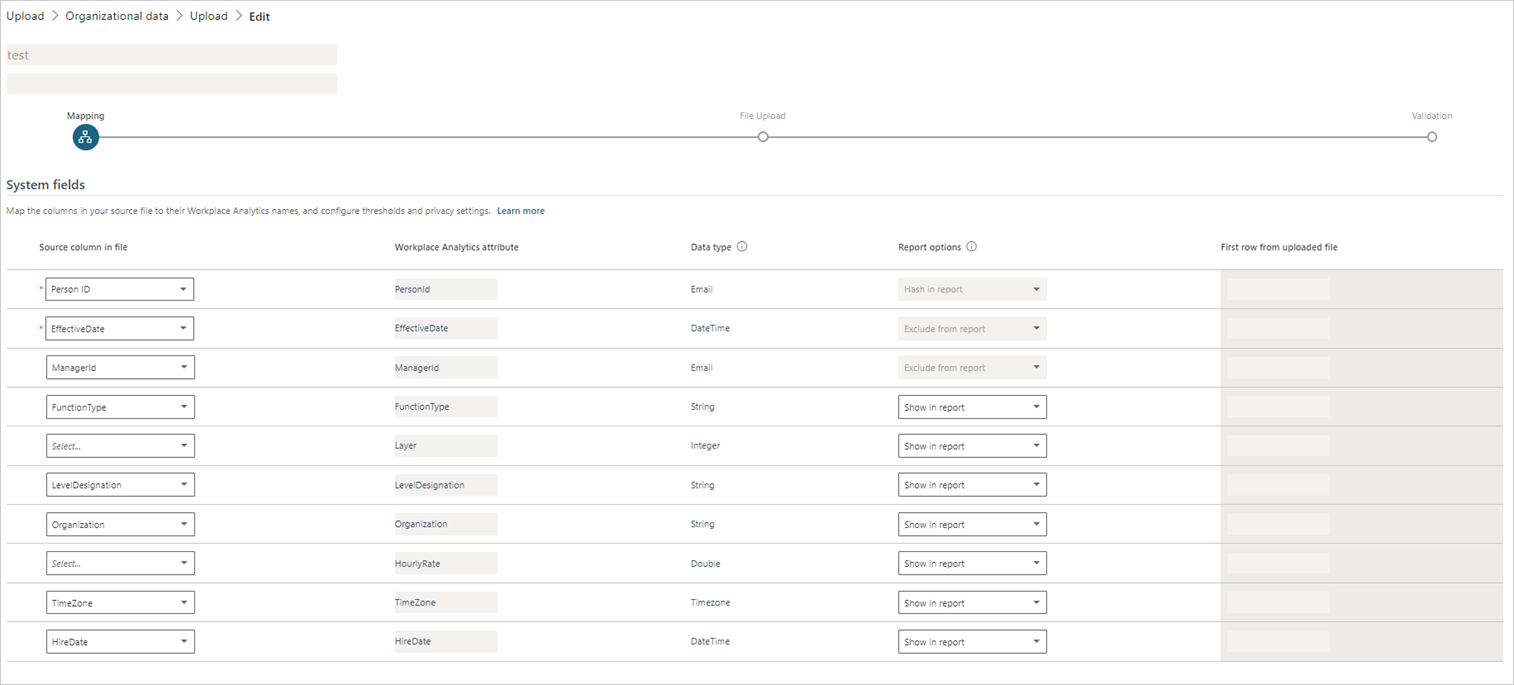
Field mapping
You need to map the fields (columns) for the source .csv file to the field names that the app recognizes. You map these in Organizational data > Upload.

The Upload page has System fields and Custom fields that you need to map for the upload file.
When appending new attributes to an existing upload, you need to select all the same required and optional attributes that you mapped before in previous uploads, in addition to the new attributes you want to add (append).
Use the Add new data for existing employees or Edit data for existing employees option to upload new or replace existing data. Make sure your file follows the format for required attributes (such as PersonId and EffectiveDate, which if not provided, the process automatically adds the upload date for all EffectiveDate values) and the new attributes, and then map accordingly.
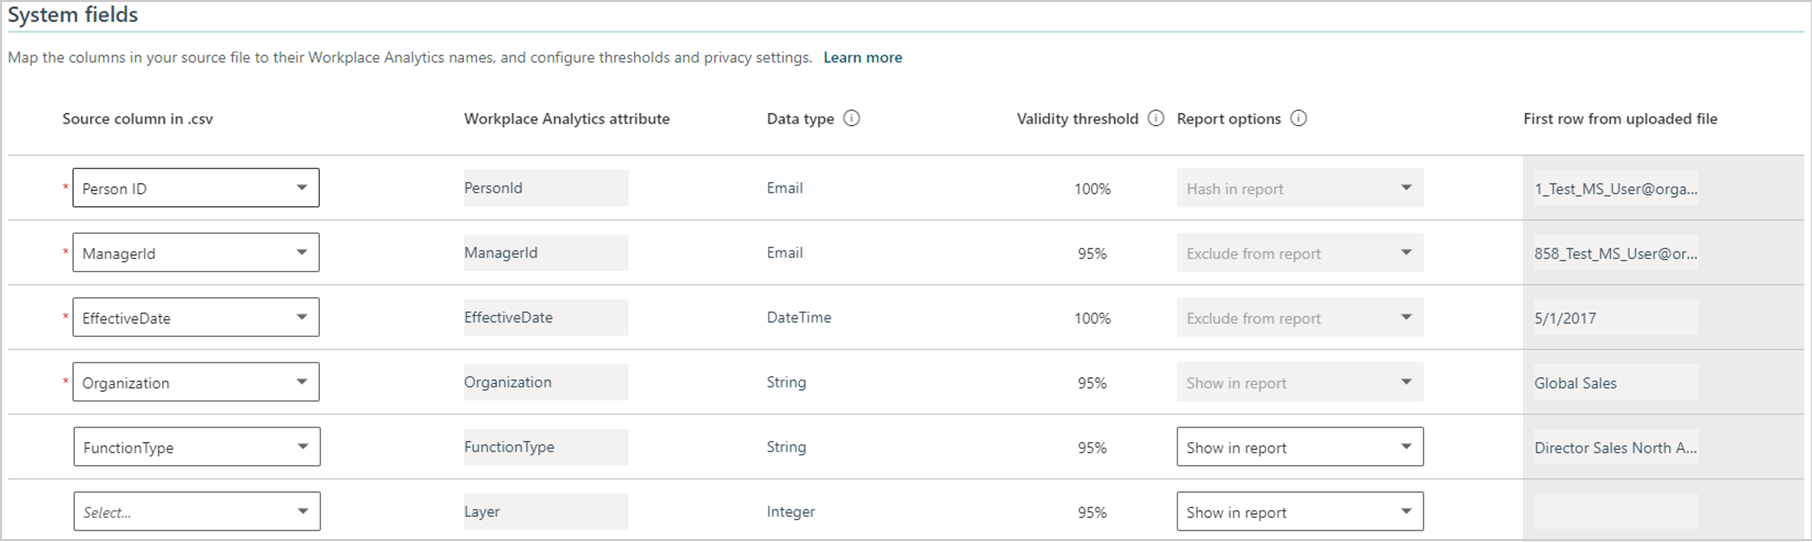
System fields
System fields represent attributes that are known by the app and are used in specific calculations beyond grouping and filtering. A system field can be either required or optional. However, the validity threshold cannot be changed when editing existing data.
Required fields are identified in two ways. Their rows have dark shading and show as "Required" under the Source column header. These rows represent data that was found in the uploaded file. For the upload to succeed, you must map the required fields with a column in your .csv file that is the correct data type and meets the validity threshold.
Important
Every required field must have a valid, non-null value in every row. This means that, even if the names of these attributes are not present in the uploaded .csv file, other columns must be present in the .csv file that are mapped to these attributes.
Optional fields appear below the required fields in rows that have lighter shading. These rows are commonly encountered system fields that are suggested for use. You don't need to map these fields if your organization doesn't have data for them.
Custom fields
Custom fields are optional attributes you can create. Select a column from the .csv file. Name the column, select the data type, set the validity threshold, and then select the report option. The validity threshold cannot be changed when editing existing data.
Field column details
Source column corresponds to each of the fields in the uploaded file.
Advanced insights app name is the name of your organization's version of the app.
Data type is the data type of the fields.
Note
If the data type is Boolean, the value for the Boolean field must be TRUE or FALSE.
Validity threshold sets the percentage of rows in the uploaded file that must have non-null values (no blanks) for the attribute within the following fields. The source file might still be valid even if some rows have missing values for some columns. This setting is not intended to check or allow invalid values. A single invalid value, such as an incorrect data type, email address, or TimeZone string will cause the file upload to fail.
- Required attributes - Because PersonId and EffectiveDate are required attributes, their Validity threshold value must be 100 percent. This value cannot be changed.
- Fields with minimum values - The threshold for the ManagerId, Organization, and LevelDesignation fields is set to 95 percent by default.
- Other system fields - The Validation threshold for other system fields is set to 95 percent by default, but you can increase or decrease this value.
- Custom fields - For details, see Set Validity threshold for custom fields.
Include in report - Lets you decide how to treat sensitive data in the report that will be generated about the import operation. It offers the following options for each of the columns in your source data:
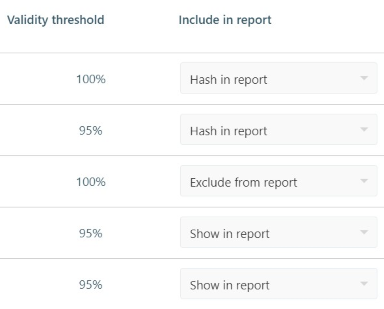
- Show in report - Lets the actual data value appear in the report just as it was imported in the organizational data file.
- Hash in report - De-identifies sensitive data. If you choose this option, the report will include data that was generated about the import operation, but instead of showing actual values that were taken from the source file, it shows a hashed version of the value – a format that cannot be read.
- Exclude from report - Prevents the data value from appearing in the report. You can select this option for any attribute that you consider highly sensitive. However, for data-privacy reasons, the app automatically assigns Exclude from report to particular attributes, such as ManagerId. In those cases, you cannot change this value.
Note
The visibility of one or more attributes (columns) might be set to Show in report or Hash in report for previously uploaded data. If you change this setting to Exclude from report, any auto-refresh query that depends on the data in that column will experience a schema violation.
If so, after you finish mapping fields, you'll see a warning message about "Your upload has certain issues that may affect the auto-refresh of queries." For more details about this message, see If expected columns are missing or excluded.
If expected columns are missing or excluded
For a query to run successfully, it requires particular attributes (columns) to be present in the organizational data. This is also true for queries for which the auto-refresh option is turned on. If expected columns are missing, or if visibility settings (which you set by using the Report options on the Mapping page) exclude expected columns, you'll see a warning message similar to the following:

Below this message, a table in the Warning details area lists the affected auto-refresh queries and provides details about issues that were encountered. This information is for review only. You cannot change data or mapping settings on this page.
After you review the issues, if you decide not to continue with the data replacement, select Back. This returns you to the field mapping page; continue with Step 8.
To continue with data upload despite the issues, select Next. Note that this choice will turn auto-refresh off for queries that were listed in the Warning Details area. The results of the last runs of these queries remain available.
Data validation
After you complete the steps in Field mapping, the organizational data file is uploaded and validated. During this phase, you'll see a message about the File being uploaded:

In most cases, file validation should complete very quickly. However, if your organizational data file is very large, validation could take a few minutes.
When this phase completes, the file will either pass or fail validation. Go to the applicable section for details:
Note
Each tenant can only have one upload in progress at a time. You must complete the workflow of one data file, by either guiding it to a successful validation or abandoning it, before you begin a new upload. The status or stage of the upload shows in the progress bar at the top of the Upload page.
Important
You must stay logged in and keep the page open in your web browser during the upload. If you close the browser (or browser page), the upload will be canceled.
Validation succeeds
If validation succeeds, the Upload page will indicate it and show the size of the upload and that the overall process is complete. After a successful validation, the app processes your new data.

You can select Data sources > Organizational data > Upload to see Upload history. You can then select Successes to see the data that was successfully validated and uploaded.
You can do the following for an upload:
- Select the View (eye) icon to see a summary of the validation results.
- Select the Mapping icon to see the mapping settings for the workflow.
- Select the Download log icon to see the log.
Note
Each tenant can have only one upload in progress at a time. Therefore you need to complete the workflow of one data file, which means you either guide it to a successful validation or abandon it, before you begin the upload of another data file. The status or stage of the upload is shown on the progress bar at the top of the Upload page.
Validation fails
If data validation fails, the Validation page shows a "Validation failed" notification. It also shows details about the validation attempt and presents you with options:

After a failed validation, it's best to first gain an understanding of the errors by scanning the error summary table. You can also select Download issues to examine the error log.
The information about the errors helps you decide which path to choose next, such as whether to fix the source data, change the mapping, or abandon the current upload. The following table describes these options.
Guidelines for correcting errors in data
| Nature of errors | Recommended selection | Description |
|---|---|---|
| Minor errors, small in number | Select Edit mapping | This displays the Field Mapping page, on which you can change how you map source-file fields to app attributes, optionally change validation thresholds, and then re-attempt validation. You can do these things without changing and re-uploading the source file. This is best for minor errors such as having mapped the wrong column in the source file or assigned a too-high validation threshold to a particular attribute. |
| Major errors | Select Upload file | This displays the first File upload page. Consider this option in the case of major errors in the originally uploaded data. First, edit the source-data file to fix those errors and then re-attempt the upload and validation process with the corrected file. |
There is also an option to select Abandon, a button on the top right of the page. Select this to cancel the current upload. You can abandon your upload for any reason, related or unrelated to errors in the upload file.
Note
- The app does not modify or fill in data that is missing from HR uploads, such as for TimeZone. The administrator is responsible for correcting such errors or omissions.
- When any data row or column has an invalid value for any attribute, the entire upload will fail until the source file is fixed (or the mapping changes the validation type of the attribute in a way that makes the value valid). Lowering a threshold does not ignore or skip an invalid value.
The following can help correct data in an uploaded source file that might be causing the validation errors.
When any data row or column has an invalid value for any attribute, the entire upload will fail until the source file is fixed (or the mapping changes the validation type of the attribute in a way that makes the value valid). Lowering a threshold does not ignore or skip an invalid value.
Rules for field headers
All field header or column names must:
- Begin with a letter (not a number)
- Only contain alphanumeric characters (letters and numbers, for example Date1)
- Have at least one lower-case letter (Hrbp); all uppercase won’t work (HRBP)
- Match exactly as listed for the Required and Reserved optional attributes, including for case sensitivity, such as PersonId and HireDate
- Have no leading or trailing blank spaces or special characters (non-alphanumeric, such as @, #, %, &); if spaces or special characters are included, which will be removed from the name
Rules for field values
The field values in data rows must comply with the following formatting rules:
- The required EffectiveDate and HireDate field values must be in the MM/DD/YYYY format
- The required PersonId and ManagerId field values must be a valid email address (for example, gc@contoso.com)
- The TimeZone field values must be in a supported Windows format
- The Layer field values must contain numbers only
- The HourlyRate field values must contain numbers only, which the app assumes are in US dollars for calculations and data analysis
Note
The app does not currently perform currency conversions for HourlyRate data. All calculations and data analysis assumes the data to be in US dollars.
Rules for characters in field values
The following field rules apply to characters in field values:
Double-byte characters, such as Japanese characters, are permitted in the field values
Limit the character length of field values in rows to a maximum of 128 KB, which is about 1024 x 128 characters
The following characters are not permitted in field values:
- tilde (~)
- "new line" (\n)
- Double quotes (" ")
- Single quotes (' ')
Addition of a new data column
If you've already uploaded at least 13 months of snapshot data, which included the required columns for all employees. And now you want to upload a new data column, such as an engagement score value for each employee that you want to apply to all of the historical data. When you upload to append the new EngagementScore data column, remember to upload the minimum required fields (such as PersonId) again along with the new field.
Set Validity threshold for custom fields
The threshold checks for non-null values, so it depends on the intended use of the custom field. If you intend to use this data in much of your analysis, consider setting it to a high percentage. You can set a lower threshold for data that applies, for example, to only a small subset of people in your organization.
Set a high value
Generally, you should set the Validity threshold to a high value. This is especially important if your analysis will focus on that field.
For example, you might include a SupervisorIndicator attribute. At first, you might think that you're not planning to analyze manager behavior and be tempted to omit this attribute. However, the organization hierarchy is used implicitly by the advanced insights analyses, such as for differentiating different work groups, for determining high- and low-quality meetings based on how many levels attend, and more.
Set a lower value
The goal of your analysis might be to determine sales effectiveness. Your data might include an attribute for sales attainment that only makes sense for members of your sales force, who constitute about 10 percent of the company. This number doesn't apply to engineers or program managers, but it is critical for high-performers in sales.