Install the Microsoft Entra provisioning agent
This article walks you through the installation process for the Microsoft Entra provisioning agent and how to initially configure it in the Microsoft Entra admin center.
Important
The following installation instructions assume that you've met all the prerequisites.
Note
This article deals with installing the provisioning agent by using the wizard. For information about installing the Microsoft Entra provisioning agent by using a CLI, see Install the Microsoft Entra provisioning agent by using a CLI and PowerShell.
For more information and an example, view the following video:
Group Managed Service Accounts
A group Managed Service Account (gMSA) is a managed domain account that provides automatic password management, simplified service principal name (SPN) management, and the ability to delegate the management to other administrators. A gMSA also extends this functionality over multiple servers. Microsoft Entra Cloud Sync supports and recommends the use of a gMSA for running the agent. For more information, see Group Managed Service Accounts.
Update an existing agent to use the gMSA
To update an existing agent to use the Group Managed Service Account created during installation, upgrade the agent service to the latest version by running AADConnectProvisioningAgent.msi. Now run through the installation wizard again and provide the credentials to create the account when you're prompted to do so.
Install the agent
- In the Azure portal, select Microsoft Entra ID.
- On the left, select Microsoft Entra Connect.
- On the left, select Cloud sync.

- On the left, select Agent.
- Select Download on-premises agent, and select Accept terms & download.

- Once the Microsoft Entra Connect Provisioning Agent Package has completed downloading, run the AADConnectProvisioningAgentSetup.exe installation file from your downloads folder.
Note
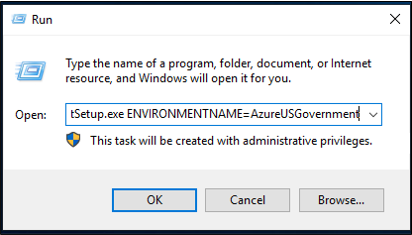
When installing for the US Government Cloud use:
AADConnectProvisioningAgentSetup.exe ENVIRONMENTNAME=AzureUSGovernment
See "Install an agent in the US government cloud" for more information.
- On the splash screen, select I agree to the license and conditions, and then select Install.
- Once the installation operation completes, the configuration wizard will launch. Select Next to start the configuration.

- On the Select Extension screen, select HR-driven provisioning (Workday and SuccessFactors) / Microsoft Entra Connect cloud sync and click Next.


Note
If you are installing the provisioning agent for use with on-premsise app provisioning then select On-premises application provisioning (Microsoft Entra ID to application).
- Sign in with your Microsoft Entra Global Administrator or Hybrid Identity Administrator account. If you have Internet Explorer enhanced security enabled, it will block the sign-in. If so, close the installation, disable Internet Explorer enhanced security, and restart the Microsoft Entra Connect Provisioning Agent Package installation.

- On the Configure Service Account screen, select a group Managed Service Account (gMSA). This account is used to run the agent service. If a managed service account is already configured in your domain by another agent and you are installing a second agent, select Create gMSA because the system will detect the existing account and add the required permissions for the new agent to use the gMSA account. When prompted, choose either:
- Create gMSA which lets the agent create the provAgentgMSA$ managed service account for you. The group managed service account (for example, CONTOSO\provAgentgMSA$) will be created in the same Active Directory domain where the host server has joined. To use this option, enter the Active Directory domain administrator credentials (recommended).
- Use custom gMSA and provide the name of the managed service account that you have manually created for this task.
To continue, select Next.

On the Connect Active Directory screen, if your domain name appears under Configured domains, skip to the next step. Otherwise, type your Active Directory domain name, and select Add directory.
Sign in with your Active Directory domain administrator account. The domain administrator account shouldn't have an expired password. In case the password is expired or changes during the agent installation, you'll need to reconfigure the agent with the new credentials. This operation will add your on-premises directory. Select OK, then select Next to continue.

- The following screenshot shows an example of contoso.com configured domain. Select Next to continue.

On the Configuration complete screen, select Confirm. This operation will register and restart the agent.
Once this operation completes, you should be notified that Your agent configuration was successfully verified. You can select Exit.

- If you still get the initial splash screen, select Close.
Verify the agent installation
Agent verification occurs in the Azure portal and on the local server that's running the agent.
Azure portal agent verification
To verify that the agent is being registered by Microsoft Entra ID, follow these steps:
- Sign in to the Azure portal.
- Select Microsoft Entra ID.
- Select Microsoft Entra Connect, and then select Cloud sync.

- On the cloud sync page, you'll see the agents you've installed. Verify that the agent is displayed and the status is healthy.
On the local server
To verify that the agent is running, follow these steps:
- Sign in to the server with an administrator account.
- Open Services either by navigating to it or by going to Start/Run/Services.msc.
- Under Services, make sure that Microsoft Entra Connect Agent Updater and Microsoft Entra Connect Provisioning Agent are present and the status is Running.


Verify the provisioning agent version
To verify that the version of the agent running, follow these steps:
- Navigate to 'C:\Program Files\Microsoft Azure AD Connect Provisioning Agent'
- Right-click on 'AADConnectProvisioningAgent.exe' and select properties.
- Click the details tab and the version number will be displayed next to Product version.
Important
After you've installed the agent, you must configure and enable it before it will start synchronizing users. To configure a new agent, see Create a new configuration for Microsoft Entra Cloud Sync.
Enable password writeback in cloud sync
You can enable password writeback in SSPR directly in the portal or through PowerShell.
Enable password writeback in the portal
To use password writeback and enable the self-service password reset (SSPR) service to detect the cloud sync agent, using the portal, complete the following steps:
- Sign in to the Microsoft Entra admin center as at least a Hybrid Identity Administrator.
- On the left, select Protection, select Password reset, then choose On-premises integration.
- Check the option for Enable password write back for synced users .
- (optional) If Microsoft Entra Connect provisioning agents are detected, you can additionally check the option for Write back passwords with Microsoft Entra Cloud Sync.
- Check the option for Allow users to unlock accounts without resetting their password to Yes.
- When ready, select Save.
Using PowerShell
To use password writeback and enable the self-service password reset (SSPR) service to detect the cloud sync agent, use the Set-AADCloudSyncPasswordWritebackConfiguration cmdlet and the tenant’s global administrator credentials:
 Import-Module "C:\\Program Files\\Microsoft Azure AD Connect Provisioning Agent\\Microsoft.CloudSync.Powershell.dll"
 Set-AADCloudSyncPasswordWritebackConfiguration -Enable $true -Credential $(Get-Credential)
For more information about using password writeback with Microsoft Entra Cloud Sync, see Tutorial: Enable cloud sync self-service password reset writeback to an on-premises environment (preview).
Install an agent in the US government cloud
By default, the Microsoft Entra provisioning agent is installed in the default Azure environment. If you're installing the agent for US government use, make this change in step 7 of the preceding installation procedure:
Instead of selecting Open file, select Start > Run, and then go to the AADConnectProvisioningAgentSetup.exe file. In the Run box, after the executable, enter ENVIRONMENTNAME=AzureUSGovernment, and then select OK.

Password hash synchronization and FIPS with cloud sync
If your server has been locked down according to the Federal Information Processing Standard (FIPS), MD5 (message-digest algorithm 5) is disabled.
To enable MD5 for password hash synchronization, do the following:
- Go to %programfiles%\Microsoft Azure AD Connect Provisioning Agent.
- Open AADConnectProvisioningAgent.exe.config.
- Go to the configuration/runtime node at the top of the file.
- Add the
<enforceFIPSPolicy enabled="false"/>node. - Save your changes.
For reference, your code should look like the following snippet:
<configuration>
   <runtime>
      <enforceFIPSPolicy enabled="false"/>
   </runtime>
</configuration>
For information about security and FIPS, see Microsoft Entra password hash sync, encryption, and FIPS compliance.
Next steps
Feedback
În curând: Pe parcursul anului 2024, vom elimina treptat Probleme legate de GitHub ca mecanism de feedback pentru conținut și îl vom înlocui cu un nou sistem de feedback. Pentru mai multe informații, consultați: https://aka.ms/ContentUserFeedback.
Trimiteți și vizualizați feedback pentru