How To: Migrate from Failover Cluster Instances and Database Mirroring to SQL Server AlwaysOn – Part 3
Writer: Cephas Lin (Microsoft)
Contributors: Oleg Bulanyy (Microsoft), Jimmy May (Microsoft)
NOTE: SQL Server Failover Clustering has been renamed AlwaysOn Failover Cluster Instances (FCI) in SQL Server 2012. For simplicity, the term FCI in this paper applies to either SQL Server Failover Clustering in SQL Server 2008 R2 or AlwaysOn FCI in SQL Server 2012.
This blog is the continuation of a blog series that shows you how to perform the following end-to-end HADR migration scenario of SQL Server inside a test environment:
- From a SQL Server 2008 R2 solution: SQL Server Failover Clustering for high availability and database mirroring for disaster recovery
- To a SQL Server 2012 solution: AlwaysOn Failover Cluster Instances for high availability and AlwaysOn Availability Groups for disaster recovery
In Part 2, you created a temporary FCI3 for primary site workload, reconfigured FCI2, and created an availability group that encompasses FCI3 and FCI2. This availability group contains both DB1 and DB2. In this installment, you will finish the migration steps by reconfiguring FCI1 and returning to the two-FCI configuration that you had pre-migration. So, let's start!
Step 5: Reconfigure FCI1 and Join It to Availability Group
In this section, you reconfigure FCI1 and join it to the availability group.
Reconfigure FCI1 with SQL Server 2012
Role: Database Administrator
First, you reconfigure FCI1 by reinstalling Windows Server and SQL Server completely on the FCI1 machines. For the reasons described in Step 3: Reconfigure FCI2 with SQL Server 2012 in Part 2, you cannot simply upgrade SQL Server 2012 on the existing configuration for FCI1.
Following the procedures at Quickly Setup SQL Server AlwaysOn Failover Cluster Instance (FCI) in Hyper-V, deploy FCI1 at the primary site using the specifications in the table below. The steps in the blog post can be applied to both physical and Hyper-V environments.
Make sure you use the steps below the table to join machines to Cluster3.
Version |
SQL Server 2012 |
FCI Name |
FCI1 |
Instance Name |
LIVE_INST1 |
Machine Names |
PRIMARY1 PRIMARY2 |
File Server Name |
FILE1 |
WSFC Cluster Name |
Cluster3* |
Cluster Service IP Address |
10.1.1.111 |
SQL Service Account |
CORP\SQLSvc1 |
SQL Agent Account |
CORP\SQLAgent1 |
*Instead of recreating Cluster1, you join the machines to the new cluster Cluster3. Follow the instructions below:
- When you initialize the shared disks, do not create a new iSCSI target for the quorum disk because the existing Cluster3 cluster already has a quorum disk. Instead, for the iSCSI target of the existing quorum disk, add the IP addresses of PRIMARY1 and PRIMARY2 to the iSCSI Initiators Identifiers page.
- When you configure PRIMARY1, use the following steps instead of the ones in the Configure [MACHINE_NAME1] section:
Log in as CORP\Install.
Join the machine to the Cluster3 cluster with the following PowerShell command.
Import-Module FailoverClusters
Get-Cluster Cluster3 | Add-ClusterNode PRIMARY1,PRIMARY2
Move-ClusterGroup "Available Storage" -Node PRIMARY1
Get-ClusterAvailableDisk | Add-ClusterDisk
Test-Cluster
After the Add-ClusterNode command runs, ignore the errors for the three missing SQL Server DLLs. These DLLs are added when you install FCI1 on the nodes.
Note: The Move-ClusterGroup command moves the Available Storage resource group to PRIMARY1. This resource group holds all newly added shared storage. Unless either PRIMARY1 or PRIMARY2 owns this resource group, you cannot bring the shared disk online after you add it to the cluster because it cannot be brought online on any other node in the cluster.
After the nodes are added to the cluster, your WSFC quorum should look as follows:
- PRIMARY1: 1 vote
- PRIMARY2: 1 vote
- TEMP1: 1 vote
- TEMP2: 1 vote
- REMOTE1: 0 vote
- REMOTE2: 0 vote
- Quorum disk: 1 vote
IMPORTANT: You should reconsider your quorum model carefully to maintain optimal WSFC quorum health both when and after adding the nodes. For more information, see the WSFC Quorum Modes and Voting Configuration section in Microsoft SQL Server AlwaysOn Solutions Guide for High Availability and Disaster Recovery.
Set the appropriate owners of the existing clustered services for FCI3 and FCI2, including the respective service resources, using the following PowerShell commands. Setting the proper node ownership ensures that FCI3 does not attempt to failover to the FCI1 nodes, which cannot host that FCI3.
Get-ClusterGroup "SQL Server (TEMP_INST)" | Set-ClusterOwnerNode -Owners TEMP1,TEMP2
Get-ClusterGroup "SQL Server (TEMP_INST)" | Get-ClusterResource | Set-ClusterOwnerNode -Owners TEMP1,TEMP2
Get-ClusterGroup "SQL Server (LIVE_INST2)" | Set-ClusterOwnerNode -Owners REMOTE1,REMOTE2
Get-ClusterGroup "SQL Server (LIVE_INST2)" | Get-ClusterResource | Set-ClusterOwnerNode -Owners REMOTE1,REMOTE2
Change to the directory that contains the setup.exe file for SQL Server 2012, then install FCI1 using the following command. Note that even though you initialize the data disk to use drive letter Z based on the blog instructions, the WSFC service changes it to a different drive letter when adding to because that drive letter is already used in the cluster (by FCI3). You must use the new drive letter that is assigned to your shared disk.
.\Setup.exe /QS /ACTION=InstallFailoverCluster /IACCEPTSQLSERVERLICENSETERMS /FEATURES=SQL, ADV_SSMS /INSTANCENAME=LIVE_INST1 /SQMREPORTING=0 /FAILOVERCLUSTERDISKS="Cluster Disk 4" /FAILOVERCLUSTERIPADDRESSES="IPv4;10.1.1.111;Cluster Network 1;255.255.255.0" /FAILOVERCLUSTERNETWORKNAME=FCI1 /AGTSVCACCOUNT="CORP\SQLAgent1" /AGTSVCPASSWORD= [PASSWORD] /INSTALLSQLDATADIR=" [SHAREDDISK_DRIVELETTER] :\" /SQLSVCACCOUNT="CORP\SQLSvc1" /SQLSVCPASSWORD= [PASSWORD] /SQLSYSADMINACCOUNTS="CORP\Install" "CORP\DBAdmin"
Run the following commands to open the firewall for SQL Server connectivity.
netsh advfirewall firewall add rule name='SQL Server Browser (UDP-In 1434)' dir=in action=allow protocol=UDP localport=1434 profile=domain
netsh advfirewall firewall add rule name='SQL Server (TCP-In)' program='C:\Program Files\Microsoft SQL Server\MSSQL11.LIVE_INST1\MSSQL\Binn\sqlservr.exe' dir=in action=allow protocol=TCP profile=domain
Run the following commands to set the proper ownership for the clustered service, including all the service resources.
Get-ClusterGroup "SQL Server (TEMP_INST)" | Set-ClusterOwnerNode -Owners TEMP1,TEMP2
Get-ClusterGroup "SQL Server (TEMP_INST)" | Get-ClusterResource | Set-ClusterOwnerNode -Owners TEMP1,TEMP2
Get-ClusterGroup "SQL Server (LIVE_INST2)" | Set-ClusterOwnerNode -Owners REMOTE1,REMOTE2
Get-ClusterGroup "SQL Server (LIVE_INST2)" | Get-ClusterResource | Set-ClusterOwnerNode -Owners REMOTE1,REMOTE2
Get-ClusterGroup "SQL Server (LIVE_INST1)" | Set-ClusterOwnerNode -Owners PRIMARY1,PRIMARY2
Get-ClusterGroup "SQL Server (LIVE_INST1)" | Get-ClusterResource | Set-ClusterOwnerNode -Owners PRIMARY1,PRIMARY2
Get-ClusterGroup "Cluster Group" | Get-ClusterResource | Set-ClusterOwnerNode -Owners PRIMARY1,PRIMARY2,REMOTE1,REMOTE2,TEMP1,TEMP2
The resource group "Cluster Group" contains cluster-level resources for Cluster3, including the quorum disk. The last command ensures that that all nodes have access to the quorum disk.
Once FCI2 has been reconfigured, it should look similar to Figure 9 when viewed in Failover Cluster Manager. Note that Cluster3 now has two cluster networks and two clustered services.
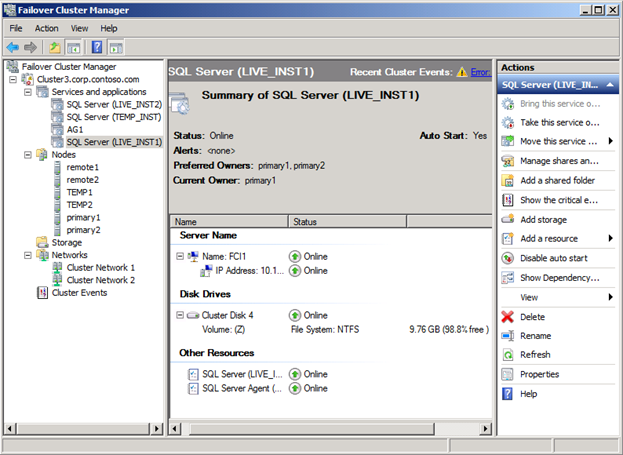
Figure 9 FCI1 after Reconfiguration as Shown in Failover Cluster Manager
Enable AlwaysOn Availability Groups on FCI1
Role: Database Administrator
First, you enable the AlwaysOn Availability Groups feature on FCI1. To do this, open a SQL Server PowerShell window from SSMS and run the following commands:
Enable-SqlAlwaysOn -Path SQLSERVER:\SQL\FCI1\LIVE_INST1 -Force
Add Primary Site to Availability Group
Role: Database Administrator
Next, you will add the primary site to the availability group.
Take both a full backup and a log backup for the two databases on FCI3\TEMP_INST and restore them on FCI1\LIVE_INST1. When restoring the databases, make sure that the WITH NO RECOVERY option is used.
In the AlwaysOn High Availability node for FCI3\TEMP_INST, under Availability Groups, right-click AG1 (Primary) and click Add Replica.
Click Next. In the Connect to Existing Secondary Replicas page, click Connect All, then click Connect.
Click Next.
In the Replica tab, click Add Replica.
In the Server name box, type FCI1\LIVE_INST1, and then click Connect.
For FCI1\LIVE_INST1, select Synchronous Commit (Up to 3) and Readable Secondary=Yes.
In the Backup Preferences tab, change the backup priority for FCI1\LIVE_INST1 to 50. Your backup priorities should now be as follows:
- FCI1\LIVE_INST1: 50
- FCI2\LIVE_INST2: 60
- FCI3\TEMP_INST: 50
This setting makes the remote site the preferred secondary replica for backup operations.
Select Join only for data synchronization preference, and then click Next.
Once validation finishes without errors, click Next, and then click Finish.
Once the availability group configuration is finished, you can monitor the availability group health in SSMS by right-clicking AlwaysOn High Availability and selecting Show Dashboard. It may take some time for FCI1\LIVE_INST1 to become synchronized. Once it is synchronized, the AlwaysOn Dashboard looks similar to Figure 10.
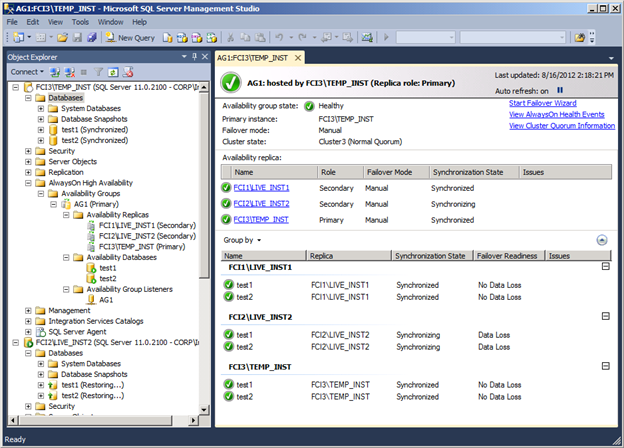
Figure 10 AlwaysOn Dashboard after Addition of FCI1\LIVE_INST1
Step 6: Remove Temporary FCI
The last step is to return the availability group to a two-FCI configuration. You will failover the availability group to the FCI1\LIVE_INST1, and then remove FCI3\TEMP_INST from the availability group.
Failover to Primary Site
Role: Database Administrator
Perform the following steps while connected to FCI3\TEMP_INST, which is currently hosting the primary replica in the availability group.
In the Object Explorer, right-click AlwaysOn High Availability, and click Show Dashboard.
In the dashboard, click AG1.
In the top-right corner of the dashboard, click Start Failover Wizard.
Click Next. Select FCI1\LIVE_INST1 as the new primary replica and click Next again.
In the Connect to Replica page, click Connect, then click Connect again, and then click Next.
Click Finish.
In the Results page, you are reminded to validate WSFC quorum vote configuration. Since your quorum state has not changed in this failover, you do not need to change the quorum settings. Click Close.
The AlwaysOn Dashboard may show error states until failover is complete and the dashboard is refreshed. By default, the dashboard refreshes every 30 seconds. You can refresh it manually by pressing F5.
Important: At this point, CORP\SQLClient still does not have access to the databases on FCI1\LIVE_INST1. You must perform the following steps immediately after the failover so that the client applications can recover database connectivity.
Add CORP\SQLClient as a login.
Give CORP\SQLClient the following database memberships for both DB1 and DB2:
- db_datareader
- db_datawriter
Remove Temporary FCI from Availability Group
Perform the following steps while connected to FCI1\LIVE_INST1, which is currently hosting the primary replica in the availability group.
In the Object Explorer, expand AlwaysOn High Availability Group, then expand Availability Groups, then expand AG1 (Primary) , and then expand Availability Replicas.
Right-click FCI3\TEMP_INST (Secondary) and click Remove from Availability Group.
Click OK.
Once the replica has been removed, you will remove the clustered service and the nodes from Cluster3.
Log in to PRIMARY1 as CORP\Install and open Failover Cluster Manager.
In Failover Cluster Manager, expand Cluster3.corp.contoso.com, and then expand Services and applications.
Right-click SQL Server (TEMP_INST) and click Delete. Confirm by clicking Delete SQL Server (TEMP_INST) .
In Cluster3.corp.contoso.com, click Storage.
In the Available Storage section, right-click Cluster Disk 2 and select Delete.
IMPORTANT: Before evicting TEMP1 and TEMP2 from the cluster, make sure all nodes have access to the quorum disk. If TEMP1 and TEMP2 are still the only nodes that can access it, the quorum disk is taken offline immediately after you evict the two nodes because no other node is able to take ownership of the quorum disk. You can test this condition by attempting to move the quorum disk between the remaining nodes. For example, to move the quorum disk to PRIMARY1, the following PowerShell command:
Move-ClusterSharedVolume "Cluster Disk 1" -Node PRIMARY1
In Cluster3.corp.contoso.com, click Nodes.
Inspect all the nodes in Cluster3 and make sure that all nodes are online. Specifically, the success of the following steps depends on whether the quorum is in optimal health. In other words, at least the following nodes should be online (the ones that have quorum votes):
- PRIMARY1
- PRIMARY2
- TEMP1
- TEMP2
Click Cluster3.corp.contoso.com and expand the Cluster Core Resources tab.
Make sure that the disk witness is online.
Click Nodes again.
Right-click TEMP1, then point to More Actions, and then click Evict.
Confirm by clicking Evict node TEMP1.
Right-click TEMP2, then point to More Actions, and then click Evict.
Confirm by clicking Evict node TEMP2.
Your Cluster3 quorum should now look as follows:
- PRIMARY1: 1 vote
- PRIMARY2: 1 vote
- REMOTE1: 0 vote
- REMOTE2: 0 vote
- Quorum disk: 1 vote
After you finish removing the FCI3 nodes from Cluster3, the cluster should look similar to Figure 11. The storage view is shown here to demonstrate that the quorum disk is online and hosted by one of the remaining nodes.
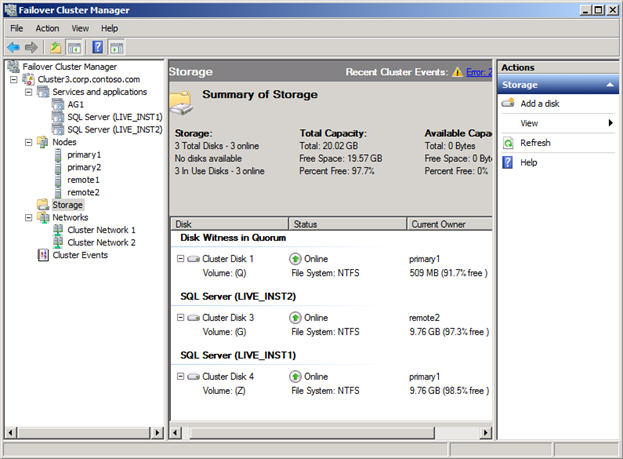
Figure 11 Failover Cluster Manager View after Removal of FCI3
You're Done!
Whew! Three blogs later, you have migrated a SQL Server 2008 R2 HADR solution to a SQL Server AlwaysOn solution. Take a look at the table below for a comparison of the two solutions.
SQL Server 2008 R2 Solution (Pre-Migration) |
SQL Server AlwaysOn Solution (Post-Migration) |
|
Number of WSFC Clusters |
2 |
1 |
Number of FCIs |
2 |
2 |
Number of Cluster Networks |
1 in each cluster for the respective subnet |
2 in the cluster, spanning both subnets |
Number of Cluster Disks |
2 in each cluster (1 for quorum and 1 for FCI) |
3 (1 for quorum and 1 for each FCI) |
Number of Nodes |
2 in each cluster |
4 |
Number of Clustered Services |
1 in each cluster |
3 (1 for each FCI and 1 for availability group) |
Cluster Resource Ownership |
Owned by all nodes in each cluster |
FCI resources owned by respective FCI nodes. Availability group resources owned by all nodes. |
HA Failover Approach |
FCI failover in Failover Cluster Manager |
FCI failover in Failover Cluster Manager |
DR Failover Approach |
Database mirroring failover in SQL Server Management Studio |
Availability group failover in SQL Server Management Studio |
Migrating an HADR solution is not a trivial matter, and clearly, migrating to SQL Server AlwaysOn is not an exemption. Hopefully, I have put you on the right track by helping you avoid many of the potential issues. I want to remind you at this point that the whitepaper: Migration Guide: Migrating to SQL Server 2012 Failover Clustering and Availability Groups from Prior Clustering and Mirroring Deployments, Part 1, shows you an alternative migration approach without using intermediate hardware. If there is the interest, I can blog about that in a separate series. Whatever path you take to migrate your solution to SQL Server AlwaysOn, be sure to test your particular migration scenario extensively, including rehearsing failover scenarios and disaster recovery scenarios, before performing the migration on your production system.
Also, I have not shown you the new workloads that are possible with your new SQL Server AlwaysOn solution, such as using the read-only secondary replica for read workloads. For more information, see Availability Group Listeners, Client Connectivity, and Application Failover (SQL Server).