Добавление push-уведомлений в приложение iOS
Обзор
В этом руководстве мы добавим push-уведомления в проект по быстрому запуску iOS, чтобы при каждом добавлении новой записи на устройство отправлялось push-уведомление.
Если вы не используете скачанный проект сервера, необходимо добавить пакет расширений для push-уведомлений. Дополнительные сведения см. в руководстве Работа с пакетом SDK для внутреннего сервера .NET для мобильных приложений Azure.
Симулятор iOS не поддерживает push-уведомления. Требуется физическое устройство iOS и участие в программе для разработчиков на платформе Apple.
Настройка центра уведомлений
Компонент мобильных приложений в службе приложений Azure использует Центры уведомлений Azure для отправки push-уведомлений, поэтому вам нужно настроить центр уведомлений для мобильного приложения.
На портале Azure щелкните Службы приложений, а затем выберите серверную часть приложения. В разделе Параметры выберите Push.
Чтобы добавить в приложение ресурс концентратора уведомлений, нажмите кнопку Подключить. Вы можете создать центр или подключиться к существующему.
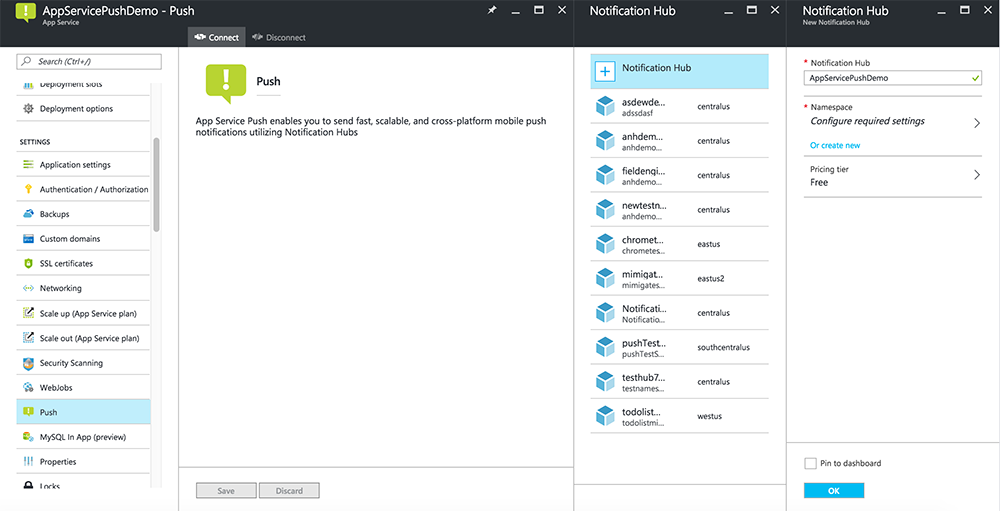
Теперь центр уведомлений подключен к серверной части проекта вашего мобильного приложения. Позднее вы настроите этот концентратор уведомлений, чтобы подключиться к системе отправки уведомлений платформы (PNS), которая отправляет push-уведомления на устройства.
Регистрация приложения для работы с push-уведомлениями
- Зарегистрируйте идентификатор приложения для приложения. Создайте явный идентификатор приложения (а не идентификатор приложения с подстановочными знаками) и для идентификатора пакета используйте точный идентификатор пакета, который находится в проекте быстрого запуска Xcode. Также необходимо выбрать параметр Push-уведомления.
- Затем, чтобы подготовиться к настройке push-уведомлений, создайте SSL-сертификат "Разработка" или "Распространение".
Настройка Azure для отправки push-уведомлений
- На компьютере Mac запустите программу Keychain Access. На панели навигации слева в разделе Category (Категория) откройте My Certificates (Мои сертификаты). Найдите и откройте скачанный на предыдущем этапе SSL-сертификат. Выберите только сертификат (без закрытого ключа). Затем экспортируйте его.
- На портале Azure последовательно выберите Browse All (Просмотреть все)>Службы приложений. Выберите серверную часть для функции "Мобильные приложения".
- В разделе Параметры выберите Push-уведомления службы приложений. Затем выберите имя концентратора уведомлений.
- Перейдите ксертификату отправки сертификата служб >push-уведомлений Apple. Передайте P12-файл, выбрав правильный режим (в зависимости от того, откуда получен SSL-сертификат клиента: из рабочей среды или песочницы). Сохраните внесенные изменения.
Теперь ваша служба настроена для работы с push-уведомлениями в iOS.
Обновление серверной части для отправки push-уведомлений
Серверная служба .NET:
В Visual Studio щелкните правой кнопкой мыши серверный проект, выберите пункт Управление пакетами NuGet, найдите
Microsoft.Azure.NotificationHubsи нажмите кнопку Установить. Она устанавливает библиотеку центров уведомлений для отправки уведомлений из серверной части.В проекте Visual Studio серверной части откройте файл Controllers>TodoItemController.cs. Добавьте в начало файла следующий оператор
using:using Microsoft.Azure.Mobile.Server.Config; using Microsoft.Azure.NotificationHubs;Замените метод
PostTodoItemследующим кодом:public async Task<IHttpActionResult> PostTodoItem(TodoItem item) { TodoItem current = await InsertAsync(item); // Get the settings for the server project. HttpConfiguration config = this.Configuration; MobileAppSettingsDictionary settings = this.Configuration.GetMobileAppSettingsProvider().GetMobileAppSettings(); // Get the Notification Hubs credentials for the Mobile App. string notificationHubName = settings.NotificationHubName; string notificationHubConnection = settings .Connections[MobileAppSettingsKeys.NotificationHubConnectionString].ConnectionString; // Create a new Notification Hub client. NotificationHubClient hub = NotificationHubClient .CreateClientFromConnectionString(notificationHubConnection, notificationHubName); // iOS payload var appleNotificationPayload = "{\"aps\":{\"alert\":\"" + item.Text + "\"}}"; try { // Send the push notification and log the results. var result = await hub.SendAppleNativeNotificationAsync(appleNotificationPayload); // Write the success result to the logs. config.Services.GetTraceWriter().Info(result.State.ToString()); } catch (System.Exception ex) { // Write the failure result to the logs. config.Services.GetTraceWriter() .Error(ex.Message, null, "Push.SendAsync Error"); } return CreatedAtRoute("Tables", new { id = current.Id }, current); }Повторная публикация серверного проекта
Node.js серверной части:
Настройте внутренний проект.
Замените сценарий таблицы todoitem.js на следующий код:
var azureMobileApps = require('azure-mobile-apps'),
    promises = require('azure-mobile-apps/src/utilities/promises'),
    logger = require('azure-mobile-apps/src/logger');

var table = azureMobileApps.table();

// When adding record, send a push notification via APNS
table.insert(function (context) {
    // For details of the Notification Hubs JavaScript SDK,
    // see https://aka.ms/nodejshubs
    logger.info('Running TodoItem.insert');

    // Create a payload that contains the new item Text.
    var payload = "{\"aps\":{\"alert\":\"" + context.item.text + "\"}}";

    // Execute the insert; Push as a post-execute action when results are returned as a Promise.
    return context.execute()
        .then(function (results) {
            // Only do the push if configured
            if (context.push) {
                context.push.apns.send(null, payload, function (error) {
                    if (error) {
                        logger.error('Error while sending push notification: ', error);
                    } else {
                        logger.info('Push notification sent successfully!');
                    }
                });
            }
            return results;
        })
        .catch(function (error) {
            logger.error('Error while running context.execute: ', error);
        });
});

module.exports = table;
При редактировании этого файла на локальном компьютере повторно опубликуйте серверный проект.
Добавление push-уведомлений в приложение
Objective-C:
В QSAppDelegate.m импортируйте пакет SDK для iOS и QSTodoService.h:
#import <MicrosoftAzureMobile/MicrosoftAzureMobile.h>
#import "QSTodoService.h"
В коде
didFinishLaunchingWithOptionsв QSAppDelegate.m вставьте следующие строки прямо передreturn YES;:UIUserNotificationSettings* notificationSettings = [UIUserNotificationSettings settingsForTypes:UIUserNotificationTypeAlert | UIUserNotificationTypeBadge | UIUserNotificationTypeSound categories:nil]; [[UIApplication sharedApplication] registerUserNotificationSettings:notificationSettings]; [[UIApplication sharedApplication] registerForRemoteNotifications];В QSAppDelegate.mдобавьте приведенные ниже методы обработчика. Ваше приложение теперь обновлено для поддержки push-уведомлений.
// Registration with APNs is successful
- (void)application:(UIApplication *)application
didRegisterForRemoteNotificationsWithDeviceToken:(NSData *)deviceToken {

    QSTodoService *todoService = [QSTodoService defaultService];
    MSClient *client = todoService.client;

    [client.push registerDeviceToken:deviceToken completion:^(NSError *error) {
        if (error != nil) {
            NSLog(@"Error registering for notifications: %@", error);
        }
    }];
}

// Handle any failure to register
- (void)application:(UIApplication *)application didFailToRegisterForRemoteNotificationsWithError:
(NSError *)error {
    NSLog(@"Failed to register for remote notifications: %@", error);
}

// Use userInfo in the payload to display an alert.
- (void)application:(UIApplication *)application
        didReceiveRemoteNotification:(NSDictionary *)userInfo {
    NSLog(@"%@", userInfo);

    NSDictionary *apsPayload = userInfo[@"aps"];
    NSString *alertString = apsPayload[@"alert"];

    // Create alert with notification content.
    UIAlertController *alertController = [UIAlertController
                                    alertControllerWithTitle:@"Notification"
                                    message:alertString
                                    preferredStyle:UIAlertControllerStyleAlert];

    UIAlertAction *cancelAction = [UIAlertAction
                                    actionWithTitle:NSLocalizedString(@"Cancel", @"Cancel")
                                    style:UIAlertActionStyleCancel
                                    handler:^(UIAlertAction *action)
                                    {
                                        NSLog(@"Cancel");
                                    }];

    UIAlertAction *okAction = [UIAlertAction
                                actionWithTitle:NSLocalizedString(@"OK", @"OK")
                                style:UIAlertActionStyleDefault
                                handler:^(UIAlertAction *action)
                                {
                                    NSLog(@"OK");
                                }];

    [alertController addAction:cancelAction];
    [alertController addAction:okAction];

    // Get current view controller.
    UIViewController *currentViewController = [[[[UIApplication sharedApplication] delegate] window] rootViewController];
    while (currentViewController.presentedViewController)
    {
        currentViewController = currentViewController.presentedViewController;
    }

    // Display alert.
    [currentViewController presentViewController:alertController animated:YES completion:nil];

}
Swift:
Добавьте файл ClientManager.swift со следующим содержимым. Замените %AppUrl% на URL-адрес внутреннего сервера мобильных приложений Azure.
class ClientManager {
    static let sharedClient = MSClient(applicationURLString: "%AppUrl%")
}
В ToDoTableViewController.swift замените строку
let client, которая инициализируетMSClient, на следующую:let client = ClientManager.sharedClientВ AppDelegate.swift замените текст
func applicationна следующий:func application(application: UIApplication, didFinishLaunchingWithOptions launchOptions: [NSObject: AnyObject]?) -> Bool { application.registerUserNotificationSettings( UIUserNotificationSettings(forTypes: [.Alert, .Badge, .Sound], categories: nil)) application.registerForRemoteNotifications() return true }В QSAppDelegate.mдобавьте приведенные ниже методы обработчика. Ваше приложение теперь обновлено для поддержки push-уведомлений.
func application(application: UIApplication,
    didRegisterForRemoteNotificationsWithDeviceToken deviceToken: NSData) {
    ClientManager.sharedClient.push?.registerDeviceToken(deviceToken) { error in
        print("Error registering for notifications: ", error?.description)
    }
}

func application(application: UIApplication,
    didFailToRegisterForRemoteNotificationsWithError error: NSError) {
    print("Failed to register for remote notifications: ", error.description)
}

func application(application: UIApplication,
    didReceiveRemoteNotification userInfo: [NSObject: AnyObject]) {

    print(userInfo)

    let apsNotification = userInfo["aps"] as? NSDictionary
    let apsString       = apsNotification?["alert"] as? String

    let alert = UIAlertController(title: "Alert", message: apsString, preferredStyle: .Alert)
    let okAction = UIAlertAction(title: "OK", style: .Default) { _ in
        print("OK")
    }
    let cancelAction = UIAlertAction(title: "Cancel", style: .Default) { _ in
        print("Cancel")
    }

    alert.addAction(okAction)
    alert.addAction(cancelAction)

    var currentViewController = self.window?.rootViewController
    while currentViewController?.presentedViewController != nil {
        currentViewController = currentViewController?.presentedViewController
    }

    currentViewController?.presentViewController(alert, animated: true) {}

}
Тестирование push-уведомлений
- В Xcode нажмите Run и запустите приложение на реальном устройстве iOS (push-уведомления не будут работать на симуляторах). Нажмите кнопку ОК, чтобы подтвердить принятие push-уведомлений. Этот запрос отображается при первом запуске приложения.
- В приложении добавьте новый элемент и щелкните +.
- Убедитесь, что получено уведомление, а затем нажмите кнопку "ОК ", чтобы закрыть уведомление. На этом работа с данным учебником завершена.
Подробнее
- Шаблоны обеспечивают гибкость при отправке push-уведомлений локально и между различными платформами. Использование клиентской библиотеки iOS для мобильных приложений Azure описано, как регистрировать шаблоны.