Release pipelines
TFS 2017 | TFS 2015
Note
In Microsoft Team Foundation Server (TFS) 2018 and previous versions, build and release pipelines are called definitions, runs are called builds, service connections are called service endpoints, stages are called environments, and jobs are called phases.
Release pipelines in Azure Pipelines help your team continuously deliver software to your customers at a faster pace and with lower risk. You can fully automate the testing and delivery of your software in multiple stages all the way to production. Or, set up semi-automated processes with approvals and on-demand deployments.
See Releases in Azure Pipelines to understand releases and deployments and watch the following video to see release pipelines in action.
How do release pipelines work?
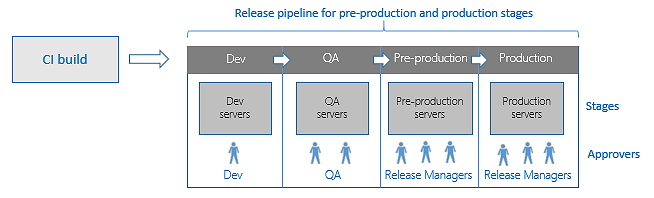
Release pipelines store the data for your pipelines, stages, tasks, releases, and deployments in Azure Pipelines.
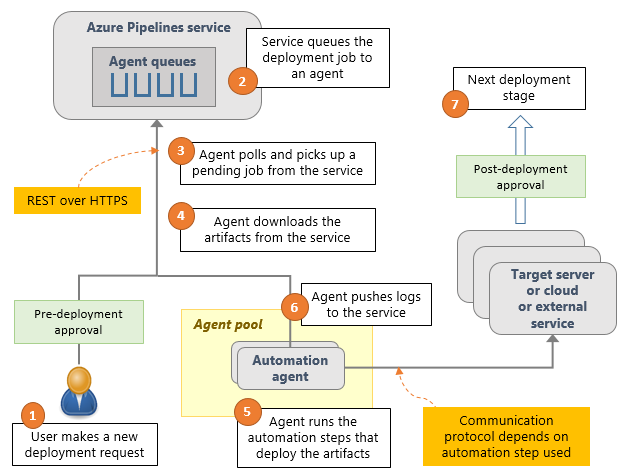
Azure Pipelines runs the following steps as part of every deployment:
Pre-deployment approval: When a new deployment request is triggered, Azure Pipelines checks whether a pre-deployment approval is required before deploying a release to a stage. If it's required, it sends out email notifications to the appropriate approvers.
Queue deployment job: Azure Pipelines schedules the deployment job on an available automation agent. An agent is a piece of software that can run tasks in the deployment.
Agent selection: An automation agent picks up the job. The agents for release pipelines are exactly the same as the agents that run your builds in Azure Pipelines. A release pipeline can contain settings to select an appropriate agent at runtime.
Download artifacts: The agent downloads all the artifacts specified in that release, provided you haven't opted to skip the download. The agent currently understands two types of artifacts: Azure Pipelines artifacts and Jenkins artifacts.
Run the deployment tasks: The agent then runs all the tasks in the deployment job to deploy the app to the target servers for a stage.
Generate progress logs: The agent creates detailed logs for each step while running the deployment, and pushes these logs back to Azure Pipelines.
Post-deployment approval: When deployment to a stage is complete, Azure Pipelines checks if there's a post-deployment approval required for that stage. If no approval is required, or upon completion of a required approval, it proceeds to trigger deployment to the next stage.
Release pipelines and build pipelines have separate UIs. The main differences in the pipelines are the support in release pipelines for different types of triggers, and the support for approvals and gates.
How do I use a release pipeline?
You start using Azure Pipelines releases by authoring a release pipeline for your application. To author a release pipeline, you must specify the artifacts that make up the application and the release pipeline.
An artifact is a deployable component of your application. It's typically produced through a Continuous Integration or a build pipeline. Azure Pipelines releases can deploy artifacts produced by a wide range of artifact sources. such as Azure Pipelines build, Jenkins, or Team City.
Define the release pipeline using stages and restrict deployments into or out of a stage using approvals. Define the automation in each stage using jobs and tasks. Use variables to generalize your automation and triggers to control when the deployments should be kicked off automatically.
See the following example of a release pipeline that can be modeled through a release pipeline:
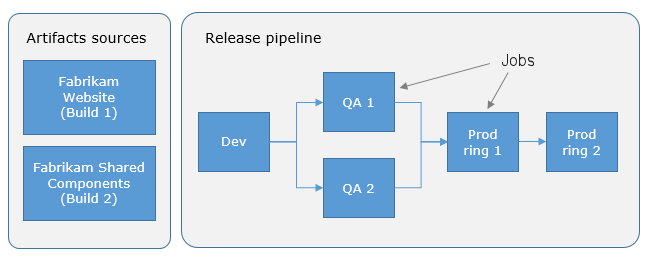
In this example, a release of a website is created by collecting specific versions of two builds (artifacts), each from a different build pipeline. The release is first deployed to a Dev stage and then forked to two QA stages in parallel. If the deployment succeeds in both the QA stages, the release is deployed to Production ring 1 and then to Production ring 2. Each production ring represents multiple instances of the same website deployed at various locations around the world.
See the following example of how deployment automation can be modeled within a stage:
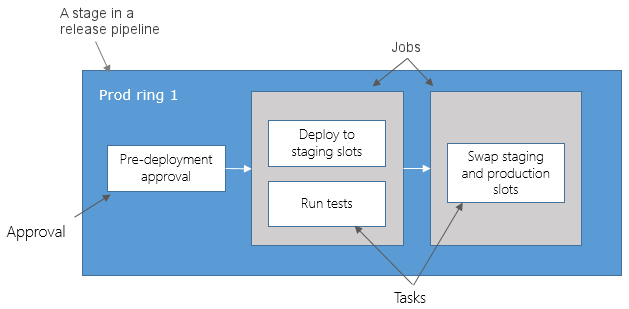
In this example, a job is used to deploy the app to websites across the world in parallel within production ring 1. After all those deployments are successful, a second job is used to switch traffic from the previous version to the newer version.
Next:
Check out the following articles to learn how to:
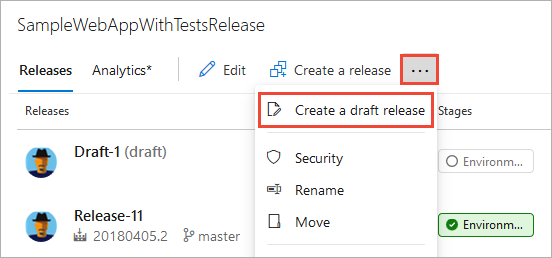
What is a draft release?
Creating a draft release allows you to edit some settings for the release and tasks, depending on your role permissions before you start the deployment. The changes apply only to that release, and don't affect the settings of the original pipeline.
Create a draft release using the "..." ellipses link in the list of releases:
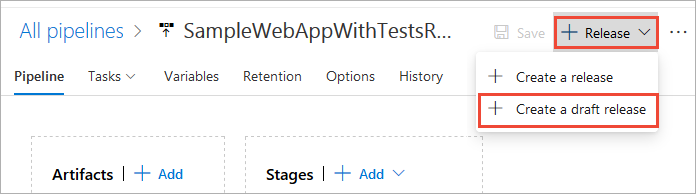
... or the Release drop-down in the pipeline definition page:
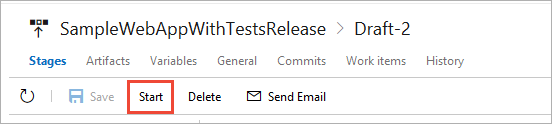
After you finish editing the draft release, choose Start from the draft release toolbar.
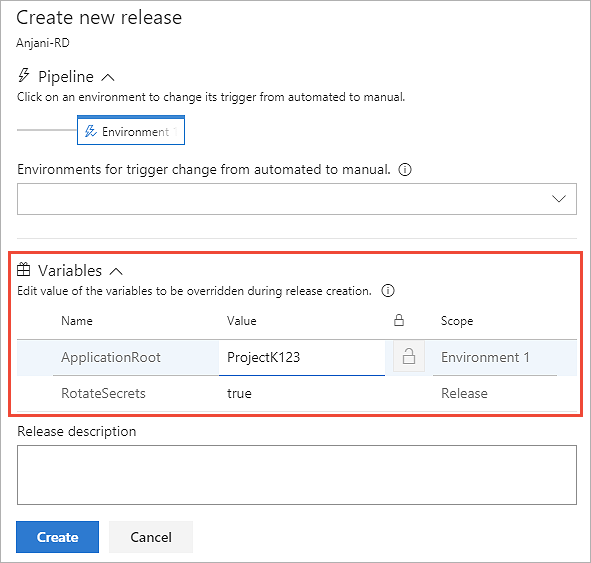
How do I specify variables I want to edit when a release is created?
In the Variables tab of a release pipeline, when you add new variables, set Settable at release time for the variables that you want to edit when a release gets created and queued.
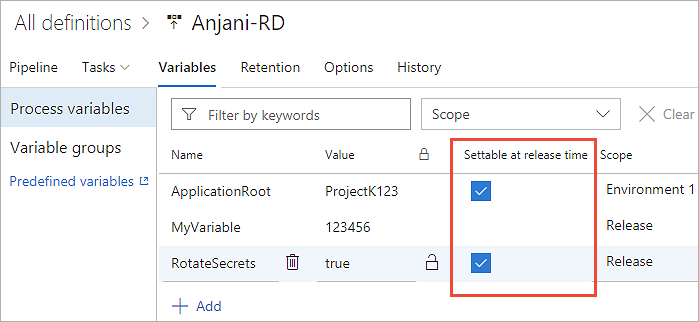
Then, when you create a new release, you can edit the values for these variables.
How do I integrate and report release status?
With release pipelines integrations, you can report your deployment status to multiple sources such as your repository host, your work items (links or deployments), or to Jira issues.
To configure your release pipeline integrations, select the Options tab, and then select Integrations from your release pipeline definition.
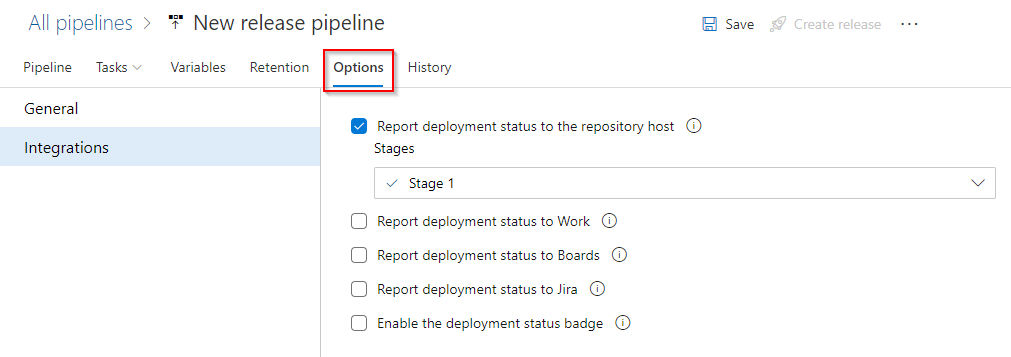
Report deployment status to the repository host
If your source code is in Azure Repos, this option displays a status badge on the Azure Repos pages. The badge indicates where the specific commit got deployed and whether the deployment is passing or failing. By default, a deployment status is posted for all stages of your release pipeline. You can also select specific stages to display the deployment status.
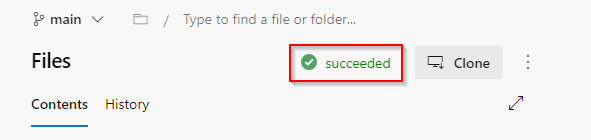
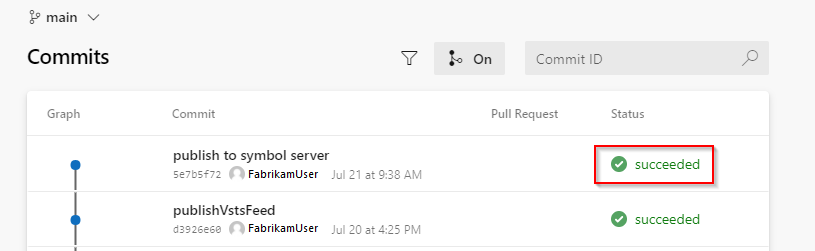
The deployment status is displayed in the following areas of Azure Repos:
Files: indicates the status of the latest deployment for the selected branch.
Commits: indicates the deployment status for each commit (requires the continuous integration trigger to be enabled).
Branches: indicates the status of the latest deployment for each branch.

Note
If your source code is not in Azure Repos, you can use the Enable the Deployment status badge feature to display your deployment status in external repositories.
Report deployment status to Work
Select this option if you want to link your release pipeline to your work items. The deployment status will be displayed in the Links tab of your work item.
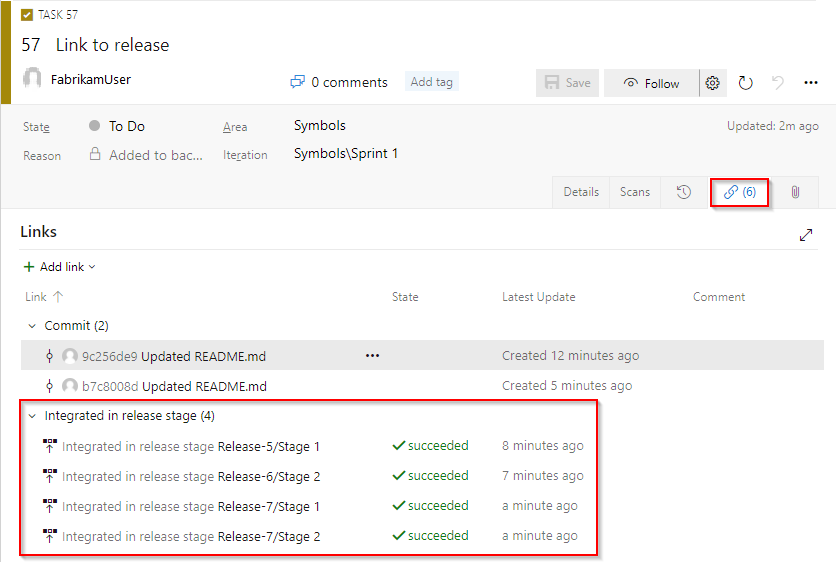
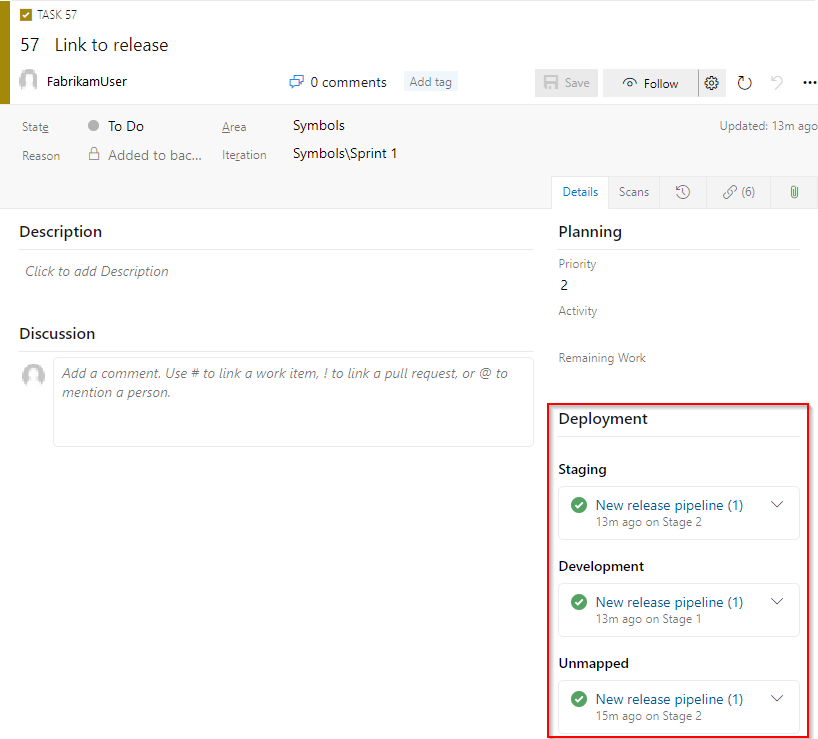
Report deployment status to Boards
Select this option if you want to link your release pipeline to your work items and display the deployment status in the Details tab of your work item.
Enable the deployment status badge
Select this option if you want to display the deployment status on an external website. You can copy the stage badge and add it to your website to have a visualization of your deployment status:
Select Enable the deployment status badge.
Select the stages for which you want to display the status. By default, all the stages are selected.
Copy the badge URL and add it to your website or GitHub Readme file to display the deployment status.

Report deployment status to Jira
Select this option if you want to link your release pipeline to Jira issues. You must install Azure Pipelines for Jira and connect your Azure DevOps organization with your Jira account. Check out the Jira integration tutorial for more details.
When should I edit a release instead of the pipeline that defines it?
You can edit the approvals, tasks, and variables of a previously deployed release. Do so instead of editing these values in the pipeline from which the release was created. However, these edits apply to only the release generated when you redeploy the artifacts. If you want your edits apply to all future releases and deployments, choose the option to edit the release pipeline instead.
When and why would I abandon a release?
After you create a release, you can redeploy the artifacts to any stages that are defined in that release. This is useful if you want to do regular manual releases, or set up a continuous integration stage trigger that redeploys the artifacts using this release.
If you don't plan to reuse the release, or want to prevent it being used to redeploy the artifacts, you can abandon the release using the shortcut menu that opens from the ellipses (...) icon in the Pipeline view of the pipeline.
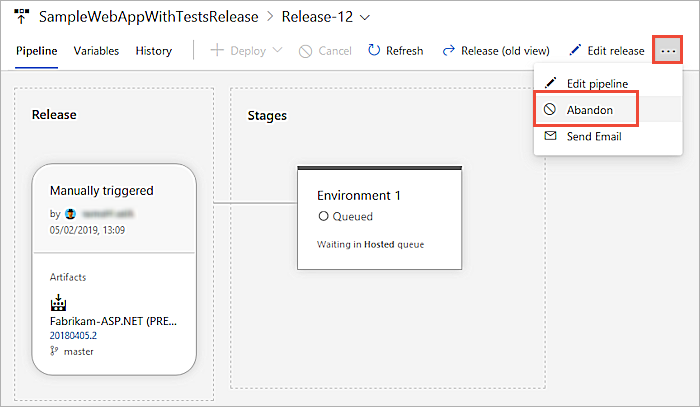
You can't abandon a release when a deployment is in progress, you must cancel the deployment first.
How do I send release summaries by email?
After a release is triggered and completed, you may want to email the summary to stakeholders. Use the Send email option on the menu that opens from the ellipses (...) icon in the Pipeline view of the pipeline.
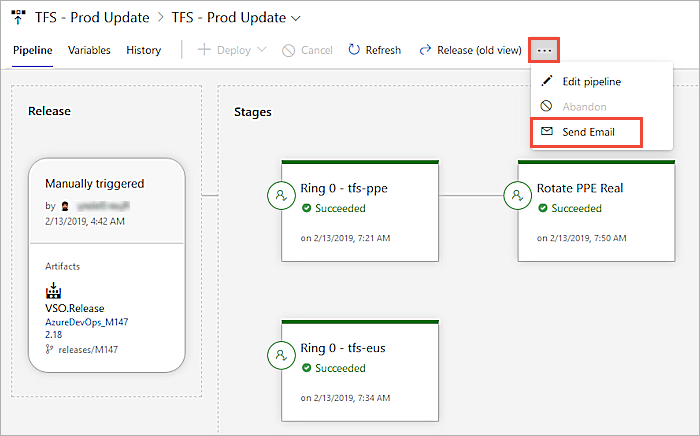
In the Send release summary mail window, you can further customize the information sent in the email by selecting only certain sections of the release summary.
How do I manage the names for new releases?
The names of releases for a release pipeline are, by default, sequentially numbered. The first release is named Release-1, the next release is Release-2, and so on. You can change this naming scheme by editing the release name format mask. In the Options tab of a release pipeline, edit the Release name format property in the General page.
When specifying the format mask, you can use the following predefined variables.
| Variable | Description |
|---|---|
| Rev: rr | An auto-incremented number with at least the specified number of digits. |
| Date / Date: MMddyy | The current date, with the default format MMddyy. Any combinations of M/MM/MMM/MMMM, d/dd/ddd/dddd, y/yy/yyyy/yyyy, h/hh/H/HH, m/mm, s/ss are supported. |
| System.TeamProject | The name of the project to which this build belongs. |
| Release.ReleaseId | The ID of the release, which is unique across all releases in the project. |
| Release.DefinitionName | The name of the release pipeline to which the current release belongs. |
| Build.BuildNumber | The number of the build contained in the release. If a release has multiple builds, it's the number of the primary build. |
| Build.DefinitionName | The pipeline name of the build contained in the release. If a release has multiple builds, it's the pipeline name of the primary build. |
| Artifact.ArtifactType | The type of the artifact source linked with the release. For example, this can be Azure Pipelines or Jenkins. |
| Build.SourceBranch | The branch of the primary artifact source. For Git, this is of the form main if the branch is refs/heads/main. For Team Foundation Version Control, this is of the form branch if the root server path for the workspace is $/teamproject/branch. This variable is not set for Jenkins or other artifact sources. |
| Custom variable | The value of a global configuration property defined in the release pipeline. You can update the release name with custom variables using the Release logging commands |
For example, the release name format Release $(Rev:rrr) for build $(Build.BuildNumber) $(Build.DefinitionName) creates releases with names such as Release 002 for build 20170213.2 MySampleAppBuild.
How do I specify the retention period for releases?
You can customize how long releases of this pipeline must be retained. For more information, see release retention.
How do I use and manage release history?
Every time you save a release pipeline, Azure Pipelines keeps a copy of the changes. This copy allows you to compare the changes at a later point, especially when you're debugging a deployment failure.
How do I set it up to automatically link new work in a build?
When we establish traceability between work items and builds/releases, there are the following two aspects:
- List the work items that were newly built as part of a build. You can find this when you're looking at a build instance.
- List the builds that this work item was built in. You can find the list in the "Development" section in a work item form. The setting to "Automatically link new work in this build" has nothing to do with how we compute the first bulleted item. It only influences how we compute the second bulleted item.
The computation for the first bullet is as follows for a build: Let's say, for example, that you started a new build. Whatever the setting, we compute a list of new commits for the build. We do the following tasks:
- We find the commit c2 that is being built now.
- We find the commit c1 that was built in the last successful build of the same branch (Build.SourceBranch).
- We find all the commits between c1 and c2 (in the commit tree).
It could happen that there's no last known successful build on the same branch. For example, when you run a build for the first time on a branch, or when all the previous builds on a branch have been deleted (possibly through retention policies). The list could be long in these cases.
Once we have the list of commits, we enumerate all the work items associated with each of those commits. This is the list that you see in a build.
Get started now!
Complete the following steps: