Connect to Azure Blob storage in Microsoft Purview
Článok
This article outlines the process to register and govern Azure Blob Storage accounts in Microsoft Purview including instructions to authenticate and interact with the Azure Blob Storage source
** Lineage is supported if dataset is used as a source/sink in Azure Data Factory Copy and Data Flow activities and [Azure Synapse Pipelines - Copy and Data Flow activities] (how-to-lineage-azure-synapse-analytics.md)
For file types such as csv, tsv, psv, ssv, the schema is extracted when the following logics are in place:
You'll need to be a Data Source Administrator and Data Reader to register a source and manage it in the Microsoft Purview governance portal. See our Microsoft Purview Permissions page for details.
This section will enable you to register the Azure Blob storage account for scan and data share in Purview.
Prerequisites for register
You'll need to be a Data Source Admin and one of the other Purview roles (for example, Data Reader or Data Share Contributor) to register a source and manage it in the Microsoft Purview governance portal. See our Microsoft Purview Permissions page for details.
Steps to register
It is important to register the data source in Microsoft Purview prior to setting up a scan for the data source.
Create the Collection hierarchy using the Collections menu and assign permissions to individual subcollections, as required
Navigate to the appropriate collection under the Sources menu and select the Register icon to register a new Azure Blob data source
Select the Azure Blob Storage data source and select Continue
Provide a suitable Name for the data source, select the relevant Azure subscription, existing Azure Blob Storage account name and the collection and select Apply. Leave the Data Policy Enforcement toggle on the disabled position until you have a chance to carefully go over this document.
The Azure Blob storage account will be shown under the selected Collection
Scan
For file types such as csv, tsv, psv, ssv, the schema is extracted when the following logics are in place:
First row values are non-empty
First row values are unique
First row values are not a date or a number
Authentication for a scan
Your Azure network may allow for communications between your Azure resources, but if you've set up firewalls, private endpoints, or virtual networks within Azure, you'll need to follow one of these configurations below.
Networking constraints
Integration runtime type
Available credential types
No private endpoints or firewalls
Azure IR
Managed identity (Recommended), service principal, or account key
Using a system or user assigned managed identity for scanning
There are two types of managed identity you can use:
System-assigned managed identity (Recommended) - As soon as the Microsoft Purview Account is created, a system-assigned managed identity (SAMI) is created automatically in Microsoft Entra tenant. Depending on the type of resource, specific RBAC role assignments are required for the Microsoft Purview system-assigned managed identity (SAMI) to perform the scans.
User-assigned managed identity (preview) - Similar to a system managed identity, a user-assigned managed identity (UAMI) is a credential resource that can be used to allow Microsoft Purview to authenticate against Microsoft Entra ID. For more information, you can see our User-assigned managed identity guide.
It's important to give your Microsoft Purview account the permission to scan the Azure Blob data source. You can add access for the SAMI or UAMI at the Subscription, Resource Group, or Resource level, depending on what level scan permission is needed.
Poznámka
If you have firewall enabled for the storage account, you must use managed identity authentication method when setting up a scan.
Poznámka
You need to be an owner of the subscription to be able to add a managed identity on an Azure resource.
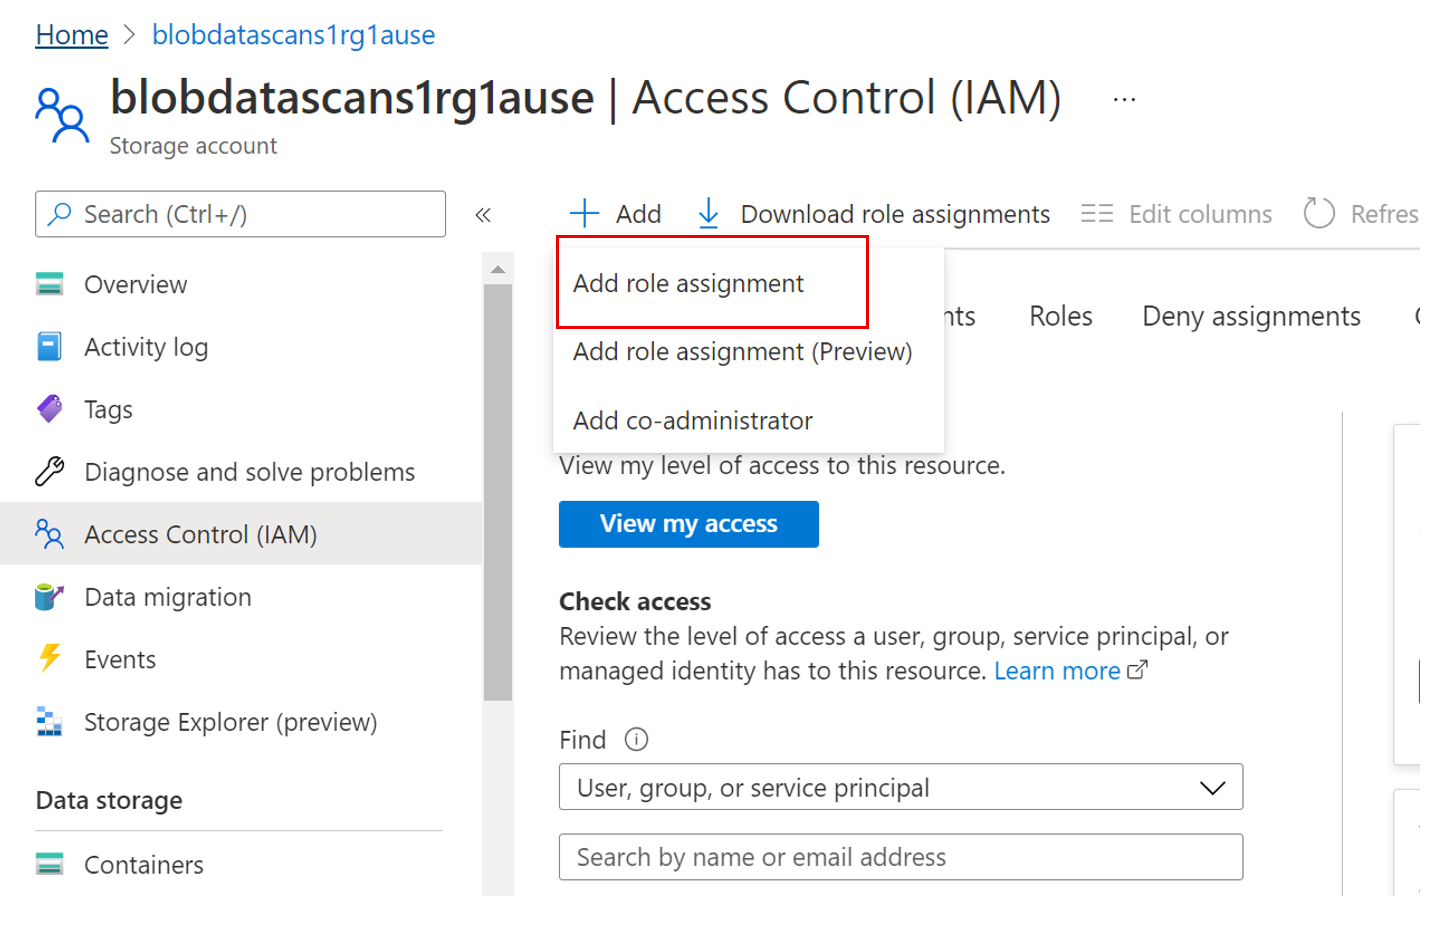
From the Azure portal, find either the subscription, resource group, or resource (for example, an Azure Blob storage account) that you would like to allow the catalog to scan.
Select Access Control (IAM) in the left navigation and then select + Add --> Add role assignment
Set the Role to Storage Blob Data Reader and enter your Microsoft Purview account name or user-assigned managed identity under Select input box. Then, select Save to give this role assignment to your Microsoft Purview account.
Go into your Azure Blob storage account in Azure portal
Navigate to Security + networking > Networking
Choose Selected Networks under Allow access from
In the Exceptions section, select Allow trusted Microsoft services to access this storage account and hit Save
If you need to Create a new service principal, it's required to register an application in your Microsoft Entra tenant and provide access to Service Principal in your data sources. Your Microsoft Entra Application Administrator can perform this operation.
Getting the Service Principal's Application ID
Copy the Application (client) ID present in the Overview of the Service Principal already created
Granting the Service Principal access to your Azure Blob account
It's important to give your service principal the permission to scan the Azure Blob data source. You can add access for the service principal at the Subscription, Resource Group, or Resource level, depending on what level scan access is needed.
Poznámka
You need to be an owner of the subscription to be able to add a service principal on an Azure resource.
From the Azure portal, find either the subscription, resource group, or resource (for example, an Azure Blob Storage storage account) that you would like to allow the catalog to scan.
Select Access Control (IAM) in the left navigation and then select + Add --> Add role assignment
Set the Role to Storage Blob Data Reader and enter your service principal under Select input box. Then, select Save to give this role assignment to your Microsoft Purview account.
Creating the scan
Open your Microsoft Purview account and select the Open Microsoft Purview governance portal
Navigate to the Data map --> Sources to view the collection hierarchy
Select the New Scan icon under the Azure Blob data source registered earlier
If using a system or user assigned managed identity
Provide a Name for the scan, select the Microsoft Purview accounts SAMI or UAMI under Credential, choose the appropriate collection for the scan, and select Test connection. On a successful connection, select Continue
If using Account Key
Provide a Name for the scan, select the Azure IR or your Self-Hosted IR depending on your configuration, choose the appropriate collection for the scan, and select Authentication method as Account Key and select Create
If using Service Principal
Provide a Name for the scan, select the Azure IR or your Self-Hosted IR depending on your configuration, choose the appropriate collection for the scan, and select the + New under Credential
Select the appropriate Key vault connection and the Secret name that was used while creating the Service Principal. The Service Principal ID is the Application (client) ID copied earlier
Select Test connection. On a successful connection, select Continue
Scoping and running the scan
You can scope your scan to specific folders and subfolders by choosing the appropriate items in the list.
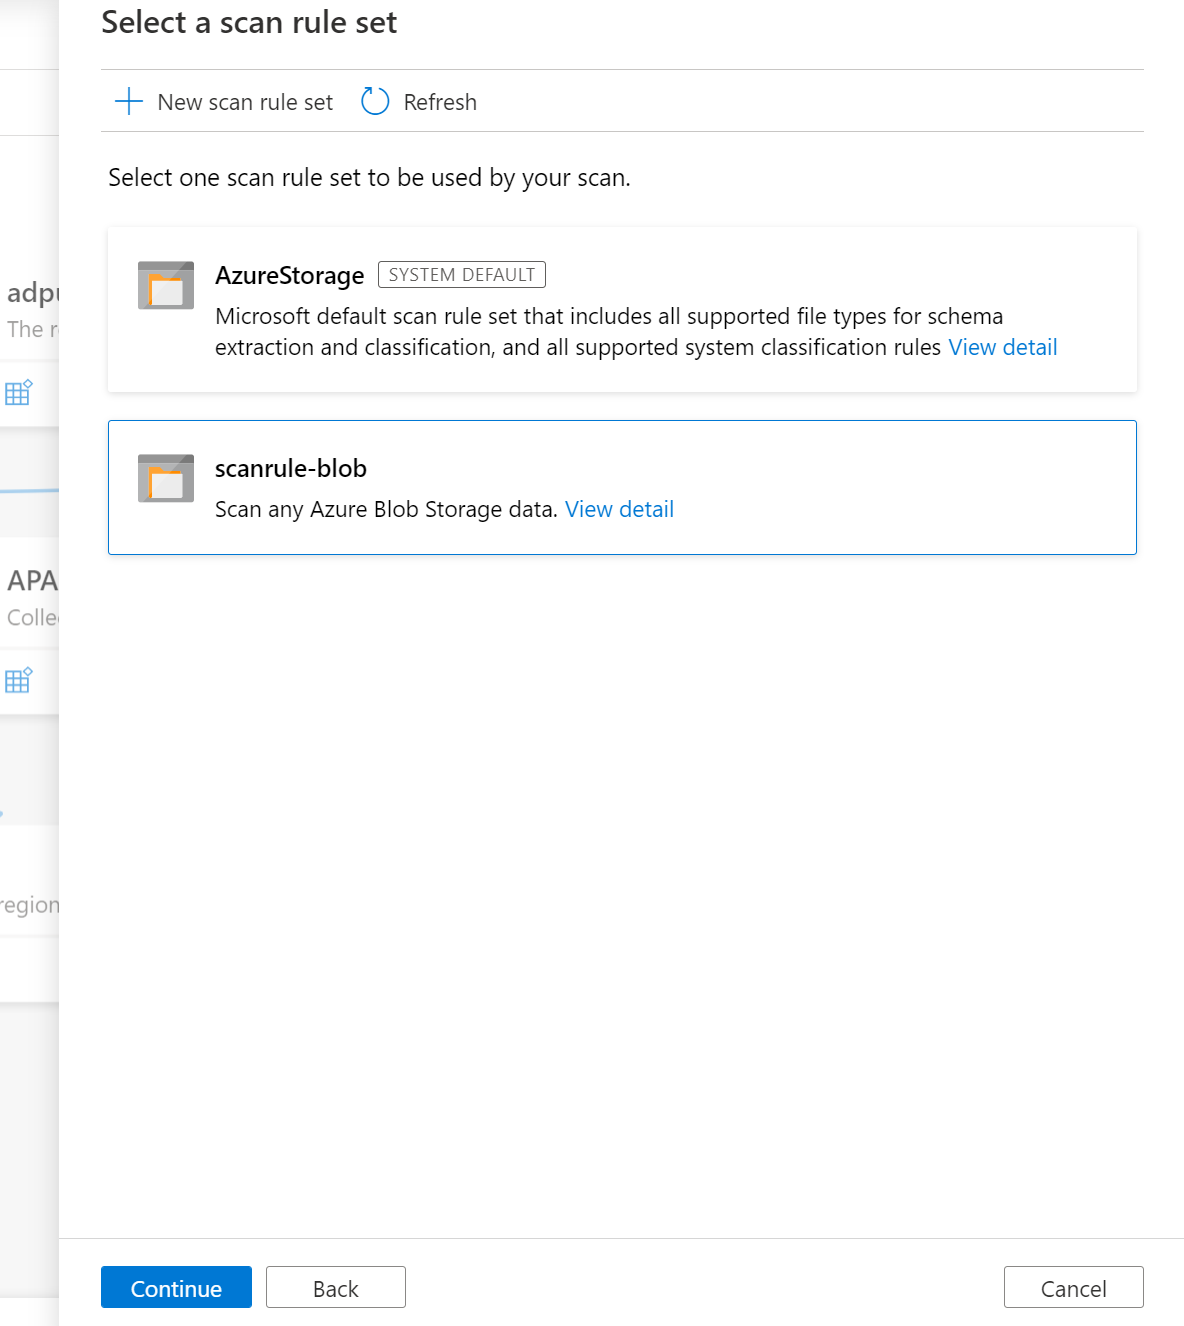
Then select a scan rule set. You can choose between the system default, existing custom rule sets, or create a new rule set inline.
If creating a new scan rule set, select the file types to be included in the scan rule.
You can select the classification rules to be included in the scan rule
Choose your scan trigger. You can set up a schedule or run the scan once.
Review your scan and select Save and run.
Viewing Scan
Navigate to the data source in the Collection and select View Details to check the status of the scan
The scan details indicate the progress of the scan in the Last run status and the number of assets scanned and classified
The Last run status will be updated to In progress and then Completed once the entire scan has run successfully
Managing Scan
Scans can be managed or run again on completion
Select the Scan name to manage the scan
You can run the scan again, edit the scan, delete the scan
You can run an incremental scan or a full scan again.
Data sharing
Microsoft Purview Data Sharing (preview) enables sharing of data in-place from Azure Blob storage account to Azure Blob storage account. This section provides details about the specific requirements for sharing and receiving data in-place between Azure Blob storage accounts. Refer to How to share data and How to receive share for step by step guides on how to use data sharing.
Storage accounts supported for in-place data sharing
The following storage accounts are supported for in-place data sharing:
Regions: Canada Central, Canada East, UK South, UK West, Australia East, Japan East, Korea South, and South Africa North
Redundancy options: LRS, GRS, RA-GRS
Tiers: Hot, Cool
Only use storage accounts without production workload for the preview.
Poznámka
Source and target storage accounts must be in the same region as each other. They don't need to be in the same region as the Microsoft Purview account.
Storage account permissions required to share data
To add or update a storage account asset to a share, you need ONE of the following permissions:
Microsoft.Authorization/roleAssignments/write - This permission is available in the Owner role.
Microsoft.Storage/storageAccounts/blobServices/containers/blobs/modifyPermissions/ - This permission is available in the Blob Storage Data Owner role.
Storage account permissions required to receive shared data
To map a storage account asset in a received share, you need ONE of the following permissions:
Microsoft.Storage/storageAccounts/write - This permission is available in the Contributor and Owner role.
Microsoft.Storage/storageAccounts/blobServices/containers/write - This permission is available in the Contributor, Owner, Storage Blob Data Contributor and Storage Blob Data Owner role.
Update shared data in source storage account
Updates you make to shared files or data in the shared folder from source storage account will be made available to recipient in target storage account in near real time. When you delete subfolder or files within the shared folder, they will disappear for recipient. To delete the shared folder, file or parent folders or containers, you need to first revoke access to all your shares from the source storage account.
Access shared data in target storage account
The target storage account enables recipient to access the shared data read-only in near real time. You can connect analytics tools such as Synapse Workspace and Databricks to the shared data to perform analytics. Cost of accessing the shared data is charged to the target storage account.
Service limit
Source storage account can support up to 20 targets, and target storage account can support up to 100 sources. If you require an increase in limit, please contact Support.
Policies
The following types of policies are supported on this data resource from Microsoft Purview:
Data owner policies - a set of policy statements that allow you to grant users and groups access to data sources.
Self-service access policies - policy that allows users to request access to data sources registered to Microsoft Purview.
Protection policies - denies access to data tagged with sensitivity labels to all users except those specified by the policy.
Access policy pre-requisites on Azure Storage accounts
Storage accounts in the following regions are supported without the need for additional configuration. However, zone-redundant storage (ZRS) accounts are not supported.
Australia Central
Australia East
Australia Southeast
Brazil South
Canada Central
Canada East
Central India
Central US
East Asia
East US 2
East US
France Central
Germany West Central
Japan East
Japan West
Korea Central
North Central US
North Europe
Norway East
Poland Central
Qatar Central
South Central US
South Africa North
Southeast Asia
South India
Sweden Central
Switzerland North
West Central US
West Europe
West US
West US 2
West US 3
UAE North
UK South
UK West
Storage accounts in other regions in Public Cloud are supported after setting feature flag AllowPurviewPolicyEnforcement, as outlined in the next section. Newly created ZRS Storage accounts are supported, if created after setting the feature flag AllowPurviewPolicyEnforcement.
Configure the subscription where the Azure Storage account resides for policies from Microsoft Purview
This step is only necessary in certain regions (see prior section). To enable Microsoft Purview to manage policies for one or more Azure Storage accounts, execute the following PowerShell commands in the subscription where you'll deploy your Azure Storage account. These PowerShell commands will enable Microsoft Purview to manage policies on all Azure Storage accounts in that subscription.
If you’re executing these commands locally, be sure to run PowerShell as an administrator.
Alternatively, you can use the Azure Cloud Shell in the Azure portal: https://shell.azure.com.
PowerShell
# Install the Az moduleInstall-Module -Name Az -Scope CurrentUser -Repository PSGallery -Force# Login into the subscriptionConnect-AzAccount -Subscription <SubscriptionID>
# Register the featureRegister-AzProviderFeature -FeatureName AllowPurviewPolicyEnforcement -ProviderNamespace Microsoft.Storage
If the output of the last command shows RegistrationState as Registered, then your subscription is enabled for access policies.
If the output is Registering, wait at least 10 minutes, and then retry the command. Do not continue unless the RegistrationState shows as Registered.
Configure the Microsoft Purview account for policies
Register the data source in Microsoft Purview
Before a policy can be created in Microsoft Purview for a data resource, you must register that data resource in Microsoft Purview Studio. You will find the instructions related to registering the data resource later in this guide.
Poznámka
Microsoft Purview policies rely on the data resource ARM path. If a data resource is moved to a new resource group or subscription it will need to be de-registered and then registered again in Microsoft Purview.
Configure permissions to enable Data policy enforcement on the data source
Once a resource is registered, but before a policy can be created in Microsoft Purview for that resource, you must configure permissions. A set of permissions are needed to enable the Data policy enforcement. This applies to data sources, resource groups, or subscriptions. To enable Data policy enforcement, you must have both specific Identity and Access Management (IAM) privileges on the resource as well as specific Microsoft Purview privileges:
You must have either one of the following IAM role combinations on the resource's Azure Resource Manager path or any parent of it (that is, using IAM permission inheritance):
IAM Owner
Both IAM Contributor and IAM User Access Administrator
To configure Azure role-based access control (RBAC) permissions, follow this guide. The following screenshot shows how to access the Access Control section in the Azure portal for the data resource to add a role assignment.
Poznámka
The IAM Owner role for a data resource can be inherited from a parent resource group, a subscription, or a subscription management group. Check which Microsoft Entra users, groups, and service principals hold or are inheriting the IAM Owner role for the resource.
You also need to have the Microsoft Purview Data source admin role for the collection or a parent collection (if inheritance is enabled). For more information, see the guide on managing Microsoft Purview role assignments.
The following screenshot shows how to assign the Data source admin role at the root collection level.
Configure Microsoft Purview permissions to create, update, or delete access policies
To create, update or delete policies, you need to get the Policy author role in Microsoft Purview at root collection level:
The Policy author role can create, update, and delete DevOps and Data Owner policies.
The Policy author role can delete self-service access policies.
Policy author role must be configured at the root collection level.
In addition, to easily search Microsoft Entra users or groups when creating or updating the subject of a policy, you can greatly benefit from getting the Directory Readers permission in Microsoft Entra ID. This is a common permission for users in an Azure tenant. Without the Directory Reader permission, the Policy Author will have to type the complete username or email for all the principals included in the subject of a data policy.
Configure Microsoft Purview permissions for publishing Data Owner policies
Data Owner policies allow for checks and balances if you assign the Microsoft Purview Policy author and Data source admin roles to different people in the organization. Before a Data owner policy takes effect, a second person (Data source admin) must review it and explicitly approve it by publishing it. This does not apply to DevOps or Self-service access policies as publishing is automatic for them when those policies are created or updated.
To publish a Data owner policy you need to get the Data source admin role in Microsoft Purview at root collection level.
To publish Data owner policies, the Data source admin role must be configured at the root collection level.
Delegate access provisioning responsibility to roles in Microsoft Purview
After a resource has been enabled for Data policy enforcement, any Microsoft Purview user with the Policy author role at the root collection level can provision access to that data source from Microsoft Purview.
Poznámka
Any Microsoft Purview root Collection admin can assign new users to root Policy author roles. Any Collection admin can assign new users to a Data source admin role under the collection. Minimize and carefully vet the users who hold Microsoft Purview Collection admin, Data source admin, or Policy author roles.
If a Microsoft Purview account with published policies is deleted, such policies will stop being enforced within an amount of time that depends on the specific data source. This change can have implications on both security and data access availability. The Contributor and Owner roles in IAM can delete Microsoft Purview accounts. You can check these permissions by going to the Access control (IAM) section for your Microsoft Purview account and selecting Role Assignments. You can also use a lock to prevent the Microsoft Purview account from being deleted through Resource Manager locks.
Register the data source in Microsoft Purview for Data Policy Enforcement
The Azure Storage resource needs to be registered first with Microsoft Purview before you can create access policies.
To register your resource, follow the Prerequisites and Register sections of this guide:
After you've registered the data source, you'll need to enable Data Policy Enforcement. This is a pre-requisite before you can create policies on the data source. Data Policy Enforcement can impact the security of your data, as it delegates to certain Microsoft Purview roles managing access to the data sources. Go through the secure practices related to Data Policy Enforcement in this guide: How to enable Data Policy Enforcement
Once your data source has the Data Policy Enforcement option set to Enabled, it will look like this screenshot:
To create policies that cover all data sources inside a resource group or Azure subscription you can refer to this section.
Protection policy
Protection access control policies (protection policies) enable organizations to automatically protect sensitive data across data sources. Microsoft Purview already scans data assets and identifies sensitive data elements, and this new feature allows you to automatically restrict access to that data using sensitivity labels from Microsoft Purview Information Protection.
Know your data, protect your data, and don't lose your data. These are the basic tenets of good information protection - data discovery, classification, and protection. This learning path provides an overview of the Microsoft data protection capabilities and how to use them to protect and govern data as part of a cybersecurity solution.The deadline for the heads of federal civilian agencies to evaluate and classify agency data and provide to DHS and OMB a report of their evaluation, per Section 8 of the Exe
This guide describes how to connect to multiple Azure sources in Microsoft Purview at once, and use Microsoft Purview's features to scan and manage your sources.
This guide describes how to connect to Azure Files in Microsoft Purview, and use Microsoft Purview's features to scan and manage your Azure Files source.
This article describes how you can set up a private endpoint to connect to your Microsoft Purview account and scan data sources from restricted network for an end to end isolation.