Add Azure Cosmos DB to your app by using Visual Studio Connected Services
With Visual Studio, you can connect any of the following to Azure Cosmos DB by using the Connected Services feature:
- .NET Framework console app
- ASP.NET Model-View-Controller (MVC) (.NET Framework)
- ASP.NET Core
- .NET Core (including console app, WPF, Windows Forms, class library)
- .NET Core Worker Role
- Azure Functions
- Universal Windows Platform App
- Xamarin
- Cordova
The connected service functionality adds all the needed references and connection code to your project, and modifies your configuration files appropriately.
Note
This topic applies to Visual Studio on Windows. For Visual Studio for Mac, see Connected services in Visual Studio for Mac.
Prerequisites
- Visual Studio with the Azure workload installed.
- A project of one of the supported types
- An Azure account. If you don't have an Azure account, activate your Azure benefits for Visual Studio subscribers or sign up for a free trial.
Connect to Azure Cosmos DB using Connected Services
Open your project in Visual Studio.
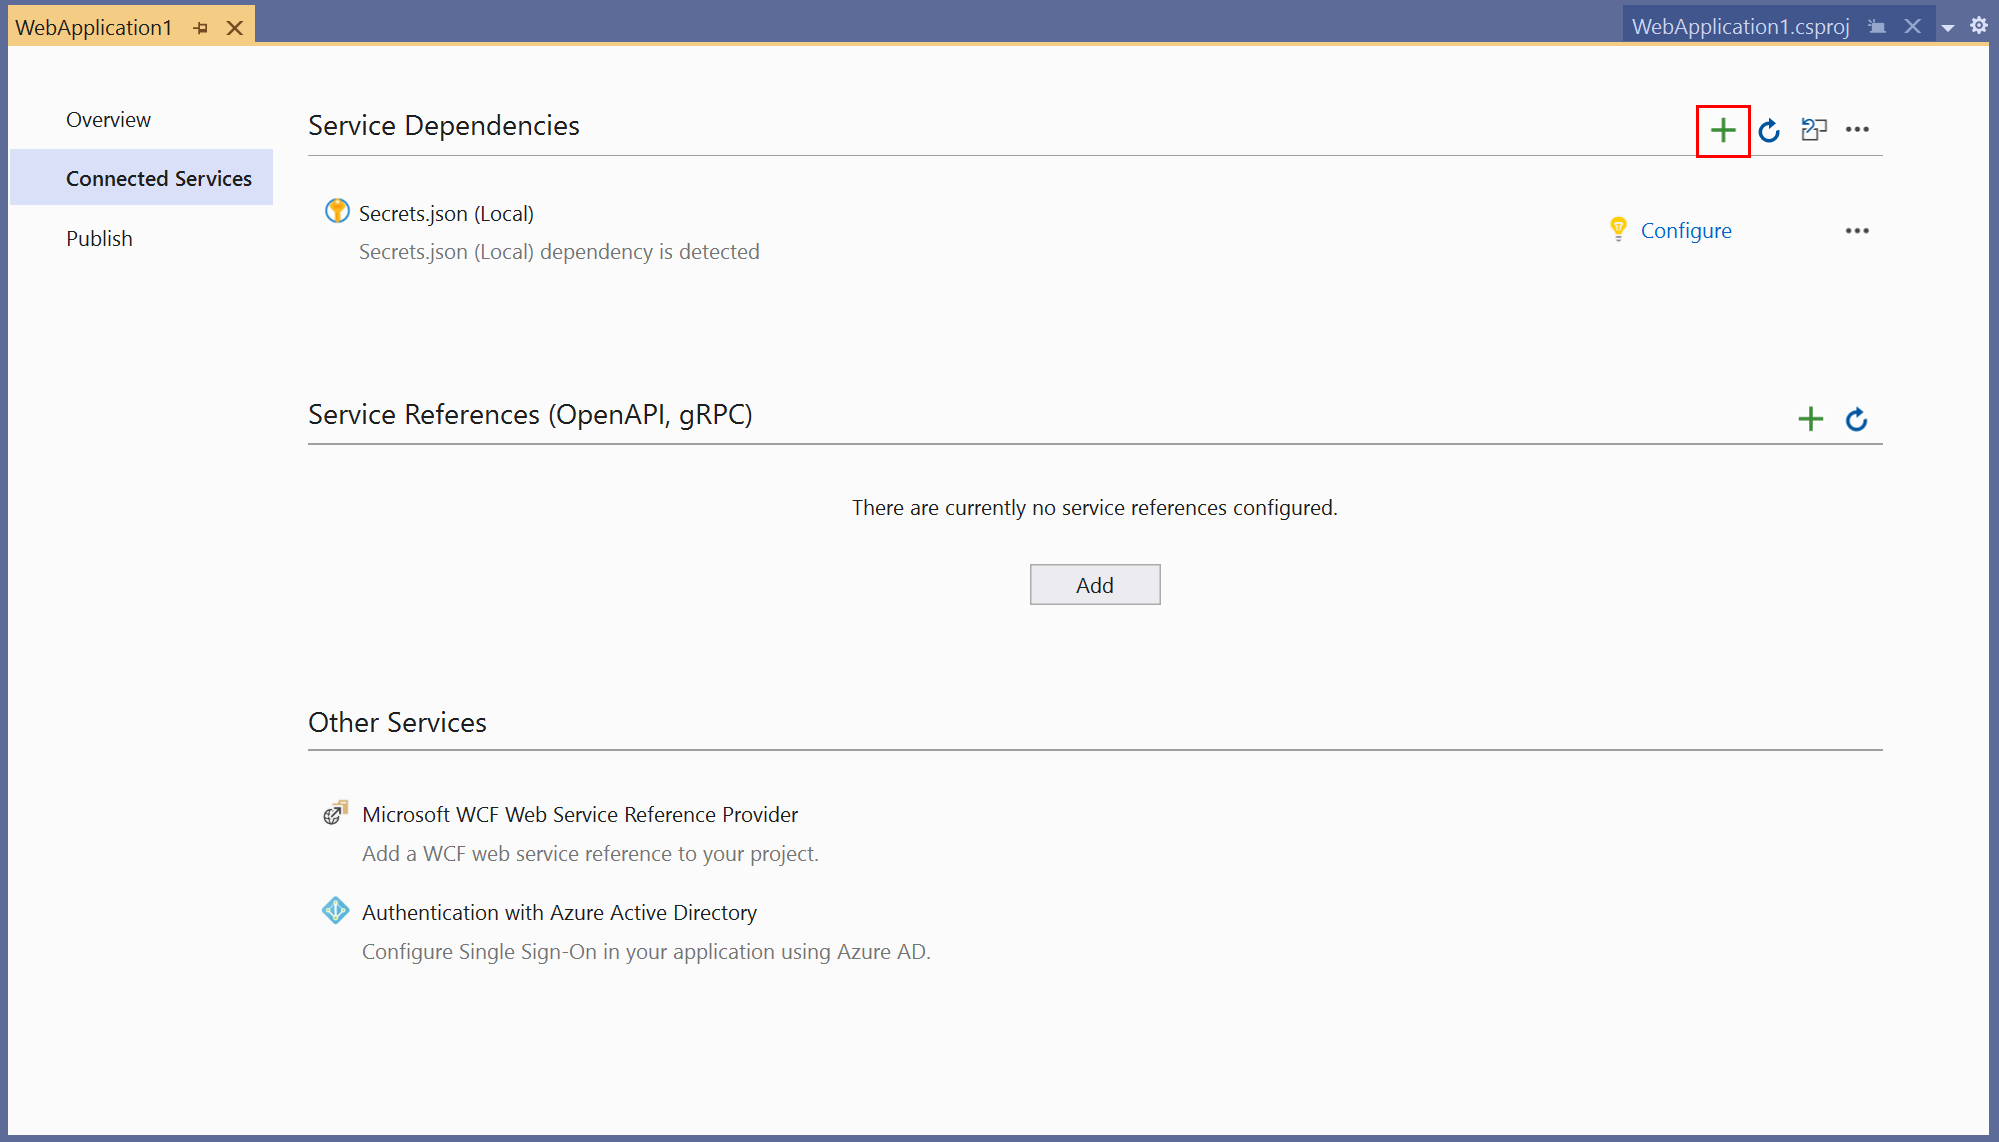
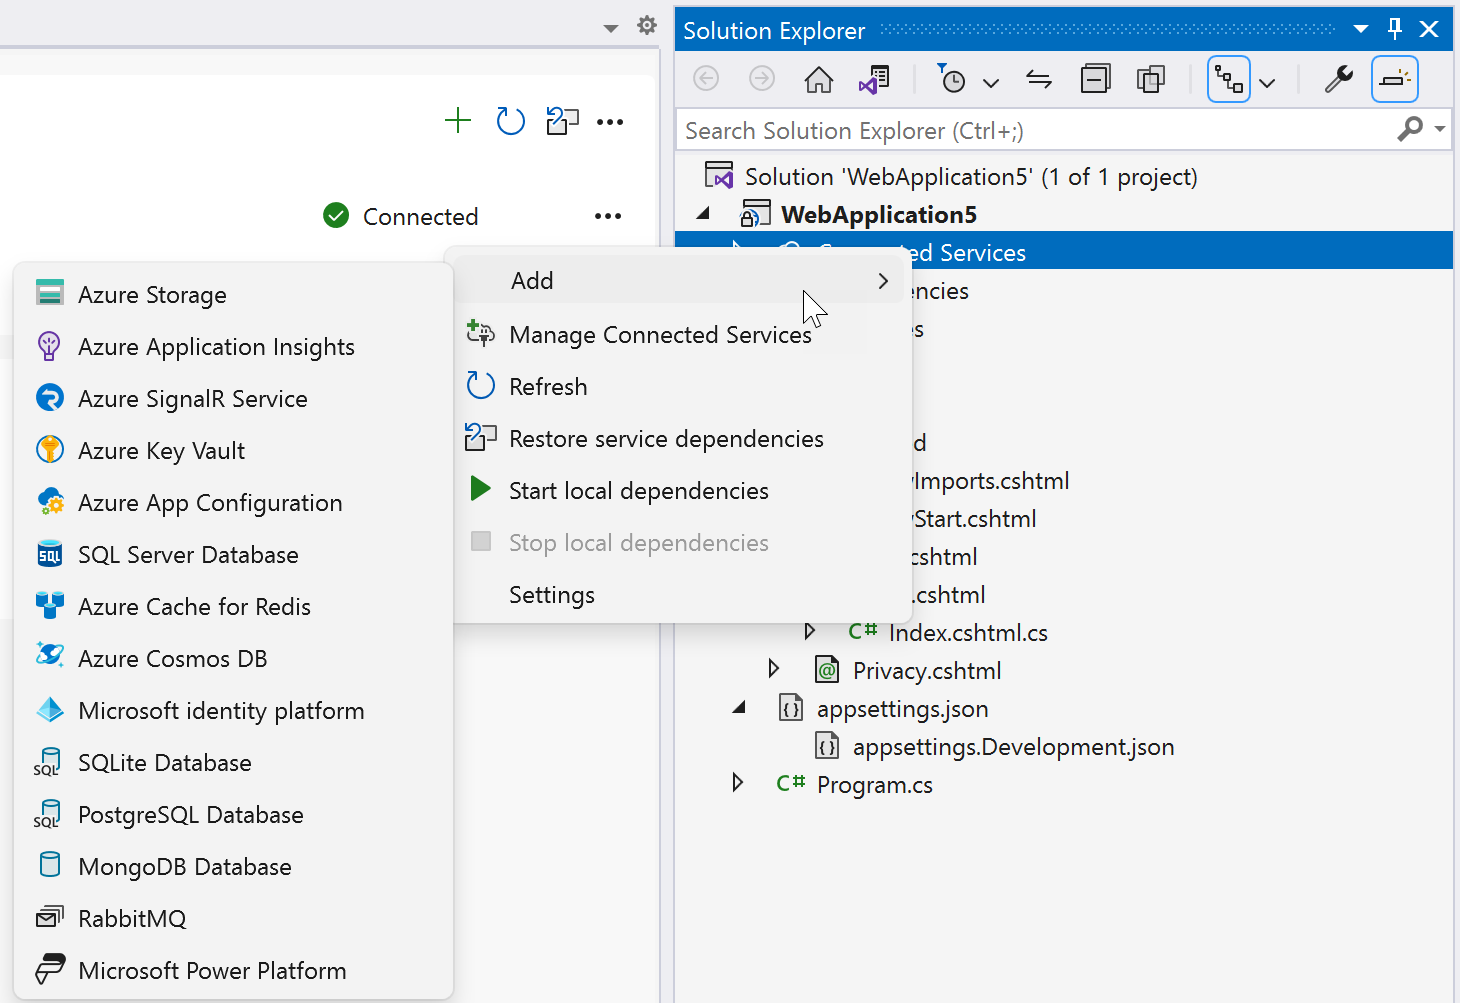
In Solution Explorer, right-click the Connected Services node, and, from the context menu, select Add Connected Service.
In the Connected Services tab, select the + icon for Service Dependencies.
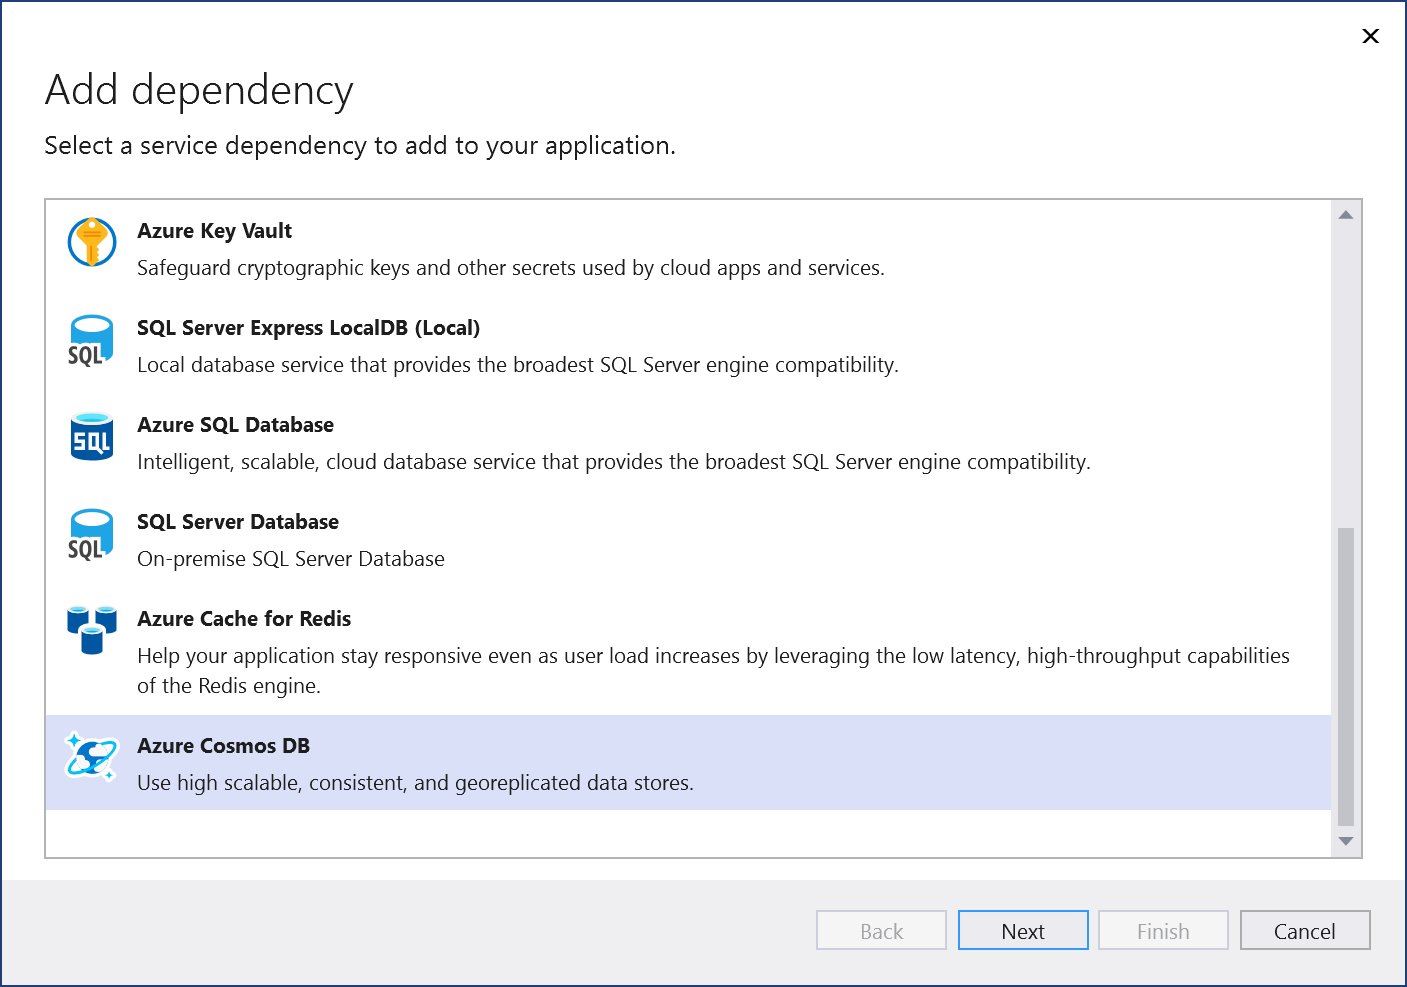
In the Add Dependency page, select Azure Cosmos DB.
If you aren't signed in already, sign in to your Azure account. If you don't have an Azure account, you can sign up for a free trial.
In the Azure Cosmos DB screen, select an existing Azure Cosmos DB, and select Next.
If you need to create a database, go to the next step. Otherwise, skip to step 7.
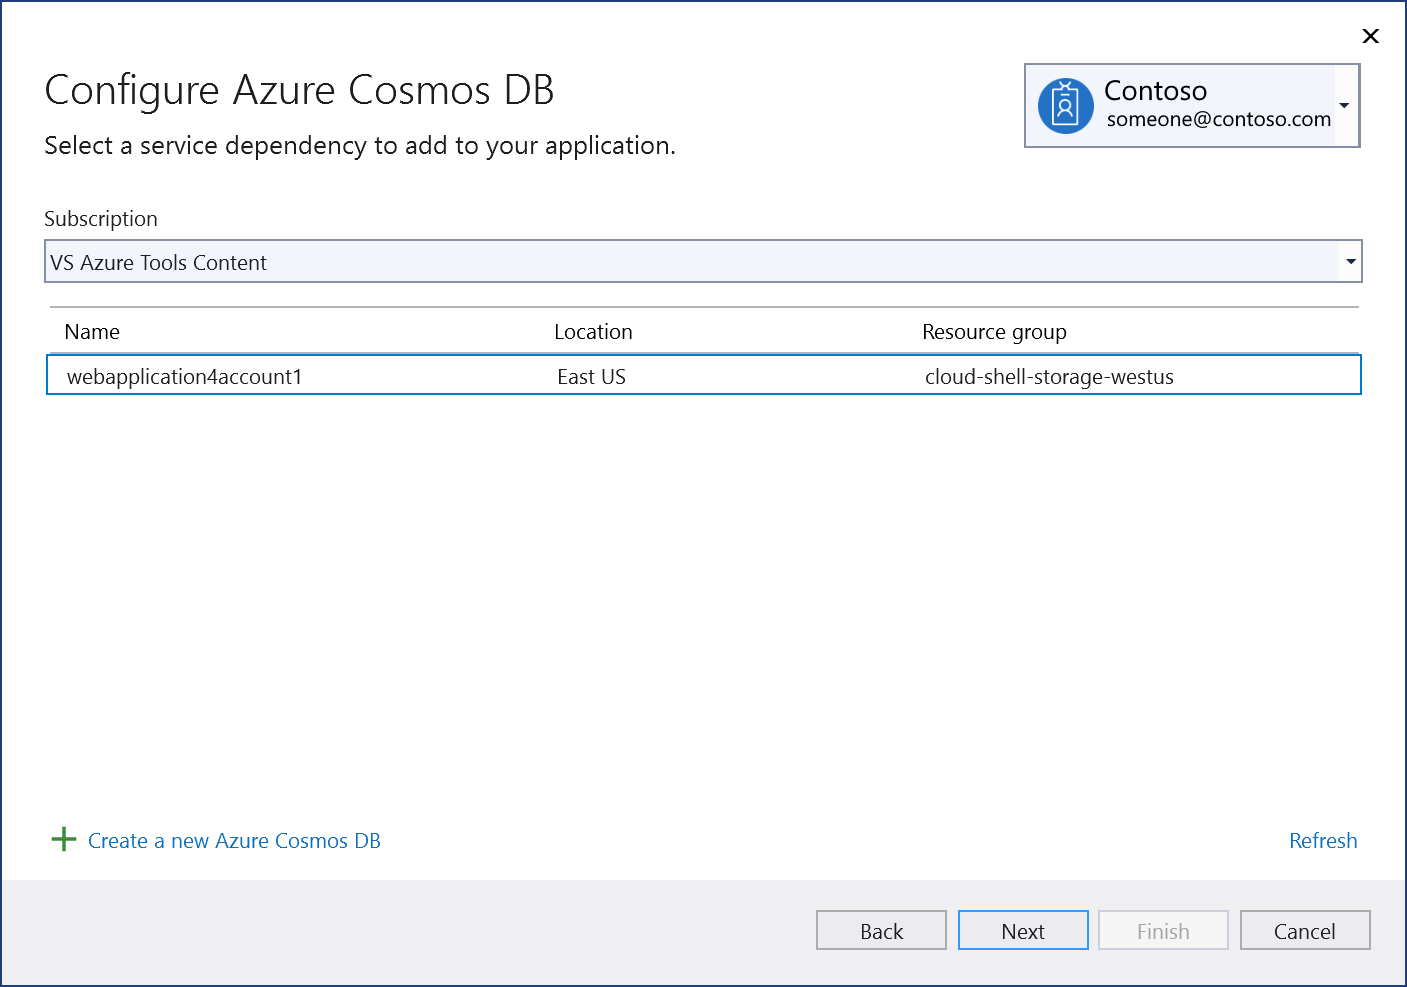
To create an Azure Cosmos DB:
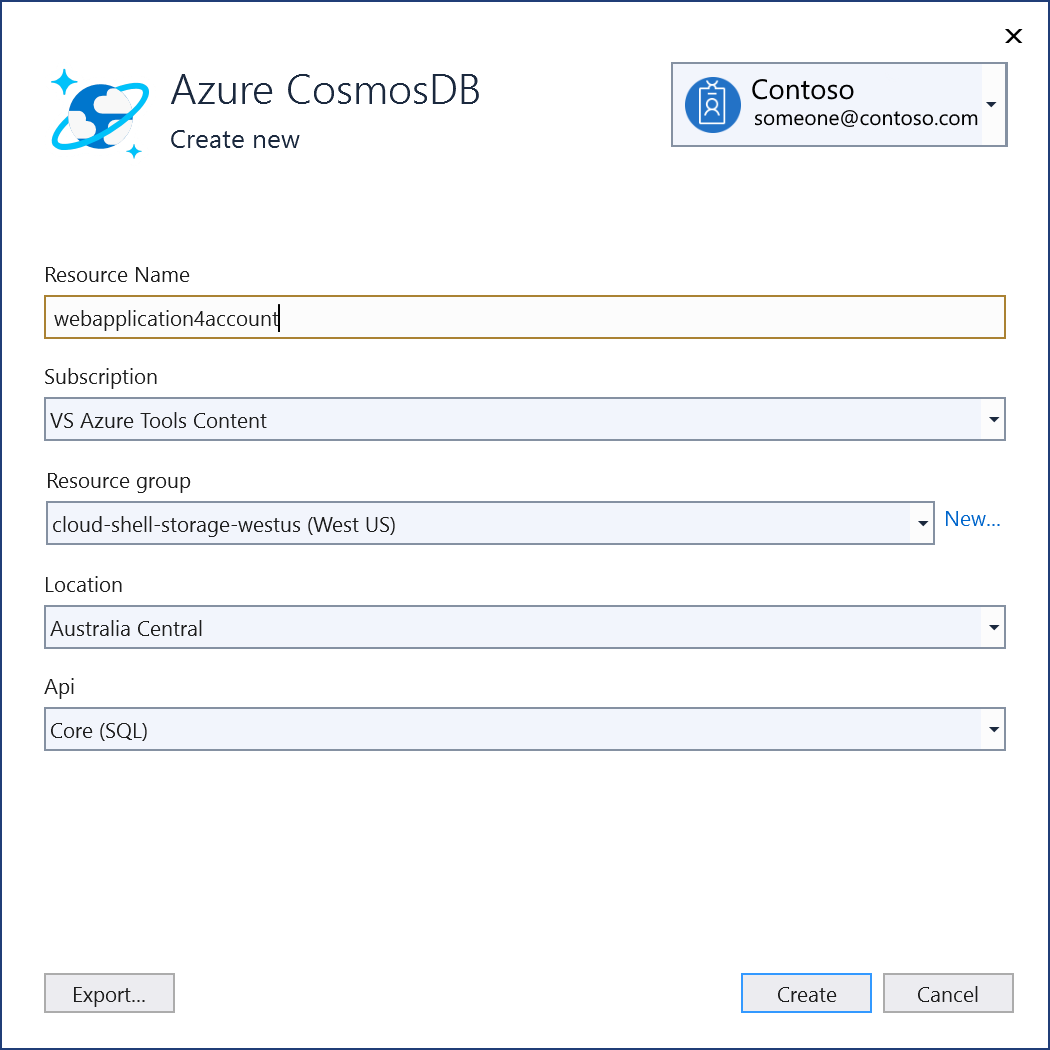
Select Create a new Azure Cosmos DB at the bottom of the screen.
Fill out the Azure Cosmos DB: Create new screen, and select Create.
When the Configure Azure Cosmos DB dialog is displayed, the new database appears in the list. Select the new database in the list, and select Next.
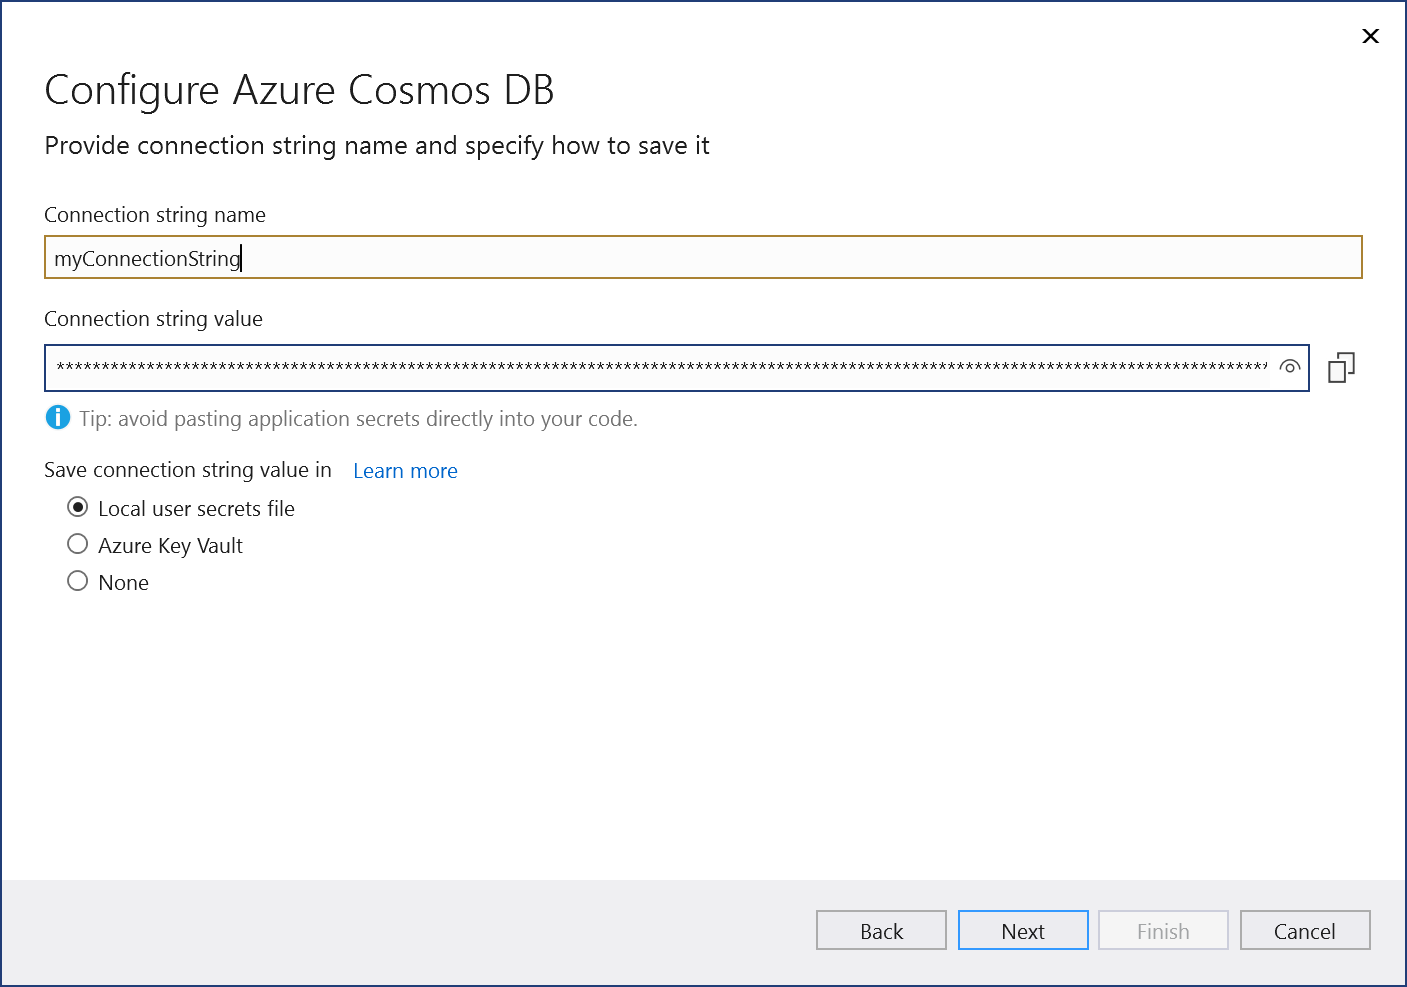
Enter a connection string name, and choose whether you want the connection string stored in a local secrets file, or in Azure Key Vault.
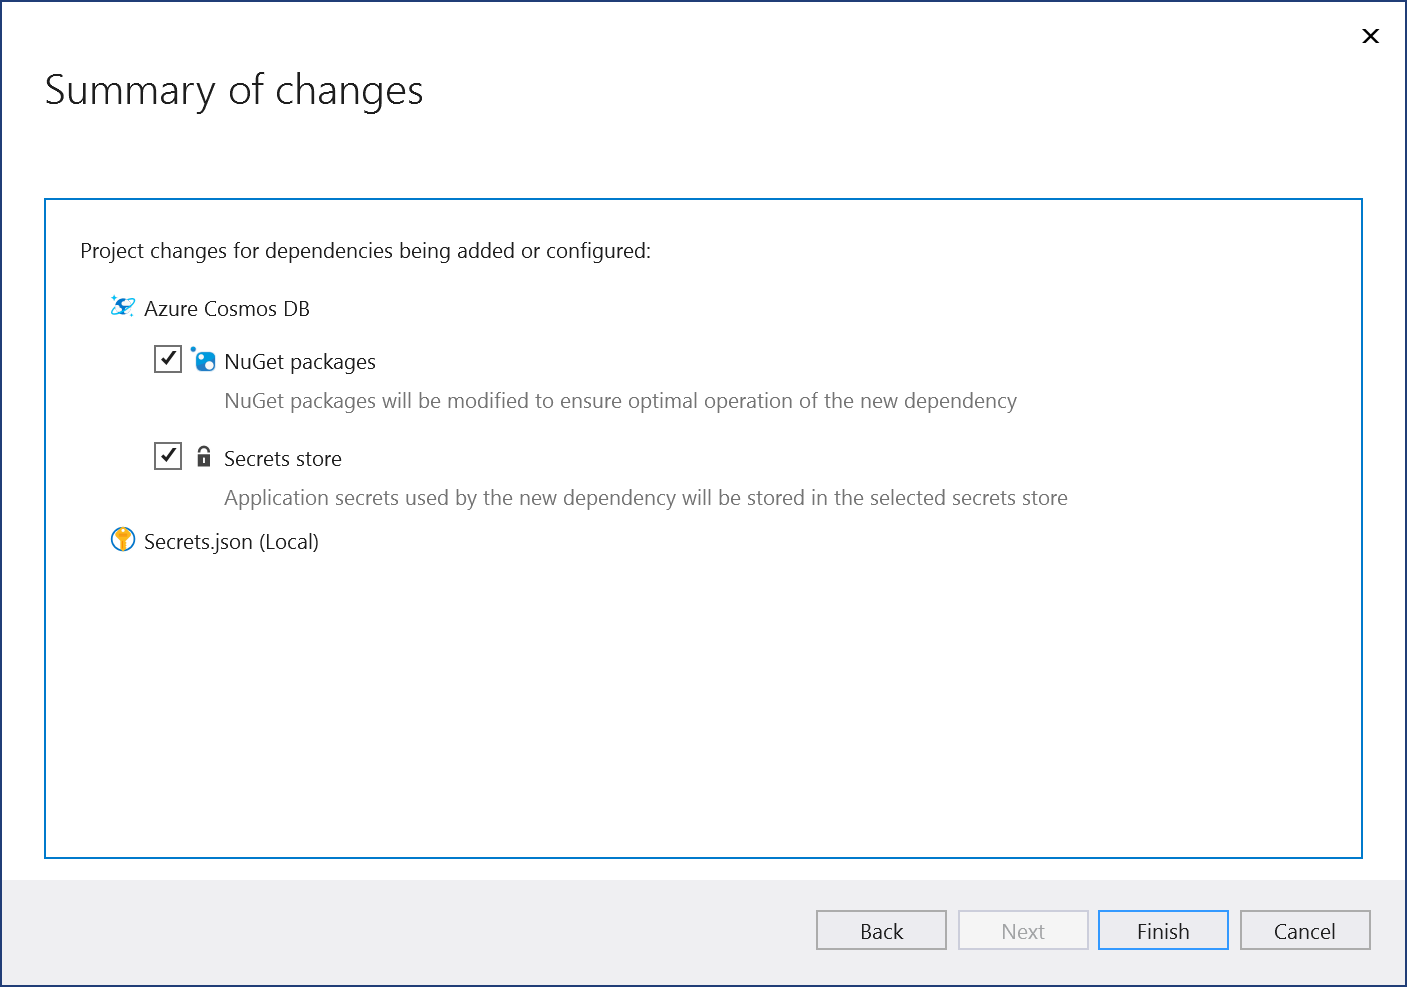
The Summary of changes screen shows all the modifications that will be made to your project if you complete the process. If the changes look OK, choose Finish.
The connection appears under the Service Dependencies section of the Connected Services tab.

Note
For .NET Framework projects, Connected Services UI is slightly different. To see the differences, compare to the Visual Studio 2019 version of this page.
Open your project in Visual Studio.
In Solution Explorer, right-click the Connected Services node, and, from the context menu, select Add to open the menu of available services.
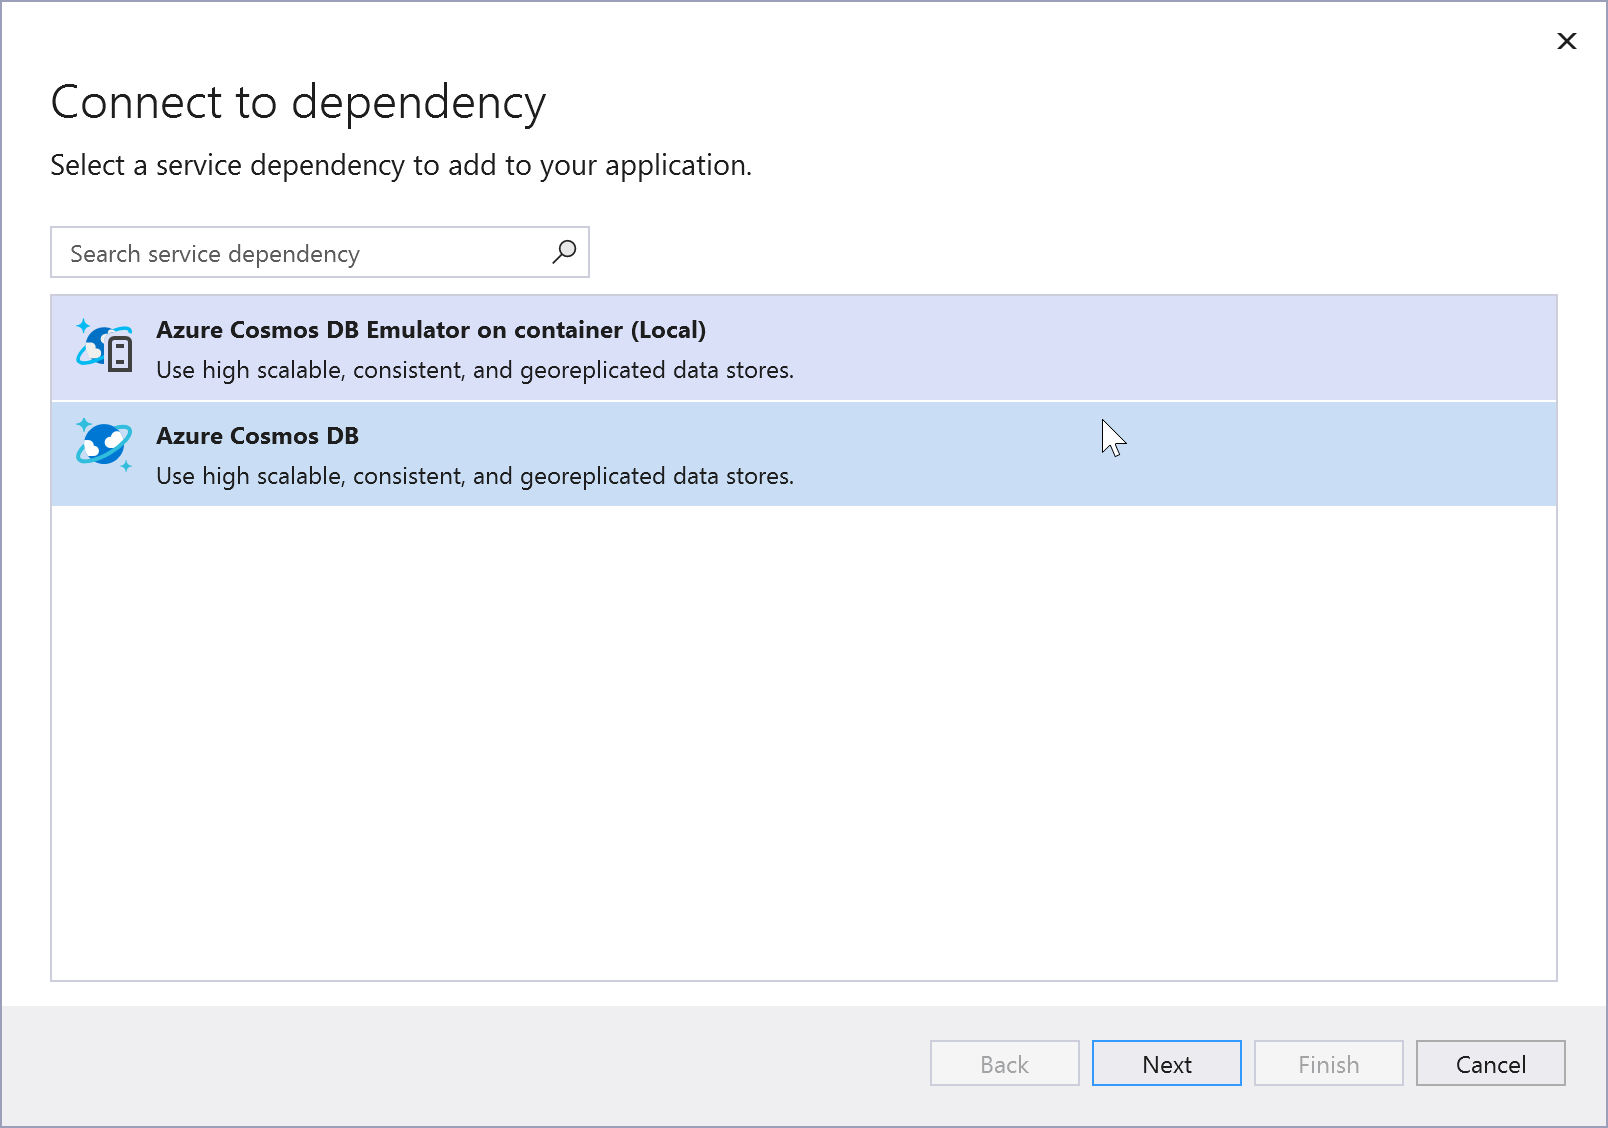
Choose Azure Cosmos DB. The Connect to dependency page appears. You should see two options, one for a local emulator, Azure Cosmos DB Emulator on container (Local), and one for connecting to the live Azure Cosmos DB service. You can reduce cost and simplify early development by starting with the local emulator. You can migrate to the live service later by repeating these steps and choosing the other option.
If you choose to use the Azure Cosmos DB Emulator, click Next to see the Summary of changes screen, which shows how your project is being modified. A NuGet package reference is added to your project and the connection code for the local emulator is added to your project. Once you click Finish on the last screen, the container for the emulator is created; you'll see the image download status in the output window.
If you want to connect to the Azure service, continue to the next step, or if you aren't signed in already, sign in to your Azure account before continuing. If you don't have an Azure account, you can sign up for a free trial.
In the Azure Cosmos DB screen, select an existing Azure Cosmos DB, and select Next.
If you need to create a database, go to the next step. Otherwise, skip to step 7.
To create an Azure Cosmos DB:
Select Create a new Azure Cosmos DB at the bottom of the screen.
Fill out the Azure Cosmos DB: Create new screen, and select Create.
When the Configure Azure Cosmos DB dialog is displayed, the new database appears in the list. Select the new database in the list, and select Next.
Enter a connection string name, and choose whether you want the connection string stored in a local secrets file, or in Azure Key Vault.
The connection string is added as a secret and made available in the app configuration. In ASP.NET Core apps, you can access this connection string by using the
Configurationproperty on theWebApplicationBuildobject.The Summary of changes screen shows all the modifications that will be made to your project if you complete the process. If the changes look OK, choose Finish.
In Solution Explorer, double-click on the Connected Services node to open the Connected Services tab. The connection appears under the Service Dependencies section:
If you click on the three dots next to the dependency you added, you can see various options such as Connect to reopen the wizard and change the connection. You can also click the three dots at the top right of the window to see options to start local dependencies, change settings, and more.
By default, the memory limit in the container is set to 2G, but normally, more memory is required to run Azure Cosmos DB. To fix this, navigate to the
.vs/sd/<GUID>/localfolder under your solution folder. In Windows Explorer, you might have to enable hidden files to see the.vsfolder. Find and open the file cosmosdb1.docker-compose.yml. Set a 4G or higher memory limit.mem_limit = 4GTo restart the container with the new setting, in the Service Dependencies section of the Connected Services tab, click on the three dots, and choose Start local dependencies.
Note
The local emulator for Azure Cosmos DB might reference a base image that uses a temporary license for Azure Cosmos DB. If the container doesn't start, check the Logs tab in the Containers* window for the Azure Cosmos DB container. If it mentions a PAL expiration issue, you need to get the latest base image for the local container. Run the following command from the console prompt: docker pull mcr.microsoft.com/cosmosdb/linux/azure-cosmos-emulator:latest. The license is periodically updated, and when it expires, refreshing to the newest container should solve the issue. You can view and report issues for the Azure Cosmos DB emulator at the Azure Cosmos DB emulator GitHub repo.
Next steps
Learn how to store secrets safely by following Safe storage of app secrets in development in ASP.NET Core. In particular, to read the connection string from the secrets store, you can add code as in Read the secret via the configuration API. The code might look like this, where builder is an instance of WebApplicationBuild that appears in Program.cs in ASP.NET Core project templates:
// New instance of CosmosClient class using a connection string
using CosmosClient client = new(
    connectionString: builder.Configuration["CosmosDBConnectionString"]
);
The CosmosClient provides access to Azure Cosmos DB functionality through its various methods. Once you have an instance of CosmosClient, you can create a NoSQL database by following this guide: Create a database in Azure Cosmos DB for NoSQL using .NET.
Related content
Feedback
Kommer snart: Under hela 2024 kommer vi att fasa ut GitHub-problem som feedbackmekanism för innehåll och ersätta det med ett nytt feedbacksystem. Mer information finns i: https://aka.ms/ContentUserFeedback.
Skicka och visa feedback för