Tutorial: Create a Word task pane add-in
In this tutorial, you'll create a Word task pane add-in that:
- Inserts a range of text
- Formats text
- Replaces text and inserts text in various locations
- Inserts images, HTML, and tables
- Creates and updates content controls
Tip
If you've already completed the Build your first Word task pane add-in quick start, and want to use that project as a starting point for this tutorial, go directly to the Insert a range of text section to start this tutorial.
If you want a completed version of this tutorial, head over to the Office Add-ins samples repo on GitHub.
Prerequisites
Node.js (the latest LTS version). Visit the Node.js site to download and install the right version for your operating system.
The latest version of Yeoman and the Yeoman generator for Office Add-ins. To install these tools globally, run the following command via the command prompt.
npm install -g yo generator-officeNote
Even if you've previously installed the Yeoman generator, we recommend you update your package to the latest version from npm.
Office connected to a Microsoft 365 subscription (including Office on the web).
Note
If you don't already have Office, you might qualify for a Microsoft 365 E5 developer subscription through the Microsoft 365 Developer Program; for details, see the FAQ. Alternatively, you can sign up for a 1-month free trial or purchase a Microsoft 365 plan.
Office connected to a Microsoft 365 subscription (including Office on the web).
Note
If you don't already have Office, you might qualify for a Microsoft 365 E5 developer subscription to use for development through the Microsoft 365 Developer Program; for details, see the FAQ. Alternatively, you can sign up for a 1-month free trial or purchase a Microsoft 365 plan.
Create your add-in project
Run the following command to create an add-in project using the Yeoman generator. A folder that contains the project will be added to the current directory.
yo office
Note
When you run the yo office command, you may receive prompts about the data collection policies of Yeoman and the Office Add-in CLI tools. Use the information that's provided to respond to the prompts as you see fit.
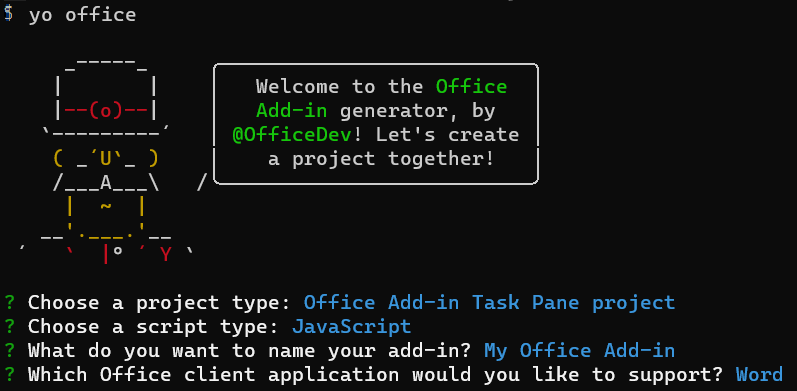
When prompted, provide the following information to create your add-in project.
- Choose a project type:
Office Add-in Task Pane project - Choose a script type:
JavaScript - What do you want to name your add-in?
My Office Add-in - Which Office client application would you like to support?
Word
After you complete the wizard, the generator creates the project and installs supporting Node components.
Note
If you're using Node.js version 20.0.0 or later, you may see a warning when the generator runs the installation that you have an unsupported engine. We're working on a fix for this. In the meantime, the warning doesn't affect the generator or the project you generate, so it can be ignored.
Tip
You can ignore the next steps guidance that the Yeoman generator provides after the add-in project's been created. The step-by-step instructions within this article provide all of the guidance you'll need to complete this tutorial.
Insert a range of text
In this step of the tutorial, you'll programmatically test that your add-in supports the user's current version of Word, and then insert a paragraph into the document.
Code the add-in
Open the project in your code editor.
Open the file ./src/taskpane/taskpane.html. This file contains the HTML markup for the task pane.
Locate the
<main>element and delete all lines that appear after the opening<main>tag and before the closing</main>tag.Add the following markup immediately after the opening
<main>tag.<button class="ms-Button" id="insert-paragraph">Insert Paragraph</button><br/><br/>Open the file ./src/taskpane/taskpane.js. This file contains the Office JavaScript API code that facilitates interaction between the task pane and the Office client application.
Remove all references to the
runbutton and therun()function by doing the following:Locate and delete the line
document.getElementById("run").onclick = run;.Locate and delete the entire
run()function.
Within the
Office.onReadyfunction call, locate the lineif (info.host === Office.HostType.Word) {and add the following code immediately after that line. Note:- This code adds an event handler for the
insert-paragraphbutton. - The
insertParagraphfunction is wrapped in a call totryCatch(both functions will be added in the next step). This allows any errors generated by the Office JavaScript API layer to be handled separately from your service code.
// Assign event handlers and other initialization logic. document.getElementById("insert-paragraph").onclick = () => tryCatch(insertParagraph);- This code adds an event handler for the
Add the following functions to the end of the file. Note:
Your Word.js business logic will be added to the function passed to
Word.run. This logic doesn't execute immediately. Instead, it's added to a queue of pending commands.The
context.syncmethod sends all queued commands to Word for execution.The
tryCatchfunction will be used by all the functions interacting with the workbook from the task pane. Catching Office JavaScript errors in this fashion is a convenient way to generically handle uncaught errors.
async function insertParagraph() {
    await Word.run(async (context) => {

        // TODO1: Queue commands to insert a paragraph into the document.

        await context.sync();
    });
}

/** Default helper for invoking an action and handling errors. */
async function tryCatch(callback) {
    try {
        await callback();
    } catch (error) {
        // Note: In a production add-in, you'd want to notify the user through your add-in's UI.
        console.error(error);
    }
}
Within the
insertParagraph()function, replaceTODO1with the following code. Note:The first parameter to the
insertParagraphmethod is the text for the new paragraph.The second parameter is the location within the body where the paragraph will be inserted. Other options for insert paragraph, when the parent object is the body, are "End" and "Replace".
const docBody = context.document.body;
docBody.insertParagraph("Office has several versions, including Office 2016, Microsoft 365 subscription, and Office on the web.",
                        Word.InsertLocation.start);
Save all your changes to the project.
Test the add-in
Complete the following steps to start the local web server and sideload your add-in.
Note
Office Add-ins should use HTTPS, not HTTP, even while you're developing. If you're prompted to install a certificate after you run one of the following commands, accept the prompt to install the certificate that the Yeoman generator provides. You may also have to run your command prompt or terminal as an administrator for the changes to be made.
Tip
If you're testing your add-in on Mac, run the following command in the root directory of your project before proceeding. When you run this command, the local web server starts.
npm run dev-serverTo test your add-in in Word, run the following command in the root directory of your project. This starts the local web server (if it isn't already running) and opens Word with your add-in loaded.
npm startTo test your add-in in Word on the web, run the following command in the root directory of your project. When you run this command, the local web server starts. Replace "{url}" with the URL of a Word document on your OneDrive or a SharePoint library to which you have permissions.
Note
If you are developing on a Mac, enclose the
{url}in single quotation marks. Do not do this on Windows.npm run start:web -- --document {url}The following are examples.
npm run start:web -- --document https://contoso.sharepoint.com/:t:/g/EZGxP7ksiE5DuxvY638G798BpuhwluxCMfF1WZQj3VYhYQ?e=F4QM1Rnpm run start:web -- --document https://1drv.ms/x/s!jkcH7spkM4EGgcZUgqthk4IK3NOypVw?e=Z6G1qpnpm run start:web -- --document https://contoso-my.sharepoint-df.com/:t:/p/user/EQda453DNTpFnl1bFPhOVR0BwlrzetbXvnaRYii2lDr_oQ?e=RSccmNP
If your add-in doesn't sideload in the document, manually sideload it by following the instructions in Manually sideload add-ins to Office on the web.
In Word, if the "My Office Add-in" task pane isn't already open, choose the Home tab, and then choose the Show Taskpane button on the ribbon to open the add-in task pane.
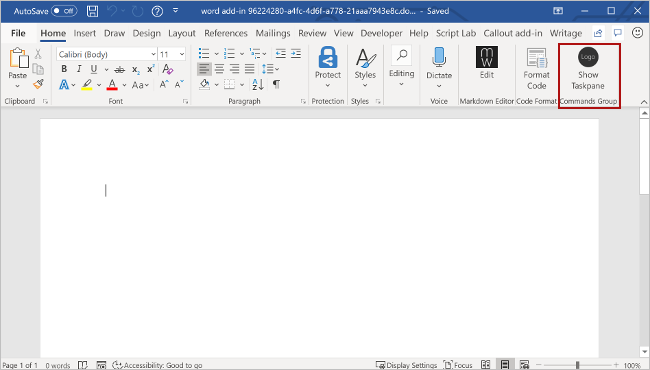
In the task pane, choose the Insert Paragraph button.
Make a change in the paragraph.
Choose the Insert Paragraph button again. Note that the new paragraph appears above the previous one because the
insertParagraphmethod is inserting at the start of the document's body.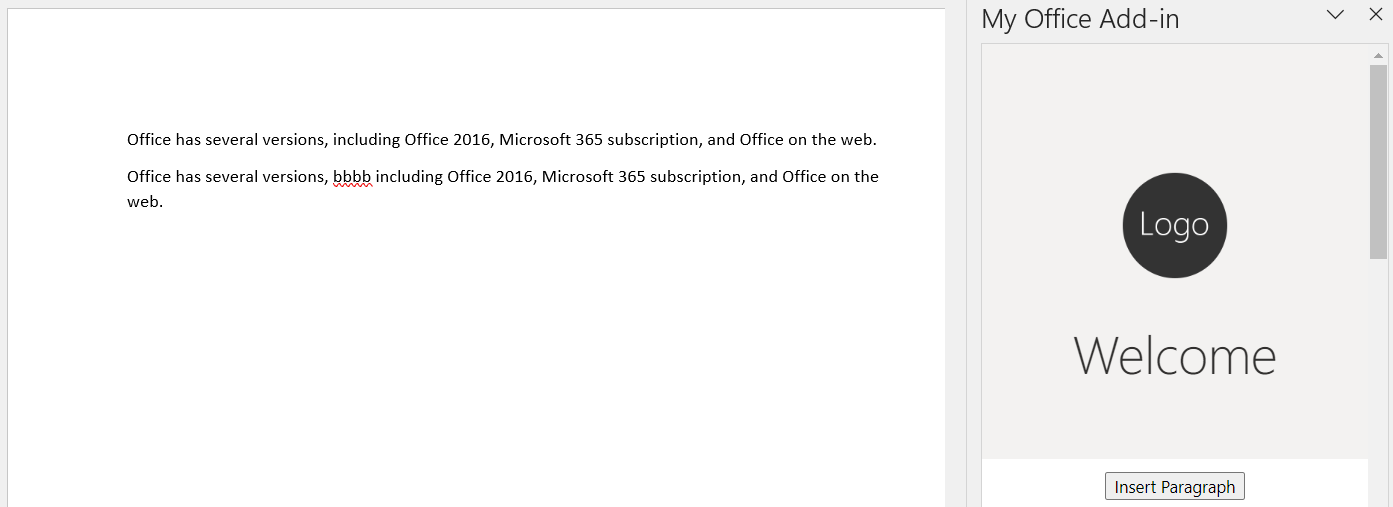
Format text
In this step of the tutorial, you'll apply a built-in style to text, apply a custom style to text, and change the font of text.
Apply a built-in style to text
Open the file ./src/taskpane/taskpane.html.
Locate the
<button>element for theinsert-paragraphbutton, and add the following markup after that line.<button class="ms-Button" id="apply-style">Apply Style</button><br/><br/>Open the file ./src/taskpane/taskpane.js.
Within the
Office.onReadyfunction call, locate the line that assigns a click handler to theinsert-paragraphbutton, and add the following code after that line.document.getElementById("apply-style").onclick = () => tryCatch(applyStyle);Add the following function to the end of the file.
async function applyStyle() {
    await Word.run(async (context) => {

        // TODO1: Queue commands to style text.

        await context.sync();
    });
}
Within the
applyStyle()function, replaceTODO1with the following code. Note that the code applies a style to a paragraph, but styles can also be applied to ranges of text.const firstParagraph = context.document.body.paragraphs.getFirst(); firstParagraph.styleBuiltIn = Word.Style.intenseReference;
Apply a custom style to text
Open the file ./src/taskpane/taskpane.html.
Locate the
<button>element for theapply-stylebutton, and add the following markup after that line.<button class="ms-Button" id="apply-custom-style">Apply Custom Style</button><br/><br/>Open the file ./src/taskpane/taskpane.js.
Within the
Office.onReadyfunction call, locate the line that assigns a click handler to theapply-stylebutton, and add the following code after that line.document.getElementById("apply-custom-style").onclick = () => tryCatch(applyCustomStyle);Add the following function to the end of the file.
async function applyCustomStyle() {
    await Word.run(async (context) => {

        // TODO1: Queue commands to apply the custom style.

        await context.sync();
    });
}
Within the
applyCustomStyle()function, replaceTODO1with the following code. Note that the code applies a custom style that does not exist yet. You'll create a style with the name MyCustomStyle in the Test the add-in step.const lastParagraph = context.document.body.paragraphs.getLast(); lastParagraph.style = "MyCustomStyle";Save all your changes to the project.
Change the font of text
Open the file ./src/taskpane/taskpane.html.
Locate the
<button>element for theapply-custom-stylebutton, and add the following markup after that line.<button class="ms-Button" id="change-font">Change Font</button><br/><br/>Open the file ./src/taskpane/taskpane.js.
Within the
Office.onReadyfunction call, locate the line that assigns a click handler to theapply-custom-stylebutton, and add the following code after that line.document.getElementById("change-font").onclick = () => tryCatch(changeFont);Add the following function to the end of the file.
async function changeFont() {
    await Word.run(async (context) => {

        // TODO1: Queue commands to apply a different font.

        await context.sync();
    });
}
Within the
changeFont()function, replaceTODO1with the following code. Note that the code gets a reference to the second paragraph by using theParagraphCollection.getFirstmethod chained to theParagraph.getNextmethod.const secondParagraph = context.document.body.paragraphs.getFirst().getNext(); secondParagraph.font.set({ name: "Courier New", bold: true, size: 18 });Save all your changes to the project.
Test the add-in
If the local web server is already running and your add-in is already loaded in Word, proceed to step 2. Otherwise, start the local web server and sideload your add-in.
To test your add-in in Word, run the following command in the root directory of your project. This starts the local web server (if it isn't already running) and opens Word with your add-in loaded.
npm startTo test your add-in in Word on the web, run the following command in the root directory of your project. When you run this command, the local web server starts. Replace "{url}" with the URL of a Word document on your OneDrive or a SharePoint library to which you have permissions.
Note
If you are developing on a Mac, enclose the
{url}in single quotation marks. Do not do this on Windows.npm run start:web -- --document {url}The following are examples.
npm run start:web -- --document https://contoso.sharepoint.com/:t:/g/EZGxP7ksiE5DuxvY638G798BpuhwluxCMfF1WZQj3VYhYQ?e=F4QM1Rnpm run start:web -- --document https://1drv.ms/x/s!jkcH7spkM4EGgcZUgqthk4IK3NOypVw?e=Z6G1qpnpm run start:web -- --document https://contoso-my.sharepoint-df.com/:t:/p/user/EQda453DNTpFnl1bFPhOVR0BwlrzetbXvnaRYii2lDr_oQ?e=RSccmNP
If your add-in doesn't sideload in the document, manually sideload it by following the instructions in Manually sideload add-ins to Office on the web.
If the add-in task pane isn't already open in Word, go to the Home tab and choose the Show Taskpane button on the ribbon to open it.
Be sure there are at least three paragraphs in the document. You can choose the Insert Paragraph button three times. Check carefully that there's no blank paragraph at the end of the document. If there is, delete it.
In Word, create a custom style named "MyCustomStyle". It can have any formatting that you want.
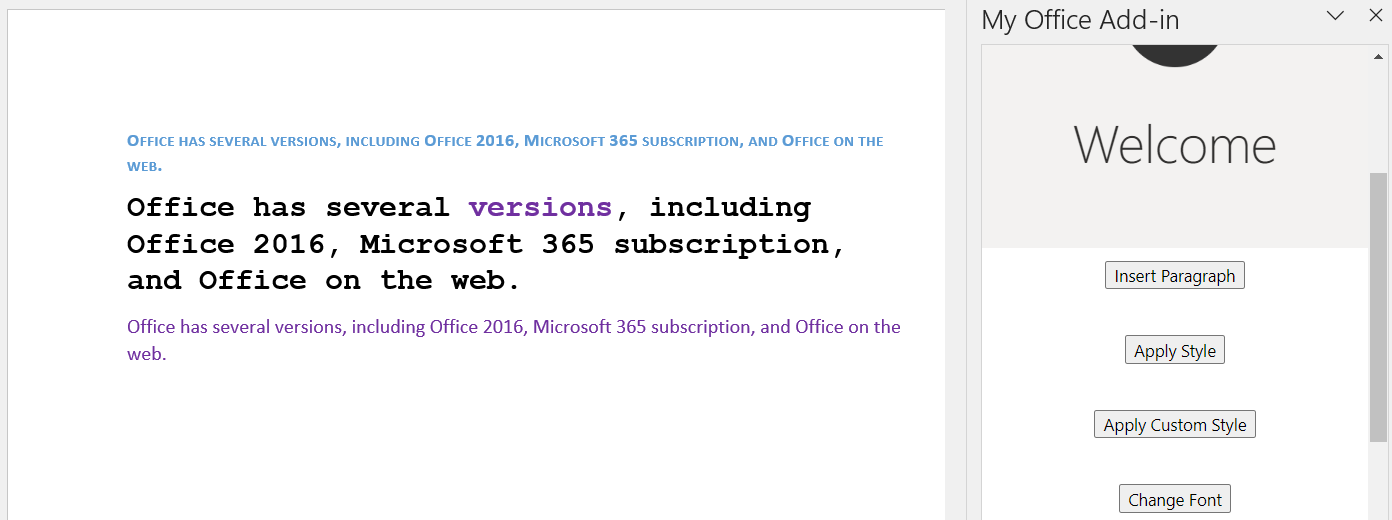
Choose the Apply Style button. The first paragraph will be styled with the built-in style Intense Reference.
Choose the Apply Custom Style button. The last paragraph will be styled with your custom style. (If nothing seems to happen, the last paragraph might be blank. If so, add some text to it.)
Choose the Change Font button. The font of the second paragraph changes to 18 pt., bold, Courier New.
Replace text and insert text
In this step of the tutorial, you'll add text inside and outside of selected ranges of text, and replace the text of a selected range.
Add text inside a range
Open the file ./src/taskpane/taskpane.html.
Locate the
<button>element for thechange-fontbutton, and add the following markup after that line.<button class="ms-Button" id="insert-text-into-range">Insert Abbreviation</button><br/><br/>Open the file ./src/taskpane/taskpane.js.
Within the
Office.onReadyfunction call, locate the line that assigns a click handler to thechange-fontbutton, and add the following code after that line.document.getElementById("insert-text-into-range").onclick = () => tryCatch(insertTextIntoRange);Add the following function to the end of the file.
async function insertTextIntoRange() {
    await Word.run(async (context) => {

        // TODO1: Queue commands to insert text into a selected range.

        // TODO2: Load the text of the range and sync so that the
        //        current range text can be read.

        // TODO3: Queue commands to repeat the text of the original
        //        range at the end of the document.

        await context.sync();
    });
}
Within the
insertTextIntoRange()function, replaceTODO1with the following code. Note:The function is intended to insert the abbreviation ["(M365)"] into the end of the Range whose text is "Microsoft 365". It makes a simplifying assumption that the string is present and the user has selected it.
The first parameter of the
Range.insertTextmethod is the string to insert into theRangeobject.The second parameter specifies where in the range the additional text should be inserted. Besides "End", the other possible options are "Start", "Before", "After", and "Replace".
The difference between "End" and "After" is that "End" inserts the new text inside the end of the existing range, but "After" creates a new range with the string and inserts the new range after the existing range. Similarly, "Start" inserts text inside the beginning of the existing range and "Before" inserts a new range. "Replace" replaces the text of the existing range with the string in the first parameter.
You saw in an earlier stage of the tutorial that the
insert*methods of the body object don't have the "Before" and "After" options. This is because you can't put content outside of the document's body.
const doc = context.document;
const originalRange = doc.getSelection();
originalRange.insertText(" (M365)", Word.InsertLocation.end);
We'll skip over
TODO2until the next section. Within theinsertTextIntoRange()function, replaceTODO3with the following code. This code is similar to the code you created in the first stage of the tutorial, except that now you are inserting a new paragraph at the end of the document instead of at the start. This new paragraph will demonstrate that the new text is now part of the original range.doc.body.insertParagraph("Original range: " + originalRange.text, Word.InsertLocation.end);
Add code to fetch document properties into the task pane's script objects
In all previous functions in this tutorial, you queued commands to write to the Office document. Each function ended with a call to the context.sync() method which sends the queued commands to the document to be executed. But the code you added in the last step calls the originalRange.text property, and this is a significant difference from the earlier functions you wrote, because the originalRange object is only a proxy object that exists in your task pane's script. It doesn't know what the actual text of the range in the document is, so its text property can't have a real value. It's necessary to first fetch the text value of the range from the document and use it to set the value of originalRange.text. Only then can originalRange.text be called without causing an exception to be thrown. This fetching process has three steps.
Queue a command to load (that is, fetch) the properties that your code needs to read.
Call the context object's
syncmethod to send the queued command to the document for execution and return the requested information.Because the
syncmethod is asynchronous, ensure that it has completed before your code calls the properties that were fetched.
The following step must be completed whenever your code needs to read information from the Office document.
Within the
insertTextIntoRange()function, replaceTODO2with the following code.originalRange.load("text"); await context.sync();
When you're done, the entire function should look like the following:
async function insertTextIntoRange() {
await Word.run(async (context) => {
const doc = context.document;
const originalRange = doc.getSelection();
originalRange.insertText(" (M365)", Word.InsertLocation.end);
originalRange.load("text");
await context.sync();
doc.body.insertParagraph("Original range: " + originalRange.text, Word.InsertLocation.end);
await context.sync();
});
}
Add text between ranges
Open the file ./src/taskpane/taskpane.html.
Locate the
<button>element for theinsert-text-into-rangebutton, and add the following markup after that line.<button class="ms-Button" id="insert-text-outside-range">Add Version Info</button><br/><br/>Open the file ./src/taskpane/taskpane.js.
Within the
Office.onReadyfunction call, locate the line that assigns a click handler to theinsert-text-into-rangebutton, and add the following code after that line.document.getElementById("insert-text-outside-range").onclick = () => tryCatch(insertTextBeforeRange);Add the following function to the end of the file.
async function insertTextBeforeRange() {
    await Word.run(async (context) => {

        // TODO1: Queue commands to insert a new range before the
        //        selected range.

        // TODO2: Load the text of the original range and sync so that the
        //        range text can be read and inserted.

    });
}
Within the
insertTextBeforeRange()function, replaceTODO1with the following code. Note:The function is intended to add a range whose text is "Office 2019, " before the range with text "Microsoft 365". It makes an assumption that the string is present and the user has selected it.
The first parameter of the
Range.insertTextmethod is the string to add.The second parameter specifies where in the range the additional text should be inserted. For more details about the location options, see the previous discussion of the
insertTextIntoRangefunction.
const doc = context.document;
const originalRange = doc.getSelection();
originalRange.insertText("Office 2019, ", Word.InsertLocation.before);
Within the
insertTextBeforeRange()function, replaceTODO2with the following code.originalRange.load("text"); await context.sync(); // TODO3: Queue commands to insert the original range as a // paragraph at the end of the document. // TODO4: Make a final call of context.sync here and ensure // that it runs after the insertParagraph has been queued.Replace
TODO3with the following code. This new paragraph will demonstrate the fact that the new text is not part of the original selected range. The original range still has only the text it had when it was selected.doc.body.insertParagraph("Current text of original range: " + originalRange.text, Word.InsertLocation.end);Replace
TODO4with the following code.await context.sync();
Replace the text of a range
Open the file ./src/taskpane/taskpane.html.
Locate the
<button>element for theinsert-text-outside-rangebutton, and add the following markup after that line.<button class="ms-Button" id="replace-text">Change Quantity Term</button><br/><br/>Open the file ./src/taskpane/taskpane.js.
Within the
Office.onReadyfunction call, locate the line that assigns a click handler to theinsert-text-outside-rangebutton, and add the following code after that line.document.getElementById("replace-text").onclick = () => tryCatch(replaceText);Add the following function to the end of the file.
async function replaceText() {
    await Word.run(async (context) => {

        // TODO1: Queue commands to replace the text.

        await context.sync();
    });
}
Within the
replaceText()function, replaceTODO1with the following code. Note that the function is intended to replace the string "several" with the string "many". It makes a simplifying assumption that the string is present and the user has selected it.const doc = context.document; const originalRange = doc.getSelection(); originalRange.insertText("many", Word.InsertLocation.replace);Save all your changes to the project.
Test the add-in
If the local web server is already running and your add-in is already loaded in Word, proceed to step 2. Otherwise, start the local web server and sideload your add-in.
To test your add-in in Word, run the following command in the root directory of your project. This starts the local web server (if it isn't already running) and opens Word with your add-in loaded.
npm startTo test your add-in in Word on the web, run the following command in the root directory of your project. When you run this command, the local web server starts. Replace "{url}" with the URL of a Word document on your OneDrive or a SharePoint library to which you have permissions.
Note
If you are developing on a Mac, enclose the
{url}in single quotation marks. Do not do this on Windows.npm run start:web -- --document {url}The following are examples.
npm run start:web -- --document https://contoso.sharepoint.com/:t:/g/EZGxP7ksiE5DuxvY638G798BpuhwluxCMfF1WZQj3VYhYQ?e=F4QM1Rnpm run start:web -- --document https://1drv.ms/x/s!jkcH7spkM4EGgcZUgqthk4IK3NOypVw?e=Z6G1qpnpm run start:web -- --document https://contoso-my.sharepoint-df.com/:t:/p/user/EQda453DNTpFnl1bFPhOVR0BwlrzetbXvnaRYii2lDr_oQ?e=RSccmNP
If your add-in doesn't sideload in the document, manually sideload it by following the instructions in Manually sideload add-ins to Office on the web.
If the add-in task pane isn't already open in Word, go to the Home tab and choose the Show Taskpane button on the ribbon to open it.
In the task pane, choose the Insert Paragraph button to ensure that there's a paragraph at the start of the document.
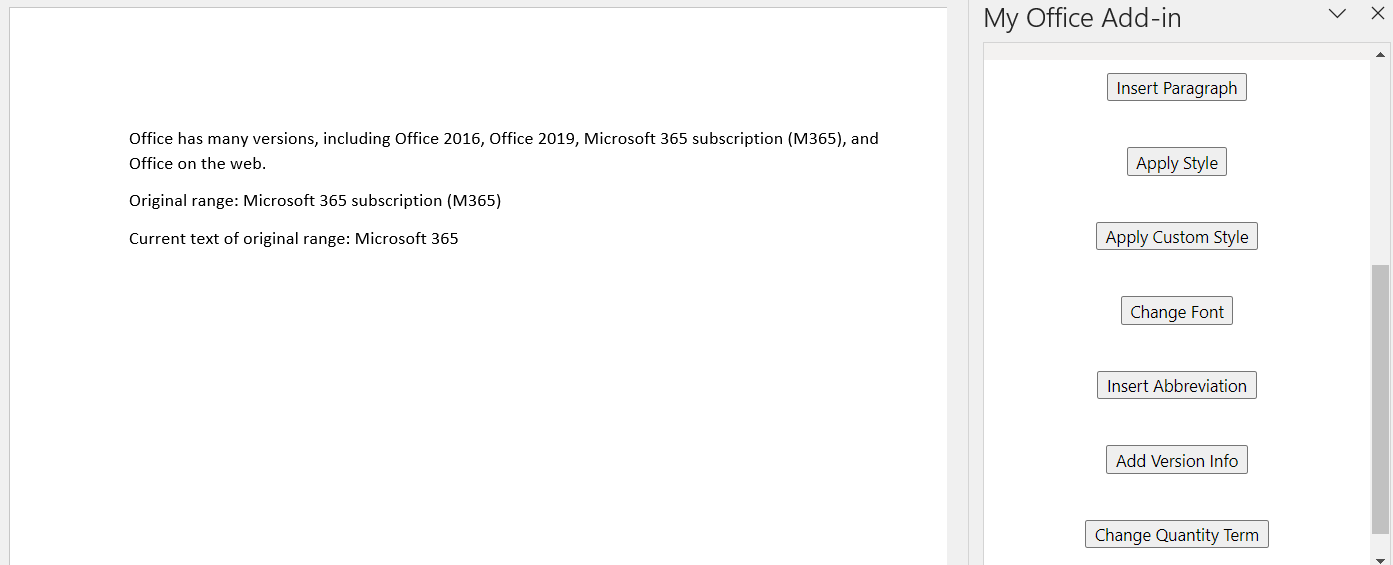
Within the document, select the phrase "Microsoft 365 subscription". Be careful not to include the preceding space or following comma in the selection.
Choose the Insert Abbreviation button. Note that " (M365)" is added. Note also that at the bottom of the document a new paragraph is added with the entire expanded text because the new string was added to the existing range.
Within the document, select the phrase "Microsoft 365". Be careful not to include the preceding or following space in the selection.
Choose the Add Version Info button. Note that "Office 2019, " is inserted between "Office 2016" and "Microsoft 365". Note also that at the bottom of the document a new paragraph is added but it contains only the originally selected text because the new string became a new range rather than being added to the original range.
Within the document, select the word "several". Be careful not to include the preceding or following space in the selection.
Choose the Change Quantity Term button. Note that "many" replaces the selected text.
Insert images, HTML, and tables
In this step of the tutorial, you'll learn how to insert images, HTML, and tables into the document.
Define an image
Complete the following steps to define the image that you'll insert into the document in the next part of this tutorial.
In the root of the project, create a new file named base64Image.js.
Open the file base64Image.js and add the following code to specify the Base64-encoded string that represents an image.
export const base64Image =
    "iVBORw0KGgoAAAANSUhEUgAAAZAAAAEFCAIAAABCdiZrAAAACXBIWXMAAAsSAAALEgHS3X78AAAgAElEQVR42u2dzW9bV3rGn0w5wLBTRpSACAUDmDRowGoj1DdAtBA6suksZmtmV3Qj+i8w3XUB00X3pv8CX68Gswq96aKLhI5bCKiM+gpVphIa1qQBcQbyQB/hTJlpOHUXlyEvD885vLxfvCSfH7KIJVuUrnif+z7nPOd933v37h0IIWQe+BEvASGEgkUIIRQsQggFixBCKFiEEELBIoRQsAghhIJFCCEULEIIBYsQQihYhBBCwSKEULAIIYSCRQghFCxCCAWLEEIoWIQQQsEihCwQCV4CEgDdJvYM9C77f9x8gkyJV4UEznvs6U780rvAfgGdg5EPbr9CyuC1IbSEJGa8KopqBWC/gI7Fa0MoWCROHJZw/lxWdl3isITeBa8QoWCRyOk2JR9sVdF+qvwnnQPsF+SaRSEjFCwSCr0LNCo4rYkfb5s4vj/h33YOcFSWy59VlIsgIRQs4pHTGvYMdJvIjupOx5Ir0Tjtp5K/mTKwXsSLq2hUWG0R93CXkKg9oL0+ldnFpil+yhlicIM06NA2cXgXySyuV7Fe5CUnFCziyQO2qmg8BIDUDWzVkUiPfHY8xOCGT77EWkH84FEZbx4DwOotbJpI5nj5CQWLTOMBj8votuRqBWDP8KJWABIr2KpLwlmHpeHKff4BsmXxFQmhYBGlBxzoy7YlljxOcfFAMottS6JH+4Xh69IhEgoWcesBNdVQozLyd7whrdrGbSYdIqFgkQkecMD4epO9QB4I46v4tmbtGeK3QYdIKFhE7gEHjO/odSzsfRzkS1+5h42q+MGOhf2CuPlIh0goWPSAogcccP2RJHI1riP+kQYdVK9Fh0goWPSAk82a5xCDG4zPJaWTxnvSIVKwKFj0gEq1go8QgxtUQQeNZtEhUrB4FZbaA9pIN+98hhhcatbNpqRoGgRKpdAhUrDIMnpAjVrpJSNApK/uRi7pEClYZIk84KDGGQ+IBhhicMP6HRg1ycedgVI6RELBWl4POFCr8VWkszpe3o76G1aFs9ws+dMhUrDIInvAAeMB0ZBCDG6QBh2kgVI6RAoWWRYPqBEI9+oQEtKgg3sNpUOkYJGF8oADxgOioUauXKIKOkxV99EhUrDIgnhAG+mCUQQhBpeaNb4JgOn3AegQKVhkvj2gjXRLLrIQgxtUQYdpNYsOkYJF5tUDarQg4hCDS1u3VZd83IOw0iFSsMiceUCNWp3WYH0Wx59R6ls9W1c6RAoWmQ8PaCNdz55hiMEN4zsDNhMDpXSIFCwylx5Qo1a9C3yVi69a2ajCWZ43NOkQKVgkph5wwHi+KQ4hBs9SC9+RMTpEChaJlwfUFylWEafP5uMKqIIOPv0sHSIFi8TFAzpLiXxF/KCbdetEGutFUSa6TXQsdKypv42UgZQhfrWOhbO6q8nPqqCD/zU4OkQKFpm9B7SRbrTpQwzJHNaL/VHyiRVF0dfC2xpOzMnKlUgjW0amhGRW/ZM+w5sqzuqTNWtb9nKBZDLoEClYZGYe0EYaENWHGDaquHJv5CPnz/H9BToWkjmsFkTdOX0GS22p1ovYNEdUr9vCeR3dJlIG1gojn2o8RKPiRX+D0iw6RAoWmYEH1HioiQZqq47VW32dalUlfi1fQf7ByEdUQpMpYfOJ46UPcFweKaMSaWyaWL8z/Mibxzgqe3G4CC6pT4dIwSLReUCNWrkJMdjh8sMSuk1d3bReRGb3hy97iS/SEl+5bQ0LqM4B9gvytaptC6kbwz++vD3ZG0r3EBDoWUg6RAoWCd0D9isXReTKTYghZbhdUB/UYlKV2TSHitZtYc9QrqynDGy/GnGg+4XJr779ShJ0gNdAKR3i/PAjXoIZe8BGBS+uhqtWAF4VXUWu3G//ORVqdVRiEumhWgFoVHT7gB1LnFAvVaJxYZJ+qx/XRuo1X0+RFqzPsF/QFZuEgrVcHnDPCGbFylnajN/wAZZvqgpR8IzO275tTvjnwl/4sORC6C9xWJLoYCKNrbpuR3Jazp/jxdUJmksoWIvvAfcLsD4LuLfn5hOJhWlVQ+lyNZDFcUl636GY5/Wpyzo3FRZ+WBeT1JhpGDVlIMMbjYfYM3Ba4zuXgkUPGBD5B5Kl6LaJ4/uh/CCDTvDjW4ROxZm4gj7+dwZLY24067AkF9OtesCaRYdIwaIHDIzMrmSzv2NNTgl4fLlSXw6kjs8pWN+FfHu3n8p/xpSBjWrwL0eHSMGiB/TL+h1JnNJ+xTA6MawXh1ogTWA5S5tvLS8vMVUM6s1j+TKZEASjQ6RgkVl6wH4pcUM+zs8qBq9WyRyMGozP+5J0/nzygrrLSkS4ONPmNg/vyr1npiQG9+kQKVhkBh5woFbSI8EuQwxTkS1j2xoG0zsHeBVcRsl/RNMqyoMOG9WRjAUd4pzD4GhoHjDsMIEqchX48JuUgU1zJN+kSa4D+LnjHfXiqqsa5Oejb8J/fs9TAZjFtiXXvgADpaqXZsqUFRY94NRq1agErFbrRWzVR9Tq9JlOrWy75NncCf982n+o+sYCDJTSIVKw6AGnRhoQbZsBv3S+MlyxAtC7xPF9WMUJDsi5M+gmVCWImpvolorOgXzTMPBAKR0iBWvuPWB4+4CiWj2Rz3MPcFSXHb90NmawbWDLRVZAc2pHZTkF2fWDKugQRqBUCvcQKVj0gI6qRxYQtfvGBIUdvHQ2fmk/VR7fk5Q5jr+2fmfygrpTfM+fu8qa6lEFHcIIlGocolWkQwwcLrr79oBB9YRxg7SDXbDjJISue71LHJWnrno+vRh+BX2Xq2QOO6+Hf3TTXsYl43M3BhVcZFNjEyvIluUNvAgrrIX1gINqRdpvM0C1EhatbBvowaM5neOVe/L2VX176/jip88CUysAhyV5SRheoFRSfV+i8RAvckH+XKyweBW8qNWeEelEP1XkKqgQw3j/T3sxyNv6cSKNm02xA3KrOvLV1gq4Xh1u3vUusWcE7KESK7jZlHvSoDqU+q/4CAUrItomWtUoRvup1KpRCWxb0KiNqFXvcoreWCem/ETh+ILRYJnvJzlxz+7wrt/l9qkuHUIIrMk9bxaZEjIltl2mYMWDjoVWFae1sAouVeQq2LUYZwfRaVG1dR9PnKp802EpxG016TCOgZsOb6tk9RayZVZVFKwZ8cff4b/+Htcq8sd17wInJt5UA17SUqnVWR0vbwf5Qn5KgPO6bo0mU0K2LJetbgtvqjgxQw8uqcbthDH+OrHS/5FV19MuJDXreoSCFQC9C3yxisQK8hVk1dteZ3W8qQY2VFm68OF/emj0JNJ430DKQCKN3gU6FrrNSHf9VaMrfI68F+ynXVKpkhxndRyX0TlQzv4hFKyABWuwMPGROWxiJ6kdmmibaJu+7gTpPRbgDbZsqJa9/T8AMrvIlnWx/m4Tx+XhY4yC5RXGGjzRbeHlbd3ZsWQO+Qp2mth84nFtSBoQtS0M1cobqqCD50BpMovrj/Dpufyk1OBXZueKgyq6KVjEI/bZMf3ef6aErTp2XiOzO8UtIe0gCuCoHMWm5MLWyJfK09HTdihdvwPjc+w0J4wvbJv4KhfF2VIKFnHLm8f4KjfhkF0yh00TN5vYfDJ510wVED0qR7ENv7Sa5SZQmlhB/gF2XsOoTdj+O6tjz8Dh3Tlbaow9XMNy/153rGGpDIJ+Ycv5bm6bcvVR5YaiPFCy8Kze6s+4lj4VpIHS1Vv4sORqa09YrlL5fa5hUbBmLFiDd/am6Soi0LtAqzqyMK9Sq8BDDEQVdMBooDSxgvXihAV14RfqxgBSsChYcREsmyv3lImtcU5raJs4q8sjV/MYYpgLrj9SxlP2C/iuiXxFl1EYL4GPym5/TRQsCla8BKu/3qFNbLl80a9yVKuwUIWzpmKQrnIPBcsrXHQPT+AucXzf70l91lahclT2FV7tNmEV8fI2t24jI8FLEC52Ysv9wpbAtsVLGNNy2+VyFWGFNX+4SWyReYHpKgrWUuAmsUXiDNNVFKwlsxJBLGyRGVh7LlfFAq5hzeTd38LL27oo0ABpnykSIG766pzWYH3GS0XBWvJr7yLg8/1F1J18l4pk1lXuhM1CaQkJPixN/jvXKlGMpVpa8u7CvSkj9CGshIIV92e7tOvxeBXGhGFIrN6Sp0ZPa5Jw1gfsdEzBWmbGb4BuE4d3JbdKtszHe1jllZTjsqTBvJtymFCwFpbxpRM77nAouzE+MnnBAiazK++rYZ9Flw4B4mODgrWkpG5I1nHf1gDFrPa1gveRNmQc+5jnOL2L/pDqzoGkN2mArpChFgrWXD3eS5J38KDJjDTKsMG4aaDlrXTjr1UdJkJPTLpCChYBAEmzSqcHOX8utySZXV65AFBFGezjgULBS1dIwaIflDzehVVeVZHFiIN/VFEGoZtVtyUxbtwrpGDNDb3fheUH26Z4Nq3bkhw5TKT9dtciqihDtynpWN2mK6RgzS/vemH5QemU9kZF0tohX6Er8VteSTmWPQlOZa5w4gwRQsFaZD/Yu5APLOhdyvs6XOfqu+faVhFlOKsrfwXjRRZHzFOwlumeKbkqr2xaVUmOdL3IiEPA5ZXmhPn4b2edy1gUrOVh/O2uaY/Vu2TEITi1eiCPMrRNnD9XC9Yz0Zgnc3SFFKxl9YPd5oT+Su2nkgQjIw7TklhR7ldMbOBzQldIwVpOxu+Z8SWScY7K8iKLEQf3bFTlUYZWdZjXVT4zTLrCGD16eAlm6QfdCJZ9WEdYLbYjDmG3FU/mRqoJD90EV3+Ga//o5aUPS77m2QiFrbQm6l24+ok6B+g2R0pj2xWy9SgFa6HV6o74kO9Ykx/vNsdlyficfGVkanRIgpV/4Euw3v/E4xZBMheYYKn2VZ0HcfS0quK6YaaE4/t8U9MSLlN55X4aRedAXouxVZab54Q0ytBtTnH933KvkIJFwdIEGsaRVjeZEiMOHsurRmWKyTfdlrj1wb1CCtZy+cHT2nSjorotuWbFvMj6w6/xhxN81xL/G/zsvY7ks384wfdBDHBURRmkB3EmukIBHpOaBVzDmlF55Wa5ffyeyZZF4VsrILM79e0XGb/5JX7zS8nHt+r92rDz79gvhPPWVkcZpF0S9cgTpHf51maFtQSCpTqOo0d1WCfPQRUyVFGGs7ouKaq5+IJmJdJYv8PLTMFaDj/ojcZDyd5ZMkd7IqKKMsDHqEcGsihYS+oHT0zvX016v3FQhYBqrV1/EGeCKxw7pkPBomAtGokV8W3dbXq/Z6A4rMNpYE5Wb8mjDPA9SZuucOb3Ey9B6OVVUH5wwFEZW3Xxg5kSTkxfUmjj/MrCdz7+ovpvclxYo2HTVKqVz5xtqyo6zfWil+VIQsGaGz/4xnevBelhHQD5Cl7eDqA88fCpcX6cns0Fv3JPHmUQWrZ7Y/yYDvcKaQkX2Q+6P46j5+uS5IN2xCEO9C7xrTWbC36toiyOpgq+KS25SVfICmtpyqsTM5ivbA/7HN8Iy1emjqQKOGu0lIHrj+SfEhD+5mFJ0t85AlQDJrrNwA6Kt01xuZCukIK1sILlIS+qolGRLJDZEQc/N6dmxqfmU85dufbTANbpPKCa3wXfa+3Co6JjIWX4coWzWt2jJSRT+EGftc/4nSNdlMmWo86R5ivDg3XdlryBVwR8ZCrVIdiTACdjrnBaJx7g24CCRcIqrwKvO1pVifNKpCPtoZwyRlrQfD0jM6iJMgQuoEyQUrAWX7B6F8ELVu8S38jMTqYUXS8BZ4ag8VBnGyP7NgQb6z/qMX7ZhV/lepGnoyhYMeP/vouRHxzw5rG80V0008CcZrBzEORS0VSoogxQDBz0D6fpULAWSrAi8IPDukYmE2uF0LfbBTPooQVCIGiiDG0zrEbG7ac8pkPBWiCEwEG3GeLOd/up3IiFXWQ5Xdjx/ZntfKmiDEC4FR9dIQVrQUhmxQXgsLf5pXem0JE9PDN4/jyAELnnS62JMoTa8P7EpCukYC0EH4QZv5JiH9YZJ6SIg9MM9i5nZgY1VWQgB3EmXnNh9ZCCRcGaSz4cvYE7VhQjoaSHdUKKODjNYIDzuKZl9ZZSI76pRJF1oiukYC2CH3TGoBHccRw99mGdcQKPODjN4Omz2YTabVRa3G3izeMovoHxc+wssihYc+8H30Z1Szcq8tBmgKvv8TGDmV3xweC8DtEwPk2HgkXBmm8/eFoLd+lXuH+kCzcBRhycZtAqzibUDiCxoiyvzuqRjuQQyuf1Ilu/UrDm2Q9G7Jikh3WCKrKcZvDN41BC7X/+NzBq+Nk3yurJZnx6UPTllap8/oBFFgVrfv1gxILVu5QfnUvmcOWe3y8+CBB0DuRHgvyI1F//Cp9+i7/6Bdbv4E/zuv5/yayyH3QYB3EmVrXCr/jDEu8DCtZ8+sG2OYNz+e2n8m27a76ngQ3+eYDtrlZv9UXqp3+BRMrVP9FUi1/PQiwEwUoZdIUULPrBaZAeoAtqUEXj4SzbOWmiDG0zuuVC4bcsyDddIQVrDhCO43iblhrMLfRMmSP1+fCP4ITz//4WHUuZ7dpQJ0VndfR6vHkDXSEFa/4E68Sc5Tejuns/Mn3dmVY4tUOvg9//J379C/zbTdQ/wN7HcsHSRBla1dmUV3SFFKy5JHVD7HAS9nEcPefP5YZ0rTDd8BtBBIMKtf/oJwDwP/+N869w/Hf44n3861/iP/4WFy+U/0QTZfB/EGe9qOyo5bKkFa4MXWE4sKd7OOVVtxnFcRw9x2X5cs+miRdXXX2Fb62RwRMB5hga/4Df/2o6+dNEGfwfxLle7ddEnqOwp7WRY9gfliJK27PCIh4f0YJDmTmqwzruIw69C5zVh/8FyG//aTq10nRl8H8QJ1/pq1VmVzKIyCXCpaYrpGDNkx98W4vFN3ZUlucPrlXm7JhueE2vEukRKfS8kdo5EDdPPWsfoWBF6gfP6gEvAKcM5Cv9/zIl5a0rKZEu5bVeUBGHaFi9pbz5/R/E2aiOaHcy611oTkwKVti89+7dO14Fd49QC3sfyz+183qkwjosBXacba2AfEVcJrdlSHUKR9SmFdxsyjXuRW6WO2vu+eRL5USc/YKvaHvKwPYriZV+kfPy1ZJZ7Iz63D1DuZT5c953rLBi4gcDyYsmc9g08cmXkk29xAryD3CzqbyNBXVTzbnyE3GIrnrdVf6YpzW/B3Gc247dVl++PRdZ3Za40qf5OrM6N07Boh8U7yKfO1a2VO28njCeM7GCT750dWupDuv4iThEQ2JFZ119TsRZL478+F+Xhsthnv2ysPSu6TbzLYc/U7BmgvCm9Bm/ShnYtiRS1TlA4yEaD3H+fEQQN5+46imq2q3fqMb62mbLyvld/g/iOM8k2mcDBl/Tc5ElFNfJXHQDIilYxIVa3Rm5o3wex0kZ2KqL+3ftp3hxFXsGGhU0Ktgv4Is0Xt4eytaVe5MrAlXT95Qx9Zj1yNBEGXoXk+c5pwydZR5EGWzXPCjWfBZZvUvxicWldwrWbHjXm1xe+Vy92jRH1KpzgL2P5U3Tz+ojp2TyD5SVyADV9r+wTRYfNFGGVnWC706kYdTwyZfYqktkS4gytKrDKzxw9EEVWexBSsGaDb3fTRYsP3lRofl65wD7BV1fBGFH302RJbWrwt0bEzRRBjcHca79UECt3pLIllOju60RKXd+cW9F1umzkQV1ukIKVoz8oLME8Hkcx6l9vUvsFyZvJDnv29XC5JdQFVlOfxSf8krFUXlCeZXMiWLnlC3BBY+30BqUb56LrBO6QgpWHAUr0OV2Z49NVUJdoGMNb103iqNq+o7wx0RPV2yqowzd5uSMW7eJPUOymDiQLWc1NL6057/Icr9XSChY8ypYmnUQvWYNcBPLUk3WEfb4Z0ggUYZuE1YR1meSWmxgBp1r7SrF8VZkdQ5Glh2TubjHRyhYS+cHO5bfXXan9LhPFTrvBDfHiVWHdRCbiIMmynBWn24T9rSGr3LKo9HfXygX9Z11nLciS7jIbOlHwYpXeeW/PcP3DpHSz4xRlVQu+x84N8WcxCHikFjR7QB4OOdsByBe3pYsLyaz2H6FTVOuj4PX8lZkveVeIQUrzoI10cQl0hNaxDkrLDfbdon0yMKT+0Mqvcv4Rhw2qsqqx89BnLM69gx5CZzZxc5ryev6LLKEGauJdGCjISlYxK8fnHgcZ72Im01dh1+MtsfL7E7OVW1UR/bLT8wpvn/VYZ3ZRhxSN3S1jM+DOGuF4b6EcFoAwJV7uNkUk1+DqtlbkSUU3SyyKFhzU14Zn/crF826eO9iZP9r09S1kcmWR+zb6bOpl/xVh3VmGHHQ7FT6b9k+qJJ6l3hVxJ4h7jYOjpQPtKljDWs6D0UWE6QUrFiQWBl53gpCI7d7Pyyg6B/UDUer39Vb2KpLNCuRxkYV1x+NfHEPjX1Vh3Uwo4jD+h2lmvufiOM85m235ek2cVjCy9uizUysYPMJdn6QLT8rWcI0HbpCCtZ8lFdOd5C6oSuy7LvIaZGcD/y1AjIlbFsjDY57l97HmqpM1kwiDvryymcDDLuNcrclbpKe1bFfwOFd8esns9h80k9s+SmyGMgKGjbwc81ZvT+Rwfh85J3npodcIo2bzb4rPH+O/cIEQRQOFWqe4frjOxPZfCIvHAY/bDTkHyjlwE6BBjVAO5nTLd7lH8i+gdbQIx/endp6f3o+LJN7F/hitf//mq6EhBVWkH7QqVbdpqutK2d4WjO7eFCyfZVD4+GEgz7+1QrqoMBaIbqIw8QoQ1BqBXXyw3adL65KfpvOFT2fK1l0hRSsOfCD475m05zwdLXvnz0DL66i8VByx3YOsGcEMDJeOPo7UvVENahCE2VwcxAnQLpN7Bfw8rZygd/DShb3CilYMRKsN67Xp3sXw/Upu1mopn2KfXzXqGHnNfIPROGwTWVQM01VveGTuSgiDvoog+cpgT69/4scju8HU9kJx3TWi3M2ryhmcA1rmvexVcSnjntbM5ZCxaY5YrXsjaSOhY6FRBopA8kcUoauIUnjod8tM0kxpVhC6l0o85ZBoVnKiXgdTeJV09iojvy+vM2nEC6vPaOEa1gUrNAFq22OpNWPyl5GeAqa5Z7z52hUAh5oOkAY/DOgbeLwbmjl6h0Yak/tcyJOYDWggY1qf9vUw6I7xqbpnNZgfUbBoiWM3A96a89wWJrabpw+w8vb2C+EpVZQr75nSiFGHDRRhrYZC7Wy6+j9AqzPvKRzB3WZc7WRrpAVVhRc/AvSPxOfk37sxnoRawUkc0ikJR6w28J5HWd1nNYiGgm1/Up+cigka3blnq4/xLzMTPT2wx6WkCmxwqJghcnvj/DTDXElItgVk/cNAPjWms3QOjtbr6oKA/5h1eNdAbSqOL6/UG+exMrI6udpDYk0BYuCFSZ//B3+5M/6/9+7wFe5IPNBMUG1sBJsehPA9Ue6iTgLeW2FvHHHcttEiDjgGpZrBmqFIKalxhPVYZ1gIw6a+V0I4iBOPBEie1QrCtbM3nwLQ+dAua6cLQfWxeEjU/mpbhONh4t5bdtPOZ6egjULuk1f01JjjqrpeyLtfYC7k9VburWbwCNmfM5RsFheLbQcqyfrCJMTvaFpu9qxIj2IEz0nJu8eClb0tf2iv+1Uh3Xgu1XWlXu6TqpH5QW/sOfPAztQRcEiruhYvqalzgW9S3yjsGZrBe/9BhIruKZ2fGf1uCRFWZ5TsFjVzxlvHitrAc9FluawN3y3bGd5TsEiEt4uzRNStf6dzMkb3enRRxna5uLXrf0K/SCApkAULOK2nl+k8yITaoGnyqOL2fLUp+E+Mr2II4t0QsHyJVhLhUpH7L4r7pkYZViex8BSFekULApWpGgm60wVcdCom7N59JLQbXHp3TMJXgK3vOvBqKF3gY6FbhPdJr5rLn5p8HVppJeTk+tVV10c9ONjF/UgzshNtoKUgR+nkTKGbRqJJ3j42f8Ds4luEx2rr2XfX6BjLdRNqJqsA8AqTgj967sydJt4cXWh3gypG8M2DKsFAGzJQMGaE2wzdV7v/3/vYl43wpJZbFty0ZmoOJr5XQiha02U1+QnOSRz/ZbWdmsgTWiDULDmkt5Fv93VfPlKje40KsrjykJr4HFBn23Lds9ujoaOgkVfGWtfqXF2mvZVQgcogZi0bKebo2CRBfSVmo7G0gahmv6lsy2v6OYoWMuL7ewiftPPyleqJutA1oJd1SFe9fcXz83ZD5vvmlPPXiUUrBBpm8Pooz1gZmAr7LtlYXylZiqXUDFldnVtZAIfHTZbN6e67IkVZMvIllm+UbDiR6uKRkWuDs5HfTI39CPz6Cs10/QGa1L6KIOf4ayzdXNTFbaZXWxUKVUUrBhjh7bdJyHt289pW+LvKzUrU4OIgz7KoNlVjJub8ybxmV3kK9xJpGDNj2wdlX3Fi2LuKzV7f0dlvK3pogzjW4rxdHOef3H5CvcWKVhzSLeJ43KQrd/j4yuTOeUqsl21ae7YjoXT2tyUk1N51Y9MShUFa845q6NRCTdtNFtfGc9rjgiDIMks8hXuA1KwFojTGo7LUcfZZ+srI3Nz3/3g6aKP2nITkIK1yLRNHJVnHF6fua/06eZsVYrDYaYr93CtQqmiYC00024jRkZMfKUtSQM3B8RxLAU3ASlYSydb31Tw5vEcfKsh+cqZuznPV2OjyhHzFKylpNtEozKXzVXc+8p4ujkPpG7gepWbgBSspSeCbcRoGA+LzkX3GDdmmZuAsXpc8hLMkrUC1uo4q+Pr0nINYpiLQjJb1kX2ySzgEIp4yNZOE5tPkMzyYsSlYLzZpFpRsIiaTAnbFvIPph75R4L8Lexi5/WEIdWEgkUAIJFGvoKbTS+jlYlPVm9h5zU2TUYWKFhketnaeY3MLi9GRFL1yZfYqlOqKFjEK8kcNk1sv+qHoUgoFzmLzSfYqjOyQMEiQZAysFXHJ19OMWaZuCpjV3D9EXbYv5iCRQJnrYBti9uIgUmVvYzBIcUAAAIqSURBVAmYLfNiULBIaGRK2GlyG9HfNdzFtsVNQAoWiYrBNiJlayq4CUjBIjMyNWnkK9i2uI3oVqq4CUjBIjPG3kbcec1tRPUlysL4nJuAFCwSJ9mytxEpWyNF6Ao2n2CnqZyXQShYZGasFbBV5zZiX6rsTUDmFShYJNbY24jXHy3venxmt39omZuAFCwyH2TLy7iNuH6nvwlIqaJgkXmzRcu0jWhvAho1bgJSsMg8M9hGXL+zoD9gtp9X4CYgBYssjmwZtUXbRrQPLe80KVUULLKI2NuIxudzv41obwJuW9wEpGCRRWe92O/FPKfr8VfucROQgkWWjExp/rYR7c7FG1VKFQWLLB+DXszx30a0NwF5aJlQsChb/W3EeMpW6gY3AQkFi4xipx9itY1obwJuW5QqIj5keQkIEJuRrhxfSlhhkSlka4YjXTm+lFCwyNREP9KV40sJBYv4sGY/bCNeuRfuC63ewvYrbgISChYJQrY2qmFtIw46F6cMXmlCwSIBEfhIV44vJRQsEi6BjHTl+FJCwSLR4XmkK8eXEgoWmQ3TjnTl+FJCwSIzZjDSVQPHl5JAee/du3e8CsQX3Sa6Y730pB8khIJFCKElJIQQChYhhFCwCCEULEIIoWARQggFixBCwSKEEAoWIYRQsAghFCxCCKFgEUIIBYsQQsEihBAKFiGEULAIIRQsQgihYBFCCAWLEELBIoQQChYhhILFS0AIoWARQkjA/D87uqZQTj7xTgAAAABJRU5ErkJggg==";
Insert an image
Open the file ./src/taskpane/taskpane.html.
Locate the
<button>element for thereplace-textbutton, and add the following markup after that line.<button class="ms-Button" id="insert-image">Insert Image</button><br/><br/>Open the file ./src/taskpane/taskpane.js.
Locate the
Office.onReadyfunction call near the top of the file and add the following code immediately before that line. This code imports the variable that you defined previously in the file ./base64Image.js.import { base64Image } from "../../base64Image";Within the
Office.onReadyfunction call, locate the line that assigns a click handler to thereplace-textbutton, and add the following code after that line.document.getElementById("insert-image").onclick = () => tryCatch(insertImage);Add the following function to the end of the file.
async function insertImage() {
    await Word.run(async (context) => {

        // TODO1: Queue commands to insert an image.

        await context.sync();
    });
}
Within the
insertImage()function, replaceTODO1with the following code. Note that this line inserts the Base64-encoded image at the end of the document. (TheParagraphobject also has aninsertInlinePictureFromBase64method and otherinsert*methods. See the following "Insert HTML" section for an example.)context.document.body.insertInlinePictureFromBase64(base64Image, Word.InsertLocation.end);
Insert HTML
Open the file ./src/taskpane/taskpane.html.
Locate the
<button>element for theinsert-imagebutton, and add the following markup after that line.<button class="ms-Button" id="insert-html">Insert HTML</button><br/><br/>Open the file ./src/taskpane/taskpane.js.
Within the
Office.onReadyfunction call, locate the line that assigns a click handler to theinsert-imagebutton, and add the following code after that line.document.getElementById("insert-html").onclick = () => tryCatch(insertHTML);Add the following function to the end of the file.
async function insertHTML() {
    await Word.run(async (context) => {

        // TODO1: Queue commands to insert a string of HTML.

        await context.sync();
    });
}
Within the
insertHTML()function, replaceTODO1with the following code. Note:The first line adds a blank paragraph to the end of the document.
The second line inserts a string of HTML at the end of the paragraph; specifically two paragraphs, one formatted with the Verdana font, the other with the default styling of the Word document. (As you saw in the
insertImagemethod earlier, thecontext.document.bodyobject also has theinsert*methods.)
const blankParagraph = context.document.body.paragraphs.getLast().insertParagraph("", Word.InsertLocation.after);
blankParagraph.insertHtml('<p style="font-family: verdana;">Inserted HTML.</p><p>Another paragraph</p>', Word.InsertLocation.end);
Insert a table
Open the file ./src/taskpane/taskpane.html.
Locate the
<button>element for theinsert-htmlbutton, and add the following markup after that line.<button class="ms-Button" id="insert-table">Insert Table</button><br/><br/>Open the file ./src/taskpane/taskpane.js.
Within the
Office.onReadyfunction call, locate the line that assigns a click handler to theinsert-htmlbutton, and add the following code after that line.document.getElementById("insert-table").onclick = () => tryCatch(insertTable);Add the following function to the end of the file.
async function insertTable() {
    await Word.run(async (context) => {

        // TODO1: Queue commands to get a reference to the paragraph
        //        that will precede the table.

        // TODO2: Queue commands to create a table and populate it with data.

        await context.sync();
    });
}
Within the
insertTable()function, replaceTODO1with the following code. Note that this line uses theParagraphCollection.getFirstmethod to get a reference to the first paragraph and then uses theParagraph.getNextmethod to get a reference to the second paragraph.const secondParagraph = context.document.body.paragraphs.getFirst().getNext();Within the
insertTable()function, replaceTODO2with the following code. Note:The first two parameters of the
insertTablemethod specify the number of rows and columns.The third parameter specifies where to insert the table, in this case after the paragraph.
The fourth parameter is a two-dimensional array that sets the values of the table cells.
The table will have plain default styling, but the
insertTablemethod returns aTableobject with many members, some of which are used to style the table.
const tableData = [
        ["Name", "ID", "Birth City"],
        ["Bob", "434", "Chicago"],
        ["Sue", "719", "Havana"],
    ];
secondParagraph.insertTable(3, 3, Word.InsertLocation.after, tableData);
Save all your changes to the project.
Test the add-in
If the local web server is already running and your add-in is already loaded in Word, proceed to step 2. Otherwise, start the local web server and sideload your add-in.
To test your add-in in Word, run the following command in the root directory of your project. This starts the local web server (if it isn't already running) and opens Word with your add-in loaded.
npm startTo test your add-in in Word on the web, run the following command in the root directory of your project. When you run this command, the local web server starts. Replace "{url}" with the URL of a Word document on your OneDrive or a SharePoint library to which you have permissions.
Note
If you are developing on a Mac, enclose the
{url}in single quotation marks. Do not do this on Windows.npm run start:web -- --document {url}The following are examples.
npm run start:web -- --document https://contoso.sharepoint.com/:t:/g/EZGxP7ksiE5DuxvY638G798BpuhwluxCMfF1WZQj3VYhYQ?e=F4QM1Rnpm run start:web -- --document https://1drv.ms/x/s!jkcH7spkM4EGgcZUgqthk4IK3NOypVw?e=Z6G1qpnpm run start:web -- --document https://contoso-my.sharepoint-df.com/:t:/p/user/EQda453DNTpFnl1bFPhOVR0BwlrzetbXvnaRYii2lDr_oQ?e=RSccmNP
If your add-in doesn't sideload in the document, manually sideload it by following the instructions in Manually sideload add-ins to Office on the web.
If the add-in task pane isn't already open in Word, go to the Home tab and choose the Show Taskpane button on the ribbon to open it.
In the task pane, choose the Insert Paragraph button at least three times to ensure that there are a few paragraphs in the document.
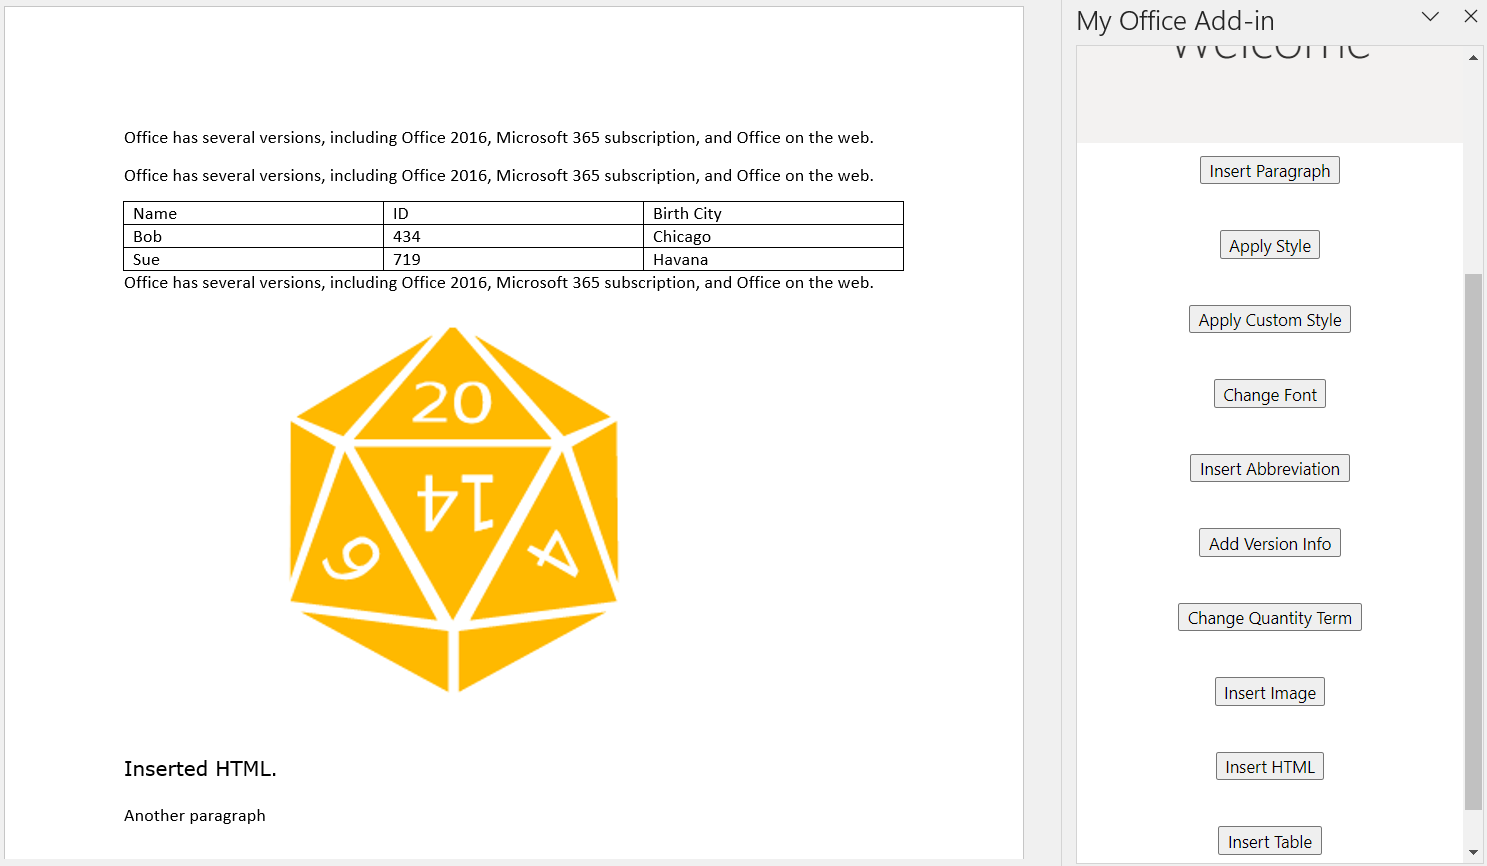
Choose the Insert Image button and note that an image is inserted at the end of the document.
Choose the Insert HTML button and note that two paragraphs are inserted at the end of the document, and that the first one has the Verdana font.
Choose the Insert Table button and note that a table is inserted after the second paragraph.
Create and update content controls
In this step of the tutorial, you'll learn how to create Rich Text content controls in the document, and then how to insert and replace content in the controls.
Note
Before you start this step of the tutorial, we recommend that you create and manipulate Rich Text content controls through the Word UI, so you can be familiar with the controls and their properties. For details, see Create forms that users complete or print in Word.
Create a content control
Open the file ./src/taskpane/taskpane.html.
Locate the
<button>element for theinsert-tablebutton, and add the following markup after that line.<button class="ms-Button" id="create-content-control">Create Content Control</button><br/><br/>Open the file ./src/taskpane/taskpane.js.
Within the
Office.onReadyfunction call, locate the line that assigns a click handler to theinsert-tablebutton, and add the following code after that line.document.getElementById("create-content-control").onclick = () => tryCatch(createContentControl);Add the following function to the end of the file.
async function createContentControl() {
    await Word.run(async (context) => {

        // TODO1: Queue commands to create a content control.

        await context.sync();
    });
}
Within the
createContentControl()function, replaceTODO1with the following code. Note:This code is intended to wrap the phrase "Microsoft 365" in a content control. It makes a simplifying assumption that the string is present and the user has selected it.
The
ContentControl.titleproperty specifies the visible title of the content control.The
ContentControl.tagproperty specifies an tag that can be used to get a reference to a content control using theContentControlCollection.getByTagmethod, which you'll use in a later function.The
ContentControl.appearanceproperty specifies the visual look of the control. Using the value "Tags" means that the control will be wrapped in opening and closing tags, and the opening tag will have the content control's title. Other possible values are "BoundingBox" and "None".The
ContentControl.colorproperty specifies the color of the tags or the border of the bounding box.
const serviceNameRange = context.document.getSelection();
const serviceNameContentControl = serviceNameRange.insertContentControl();
serviceNameContentControl.title = "Service Name";
serviceNameContentControl.tag = "serviceName";
serviceNameContentControl.appearance = "Tags";
serviceNameContentControl.color = "blue";
Replace the content of the content control
Open the file ./src/taskpane/taskpane.html.
Locate the
<button>element for thecreate-content-controlbutton, and add the following markup after that line.<button class="ms-Button" id="replace-content-in-control">Rename Service</button><br/><br/>Open the file ./src/taskpane/taskpane.js.
Within the
Office.onReadyfunction call, locate the line that assigns a click handler to thecreate-content-controlbutton, and add the following code after that line.document.getElementById("replace-content-in-control").onclick = () => tryCatch(replaceContentInControl);Add the following function to the end of the file.
async function replaceContentInControl() {
    await Word.run(async (context) => {

        // TODO1: Queue commands to replace the text in the Service Name
        //        content control.

        await context.sync();
    });
}
Within the
replaceContentInControl()function, replaceTODO1with the following code. Note:- The
ContentControlCollection.getByTagmethod returns aContentControlCollectionof all content controls of the specified tag. We usegetFirstto get a reference to the desired control.
const serviceNameContentControl = context.document.contentControls.getByTag("serviceName").getFirst(); serviceNameContentControl.insertText("Fabrikam Online Productivity Suite", Word.InsertLocation.replace);- The
Save all your changes to the project.
Test the add-in
If the local web server is already running and your add-in is already loaded in Word, proceed to step 2. Otherwise, start the local web server and sideload your add-in.
To test your add-in in Word, run the following command in the root directory of your project. This starts the local web server (if it isn't already running) and opens Word with your add-in loaded.
npm startTo test your add-in in Word on the web, run the following command in the root directory of your project. When you run this command, the local web server starts. Replace "{url}" with the URL of a Word document on your OneDrive or a SharePoint library to which you have permissions.
Note
If you are developing on a Mac, enclose the
{url}in single quotation marks. Do not do this on Windows.npm run start:web -- --document {url}The following are examples.
npm run start:web -- --document https://contoso.sharepoint.com/:t:/g/EZGxP7ksiE5DuxvY638G798BpuhwluxCMfF1WZQj3VYhYQ?e=F4QM1Rnpm run start:web -- --document https://1drv.ms/x/s!jkcH7spkM4EGgcZUgqthk4IK3NOypVw?e=Z6G1qpnpm run start:web -- --document https://contoso-my.sharepoint-df.com/:t:/p/user/EQda453DNTpFnl1bFPhOVR0BwlrzetbXvnaRYii2lDr_oQ?e=RSccmNP
If your add-in doesn't sideload in the document, manually sideload it by following the instructions in Manually sideload add-ins to Office on the web.
If the add-in task pane isn't already open in Word, go to the Home tab and choose the Show Taskpane button on the ribbon to open it.
In the task pane, choose the Insert Paragraph button to ensure that there's a paragraph with "Microsoft 365" at the top of the document.
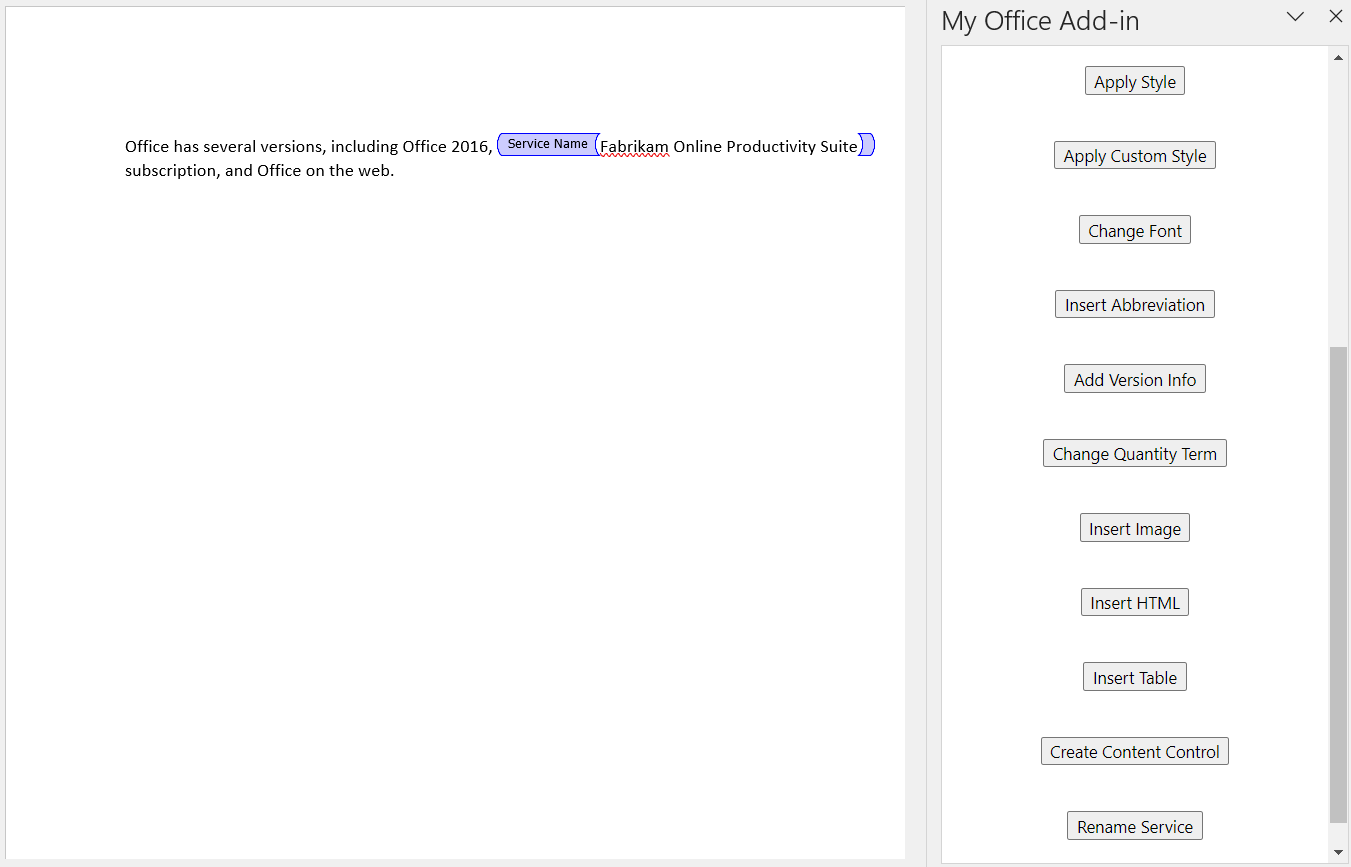
In the document, select the text "Microsoft 365" and then choose the Create Content Control button. Note that the phrase is wrapped in tags labelled "Service Name".
Choose the Rename Service button and note that the text of the content control changes to "Fabrikam Online Productivity Suite".
Next steps
In this tutorial, you've created a Word task pane add-in that inserts and replaces text, images, and other content in a Word document. To learn more about building Word add-ins, continue to the following article.
Code samples
- Completed Word add-in tutorial: The result of completing this tutorial.
See also
Office Add-ins
Feedback
Kommer snart: Under hela 2024 kommer vi att fasa ut GitHub-problem som feedbackmekanism för innehåll och ersätta det med ett nytt feedbacksystem. Mer information finns i: https://aka.ms/ContentUserFeedback.
Skicka och visa feedback för