Govern an application's existing users - Microsoft PowerShell
There are three common scenarios in which it's necessary to populate Microsoft Entra ID with existing users of an application before you use the application with a Microsoft Entra ID Governance feature such as access reviews.
License requirements
Using this feature requires Microsoft Entra ID Governance licenses. To find the right license for your requirements, see Microsoft Entra ID Governance licensing fundamentals.
Application migrated to Microsoft Entra ID after using its own identity provider
In the first scenario, the application already exists in the environment. Previously, the application used its own identity provider or data store to track which users had access.
When you change the application to rely on Microsoft Entra ID, only users who are in Microsoft Entra ID and permitted access to that application can access it. As part of that configuration change, you can choose to bring in the existing users from that application's data store into Microsoft Entra ID. Those users then continue to have access, through Microsoft Entra ID.
Having users who are associated with the application represented in Microsoft Entra ID will enable Microsoft Entra ID to track users who have access to the application, even though their relationship with the application originated elsewhere. For example, the relationship might have originated in an application's database or directory.
After Microsoft Entra ID is aware of a user's assignment, it can send updates to the application's data store. Updates include when that user's attributes change, or when the user goes out of scope of the application.
Application that doesn't use Microsoft Entra ID as its only identity provider
In the second scenario, an application doesn't solely rely on Microsoft Entra ID as its identity provider.
In some cases, an application might rely upon AD groups. This scenario is described in Pattern B in Preparing for an access review of users' access to an application. You do not need to configure provisioning for that application as described in that article, instead follow the instructions for Pattern B in that article on how to review the membership of AD groups.
In other cases, an application might support multiple identity providers or have its own built-in credential storage. This scenario is described as Pattern C in Preparing for an access review of users' access to an application.
It might not be feasible to remove other identity providers or local credential authentication from the application. In that case, if you want to use Microsoft Entra ID to review who has access to that application, or remove someone's access from that application, you'll need to create assignments in Microsoft Entra ID that represent application users who don't rely on Microsoft Entra ID for authentication.
Having these assignments is necessary if you plan to review all users with access to the application, as part of an access review.
For example, assume that a user is in the application's data store. Microsoft Entra ID is configured to require role assignments to the application. However, the user doesn't have an application role assignment in Microsoft Entra ID.
If the user is updated in Microsoft Entra ID, no changes will be sent to the application. And if the application's role assignments are reviewed, the user won't be included in the review. To have all the users included in the review, it's necessary to have application role assignments for all users of the application.
Application does not use Microsoft Entra ID as its identity provider nor does it support provisioning
For some legacy applications it might not be feasible to remove other identity providers or local credential authentication from the application, or enable support for provisioning protocols for those applications.
That scenario of an application which does not support provisioning protocols, is covered in a separate article, Govern the existing users of an application that does not support provisioning.
Terminology
This article illustrates the process for managing application role assignments by using the Microsoft Graph PowerShell cmdlets. It uses the following Microsoft Graph terminology.
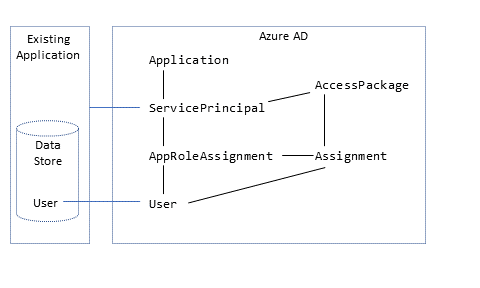
In Microsoft Entra ID, a service principal (ServicePrincipal) represents an application in a particular organization's directory. ServicePrincipal has a property called AppRoles that lists the roles that an application supports, such as Marketing specialist. AppRoleAssignment links a user to a service principal and specifies which role that user has in that application. An application may have more than one service principal, if single sign-on to the application and provisioning to the application are handled separately.
You might also be using Microsoft Entra entitlement management access packages to give users time-limited access to the application. In entitlement management, AccessPackage contains one or more resource roles, potentially from multiple service principals. AccessPackage also has assignments (Assignment) for users to the access package.
When you create an assignment for a user to an access package, Microsoft Entra entitlement management automatically creates the necessary AppRoleAssignment instances for the user to each application's service principal in the access package. For more information, see the Manage access to resources in Microsoft Entra entitlement management tutorial on how to create access packages through PowerShell.
Before you begin
You must have one of the following licenses in your tenant:
- Microsoft Entra ID P2 or Microsoft Entra ID Governance
- Enterprise Mobility + Security E5 license
You need to have an appropriate administrative role. If this is the first time you're performing these steps, you need the Global Administrator role to authorize the use of Microsoft Graph PowerShell in your tenant.
Your application needs at least one service principal in your tenant:
- If the application uses an LDAP directory, follow the guide for configuring Microsoft Entra ID to provision users into LDAP directories through the section to download, install, and configure the Microsoft Entra Connect Provisioning Agent package.
- If the application uses a SQL database, follow the guide for configuring Microsoft Entra ID to provision users into SQL-based applications through the section to download, install, and configure the Microsoft Entra Connect Provisioning Agent package.
- If the application uses SAP Cloud Identity Services or is a cloud application that supports the SCIM protocol, and the application is not already configured in your tenant, then later in this guide you will register the application from the application gallery.
- If the application is on-premises and supports the SCIM protocol, then follow the guide for configuring Microsoft Entra ID to provision users into on-premises SCIM-based applications.
Collect existing users from an application
The first step toward ensuring that all users are recorded in Microsoft Entra ID is to collect the list of existing users who have access to the application.
Some applications might have a built-in command to export a list of current users from the data store. In other cases, the application might rely on an external directory or database.
In some environments, the application might be located on a network segment or system that isn't appropriate for managing access to Microsoft Entra ID. So you might need to extract the list of users from that directory or database, and then transfer it as a file to another system that can be used for Microsoft Entra interactions.
This section explains four approaches for how to get a list of users in a comma-separated values (CSV) file:
- From an LDAP directory
- From a SQL Server database
- From another SQL-based database
- From SAP Cloud Identity Services
Collect existing users from an application that uses an LDAP directory
This section applies to applications that use an LDAP directory as the underlying data store for users who don't authenticate to Microsoft Entra ID. Many LDAP directories, such as Active Directory, include a command that outputs a list of users.
Identify which of the users in that directory are in scope for being users of the application. This choice will depend on your application's configuration. For some applications, any user who exists in an LDAP directory is a valid user. Other applications might require the user to have a particular attribute or be a member of a group in that directory.
Run the command that retrieves that subset of users from your directory. Ensure that the output includes the attributes of users that will be used for matching with Microsoft Entra ID. Examples of these attributes are employee ID, account name, and email address.
For example, this command would produce a CSV file in the current file system directory with the
userPrincipalNameattribute of every person in the LDAP directory:$out_filename = ".\users.csv" csvde -f $out_filename -l userPrincipalName,cn -r "(objectclass=person)"If needed, transfer the CSV file that contains the list of users to a system with the Microsoft Graph PowerShell cmdlets installed.
Continue reading at the Confirm Microsoft Entra ID has users that match users from the application section later in this article.
Collect existing users from an application's database table by using a SQL Server wizard
This section applies to applications that use SQL Server as the underlying data store.
First, get a list of the users from the tables. Most databases provide a way to export the contents of tables to a standard file format, such as to a CSV file. If the application uses a SQL Server database, you can use the SQL Server Import and Export Wizard to export portions of a database. If you don't have a utility for your database, you can use the ODBC driver with PowerShell, as described in the next section.
- Log in to the system where SQL Server is installed.
- Open SQL Server 2019 Import and Export (64 bit) or the equivalent for your database.
- Select the existing database as the source.
- Select Flat File Destination as the destination. Provide a file name, and change the Code page value to 65001 (UTF-8).
- Complete the wizard, and select the option to run immediately.
- Wait for the execution to finish.
- If needed, transfer the CSV file that contains the list of users to a system with the Microsoft Graph PowerShell cmdlets installed.
- Continue reading at the Confirm Microsoft Entra ID has users that match users from the application section later in this article.
Collect existing users from an application's database table by using PowerShell
This section applies to applications that use another SQL database as the underlying data store, where you're using the ECMA Connector Host to provision users into that application. If you haven't yet configured the provisioning agent, use that guide to create the DSN connection file you'll use in this section.
Log in to the system where the provisioning agent is or will be installed.
Open PowerShell.
Construct a connection string for connecting to your database system.
The components of a connection string depend on the requirements of your database. If you're using SQL Server, see the list of DSN and connection string keywords and attributes.
If you're using a different database, you need to include the mandatory keywords for connecting to that database. For example, if your database uses the fully qualified path name of the DSN file, a user ID, and a password, construct the connection string by using the following commands:
$filedsn = "c:\users\administrator\documents\db.dsn"
$db_cs = "filedsn=" + $filedsn + ";uid=p;pwd=secret"
Open a connection to your database and provide the connection string, by using the following commands:
$db_conn = New-Object data.odbc.OdbcConnection
$db_conn.ConnectionString = $db_cs
$db_conn.Open()
Construct a SQL query to retrieve the users from the database table. Be sure to include the columns that will be used to match users in the application's database with those users in Microsoft Entra ID. Columns might include employee ID, account name, or email address.
For example, if your users are held in a database table named
USERSthat has columnsnameandemail, enter the following command:$db_query = "SELECT name,email from USERS"Send the query to the database via the connection:
$result = (new-object data.odbc.OdbcCommand($db_query,$db_conn)).ExecuteReader()
$table = new-object System.Data.DataTable
$table.Load($result)
The result is the list of rows that represents users that were retrieved from the query.
Write the result to a CSV file:
$out_filename = ".\users.csv"
$table.Rows | Export-Csv -Path $out_filename -NoTypeInformation -Encoding UTF8
If this system doesn't have the Microsoft Graph PowerShell cmdlets installed or doesn't have connectivity to Microsoft Entra ID, transfer the CSV file that contains the list of users to a system that has the Microsoft Graph PowerShell cmdlets installed.
Collect existing users from SAP Cloud Identity Services
This section applies to SAP applications that use SAP Cloud Identity Services as the underlying service for user provisioning.
- Sign in to your SAP Cloud Identity Services Admin Console,
https://<tenantID>.accounts.ondemand.com/adminorhttps://<tenantID>.trial-accounts.ondemand.com/adminif a trial. - Navigate to Users & Authorizations > Export Users.
- Select all attributes required for matching Microsoft Entra users with those in SAP. This includes the
SCIM ID,userName,emails, and other attributes you may be using in your SAP Systems. - Select Export and wait for the browser to download the CSV file.
- If this system doesn't have the Microsoft Graph PowerShell cmdlets installed or doesn't have connectivity to Microsoft Entra ID, transfer the CSV file that contains the list of users to a system that has the Microsoft Graph PowerShell cmdlets installed.
Confirm Microsoft Entra ID has users that match users from the application
Now that you have a list of all the users obtained from the application, you'll match those users from the application's data store with users in Microsoft Entra ID.
Before you proceed, review the information about matching users in the source and target systems. You'll configure Microsoft Entra provisioning with equivalent mappings afterward. That step will allow Microsoft Entra provisioning to query the application's data store with the same matching rules.
Retrieve the IDs of the users in Microsoft Entra ID
This section shows how to interact with Microsoft Entra ID by using Microsoft Graph PowerShell cmdlets.
The first time your organization uses these cmdlets for this scenario, you need to be in a Global Administrator role to allow Microsoft Graph PowerShell to be used in your tenant. Subsequent interactions can use a lower-privileged role, such as:
- User Administrator, if you anticipate creating new users.
- Application Administrator or Identity Governance Administrator, if you're just managing application role assignments.
Open PowerShell.
If you don't have the Microsoft Graph PowerShell modules already installed, install the
Microsoft.Graph.Usersmodule and others by using this command:Install-Module Microsoft.GraphIf you already have the modules installed, ensure that you're using a recent version:
Update-Module microsoft.graph.users,microsoft.graph.identity.governance,microsoft.graph.applicationsConnect to Microsoft Entra ID:
$msg = Connect-MgGraph -ContextScope Process -Scopes "User.ReadWrite.All,Application.ReadWrite.All,AppRoleAssignment.ReadWrite.All,EntitlementManagement.ReadWrite.All"If this is the first time you have used this command, you may need to consent to allow the Microsoft Graph Command Line tools to have these permissions.
Read the list of users obtained from the application's data store into the PowerShell session. If the list of users was in a CSV file, you can use the PowerShell cmdlet
Import-Csvand provide the name of the file from the previous section as an argument.For example, if the file obtained from SAP Cloud Identity Services is named Users-exported-from-sap.csv and is located in the current directory, enter this command.
$filename = ".\Users-exported-from-sap.csv"
$dbusers = Import-Csv -Path $filename -Encoding UTF8
For another example if you are using a database or directory, if the file is named users.csv and located in the current directory, enter this command:
$filename = ".\users.csv"
$dbusers = Import-Csv -Path $filename -Encoding UTF8
Choose the column of the users.csv file that will match with an attribute of a user in Microsoft Entra ID.
If you are using SAP Cloud Identity Services, then the default mapping is the SAP SCIM attribute
userNamewith the Microsoft Entra ID attributeuserPrincipalName:$db_match_column_name = "userName" $azuread_match_attr_name = "userPrincipalName"For another example if you are using a database or directory, you might have users in a database where the value in the column named
EMailis the same value as in the Microsoft Entra attributeuserPrincipalName:$db_match_column_name = "EMail" $azuread_match_attr_name = "userPrincipalName"Retrieve the IDs of those users in Microsoft Entra ID.
The following PowerShell script uses the
$dbusers,$db_match_column_name, and$azuread_match_attr_namevalues specified earlier. It will query Microsoft Entra ID to locate a user that has an attribute with a matching value for each record in the source file. If there are many users in the file obtained from the source SAP Cloud Identity Services, database, or directory, this script might take several minutes to finish. If you don't have an attribute in Microsoft Entra ID that has the value, and need to use acontainsor other filter expression, then you will need to customize this script and that in step 11 below to use a different filter expression.$dbu_not_queried_list = @() $dbu_not_matched_list = @() $dbu_match_ambiguous_list = @() $dbu_query_failed_list = @() $azuread_match_id_list = @() $azuread_not_enabled_list = @() $dbu_values = @() $dbu_duplicate_list = @() foreach ($dbu in $dbusers) { if ($null -ne $dbu.$db_match_column_name -and $dbu.$db_match_column_name.Length -gt 0) { $val = $dbu.$db_match_column_name $escval = $val -replace "'","''" if ($dbu_values -contains $escval) { $dbu_duplicate_list += $dbu; continue } else { $dbu_values += $escval } $filter = $azuread_match_attr_name + " eq '" + $escval + "'" try { $ul = @(Get-MgUser -Filter $filter -All -Property Id,accountEnabled -ErrorAction Stop) if ($ul.length -eq 0) { $dbu_not_matched_list += $dbu; } elseif ($ul.length -gt 1) {$dbu_match_ambiguous_list += $dbu } else { $id = $ul[0].id; $azuread_match_id_list += $id; if ($ul[0].accountEnabled -eq $false) {$azuread_not_enabled_list += $id } } } catch { $dbu_query_failed_list += $dbu } } else { $dbu_not_queried_list += $dbu } }View the results of the previous queries. See if any of the users in SAP Cloud Identity Services, the database, or directory couldn't be located in Microsoft Entra ID, because of errors or missing matches.
The following PowerShell script will display the counts of records that weren't located:
$dbu_not_queried_count = $dbu_not_queried_list.Count if ($dbu_not_queried_count -ne 0) { Write-Error "Unable to query for $dbu_not_queried_count records as rows lacked values for $db_match_column_name." } $dbu_duplicate_count = $dbu_duplicate_list.Count if ($dbu_duplicate_count -ne 0) { Write-Error "Unable to locate Microsoft Entra ID users for $dbu_duplicate_count rows as multiple rows have the same value" } $dbu_not_matched_count = $dbu_not_matched_list.Count if ($dbu_not_matched_count -ne 0) { Write-Error "Unable to locate $dbu_not_matched_count records in Microsoft Entra ID by querying for $db_match_column_name values in $azuread_match_attr_name." } $dbu_match_ambiguous_count = $dbu_match_ambiguous_list.Count if ($dbu_match_ambiguous_count -ne 0) { Write-Error "Unable to locate $dbu_match_ambiguous_count records in Microsoft Entra ID as attribute match ambiguous." } $dbu_query_failed_count = $dbu_query_failed_list.Count if ($dbu_query_failed_count -ne 0) { Write-Error "Unable to locate $dbu_query_failed_count records in Microsoft Entra ID as queries returned errors." } $azuread_not_enabled_count = $azuread_not_enabled_list.Count if ($azuread_not_enabled_count -ne 0) { Write-Error "$azuread_not_enabled_count users in Microsoft Entra ID are blocked from sign-in." } if ($dbu_not_queried_count -ne 0 -or $dbu_duplicate_count -ne 0 -or $dbu_not_matched_count -ne 0 -or $dbu_match_ambiguous_count -ne 0 -or $dbu_query_failed_count -ne 0 -or $azuread_not_enabled_count) { Write-Output "You will need to resolve those issues before access of all existing users can be reviewed." } $azuread_match_count = $azuread_match_id_list.Count Write-Output "Users corresponding to $azuread_match_count records were located in Microsoft Entra ID."When the script finishes, it will indicate an error if any records from the data source weren't located in Microsoft Entra ID. If not all the records for users from the application's data store could be located as users in Microsoft Entra ID, you'll need to investigate which records didn't match and why.
For example, someone's email address and userPrincipalName might have been changed in Microsoft Entra ID without their corresponding
mailproperty being updated in the application's data source. Or, the user might have already left the organization but is still in the application's data source. Or there might be a vendor or super-admin account in the application's data source that does not correspond to any specific person in Microsoft Entra ID.If there were users who couldn't be located in Microsoft Entra ID, or weren't active and able to sign in, but you want to have their access reviewed or their attributes updated in SAP Cloud Identity Services, the database, or directory, you'll need to update the application, the matching rule, or update or create Microsoft Entra users for them. For more information on which change to make, see manage mappings and user accounts in applications that did not match to users in Microsoft Entra ID.
If you choose the option of creating users in Microsoft Entra ID, you can create users in bulk by using either:
- A CSV file, as described in Bulk create users in the Microsoft Entra admin center
- The New-MgUser cmdlet
Ensure that these new users are populated with the attributes required for Microsoft Entra ID to later match them to the existing users in the application, and the attributes required by Microsoft Entra ID, including
userPrincipalName,mailNicknameanddisplayName. TheuserPrincipalNamemust be unique among all the users in the directory.For example, you might have users in a database where the value in the column named
EMailis the value you want to use as the Microsoft Entra user principal Name, the value in the columnAliascontains the Microsoft Entra ID mail nickname, and the value in the columnFull namecontains the user's display name:$db_display_name_column_name = "Full name" $db_user_principal_name_column_name = "Email" $db_mail_nickname_column_name = "Alias"Then you can use this script to create Microsoft Entra users for those in SAP Cloud Identity Services, the database, or directory that didn't match with users in Microsoft Entra ID. Note that you may need to modify this script to add additional Microsoft Entra attributes needed in your organization, or if the
$azuread_match_attr_nameis neithermailNicknamenoruserPrincipalName, in order to supply that Microsoft Entra attribute.$dbu_missing_columns_list = @() $dbu_creation_failed_list = @() foreach ($dbu in $dbu_not_matched_list) { if (($null -ne $dbu.$db_display_name_column_name -and $dbu.$db_display_name_column_name.Length -gt 0) -and ($null -ne $dbu.$db_user_principal_name_column_name -and $dbu.$db_user_principal_name_column_name.Length -gt 0) -and ($null -ne $dbu.$db_mail_nickname_column_name -and $dbu.$db_mail_nickname_column_name.Length -gt 0)) { $params = @{ accountEnabled = $false displayName = $dbu.$db_display_name_column_name mailNickname = $dbu.$db_mail_nickname_column_name userPrincipalName = $dbu.$db_user_principal_name_column_name passwordProfile = @{ Password = -join (((48..90) + (96..122)) * 16 | Get-Random -Count 16 | % {[char]$_}) } } try { New-MgUser -BodyParameter $params } catch { $dbu_creation_failed_list += $dbu; throw } } else { $dbu_missing_columns_list += $dbu } }After you add any missing users to Microsoft Entra ID, run the script from step 7 again. Then run the script from step 8. Check that no errors are reported.
$dbu_not_queried_list = @() $dbu_not_matched_list = @() $dbu_match_ambiguous_list = @() $dbu_query_failed_list = @() $azuread_match_id_list = @() $azuread_not_enabled_list = @() $dbu_values = @() $dbu_duplicate_list = @() foreach ($dbu in $dbusers) { if ($null -ne $dbu.$db_match_column_name -and $dbu.$db_match_column_name.Length -gt 0) { $val = $dbu.$db_match_column_name $escval = $val -replace "'","''" if ($dbu_values -contains $escval) { $dbu_duplicate_list += $dbu; continue } else { $dbu_values += $escval } $filter = $azuread_match_attr_name + " eq '" + $escval + "'" try { $ul = @(Get-MgUser -Filter $filter -All -Property Id,accountEnabled -ErrorAction Stop) if ($ul.length -eq 0) { $dbu_not_matched_list += $dbu; } elseif ($ul.length -gt 1) {$dbu_match_ambiguous_list += $dbu } else { $id = $ul[0].id; $azuread_match_id_list += $id; if ($ul[0].accountEnabled -eq $false) {$azuread_not_enabled_list += $id } } } catch { $dbu_query_failed_list += $dbu } } else { $dbu_not_queried_list += $dbu } } $dbu_not_queried_count = $dbu_not_queried_list.Count if ($dbu_not_queried_count -ne 0) { Write-Error "Unable to query for $dbu_not_queried_count records as rows lacked values for $db_match_column_name." } $dbu_duplicate_count = $dbu_duplicate_list.Count if ($dbu_duplicate_count -ne 0) { Write-Error "Unable to locate Microsoft Entra ID users for $dbu_duplicate_count rows as multiple rows have the same value" } $dbu_not_matched_count = $dbu_not_matched_list.Count if ($dbu_not_matched_count -ne 0) { Write-Error "Unable to locate $dbu_not_matched_count records in Microsoft Entra ID by querying for $db_match_column_name values in $azuread_match_attr_name." } $dbu_match_ambiguous_count = $dbu_match_ambiguous_list.Count if ($dbu_match_ambiguous_count -ne 0) { Write-Error "Unable to locate $dbu_match_ambiguous_count records in Microsoft Entra ID as attribute match ambiguous." } $dbu_query_failed_count = $dbu_query_failed_list.Count if ($dbu_query_failed_count -ne 0) { Write-Error "Unable to locate $dbu_query_failed_count records in Microsoft Entra ID as queries returned errors." } $azuread_not_enabled_count = $azuread_not_enabled_list.Count if ($azuread_not_enabled_count -ne 0) { Write-Warning "$azuread_not_enabled_count users in Microsoft Entra ID are blocked from sign-in." } if ($dbu_not_queried_count -ne 0 -or $dbu_duplicate_count -ne 0 -or $dbu_not_matched_count -ne 0 -or $dbu_match_ambiguous_count -ne 0 -or $dbu_query_failed_count -ne 0 -or $azuread_not_enabled_count -ne 0) { Write-Output "You will need to resolve those issues before access of all existing users can be reviewed." } $azuread_match_count = $azuread_match_id_list.Count Write-Output "Users corresponding to $azuread_match_count records were located in Microsoft Entra ID."
Register the application
If the application is already registered in Microsoft Entra ID, then continue to the next step.
- If the application uses an LDAP directory, follow the guide for configuring Microsoft Entra ID to provision users into LDAP directories section to create a new registration for an on-premises ECMA app in Microsoft Entra ID.
- If the application uses a SQL database, follow the guide for configuring Microsoft Entra ID to provision users into SQL-based applications section to create a new registration for an on-premises ECMA app in Microsoft Entra ID.
- If you are using SAP Cloud Identity Services, then follow the guide for configuring Microsoft Entra ID to provision users into SAP Cloud Identity Services.
- If it is a cloud application that supports the SCIM protocol, then you can add the application from the application gallery.
- If the application is on-premises and supports the SCIM protocol, then follow the guide for configuring Microsoft Entra ID to provision users into on-premises SCIM-based applications.
Check for users who are not already assigned to the application
The previous steps have confirmed that all the users in the application's data store exist as users in Microsoft Entra ID. However, they might not all currently be assigned to the application's roles in Microsoft Entra ID. So the next steps are to see which users don't have assignments to application roles.
Look up the service principal ID for the application's service principal. If you recently created a service principal for an application that uses an LDAP directory or a SQL database, then use the name of that service principal.
For example, if the enterprise application is named
CORPDB1, enter the following commands:$azuread_app_name = "CORPDB1" $azuread_sp_filter = "displayName eq '" + ($azuread_app_name -replace "'","''") + "'" $azuread_sp = Get-MgServicePrincipal -Filter $azuread_sp_filter -AllRetrieve the users who currently have assignments to the application in Microsoft Entra ID.
This builds upon the
$azuread_spvariable set in the previous command.$azuread_existing_assignments = @(Get-MgServicePrincipalAppRoleAssignedTo -ServicePrincipalId $azuread_sp.Id -All)Compare the list of user IDs from the previous section to those users currently assigned to the application:
$azuread_not_in_role_list = @()
foreach ($id in $azuread_match_id_list) {
   $found = $false
   foreach ($existing in $azuread_existing_assignments) {
      if ($existing.principalId -eq $id) {
         $found = $true; break;
      }
   }
   if ($found -eq $false) { $azuread_not_in_role_list += $id }
}
$azuread_not_in_role_count = $azuread_not_in_role_list.Count
Write-Output "$azuread_not_in_role_count users in the application's data store are not assigned to the application roles."
If zero users are not assigned to application roles, indicating that all users are assigned to application roles, you don't need to make any further changes before performing an access review.
However, if one or more users aren't currently assigned to the application roles, you'll need to continue the procedure and add them to one of the application's roles.
Select the role of the application to assign the remaining users to.
An application might have more than one role, and a service principal may have additional roles. Use this command to list the available roles of a service principal:
$azuread_sp.AppRoles | where-object {$_.AllowedMemberTypes -contains "User"} | ft DisplayName,IdSelect the appropriate role from the list, and obtain its role ID. For example, if the role name is
Admin, provide that value in the following PowerShell commands:$azuread_app_role_name = "Admin" $azuread_app_role_id = ($azuread_sp.AppRoles | where-object {$_.AllowedMemberTypes -contains "User" -and $_.DisplayName -eq $azuread_app_role_name}).Id if ($null -eq $azuread_app_role_id) { write-error "role $azuread_app_role_name not located in application manifest"}
Configure application provisioning
If your application uses an LDAP directory, a SQL database, SAP Cloud Identity Services, or supports SCIM, then before you create new assignments, configure provisioning of Microsoft Entra users to the application. Configuring provisioning before creating assignments will enable Microsoft Entra ID to match up the users in Microsoft Entra ID with the application role assignments to the users already in the application's data store. If your application has an on-premises directory or database to be provisioned, and also supports federated SSO, then you may need two service principals to represent the application in your directory: one for provisioning and one for SSO. If your application does not support provisioning, then continue reading in the next section.
Ensure that the application is configured to require users to have application role assignments, so that only selected users will be provisioned to the application.
If provisioning hasn't been configured for the application, configure it now (but don't start provisioning):
- If the application uses an LDAP directory, follow the guide for configuring Microsoft Entra ID to provision users into LDAP directories.
- If the application uses a SQL database, follow the guide for configuring Microsoft Entra ID to provision users into SQL-based applications.
- If the application use SAP Cloud Identity Services, follow the guide for configuring Microsoft Entra ID to provision users into SAP Cloud Identity Services.
- For other applications, follow steps 1-3 to configure provisioning via Graph APIs.
Check the Properties tab for the application. Verify that the User assignment required? option is set to Yes. If it's set to No, all users in your directory, including external identities, can access the application, and you can't review access to the application.
Check the attribute mappings for provisioning to that application. Make sure that Match objects using this attribute is set for the Microsoft Entra attribute and column that you used in the previous sections for matching.
If these rules aren't using the same attributes that you used earlier, then when application role assignments are created, Microsoft Entra ID might be unable to locate existing users in the application's data store. Microsoft Entra ID might then inadvertently create duplicate users.
Check that there's an attribute mapping for
isSoftDeletedto an attribute of the application.When a user is unassigned from the application, soft-deleted in Microsoft Entra ID, or blocked from sign-in, Microsoft Entra provisioning will update the attribute mapped to
isSoftDeleted. If no attribute is mapped, users who later are unassigned from the application role will continue to exist in the application's data store.If provisioning has already been enabled for the application, check that the application provisioning is not in quarantine. Resolve any issues that are causing the quarantine before you proceed.
Create app role assignments in Microsoft Entra ID
For Microsoft Entra ID to match the users in the application with the users in Microsoft Entra ID, you need to create application role assignments in Microsoft Entra ID. Each application role assignment associates one user to one application role of one service principal.
When an application role assignment is created in Microsoft Entra ID for a user to an application, and the application supports provisioning, then:
- Microsoft Entra ID will query the application via SCIM, or its directory or database, to determine if the user already exists.
- When subsequent updates are made to the user's attributes in Microsoft Entra ID, Microsoft Entra ID will sent those updates to the application.
- The user will remain in the application indefinitely unless they're updated outside Microsoft Entra ID, or until the assignment in Microsoft Entra ID is removed.
- On the next access review of that application's role assignments, the user will be included in the access review.
- If the user is denied in an access review, their application role assignment will be removed. Microsoft Entra ID will notify the application that the user is blocked from sign-in.
If the application does not support provisioning, then
- The user will remain in the application indefinitely unless they're updated outside Microsoft Entra ID, or until the assignment in Microsoft Entra ID is removed.
- On the next review of that application's role assignments, the user will be included in the review.
- If the user is denied in an access review, their application role assignment will be removed. The user will no longer be able to sign in from Microsoft Entra ID to the application.
Create application role assignments for users who don't currently have role assignments:
foreach ($u in $azuread_not_in_role_list) {
   $res = New-MgServicePrincipalAppRoleAssignedTo -ServicePrincipalId $azuread_sp.Id -AppRoleId $azuread_app_role_id -PrincipalId $u -ResourceId $azuread_sp.Id
}
Wait one minute for changes to propagate within Microsoft Entra ID.
Check that Microsoft Entra provisioning has matched the existing users
Query Microsoft Entra ID to obtain the updated list of role assignments:
$azuread_existing_assignments = @(Get-MgServicePrincipalAppRoleAssignedTo -ServicePrincipalId $azuread_sp.Id -All)Compare the list of user IDs from the previous section to those users now assigned to the application:
$azuread_still_not_in_role_list = @()
foreach ($id in $azuread_match_id_list) {
   $found = $false
   foreach ($existing in $azuread_existing_assignments) {
      if ($existing.principalId -eq $id) {
         $found = $true; break;
      }
   }
   if ($found -eq $false) { $azuread_still_not_in_role_list += $id }
}
$azuread_still_not_in_role_count = $azuread_still_not_in_role_list.Count
if ($azuread_still_not_in_role_count -gt 0) {
   Write-Output "$azuread_still_not_in_role_count users in the application's data store are not assigned to the application roles."
}
If any users aren't assigned to application roles, check the Microsoft Entra audit log for an error from a previous step.
If the application service principal is configured for provisioning, and the Provisioning Status for the service principal is Off, turn it to On. You can also start provisioning using Graph APIs.
Based on the guidance for how long will it take to provision users, wait for Microsoft Entra provisioning to match the existing users of the application to those users just assigned.
Monitor the provisioning status through the Portal or Graph APIs to ensure that all users were matched successfully.
If you don't see users being provisioned, check the troubleshooting guide for no users being provisioned. If you see an error in the provisioning status and are provisioning to an on-premises application, check the troubleshooting guide for on-premises application provisioning.
Check the provisioning log through the Microsoft Entra admin center or Graph APIs. Filter the log to the status Failure. If there are failures with an ErrorCode of DuplicateTargetEntries, this indicates an ambiguity in your provisioning matching rules, and you'll need to update the Microsoft Entra users or the mappings that are used for matching to ensure each Microsoft Entra user matches one application user. Then filter the log to the action Create and status Skipped. If users were skipped with the SkipReason code of NotEffectivelyEntitled, this may indicate that the user accounts in Microsoft Entra ID were not matched because the user account status was Disabled.
After the Microsoft Entra provisioning service has matched the users based on the application role assignments you've created, subsequent changes to those users will be sent to the application.
Select appropriate reviewers
When you create each access review, administrators can choose one or more reviewers. The reviewers can carry out a review by choosing users for continued access to a resource or removing them.
Typically a resource owner is responsible for performing a review. If you're creating a review of a group, as part of reviewing access for an application integrated in pattern B, then you can select the group owners as reviewers. As applications in Microsoft Entra ID don't necessarily have an owner, the option for selecting the application owner as a reviewer isn't possible. Instead, when creating the review, you can supply the names of the application owners to be the reviewers.
You can also choose, when creating a review of a group or application, to have a multi-stage review. For example, you could select to have the manager of each assigned user perform the first stage of the review, and the resource owner the second stage. That way the resource owner can focus on the users who have already been approved by their manager.
Before creating the reviews, check that you have sufficient Microsoft Entra ID P2 or Microsoft Entra ID Governance SKU seats in your tenant. Also, check that all reviewers are active users with email addresses. When the access reviews start, they each review an email from Microsoft Entra ID. If the reviewer doesn't have a mailbox, they will not receive the email when the review starts or an email reminder. And, if they are blocked from being able to sign in to Microsoft Entra ID, they will not be able to perform the review.
Configure access reviews or entitlement management
Once the users are in the application roles, and you have the reviewers identified, then you can govern those users and any additional users who will need access, using access reviews or entitlement management.
- If the application only has a single application role, the application is represented by a single service principal in your directory, and no additional users will need access to the application, then continue with the next section to review and remove existing access using an access review.
- Otherwise, continue at the section of this article to govern access using entitlement management.
Review and remove existing access using an access review of app role assignments
If the application has multiple application roles, is represented by multiple service principals, or you want to have a process for users to request or be assigned access to the application, then continue at the following section of this article to govern access using entitlement management.
Now that the existing users have assignments to an application role, you can configure Microsoft Entra ID to start a review of those assignments.
For this step, you'll need to be in the
Global administratororIdentity Governance administratorrole.Follow the instructions in the guide for creating an access review of groups or applications, to create the review of the application's role assignments. Configure the review to apply results when it completes. You can create the access review in PowerShell with the
New-MgIdentityGovernanceAccessReviewDefinitioncmdlet from the Microsoft Graph PowerShell cmdlets for Identity Governance module. For more information, see the examples.Note
If you enable review decision helpers when creating the access review, then the decision helper recommendations are based on the 30-day interval period depending on when the user last signed in to the application using Microsoft Entra ID.
When the access review starts, ask the reviewers to give input. By default, they each receive an email from Microsoft Entra ID with a link to the access panel, where they review access to the application.
Once the reviews have started, you can monitor their progress, and update the approvers if needed, until the access review completes. You can then confirm that the users, whose access was denied by the reviewers, are having their access removed from the application.
If auto-apply wasn't selected when the review was created, then you'll need to apply the review results when it completes.
Wait for the status of the review to change to Result applied. You should expect to see denied users, if any, having their application role assignments being removed in a few minutes.
After the results are applied, Microsoft Entra ID will begin deprovisioning denied users from the application. Based on the guidance for how long will it take to provision users, wait for Microsoft Entra provisioning to start deprovisioning the denied users. Monitor the provisioning status through the Portal or Graph APIs to ensure that all denied users were removed successfully.
If you don't see users being deprovisioned, check the troubleshooting guide for no users being provisioned. If you see an error in the provisioning status and are provisioning to an on-premises application, check the troubleshooting guide for on-premises application provisioning.
Now that you have a baseline that ensures existing access has been reviewed, then you can continue in the next section to configure entitlement management, to enable new access requests.
Govern access using entitlement management
In other situations, such as wanting to have different reviewers for each application role, the application is represented by multiple service principals, or you want to have a process for users to request or be assigned access to the application, then you can configure Microsoft Entra ID with an access package for each application role. Each access package can have a policy for recurring review of assignments made to that access package. Once the access packages and policies are created, then you can assign the users who have existing application role assignments to the access packages, so their assignments can be reviewed via the access package.
In this section, you'll configure Microsoft Entra entitlement management for a review of access package assignments that contain the app role assignments, and also configure additional policies so users can request access to your application's roles.
- For this step, you'll need to be in the
Global administratororIdentity Governance administratorrole, or be delegated as a catalog creator and the owner of the application. - If you don't already have a catalog for your application governance scenario, create a catalog in Microsoft Entra entitlement management. You can use a PowerShell script to create each catalog.
- Populate the catalog with necessary resources, by adding the application, and any Microsoft Entra groups that the application relies upon, as resources in that catalog. You can use a PowerShell script to add each resource to a catalog.
- For each of the applications, and for each of their application roles or groups, create an access package that includes that role or group as its resource. At this stage of configuring these access packages, configure the first access package assignment policy in each access package to be a policy for direct assignment, so that only administrators can create assignmentsn that policy, set the access review requirements for existing users, if any, so that they don't keep access indefinitely. If you have many access packages, you can use a PowerShell script to create each access package in a catalog.
- For each access package, assign existing users of the application in that corresponding role, or members of that group, to the access package and its direct assignment policy. You can directly assign a user to an access package using the Microsoft Entra admin center, or in bulk via Graph or PowerShell.
- If you have configured access reviews in the access package assignment policies, then when the access review starts, ask the reviewers to give input. By default, they each receive an email from Microsoft Entra ID with a link to the access panel, where they will review the access package assignments. Once the review completes, you should expect to see denied users, if any, having their application role assignments being removed in a few minutes. Subsequently, Microsoft Entra ID will begin deprovisioning denied users from the application. Based on the guidance for how long will it take to provision users, wait for Microsoft Entra provisioning to start deprovisioning the denied users. Monitor the provisioning status through the Portal or Graph APIs to ensure that all denied users were removed successfully.
- If you have separation of duties requirements, then configure the incompatible access packages or existing groups for your access package. If your scenario requires the ability to override a separation of duties check, then you can also set up additional access packages for those override scenarios.
- If you wish to allow users who don't already have access to request access, then in each access package, create additional access package assignment policies for users to request access.Configure the approval and recurring access review requirements in that policy.
Next steps
Зворотний зв’язок
Очікується незабаром: протягом 2024 року ми будемо припиняти використання механізму реєстрації проблем у GitHub для зворотного зв’язку щодо вмісту й замінювати його новою системою зворотного зв’язку. Докладніше: https://aka.ms/ContentUserFeedback.
Надіслати й переглянути відгук про